


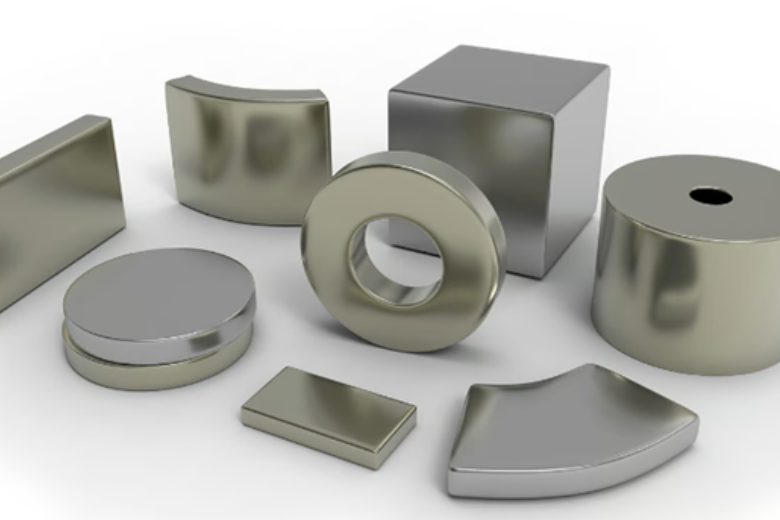
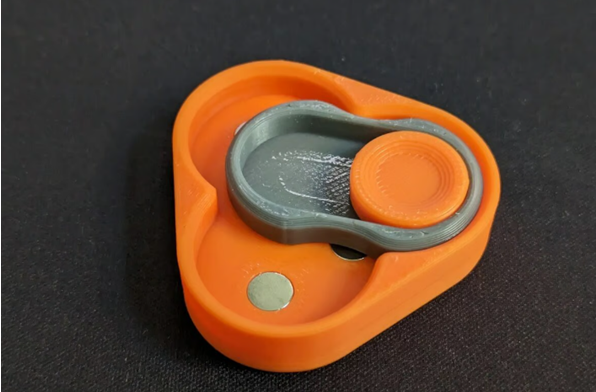
Magnets can make your 3D print projects much better. You can add them during printing or after by making slots. Both ways are easy and work well, based on your project. For example, magnets help create a modular guitar pick box or a cool custom trinket box that closes perfectly. They are great for adding features, making assembly easier, and making designs more fun. Once you use magnets, you’ll wonder how you did without them!
Key Takeaways
- Plan your design so magnets fit tightly in their spots. A snug fit keeps parts aligned properly.
- Always check which side of the magnet is north or south. Mark them to avoid problems with attraction.
- Use materials like PLA for your 3D prints. These work well with magnets and don’t cause problems.
- Add magnets during printing for a neater finish. Pause the printer at the right layer to place them easily.
- Keep magnets safe from water and rust. Use waterproof coatings or make covers in your designs.
Design Considerations for Embedding Magnets
Magnet placement and alignment
When adding magnets to your 3D prints, placement matters a lot. Make sure magnets fit tightly in their slots. They should line up perfectly with the other magnets. If they don’t, parts might not stay in place or connect well. To prevent this, design gaps that match your magnets’ size and shape. This way, everything will fit together smoothly.
Did you know magnet alignment is important in advanced printing? For instance, magnetically assisted printing uses magnetic fields to arrange tiny particles. This helps create detailed models and improves assembly. While you may not need this for simple projects, it shows how proper placement leads to better results.
Understanding magnet polarity
Magnets have two ends: north and south. If you’ve ever felt magnets push away from each other, that’s polarity. When adding magnets to your prints, you must check this. If the poles are wrong, parts won’t stick together as planned.
A helpful tip is to mark the poles before using the magnets. Use a marker or tape to label the north and south sides. This makes it easy to know which side faces out. Correct polarity ensures your magnets work well, whether for a toy or a box latch.
Material compatibility with magnets
Not all 3D printing materials work well with magnets. Some, like metals, can mess with magnetic fields. Others, like PLA, are great because they don’t affect magnets. PLA is also light and easy to print, making it a favorite for magnet projects.
Tests show PLA works well with electromagnetic properties. It doesn’t cause signals that could mess up sensitive tools, like quantum sensors. If you’re designing gaps for magnets, pick a material like PLA. It avoids problems and keeps your magnets working right.
Tip: Try your material with a magnet before printing. This quick test can save you trouble later.
Methods to Use Magnets in 3D Prints
Designing magnet slots in CAD software
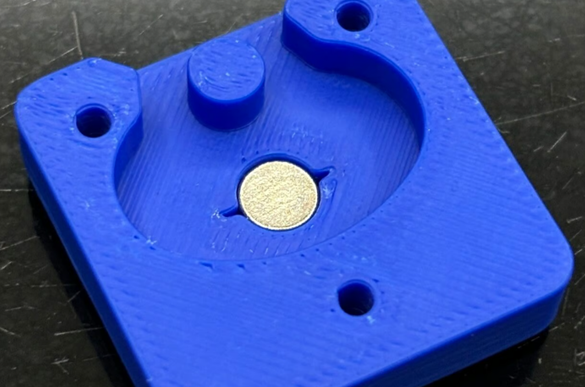
To use magnets in your 3D prints, start by making slots in your CAD software. This helps you decide the size, shape, and spot for the magnets. Measure your magnets carefully first. Then, design slots slightly bigger than the magnets so they fit tightly.
Try different slot shapes to see what works best. Flat magnets fit well in rectangular slots. Round magnets work better in circular slots. For something like a guitar pick box, design slots that let magnets sit even with the surface. This keeps your design neat and useful.
Tip: Add a small slant or curve to the slot edges. This makes inserting magnets easier and protects your print from damage.
Embedding magnets mid-print
Adding magnets during printing can make your design stronger. It lets you place magnets directly into the model. To do this, pause the printer at the right layer. Most slicer programs let you set a pause point for this step.
When the printer stops, carefully place the magnets in the slots. Make sure they are flat and lined up correctly. Then, restart the printer. It will cover the magnets as it continues printing. This is great for projects where you want hidden magnets, like a custom trinket box.
Note: Always check the magnet poles before placing them. If they’re wrong, the parts won’t stick together.
Using adhesives for post-print integration
If adding magnets during printing feels hard, glue them on after printing. This is easy and works for most projects. Pick a glue that sticks well to both your print material and the magnets. Super glue and epoxy are good options.
Here’s a quick look at how adhesives perform:
|
Time (days) |
Adhesive Type |
OC Secreted (ng/ml) |
Statistical Significance |
|---|---|---|---|
|
7 |
SC |
X |
P < 0.001 |
|
14 |
DMSA 25L |
Y |
P < 0.001 |
These glues are strong and work well over time. They also don’t harm cells, as tests show no big differences (P = 0.41 for mouse fibroblast cells).
When using glue, apply a small amount to avoid mess. Press the magnet into place and let it dry completely before using the model. This method is great for projects like a guitar pick box, where you might need to adjust the magnet later.
Tip: Lightly sand the magnet and slot before gluing. This helps the glue stick better and keeps the magnet secure.
Step-by-Step Guide to Add Magnets During Printing
Getting the 3D model ready for magnets
Before printing, prepare your 3D model for magnets. Use CAD software to design slots or spaces for the magnets. Measure the magnets carefully and make the slots slightly bigger. This helps the magnets fit easily and stay secure. A snug fit means no extra adjustments are needed.
If unsure about the size, print a test slot first. This small test saves time and material. Also, check the magnet's thickness and match the slot depth to it. For example, if the magnet is 2mm thick, the slot should also be 2mm deep.
Tip: Don’t place magnets too close to the edges. This can weaken the model and cause cracks during use.
Adjusting the slicer for a pause
To add magnets mid-print, set your slicer to pause at the right layer. Most slicers, like Cura or PrusaSlicer, have a "Pause at Height" option. You can also use a custom G-code like M601.
Here’s how to find the correct pause height:
- Find the layer where the magnet slot starts.
- Add the magnet’s thickness to this height. For example, if the slot starts at 0.4mm and the magnet is 2mm thick, pause at 2.4mm.
- Make sure there are at least three layers above the magnet. This improves strength and looks better.
This pause method is a simple way to add magnets without using glue. It keeps the model strong and neat.
Adding magnets during the pause
When the printer pauses, place the magnets into the slots. Make sure they are flat and match the slot edges. Misaligned magnets can cause printing issues or may not work properly.
Follow these tips for success:
- Check the magnet’s polarity before placing it. Mark the poles with a marker to avoid mistakes.
- Clean the magnet and slot to remove dust. This helps them fit better.
- If the magnet is loose, use a little glue like super glue. Don’t use too much glue, as it can mess up the print.
After placing the magnets, restart the printer. The remaining layers will cover the magnets and hold them in place. This method is great for hidden magnets in modular designs or closures.
Pro Tip: Use tweezers to place magnets carefully. This keeps your hands safe from the hot print bed and avoids moving the model.
Resuming the print and ensuring proper adhesion
Once you’ve placed the magnets, it’s time to restart the print. This step is crucial because it ensures the magnets stay securely embedded and the layers above them adhere properly. If you rush or skip checks, the magnets might shift or the print could fail.
Here’s how you can resume the print smoothly:
- Double-check magnet placement: Before hitting "Resume," make sure the magnets are sitting flat in their slots. If they’re tilted or sticking out, the nozzle might hit them, causing damage.
- Inspect the printer bed: Look for any debris or dust around the magnets or the print bed. A clean surface helps the next layers stick better.
- Restart the print carefully: Use your printer’s interface to resume the paused job. Watch closely as the nozzle moves back into position. If the magnets are near the edges, keep an eye out for any wobbling or misalignment.
Tip: If your printer has a magnetic nozzle or components, check that the magnets don’t interfere with the movement. A quick test can save you from unexpected issues.
As the print continues, the layers above the magnets will seal them into the model. To ensure proper adhesion, focus on these key points:
- Layer height and material flow: Make sure your slicer settings provide consistent material flow. Uneven layers can weaken the bond around the magnets.
- Cooling settings: If your printer uses a cooling fan, adjust the speed to avoid warping. Too much cooling can cause the material to shrink around the magnets.
Once the print finishes, let it cool completely before removing it from the bed. This helps the layers settle and strengthens the bond around the magnets.
Pro Tip: If you notice gaps or weak spots around the magnets, use a small amount of adhesive to reinforce the area. A quick touch-up can make a big difference in durability.
By following this step-by-step guide, you’ll get a clean, functional print with securely embedded magnets. Whether you’re making a modular toy or a custom box, this method ensures your magnets stay in place and work as intended.
Tips for Successful Magnet Integration
Testing magnet fit before printing
Before printing, check if your magnets will fit well. Print a small test slot matching the magnet’s size. See if the magnet fits snugly, not too tight or loose.
If it doesn’t fit, change the slot size in your CAD software. A good fit keeps the magnet secure during use. Many people find that designing spaces for magnets improves results. It also avoids needing glue or extra tools, making things easier.
Tip: Measure your magnets carefully before designing slots. Even small errors can cause problems.
Ensuring proper magnet orientation
Placing magnets the right way is very important. Magnets have north and south poles. If placed wrong, they might repel instead of sticking together.
To fix this, mark the poles before using the magnets. Use a marker or sticker to label them. Some advanced methods let you control magnet directions during printing. Special tools, like magnet cameras, show how well these methods work.
Pro Tip: Always check the magnet’s poles before placing it. A quick test can save you from reprinting.
Avoiding interference with printer components
Magnets can mess with your printer if parts are magnetic. This might move the magnets or harm the printer.
To stop this, keep magnets away from printer parts. Use non-magnetic tweezers to place magnets mid-print. This protects your hands and keeps magnets steady.
Magnets also make printed parts easy to take apart and put back together. This is great for modular projects. But always check that magnets don’t affect the printer while working.
Note: If unsure about your printer and magnets, test with a small print first.
Using protective coatings or enclosures for magnets
Magnets are great for 3D prints but can weaken or rust. To avoid this, use protective coatings or enclosures. These help magnets stay strong, even in tough conditions.
Water is a big problem for magnets. If your project will be outside or in wet places, protect the magnets from water damage. For example, outdoor sensors can fail because of moisture. Adding a coating to the circuit board fixed this issue. The same method works for magnets too.
Here are some ways to protect your magnets:
- Use waterproof coatings: Cover magnets with epoxy or sealant to block water.
- Design enclosures in your 3D model: Make a pocket or case to fully seal the magnet. This is great for outdoor projects.
- Choose corrosion-resistant magnets: Some magnets, like nickel-coated neodymium, resist rust naturally.
Tip: Test your design in different weather if it’s for outdoor use. This helps you find weak spots before finishing.
Protecting magnets makes them last longer and keeps your models working well. Whether it’s a weatherproof gadget or a storage box, a little care makes a big difference.
Troubleshooting Problems with Embedded Magnets
Magnets moving during printing
Do your magnets shift while printing? This happens if slots are too loose or vibrations move the magnets. A loose magnet can mess up your print and ruin the project.
To solve this, make sure the slots fit tightly. Magnets should stay in place without glue. If adding magnets mid-print, check their position during the pause. Use non-magnetic tape to hold them temporarily.
Weak bond between magnets and printed parts
Sometimes, magnets don’t stick well to the printed material. This weak connection can make magnets fall out during use. Luckily, it’s easy to fix.
First, check your material. PLA works well with glue, but PETG might need extra prep. Sand the magnet and slot lightly to make them rough. This helps the glue stick better.
If embedding magnets mid-print, ensure the layers above are thick enough. Thin layers won’t hold magnets securely.
Wrong polarity causing problems
Have you placed magnets only to see them push apart? This happens when the polarity is wrong. It’s a common mistake but easy to fix.
Before placing magnets, test their poles. Mark the north and south sides with a marker. This simple step avoids reprinting or re-gluing parts.
If a magnet is already placed wrong, carefully remove it and fix the orientation. For future projects, always double-check polarity before embedding magnets.
Material warping around embedded magnets
Warping can be a tricky issue when adding magnets to 3D prints. You might see the layers bending or shrinking near the magnet. This can mess up how your design looks and works. It happens because magnets hold heat or cause uneven cooling in the material.
Why does warping happen?
Warping happens when the material cools unevenly around the magnet. Magnets, especially metal ones, handle heat differently than plastic. This difference makes the layers shrink unevenly, causing warps. If your printer cools too fast, the problem can get worse.
How can you prevent warping?
Here are some ways to stop warping before it starts:
- Pick the right material: PLA warps less than ABS or PETG. Use materials that shrink less when embedding magnets.
- Change cooling settings: Lower the fan speed for layers near the magnet. Slower cooling helps the material settle evenly.
- Add extra support: Make walls thicker or add reinforcements around the magnet slot. This spreads out stress and reduces warping chances.
Tip: Print a small test model first. This helps you find warping problems early.
Fixing warped prints
If warping still happens, don’t worry. You can fix it with these steps:
- Use heat to reshape: Gently heat the warped area with a hairdryer or heat gun. Then, press it back into shape.
- Strengthen with glue: Fill cracks or gaps with super glue or epoxy to fix the warped parts.
- Reprint the damaged part: If the warp is too bad, reprint just that section and attach it to the model.
By knowing why warping happens and following these tips, you can keep your prints neat and functional—even with magnets inside.
Adding magnets to your 3D prints can make them much better. Plan your design well, check magnet sizes, and try methods like adding magnets during printing. This helps you make useful and creative designs. For example, use magnets for a guitar pick box latch or a hidden gadget closure. Magnets make your projects more fun and flexible.
Don’t hesitate to try new things! Test different materials, change magnet spots, and see how they improve your designs. With practice, you’ll discover many cool ideas for your 3D prints.
FAQ
How do I know which magnets to use for my project?
Choose magnets based on size, strength, and purpose. Neodymium magnets work well for most 3D prints because they’re strong and compact. Measure your slots carefully to ensure a snug fit.
Tip: Test different magnet sizes before printing to find the best match for your design.
Can magnets damage my 3D printer?
Magnets won’t harm your printer unless they interfere with magnetic components like the nozzle or bed. Keep magnets away from these parts during printing.
Note: Use non-magnetic tools like tweezers to handle magnets safely during mid-print pauses.
What’s the best way to secure magnets after printing?
Use strong adhesives like epoxy or super glue. Lightly sand the magnet and slot for better grip. Apply a small amount of glue and press the magnet firmly into place.
Pro Tip: Let the glue dry completely before using your model to avoid shifting.
Why do magnets sometimes shift during printing?
Loose slots or printer vibrations can cause magnets to move. Design snug slots and slow down your printer’s speed during mid-print pauses to keep magnets steady.
Tip: Use non-magnetic tape to hold magnets temporarily if needed.
Can I use magnets in outdoor 3D prints?
Yes, but protect them from rust and moisture. Use waterproof coatings or design enclosures to seal the magnets. Choose corrosion-resistant magnets like nickel-coated neodymium for better durability.
Tip: Test your design in different weather conditions to ensure it holds up outdoors.


Laat een reactie achter
Alle opmerkingen worden gemodereerd voordat ze worden gepubliceerd.
Deze site wordt beschermd door hCaptcha en het privacybeleid en de servicevoorwaarden van hCaptcha zijn van toepassing.