

Insufficient or excessive 3D printing output can ruin your prints and waste valuable resources. Your 3D printer might struggle with extrusion issues, leading to failed 3D prints. To solve the problem, you must identify the root cause and apply precise solutions. This approach ensures smoother operation and higher-quality 3D prints.
Key Takeaways
- Look for under-extrusion by spotting gaps or thin walls. Check for nozzle blockages and clean it often to keep filament flowing well.
- Notice over-extrusion signs like bumps or rough surfaces. Change flow rate settings and lower nozzle heat to make prints better.
- Take care of your 3D printer regularly. Clean parts, check for damage, and adjust settings to avoid problems and get good prints.
Diagnosing 3D Printing Problems
Identifying Symptoms of Under-Extrusion
Under-extrusion occurs when your 3D printer fails to push out enough filament during printing. This issue often results in weak, incomplete, or brittle prints. You might notice gaps between layers, thin walls, or missing sections in your model. In severe cases, no filament coming out of the nozzle could indicate a complete blockage.
Common causes of under-extrusion include clogged nozzles, inconsistent filament diameter, or incorrect extrusion settings. For instance, if the nozzle is partially blocked, the filament flow becomes restricted, leading to under-extrusion problems. Additionally, using low-quality filament with uneven thickness can disrupt the extrusion process.
To diagnose under-extrusion, inspect your 3D printer's nozzle for blockages and check the filament for irregularities. Monitoring the extrusion rate during a test print can also help identify inconsistencies. Addressing these symptoms promptly ensures better print quality and reduces the risk of failed 3D prints.
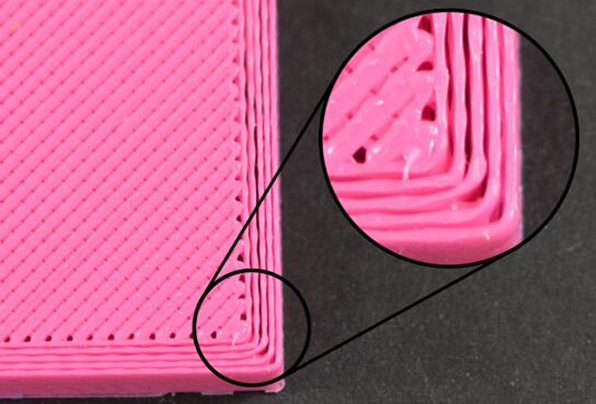
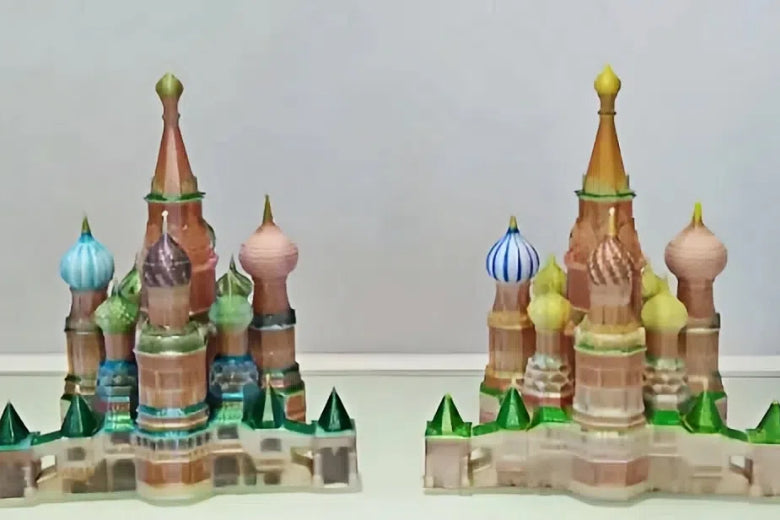
Recognizing Signs of Over-Extrusion
Over-extrusion occurs when your 3D printer pushes out too much filament, causing excess material to accumulate on your model. Symptoms of 3D printer over-extrusion include blobs, stringing, and uneven surfaces. You may also notice that the layers appear overly thick or that the print dimensions exceed the intended size.
Over-extrusion issues often stem from incorrect flow rate settings, excessive printing temperature, or poorly calibrated extruder gears. For example, a high flow rate can cause the printer to deposit more filament than necessary, leading to over extrusion. Similarly, a high nozzle temperature may cause the filament to melt excessively, resulting in poor layer adhesion and surface defects.
To fix over-extrusion, start by calibrating the flow rate and adjusting the extrusion multiplier in your slicing software. Lowering the nozzle temperature can also help reduce filament over-melting. Regularly inspecting and maintaining your extruder gears ensures consistent filament feeding, minimizing over or under-extrusion problems.
Common Causes of Failed 3D Prints
Failed 3D prints can result from various factors, including hardware issues, software misconfigurations, or environmental conditions. A study revealed that support structures account for 41% of print failures, as they are essential for complex designs but often lead to post-production challenges. Unwanted prototypes or parts contribute to 24% of failures, while other factors like empty spools make up 5%.
|
Cause of Failure |
Percentage |
Description |
|---|---|---|
|
Support Structures |
41% |
Necessary for complex designs, but become redundant post-production. |
|
Unwanted Prototypes/Parts |
24% |
Generated during prototyping, often discarded. |
|
Other |
5% |
Includes waste such as empty spools. |
Environmental factors like an incorrectly leveled bed or poor bed adhesion can also lead to failed prints. For instance, an uneven bed surface may cause the nozzle to deposit filament inconsistently, resulting in poor layer bonding. Similarly, inadequate bed adhesion can cause the print to detach during the process.
To prevent these failures, ensure proper bed leveling and use adhesives like glue sticks or specialized tapes to improve bed adhesion. Regularly calibrating your 3D printer and using high-quality filament can further enhance print reliability and reduce waste.
Hardware Solutions to Solve the Problem
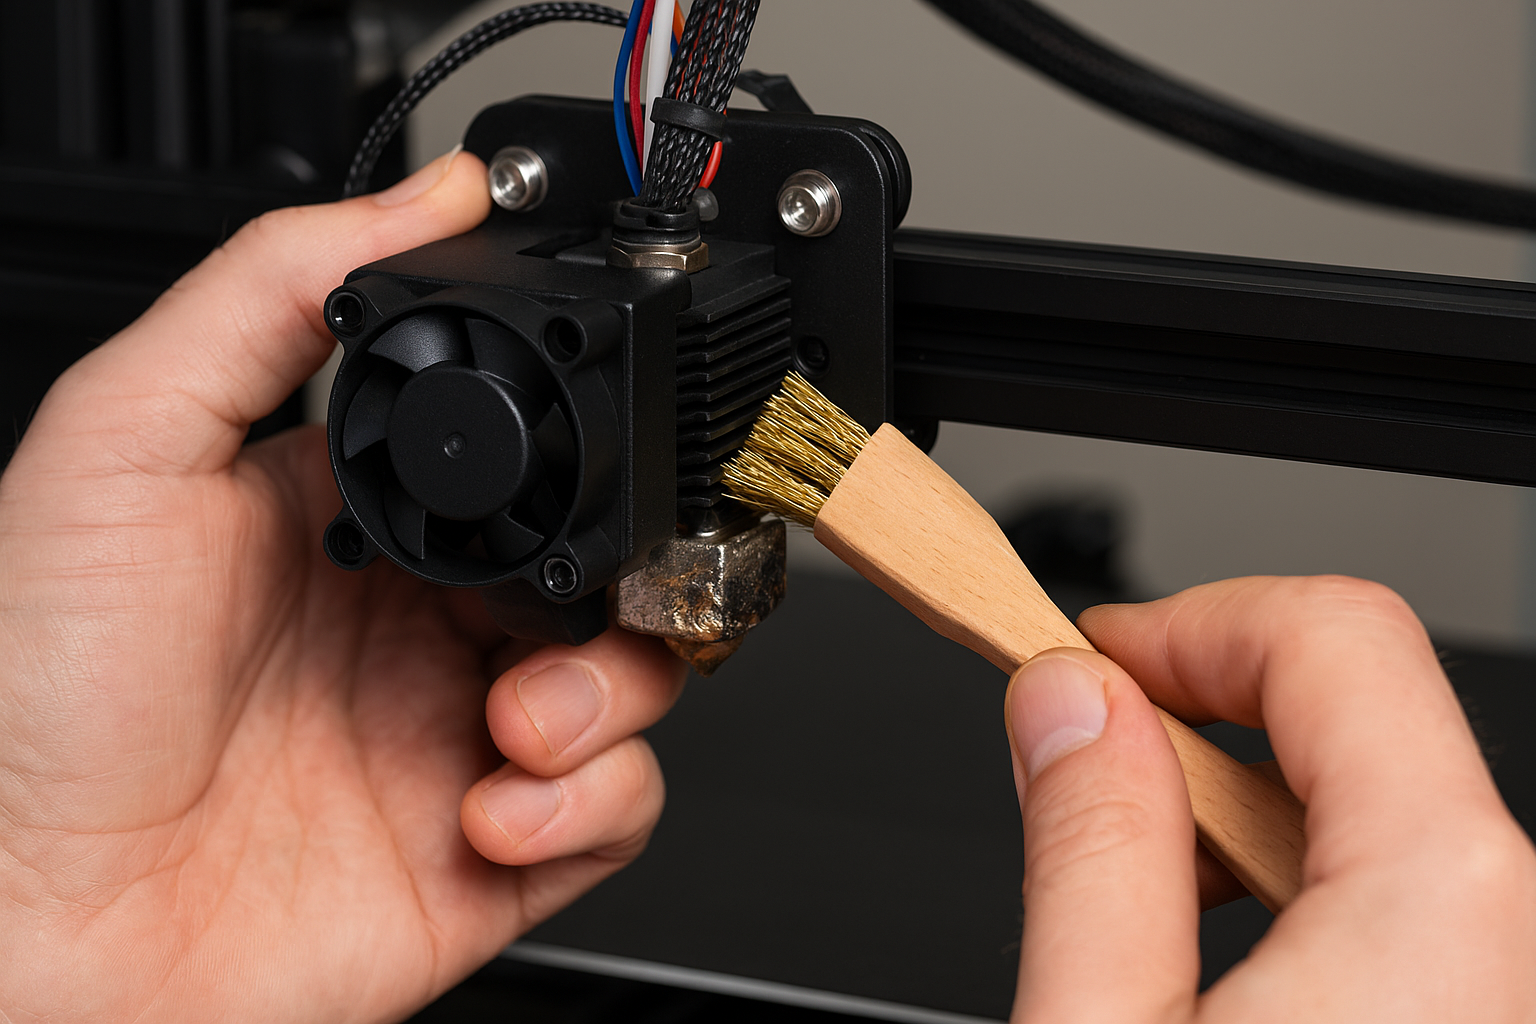
Cleaning and Maintaining the Nozzle
A clogged nozzle is one of the most common causes of under-extrusion. Over time, filament residue can accumulate inside the nozzle, restricting the flow of material and leading to extrusion problems. Regular cleaning and maintenance of the nozzle are essential to ensure consistent 3D printing performance.
To clean the nozzle, you can use a needle or a specialized cleaning tool to remove blockages. Heat the nozzle to the appropriate temperature for the filament in use before attempting to clear it. For stubborn clogs, consider performing a "cold pull" technique. This involves heating the nozzle, inserting a cleaning filament, and then pulling it out once it cools slightly. The process removes debris and ensures a smooth filament path.
Preventative maintenance also plays a crucial role. Inspect the nozzle regularly for wear and tear, as a damaged nozzle can affect print quality. Replace the nozzle if you notice signs of wear, such as uneven extrusion or inconsistent layer lines. By keeping the nozzle clean and well-maintained, you can minimize under-extrusion and achieve high-quality prints.
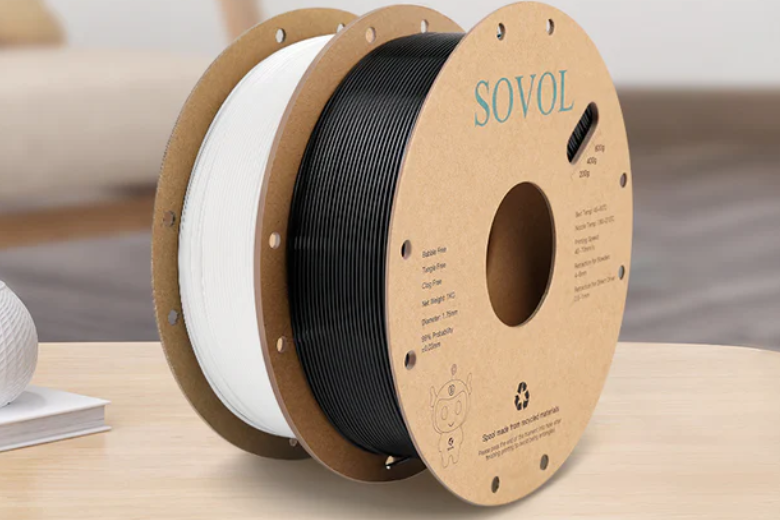
Ensuring Filament Quality
The quality of the filament you use directly impacts the success of your 3D prints. Low-quality filament often has inconsistent diameters, impurities, or moisture content, which can lead to under-extrusion or over-extrusion issues. To avoid these problems, always choose high-quality filament from reputable manufacturers.
Store your filament properly to maintain its quality. Filament absorbs moisture from the air, which can cause bubbling, stringing, and poor layer adhesion during printing. Use airtight containers with desiccant packs to keep your filament dry. If the filament has already absorbed moisture, you can dry it using a filament dryer or an oven set to a low temperature.
The FDA highlights the importance of using test coupons in additive manufacturing to validate the integrity of printed parts. These representative samples ensure that the filament meets strength and quality requirements, especially for critical applications like medical devices. By applying similar testing methods, you can verify the reliability of your filament and reduce the risk of extrusion problems.
Adjusting Extruder and Drive Gears
The extruder and drive gears are responsible for feeding the filament into the nozzle. If these components are not properly calibrated, they can cause under-extrusion or over-extrusion. Regularly inspecting and adjusting the extruder and drive gears ensures consistent filament feeding and prevents extrusion issues.
Start by checking the tension of the extruder's idler. If the tension is too loose, the filament may slip, leading to under-extrusion. Conversely, excessive tension can deform the filament and cause feeding problems. Adjust the tension to achieve a firm grip on the filament without damaging it.
Inspect the drive gears for wear or debris buildup. Clean the gears using a brush or compressed air to remove any filament residue. Replace worn gears to maintain optimal performance. Additionally, calibrate the extruder steps per millimeter (E-steps) to ensure accurate filament feeding. Use a test print to measure the actual extrusion and adjust the E-steps in your printer's firmware accordingly.
A recent advancement in 3D printing technology involves using a deep multi-head neural network to monitor the nozzle during printing. This system predicts key printing parameters and allows for real-time corrections, improving the accuracy of extrusion and reducing errors. By integrating such innovative solutions into your 3D printer, you can enhance its performance and achieve consistent results.
Software Adjustments for 3D Printing Problems
Calibrating Flow Rate and Extrusion Settings
Calibrating the flow rate is essential to address under-extrusion and over-extrusion issues in 3D printing. Incorrect flow rate settings can lead to uneven filament deposition, affecting the structural integrity of your prints. Adjusting the extrusion multiplier in your slicing software allows you to fine-tune the flow rate for optimal filament output.
A study on flow rate calibration highlights the importance of balancing extrusion conditions. For instance, a flow rate of 30% at 190°C results in under-extrusion, while a flow rate of 300% at 230°C causes over extrusion. Optimal conditions occur between 60% and 200% flow rates at 210°C. Use this data to guide your calibration process and achieve consistent results.
|
Flow Rate (%) |
Temperature (°C) |
Extrusion Condition |
|---|---|---|
|
30 |
190 |
Under-extrusion |
|
300 |
230 |
Over-extrusion |
|
60 |
210 |
Optimal condition |
|
80 |
210 |
Optimal condition |
|
120 |
210 |
Optimal condition |
|
150 |
210 |
Optimal condition |
|
200 |
210 |
Optimal condition |

Regular calibration ensures your printer maintains consistent filament output, reducing the risk of over or under-extrusion.
Optimizing Printing Temperature
Printing temperature plays a critical role in extrusion quality. Incorrect temperature settings can cause filament to melt unevenly, leading to under-extrusion or 3D printing over-extrusion. Optimizing the nozzle and bedplate temperatures ensures proper filament flow and adhesion.
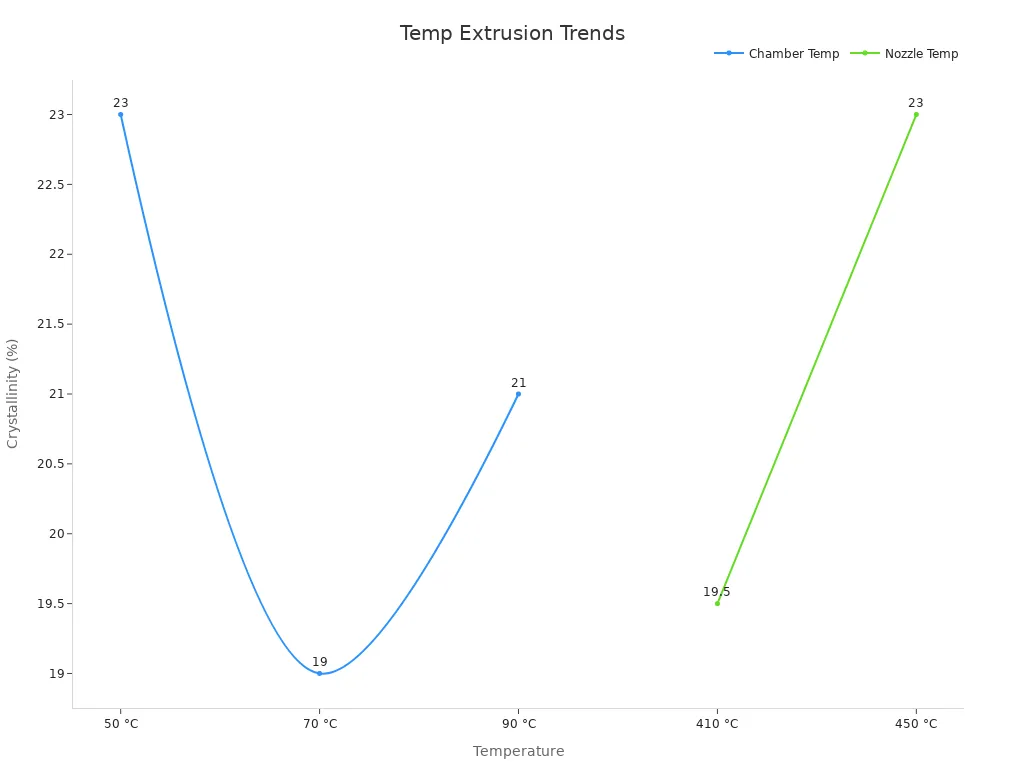
Higher nozzle temperatures improve melt viscosity and interlayer bonding. For materials like PEEK, optimal nozzle temperatures range between 400°C and 430°C. A chamber temperature of 50°C yields superior mechanical strength and crystallinity, while higher bedplate temperatures enhance adhesion and crystallization rates.
|
Temperature Setting |
Mechanical Strength |
Crystallinity |
|---|---|---|
|
Chamber Temp: 50 °C |
Superior |
23% |
|
Chamber Temp: 90 °C |
Moderate |
21% |
|
Chamber Temp: 70 °C |
Lower |
19% |
|
Nozzle Temp: 450 °C |
Peak Force: 2034 N |
23% |
|
Nozzle Temp: 410 °C |
Lower Peak Force |
19.5% |
By optimizing temperature settings, you can improve extrusion quality and minimize defects in your prints.
Adjusting Retraction and Speed Settings
Retraction and speed settings directly impact extrusion consistency. Retraction controls the filament pullback during non-printing movements, preventing stringing and blobs caused by over extrusion. Speed settings determine how quickly the filament is deposited, influencing layer adhesion and print accuracy.
To fix over-extrusion, reduce the retraction distance and increase the retraction speed. This adjustment minimizes excess filament during transitions. Lowering print speed improves layer bonding and reduces under extrusion risks. Test different settings to find the ideal balance for your printer and filament type.
Advanced slicing software offers features like dynamic retraction and speed adjustments based on model geometry. Utilize these tools to refine your settings and achieve high-quality prints. Regularly testing and calibrating these parameters ensures consistent extrusion and reduces waste.
Preventative Measures for Consistent Output
Regular Hardware Maintenance
Maintaining your 3D printer's hardware is essential for preventing under-extrusion and over-extrusion issues. Regularly inspect the nozzle, extruder, and drive gears for wear or debris. Clean these components to ensure smooth filament flow. Replace worn parts promptly to avoid inconsistent extrusion.
Check the printer's belts and pulleys for proper tension. Loose belts can cause uneven layer deposition, leading to print defects. Tighten them as needed to maintain precision. Additionally, lubricate moving parts like rods and bearings to reduce friction and improve performance.
A maintenance schedule helps you stay consistent. For example, clean the nozzle weekly and inspect the extruder monthly. By following a routine, you can minimize hardware-related problems and achieve reliable 3D printing results.
Using High-Quality Filament
Filament quality directly impacts extrusion consistency. Low-quality filament often causes under-extrusion due to uneven diameter or impurities. Always choose filament from reputable manufacturers to ensure reliability.
Proper storage is equally important. Filament absorbs moisture, which can lead to over extrusion or stringing. Store it in airtight containers with desiccant packs to keep it dry. If moisture absorption occurs, use a filament dryer to restore its quality.
Testing new filament before starting a project is a good practice. Print a small test model to check for any extrusion issues. This step ensures the filament performs as expected, reducing the risk of failed prints.
Testing and Calibrating Settings Before Printing
Calibrating your printer's settings before each project prevents under-extrusion and over-extrusion. Start by adjusting the flow rate and extrusion multiplier in your slicing software. These settings control how much filament the printer extrudes.
Temperature calibration is also crucial. Print a temperature tower to find the optimal nozzle temperature for your filament. This process ensures proper filament melting and adhesion.
Run a retraction test to fine-tune retraction and speed settings. This step minimizes stringing and blobs, improving print quality. Regularly testing and calibrating your printer's settings ensures consistent output and reduces waste.
Tip: Keep a log of your successful settings for different filaments. This record saves time and ensures repeatable results for future projects.
Diagnosing extrusion issues helps you solve the problem of inconsistent 3D printing output. Addressing under-extrusion or over-extrusion through hardware fixes and software adjustments ensures reliable results. Preventative measures like regular maintenance and calibration further enhance performance. By following these steps, you can solve the problem and achieve consistent, high-quality prints.
FAQ
What should you do if your 3D printer nozzle keeps clogging?
- Regularly clean the nozzle using a needle or perform a "cold pull." Use high-quality filament and ensure the nozzle temperature matches the filament type.
How can you prevent filament from absorbing moisture?
- Store filament in airtight containers with desiccant packs. Use a filament dryer if needed to remove absorbed moisture before printing.
Why does your 3D print have stringing or blobs?
- Incorrect retraction settings or high nozzle temperatures often cause stringing. Adjust retraction distance and speed, and lower the nozzle temperature to fix this issue.
Tip: Always test new filament with a small print to identify potential issues early.


Yorum bırak
Tüm yorumlar yayınlanmadan önce denetlenir.
Bu site hCaptcha ile korunuyor. Ayrıca bu site için hCaptcha Gizlilik Politikası ve Hizmet Şartları geçerlidir.