


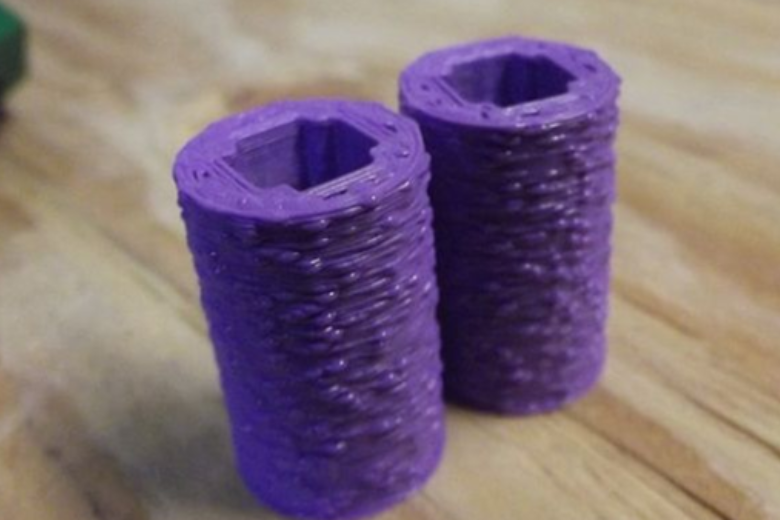
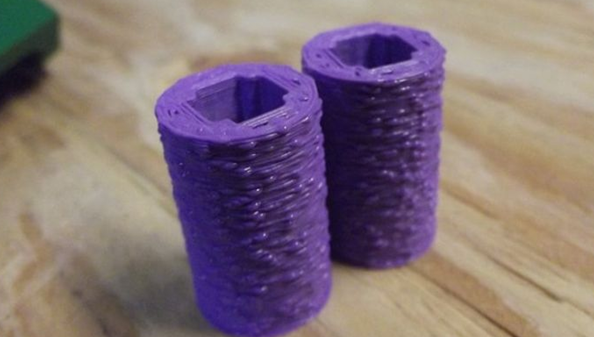
Bubbles can ruin your 3D prints by creating defects like blobs and over-extrusion. These imperfections often stem from filament moisture, cooling system inefficiencies, or incorrect temperatures. You can avoid bubbles by addressing these issues directly. Proper adjustments and preventive measures will enhance print quality and help fix 3D printer bubbles effectively.
Key Takeaways
- Keep filament dry to stop bubbles. Store it in sealed containers with drying packets.
- Fix cooling system settings. Change fan speed and ensure air flows evenly to stop overheating and make prints better.
- Use the right temperature for your filament. Check maker instructions to avoid problems like bumps and marks.
Prevent Filament Moisture
Causes of filament moisture in 3D printing
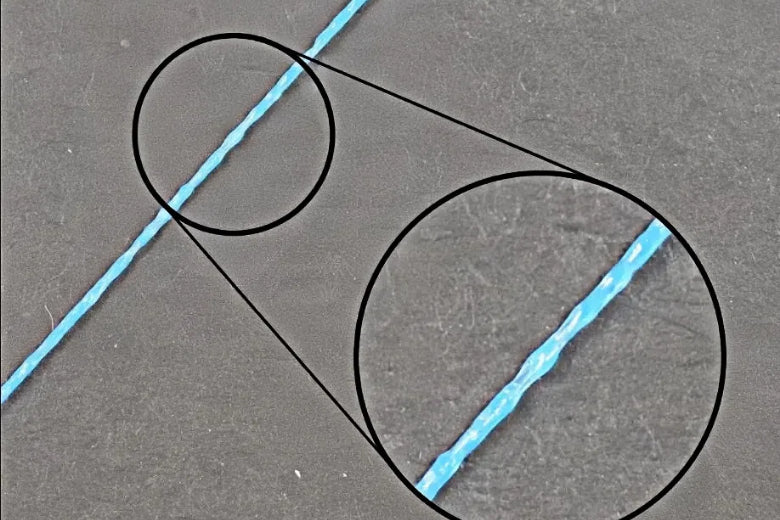
Moisture in filament is one of the leading causes of 3D printing defects, such as blobs, zits, and surface imperfections. Filaments like PLA, ABS, and PETG are hygroscopic, meaning they absorb moisture from the air. When you use a filament with high moisture content, the water inside the material turns into steam as it passes through the nozzle. This creates bubbles in filament, leading to over-extrusion, poor layer adhesion, and visible zits on your prints. Additionally, moisture can weaken the mechanical properties of your prints, reducing their overall quality and durability.
A study highlights the significant impact of moisture on print quality. Drying filament before printing can increase tensile strength by 15% and flexural strength by 11.5%. This demonstrates that controlling moisture is essential for achieving high-quality prints and avoiding 3D printing defects.
Effective filament storage techniques
Proper storage is crucial to prevent moisture from affecting your filament. You can use several techniques to keep your filament dry and avoid bubbles in filament.
- Use airtight containers: Store your filament in sealed containers with desiccants to maintain low humidity levels.
- Invest in filament storage boxes: Specialized storage boxes with built-in humidity control are excellent for long-term storage.
- Monitor humidity levels: Use a hygrometer to ensure the relative humidity (RH) inside your storage container stays below 20%.
The table below summarizes best practices for filament storage:
|
Practice |
Details |
|---|---|
|
Drying Time |
3-4 hours at ~45-50°C with airflow removes approximately 90% of absorbed moisture. |
|
Desiccant Efficiency |
Bambu calcium chloride desiccant restores RH from 25% to 12% in about 15 minutes. |
|
Temperature Recommendations |
Stick with 50°C for longer drying times instead of higher temperatures to avoid filament damage. |
|
Moisture Measurement Method |
Use weight loss and stabilized RH to determine filament dryness effectively. |
By following these techniques, you can protect your filament from moisture and reduce the risk of 3D printing defects like blobs and zits.
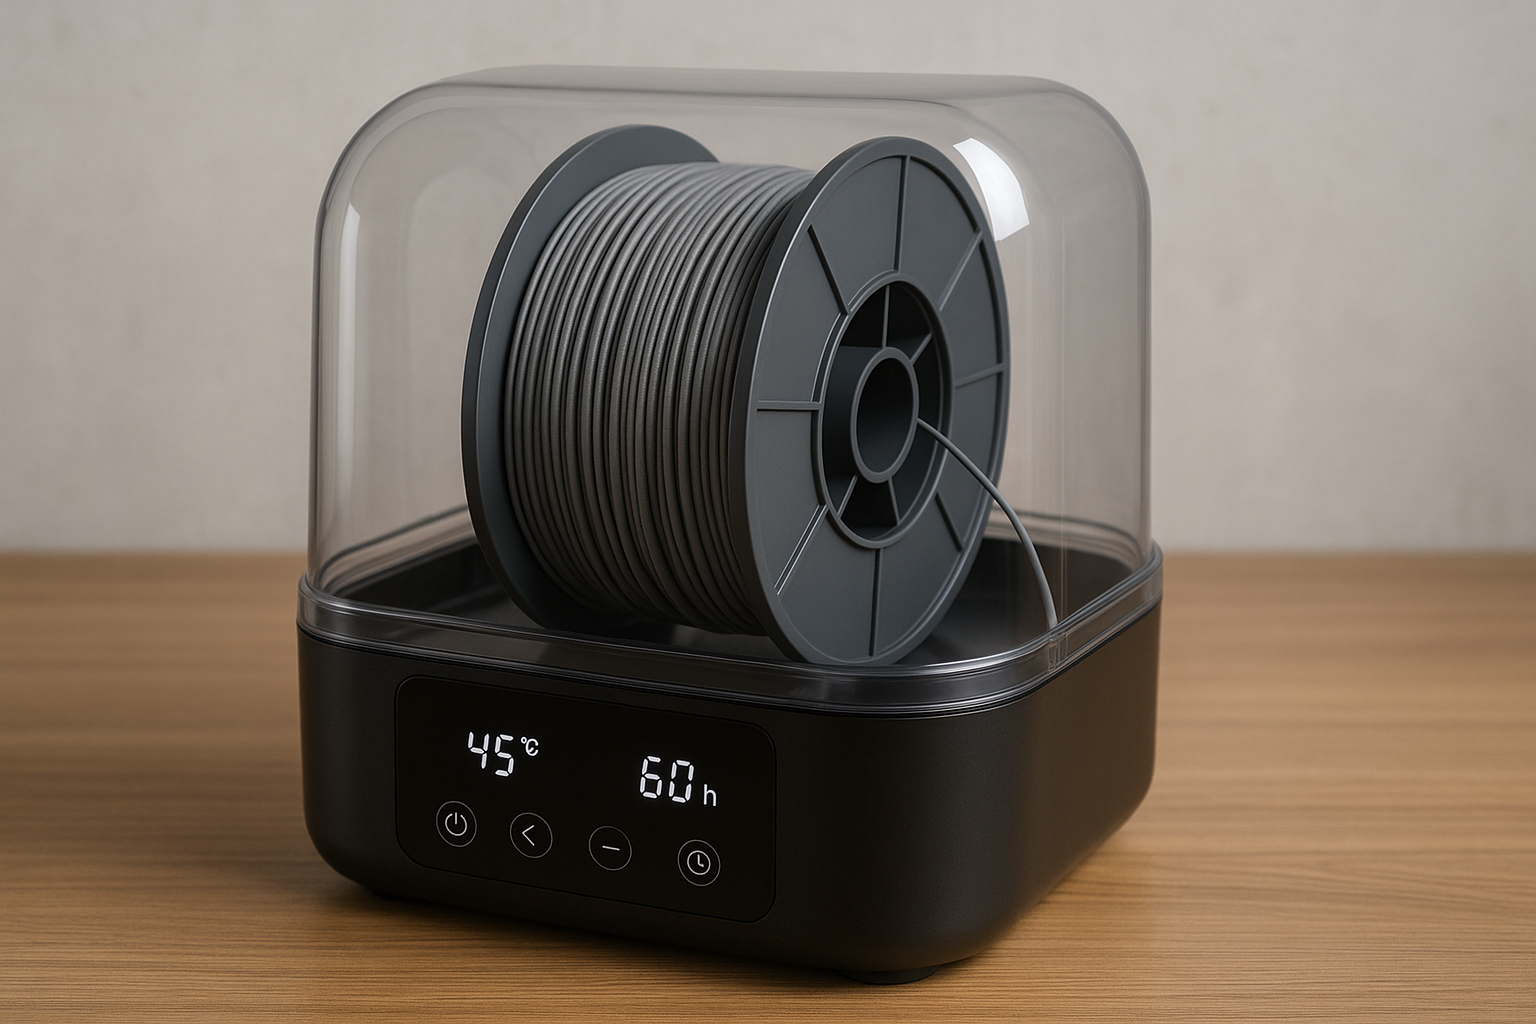
Drying filament to avoid bubbles
If your filament has already absorbed moisture, drying it before printing is essential to fix 3D printer bubbles and improve print quality. You can use a filament dryer or a regular oven to remove moisture effectively.
- Filament dryers: These devices are specifically designed to dry filament at controlled temperatures. They are safe and efficient for most filament types.
- Oven drying: Set your oven to a low temperature (around 50°C) and place the filament inside for 3-4 hours. This process removes up to 90% of the absorbed moisture.
When drying filament, avoid using high temperatures, as they can damage the material. For example, drying PLA at 50°C is sufficient to remove moisture without compromising its integrity. Using desiccants like calcium chloride after drying can help maintain low humidity levels and prevent further moisture absorption.
By taking these steps, you can eliminate bubbles in filament, reduce over-extrusion, and achieve bubble-free prints with excellent layer adhesion and minimal surface imperfections.
Improve Cooling Systems
Cooling system issues that lead to 3D printer bubbles
An inefficient cooling system can cause several 3D printing defects, including bubbles, blobs, and zits. When the cooling fan fails to regulate the nozzle temperature effectively, the filament may overheat. This overheating can lead to over-extrusion, which creates visible surface imperfections like blobs and zits. Additionally, inadequate cooling can affect layer adhesion, resulting in weak prints with poor structural integrity.
Another common issue arises when the cooling system is inconsistent. Uneven cooling can cause the filament to solidify irregularly, leading to defects such as bubbles in filament or poor layer alignment. These problems not only reduce print quality but also make it harder to achieve smooth, bubble-free prints.
Optimizing fan settings for bubble-free prints
To avoid bubbles and other defects, you need to optimize your cooling fan settings. Start by adjusting the fan speed in your slicer software. For most materials, a fan speed of 50-70% works well. However, materials like ABS may require lower fan speeds to prevent warping.
You should also ensure that the fan directs airflow evenly across the print. Misaligned fans can cause uneven cooling, leading to blobs and zits. Regularly clean your fan to remove dust or debris that might obstruct airflow. Testing different fan settings can help you find the optimal configuration for your specific filament and print.
Preventing overcooling during printing
Overcooling can be just as problematic as insufficient cooling. Excessive airflow can cause the filament to solidify too quickly, leading to poor layer adhesion and surface imperfections. To prevent overcooling, avoid setting the fan speed too high, especially for the first few layers of your print. Gradually increase the fan speed as the print progresses to maintain consistent cooling.
You can also use your slicer to set cooling thresholds based on print temperature and nozzle temperature. For example, reducing fan speed for small or intricate parts can help prevent overcooling and improve print quality. By carefully managing your cooling system, you can fix 3D printer bubbles and achieve smoother, more reliable prints.
Adjust Printing Temperatures
Effects of high temperatures on 3D print blobs
High temperatures can significantly impact your 3D prints, often leading to defects like blobs and zits. When the nozzle temperature exceeds the recommended range for your filament, the material may become too fluid. This excessive fluidity can cause over-extrusion, resulting in extrusion irregularities such as blobs on the surface of your print. These imperfections not only affect the aesthetic quality of your prints but also compromise their structural integrity.
Additionally, high temperatures can cause the filament to degrade, releasing gases that form bubbles in filament. These bubbles contribute to surface imperfections and weaken layer adhesion. For example, studies have shown that bubble formation is linked to specific temperature thresholds, particularly when multivalent oxides like cerium are thermally reduced. By avoiding excessively high nozzle temperatures, you can minimize the risk of 3D print blobs and other defects.
Setting the right temperature for your filament
Choosing the correct print temperature for your filament is crucial for achieving high-quality prints. Different filaments have unique optimal temperature ranges that influence their mechanical and aesthetic properties. For instance:
- Higher temperatures improve interlayer adhesion, enhancing the mechanical strength of your prints.
- Aesthetic finishes, such as glossiness and color vibrancy, are also affected by temperature. Higher temperatures often result in glossier surfaces.
- Printing outside the recommended temperature range can lead to failures, including over-extrusion and poor layer adhesion.
To set the right temperature, consult the filament manufacturer's guidelines. These recommendations provide a starting point for adjusting temperature settings in your slicer. For example, PLA typically prints well between 190°C and 220°C, while ABS requires a higher range of 230°C to 250°C. By adhering to these guidelines, you can avoid bubbles, blobs, and zits, ensuring better print quality.
Testing and calibrating temperature settings
Testing and calibrating your printer's temperature settings is essential for preventing defects and achieving consistent results. Start by performing a temperature tower test. This test involves printing a single model with varying nozzle temperatures to identify the optimal range for your filament. Look for signs of over-extrusion, blobs, or zits at each temperature level.
Calibration data also highlights the importance of precise temperature control. For example, bubble formation was observed at specific temperatures for certain materials, while others remained bubble-free even at higher temperatures. This demonstrates that fine-tuning your settings can fix 3D printer bubbles and improve print quality.
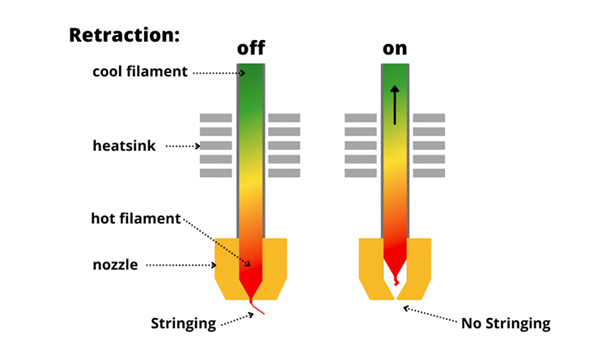
When calibrating, consider other factors like retraction settings and cooling. Retraction helps reduce extrusion irregularities, while proper cooling prevents overheating. Adjusting temperature and retraction settings together ensures smoother prints with minimal surface imperfections. Regular calibration not only avoids defects but also enhances the overall reliability of your 3D printer.
Addressing filament moisture, optimizing cooling systems, and fine-tuning printing temperatures are essential for avoiding 3D printing defects. Proper humidity control prevents imperfections like bubbling and poor layer adhesion, while effective nozzle temperature settings ensure consistent filament behavior. Regular testing and retraction adjustments in your slicer help maintain print quality by minimizing imperfections and ensuring smooth layer adhesion. Studies confirm that controlling these factors reduces random defects, leading to reliable, bubble-free 3D prints.
FAQ
What causes bubbles in 3D prints?
Bubbles form due to filament moisture, improper cooling, or incorrect nozzle temperatures. These factors disrupt extrusion and layer adhesion during the print process.
How can retraction settings help reduce blobs?
Retraction settings control filament flow during nozzle movement. Proper adjustments minimize over-extrusion, reducing blobs and improving the surface quality of your 3D prints.
What is the best way to test nozzle temperature settings?
Perform a temperature tower test. Print a model at varying temperatures to identify the optimal range for your filament and achieve consistent, bubble-free results.


發表評論
在發布之前,所有評論都會進行調節。
此網站已受到 hCaptcha 保護,且適用 hCaptcha 隱私政策以及服務條款。