


When you compare SLA, DLP, LCD, and FDM 3D printing technologies, you’ll notice significant differences. Each type of printer—SLA, DLP, LCD, and FDM—operates in its own unique way and uses specific materials. For instance, FDM printers work by melting and extruding hard thermoplastic filaments, while SLA and DLP printers use light to cure liquid photopolymer resin. LCD printers also use UV light and an LCD screen to harden resin. The table below highlights what sets SLA, DLP, LCD, and FDM technologies apart:
|
Technology |
Process |
Material |
Resolution |
Cost |
Post-Processing |
|---|---|---|---|---|---|
|
FDM |
Pushes out melted filament |
Thermoplastic filament |
Low |
Very little needed |
|
|
SLA |
UV laser hardens resin |
Photopolymer resin |
25 microns |
High |
Needs cleaning and more hardening |
|
DLP |
Shines light to harden resin |
Photopolymer resin |
High |
Needs cleaning and more hardening |
|
|
LCD |
Uses UV lights and LCD screen |
Photopolymer resin |
Not as sharp |
Medium |
Needs cleaning and more hardening |
The choice between SLA, DLP, LCD, and FDM 3D printing technologies will affect your print quality, speed, and overall cost.
Key Takeaways
- FDM printers melt plastic strings to make strong parts fast. They are good for people new to 3D printing. They also work well for big or simple models.
- SLA and DLP printers use light to harden resin. They make prints with lots of detail and smooth surfaces. These are great for jewelry, dental models, and exact prototypes.
- LCD printers give a good mix of detail, speed, and low price. They are good for miniatures, dental models, and small engineering parts.
- Resin printers (SLA, DLP, LCD) need extra cleaning and curing after printing. They use special resins. FDM printers need less work after printing and use regular plastic strings.
- Pick your 3D printer based on what you need. Choose FDM for fast prints and saving money. Pick SLA or DLP for the best detail. LCD is good if you want quality and speed for less money.
Quick Comparison of SLA, DLP, LCD, and FDM
Overview Table
Here is a side-by-side look at the main features of each 3d printing technology. This table helps you see how sla、dlp、lcd、fdm printers compare in process, speed, materials, print quality, and cost.
|
Technology |
Process |
Speed |
Materials |
Print Quality |
Cost |
|---|---|---|---|---|---|
|
FDM |
Melts and deposits plastic filament |
1-2 days (faster for small parts) |
PLA, ABS, PETG, more |
Good for prototypes, visible layers |
Low |
|
SLA |
Uses UV laser to cure resin |
3-5 days |
Photopolymer resin |
Very high, smooth surface |
High |
|
DLP |
Uses digital light projector to cure resin |
3-5 days |
Photopolymer resin |
Highest detail, thin layers |
High |
|
LCD |
Uses lcd light curing with UV light and LCD screen |
3-5 days |
Photopolymer resin |
High, but not as sharp as DLP |
Medium |
Note: FDM printers often finish jobs faster than resin printers. Resin-based 3d printing, including sla、dlp、lcd、fdm, gives you higher detail but takes more time and post-processing.
Key Differences
You will notice some clear differences when you compare these 3d printing technology types:
-
Light Source:
- SLA uses a UV laser.
- DLP uses a digital projector.
- LCD uses lcd light curing with an LCD screen and UV light.
- FDM does not use light; it melts plastic filament.
-
Print Speed:
- FDM printers usually finish faster, especially for simple or large parts.
- SLA, DLP, and LCD light curing printers take longer because they cure resin layer by layer.
-
Material Compatibility:
- FDM works with many thermoplastic filaments like PLA and ABS.
- SLA, DLP, and LCD light curing printers use only photopolymer resins.
-
Print Quality:
- DLP and SLA offer the highest detail and smoothest surfaces.
- LCD light curing gives you good detail but not as sharp as DLP.
- FDM prints show more visible layers but can be strong and accurate for some uses.
-
Cost:
- FDM printers and materials cost less.
- SLA, DLP, and LCD light curing printers and resins cost more.
You can see that sla、dlp、lcd、fdm each have unique strengths. If you want fast, low-cost prints, FDM is a good choice. If you need high detail, choose a resin printer like SLA, DLP, or LCD light curing.
SLA 3D Printing
How It Works
SLA light curing 3d printers use a UV laser to make each layer. The laser moves over liquid resin and hardens it where it shines. When one layer is done, the platform moves down. Then, the printer starts the next layer. This keeps going until the model is finished. SLA light curing makes very thin layers and smooth surfaces. Every stereolithography 3d printer uses this technology.
Features
SLA light curing 3d printers are known for high resolution and accuracy. They can make layers as thin as 25 microns. This means you can print models with sharp details. The quality of models from SLA light curing 3d printers is very good. You can use many kinds of photosensitive resin. Some are clear, tough, flexible, or safe for the body.
Tip: The way you place your print and supports can change how strong and smooth your 3d prints are.
Pros and Cons
Pros:
- High resolution and smooth finish
- Works with many photosensitive resin types
- Good for detailed 3d printed models
Cons:
- Needs cleaning and extra curing after printing
- Resin is messy and must be handled with care
- SLA light curing 3d printers cost more than FDM printers
Materials
You can use many materials with SLA light curing 3d printers. The table below lists some common resin types and what they are used for:
|
Resin Type |
Performance Characteristics |
Typical Applications |
|---|---|---|
|
Standard Resins |
Smooth surface, high detail, not very strong |
Fast prototypes, display models |
|
Engineering Resins |
Strong, tough, like plastic |
Working parts, machine pieces |
|
Flexible Resins |
Soft and bendy |
Soft parts, art projects |
|
Clear Resins |
See-through, resists water |
Light parts, lens samples |
|
Durable/Tough Resins |
Tough, does not break easily |
Real parts, strong prototypes |
|
Specialty Resins |
Very stiff, heat safe, stops static |
Special jobs, static-safe tools |
Applications
SLA light curing 3d printers are used for many things:
- Dental models and surgery guides (because of safe photosensitive resin)
- Jewelry and small models that need fine detail
- Engineering and high-precision prototypes
- Clear parts and light guides
- Strong parts made with tough or special resins
SLA light curing 3d printers give great quality, thin layers, and many material choices. You get good results for both easy and hard 3d printing jobs.
DLP 3D Printing
How It Works
DLP light curing 3d printers use a digital projector. The projector shines patterns of light onto liquid resin. Each layer forms when the light cures the resin all at once. This is different from curing one spot at a time. DLP light curing is fast and very accurate. After each layer, the build platform moves up or down. You can watch your 3d model grow as it prints. DLP 3d printing can make very tiny features, even as small as 1 micron. This is much finer than most other 3d printing methods.
Features
DLP light curing 3d printers are fast and make detailed prints. You can print shapes with sharp edges and smooth surfaces. The technology uses two types of light, 405 nm and 365 nm. This helps control how the resin hardens. You can change the mechanical properties of your 3d prints. Grayscale imaging lets you use different shades in your prints. You can also switch vats to use different materials in one job.
Tip: DLP light curing 3d printers can cure a whole layer in just 1 to 4 seconds with dual-wavelength light. This makes them much faster than older printers.
Here is a table with important numbers for DLP light curing 3d printing:
|
Parameter |
Value/Range |
What It Means |
|---|---|---|
|
Resolution |
Down to 1 µm |
Prints very fine details |
|
Printing speed |
0.5 to 15 mm/s |
Fast production |
|
Layer cure time (dual) |
1–4 s per 100 µm layer |
Quick layer curing |
|
Feature size (microneedle) |
High accuracy for small parts |
|
|
Light wavelengths |
405 nm and 365 nm |
Dual-wavelength for better control |
Pros and Cons
Pros:
- You get high resolution and smooth surfaces.
- DLP light curing 3d printers work quickly, even for small parts.
- You can print with many types of photosensitive resin.
- The printer can make complex shapes and tiny features.
Cons:
- DLP light curing 3d printers and resins cost more than FDM.
- You must clean and cure your prints after printing.
- Some resins are not as strong as SLA resins.
- The build area is usually smaller than FDM printers.
Materials
You can use many materials with DLP light curing 3d printers. Most DLP printers use photosensitive resin that hardens with light. These resins come in different types for different needs. Some are strong, some are flexible, and some are clear. DLP resin 3d printing lets you pick the best material for your project.
|
Resin Type |
Properties |
Common Uses |
|---|---|---|
|
Standard Resin |
Good detail, smooth finish |
Prototypes, models |
|
Tough Resin |
Higher impact resistance |
Functional parts, tools |
|
Flexible Resin |
Bends without breaking |
Wearables, soft parts |
|
Clear Resin |
Transparent, smooth |
Lenses, light guides |
|
Specialty Resin |
Heat-resistant, static-safe, etc. |
Engineering, electronics |
You can make your prints stronger and more accurate by changing the layer thickness. If you make the layer thinner, your print can be up to 59% more accurate. The best layer thickness for strong parts is often about 0.15 mm.
Applications
You can use DLP light curing 3d printers for many jobs. These printers are great for dental models, jewelry, and medical devices. They print fine details very well. You can also make engineering prototypes, microneedles, and small mechanical parts. DLP resin 3d printing is good for any project that needs high accuracy and smooth surfaces.
Note: DLP light curing 3d printers can make complex biological shapes. For example, they can print blood vessels from 5 microns to 3 centimeters. This makes them helpful in medical research.
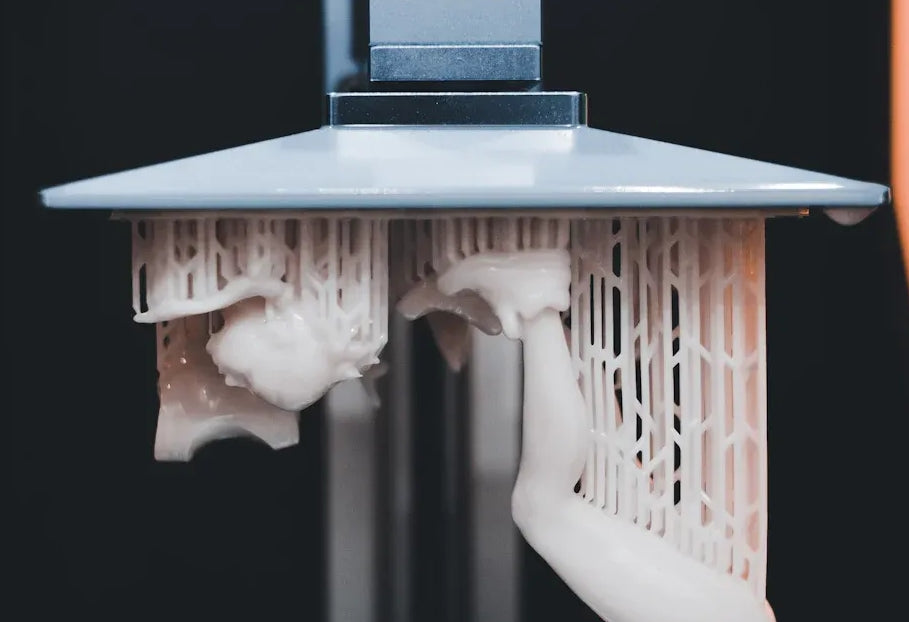
LCD 3D Printing
How It Works
You use lcd 3d printing when you want to create detailed models with a light curing 3d printer. This process uses an LCD screen and UV light to cure photosensitive resin. The LCD screen acts like a mask. It lets light pass through only where you want each layer to harden. The printer cures an entire layer at once. You get fast results and sharp details. Each time a layer finishes, the build platform moves, and the next layer starts. This method gives you smooth surfaces and accurate shapes.
Features
LCD 3d printing gives you a mix of speed, detail, and cost savings. You can print many models at once on the same platform. The printer uses lcd light curing to make thin layers, often as fine as 47 microns. Some models, like the Ackuretta Sol, reach print speeds up to 45 mm per hour. You can see how different printers compare in the table below:
|
Printer Model |
Technology |
Build Platform Size (mm) |
Max Print Speed (mm/h) |
XY Resolution (μm) |
|---|---|---|---|---|
|
Anycubic Photon |
LCD-based SLA (405nm) |
115 × 65 × 155 |
20 |
47 |
|
Anycubic Photon S |
LCD-based SLA (405nm) |
115 × 65 × 165 |
20 |
47 |
|
Elegoo Mars |
LCD-based SLA (405nm) |
119 × 68 × 155 |
22.5 |
47 |
|
Ackuretta Sol |
LCD-based SLA (385/405nm) |
128 × 80 × 120 |
45 |
49 |
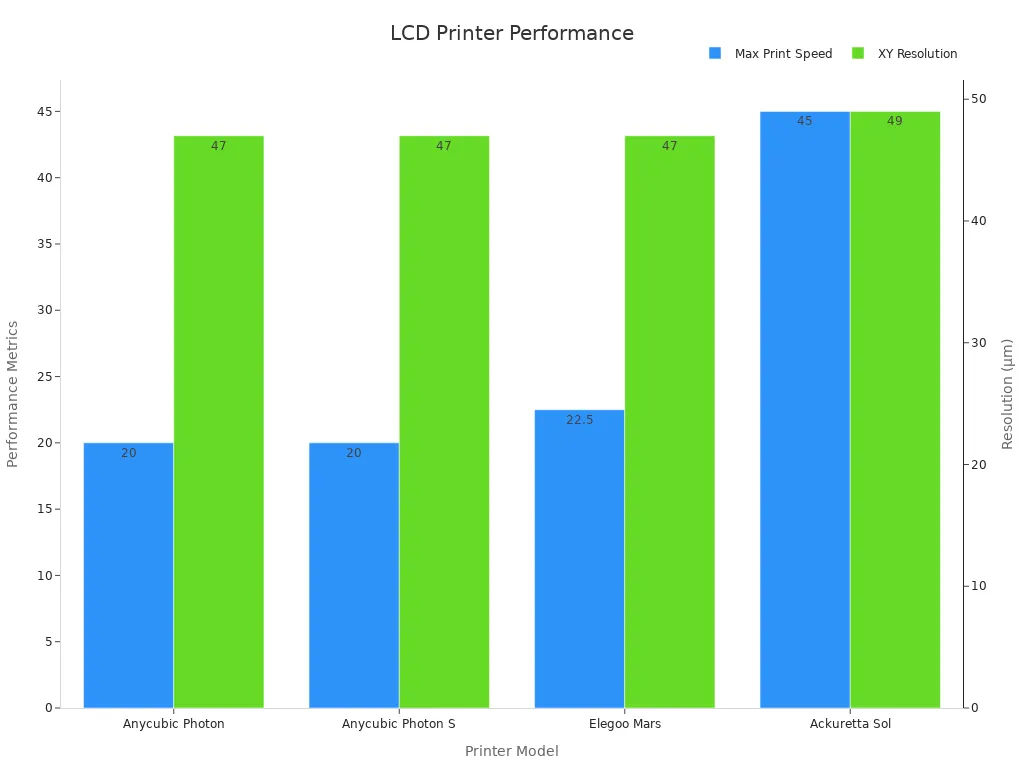
You get reliable accuracy with lcd light curing. Budget printers like Anycubic Photon and Elegoo Mars offer accuracy close to more expensive models. You can trust lcd 3d printing for both hobby and professional work.
Pros and Cons
Pros:
- You get high detail and smooth surfaces.
- LCD light curing 3d printer models cost less than many other types.
- You can print several models at once, saving time and resin.
- The process uses less photosensitive resin when you print hollow models.
Cons:
- You must clean and cure your prints after printing.
- Some lcd light curing 3d printer models have smaller build areas.
- Prints may not be as sharp as DLP, but still look very good.
Tip: You can save resin and money by printing models vertically or hollow. The right orientation makes lcd 3d printing more efficient.
Materials
You use photosensitive resin as the main material in lcd 3d printing. These resins come in many types. You can choose standard, tough, flexible, or clear options. Each type gives you different results. The table below shows how your choices affect resin use and cost:
|
Model Type / Orientation |
Resin Consumption per Model |
Cost per Model (USD) |
Number of Models per Print Platform |
Notes |
|---|---|---|---|---|
|
Hollow (Shell), Vertical |
9 mL |
$1.35 |
15 |
Uses less resin, more economical |
|
Solid, Vertical |
17 mL |
$2.50 |
15 |
Consumes nearly twice the resin |
|
Horizontal (50 models) |
915 gm total |
$558.15 total |
N/A |
Significant material and cost savings |
|
Vertical (50 models) |
1989 gm total |
$1,213.29 total |
N/A |
Nearly double resin and cost vs horizontal |
You can see that lcd light curing 3d printer models let you control how much photosensitive resin you use. This helps you manage costs and waste.
Applications
You can use lcd 3d printing for many jobs. This technology works well for dental models, jewelry, and small engineering parts. You get fine details and smooth finishes. Many people use lcd light curing for prototypes, miniatures, and custom tools. You can also print art pieces and educational models. The process fits both home and business needs.
Note: LCD light curing 3d printer models give you a balance of speed, detail, and cost. You can choose the right photosensitive resin for your project and get great results every time.
FDM 3D Printing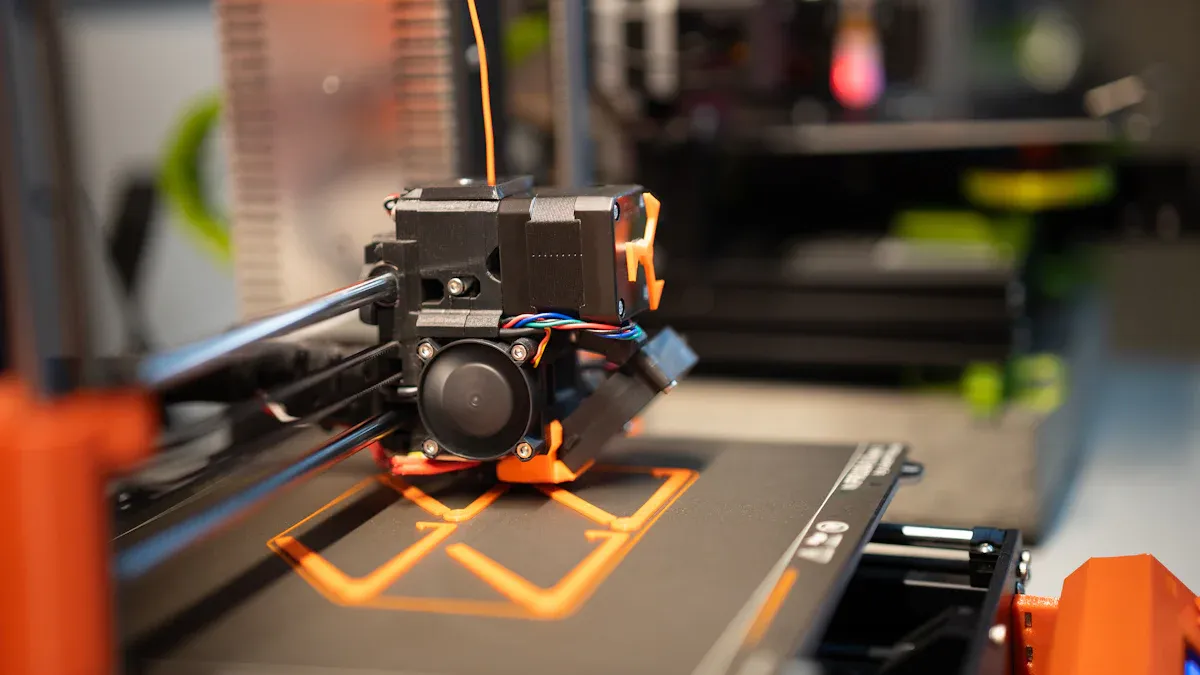
How It Works
You use fdm 3d printing to make things by stacking melted plastic. The printer heats up a thermoplastic filament until it gets soft. Then, the machine pushes the filament through a nozzle. It draws each layer on a flat surface. When one layer cools, the next layer goes on top. This keeps happening until your 3d model is finished. You can watch your design grow as each layer is added.
Features
Fdm 3d printing is simple and flexible. You can pick from many plastic filaments like PLA or ABS. The printer lets you change settings such as layer height and speed. You can print big or small models. You can also pause or restart the print if you need to. Both beginners and experts like fdm 3d printing because it is easy to use.
Tip: You can change the layer thickness. Thicker layers print faster. Thinner layers make smoother surfaces.
Pros and Cons
Pros:
- You get strong parts that work for real jobs.
- FDM 3d printing uses cheap materials, so you save money.
- The process is fast for simple shapes and needs little extra work.
- You can use open-source software to adjust your prints.
Cons:
- You might see lines between each layer.
- The accuracy is lower than resin-based 3d printing.
- Setup can be tricky with many settings to change.
- Room temperature and other factors can affect print quality.
Here is a quick comparison between fdm 3d printing and SLA 3d printing:
|
Feature |
FDM 3D Printer |
SLA 3D Printer |
|---|---|---|
|
Material Cost |
Uses cheap, easy-to-find thermoplastics (PLA, ABS); lower cost per part |
Uses special, more costly resins with shorter shelf life |
|
Print Speed & Throughput |
Prints basic parts faster; needs little extra work |
Prints slower; needs extra washing and curing |
|
Labor & Handling |
Needs less hands-on time; parts are ready fast or need small cleanup |
Needs more work after printing and safety steps |
|
Part Strength |
Makes strong parts good for real use |
Parts have more detail but are not as tough |
|
Workflow Simplicity |
Easier setup and printing |
More steps and longer post-processing |
Materials
You can use many filaments with fdm 3d printing. PLA and ABS are the most common. You can also use PETG, nylon, or flexible TPU. Each material has its own good points. PLA is easy to print and great for beginners. ABS is stronger and can handle heat. PETG is both strong and flexible. Some printers let you use special filaments with wood or metal bits.
Applications
Fdm 3d printing helps you make prototypes, tools, and spare parts. Many industries, like aerospace and car makers, use this for big, complex pieces. You can make custom phone cases, toys, or even medical devices. Industrial fdm 3d printing gives strong, repeatable results for real parts. This method is good for saving money and getting parts fast.
Note: Home fdm 3d printing can make models almost as accurate as pro machines. You get good results for many projects, from school to business.
Comparing 3D Printing Technology
Print Quality
Print quality means how smooth and detailed your models look. SLA and DLP printers make the best-looking prints. They use light to harden resin, so you get smooth and sharp details. DLP printers can make very tiny features, even down to 1 micron. SLA printers also give high resolution and smooth finishes. LCD printers are close, especially when they control light for each pixel, but they are not as sharp as DLP or SLA.
FDM printers make strong parts, but you will see lines between layers. They are not as accurate as resin printers. If you want the best detail for small objects, pick SLA or DLP. If you want good quality for bigger, stronger parts, FDM is a good choice.
Tip: You can make FDM prints smoother by sanding or using special sprays.
A big study shows SLA, DLP, and PolyJet have the best accuracy. You can check this with RMS and mean deviation numbers. These numbers help you see which printer is most accurate.
Speed
Speed is important if you need your models fast. FDM printers usually finish quicker, especially for simple or big parts. They melt and lay down plastic one layer at a time. This works well for test models and working parts.
DLP and LCD printers cure a whole layer at once, so they are faster than SLA for some jobs. SLA uses a laser to draw each layer, so it can be slower, especially for tricky shapes. But DLP and LCD still need extra time for cleaning and curing, which adds to the total time.
Here is a table that shows speed and build size for each type:
|
Technology Category |
Max Build Volume (mm) |
Advantages |
Disadvantages |
|---|---|---|---|
|
Vat Photopolymerization (SLA/DLP/LCD) |
~2100 x 700 x 800 |
High resolution; fast for small parts |
Limited part size; post-processing needed |
|
Material Extrusion (FDM) |
~1005 x 1005 x 1005 |
Inexpensive; scalable; fast for big parts |
Poor surface quality; limited accuracy |
Note: DLP and LCD printers can cure a layer in seconds. FDM speed depends on layer height and part size.
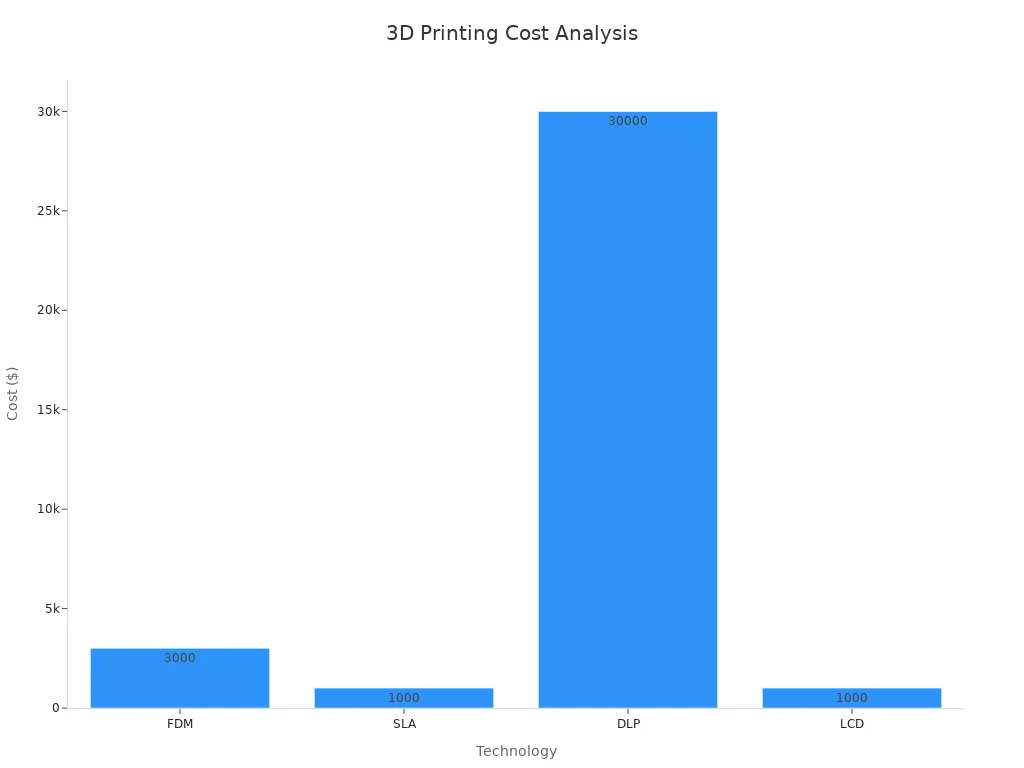
Cost
Cost is a big thing to think about when picking a printer. FDM printers are the cheapest. You can get a starter model for about $200. The filament is cheap and easy to buy. SLA and DLP printers cost more, starting at $2,000 and going much higher for big machines. Resin also costs more than filament.
LCD printers cost less than SLA and DLP, but you will need to replace the screen and other parts sometimes. Cleaning and curing also cost more, especially for resin printers.
Here is a table that compares costs:
|
Technology |
Initial Printer Price Range |
Material Type |
Post-Processing Cost |
Notes on Operational Costs |
|---|---|---|---|---|
|
FDM |
$200+ (hobbyist) to $200,000+ (industrial) |
Filaments |
$3,000+ |
Most affordable; simple post-processing |
|
SLA |
$2,000 to $200,000+ |
Liquid resin |
$1,000+ |
High resolution; solvent cleaning needed |
|
DLP |
Comparable to SLA, higher for large models |
Liquid resin |
$30,000+ |
Fast, high throughput; limited materials |
|
LCD |
Lower than SLA and DLP |
Liquid resin |
$1,000+ |
Fast curing; frequent consumable replacement |
Tip: FDM saves money on printers and materials, but resin printers give more detail for a higher price.
Ease of Use
You want a printer that matches your skills. FDM printers are easy to use and set up. Many beginners start with FDM because it is simple and the software is easy. You just load the filament, level the bed, and start printing.
Resin printers like SLA, DLP, and LCD need more steps. You must handle liquid resin, clean the prints, and cure them with UV light. This can be messy and takes practice. Most people find FDM easier to use. About 73% of users need help with 3d printing, and only 21.6% feel sure they can print alone.
|
Metric |
Data |
|---|---|
|
Percentage of users with any 3d printing experience |
31.1% |
|
Mean self-reported difficulty rating (scale 1-5) |
3.14 |
|
Mean self-reported skill level (scale 1-5) |
2.54 |
|
Percentage needing help with 3d printing tasks |
73.0% |
|
Common reported barriers |
Creating digital 3D models, lack of material knowledge, printer/software settings |
|
Percentage feeling capable of creating 3d printed objects independently |
21.6% |
Note: Pick a printer with a simple interface and good support to make things easier.
Post-Processing
Post-processing is what you do after printing. FDM prints need you to remove supports and maybe sand the surface. This is easy and does not need chemicals.
SLA, DLP, and LCD printers need more work. You must wash the prints in a solvent to get rid of extra resin. Then, you cure them under UV light to make them strong. This takes more time and care. SLA prints come out the smoothest, so you spend less time finishing the surface. DLP and LCD prints need the same extra steps.
|
Feature |
Laser SLA (L-SLA) |
DLP SLA |
MSLA / LCD SLA |
|---|---|---|---|
|
Curing Method |
UV laser draws layer point-by-point |
Digital projector flashes entire layer image |
UV LED array + LCD screen flashes entire layer |
|
Speed |
Slower, especially for large/solid layers |
Faster than laser, cures whole layer simultaneously |
Fastest, cures whole layer simultaneously |
|
Post-Processing |
Resin washing and UV curing |
Same as Laser SLA |
Same as Laser SLA |
|
Pros |
Mature tech, large build volumes |
Fast layer times, good accuracy |
Very fast, cost-effective, high resolution |
|
Cons |
Slower for complex layers, more expensive |
Projector resolution limits detail, expensive bulbs |
LCD screen lifespan limited, visible pixel grid |
Tip: Always wear gloves and work in a place with fresh air when using resin.
Best Uses
Each printer type is best for different jobs. Here is a quick guide to help you choose:
- FDM: Good for test models, big parts, and working objects. You save money and get strong prints.
- SLA: Great for detailed models, dental work, jewelry, and engineering samples. You get smooth surfaces and fine details.
- DLP: Best for small, detailed parts that need high accuracy and fast printing. Used in medical, dental, and tiny machine parts.
- LCD: Good for cheap, high-detail prints. Works well for miniatures, dental models, and small engineering parts.
If you want the best detail and smoothest finish, pick SLA or DLP. If you want fast, strong, and cheap parts, FDM is best. LCD printers give you a mix of speed, detail, and cost.
Remember: Pick the 3d printing technology that fits your project needs for the best results.
You have many options when choosing a 3D printer. SLA and DLP give you smooth, detailed prints. LCD offers good detail at a lower cost. FDM makes strong, affordable parts fast. Your best choice depends on what you need most—detail, speed, or budget.
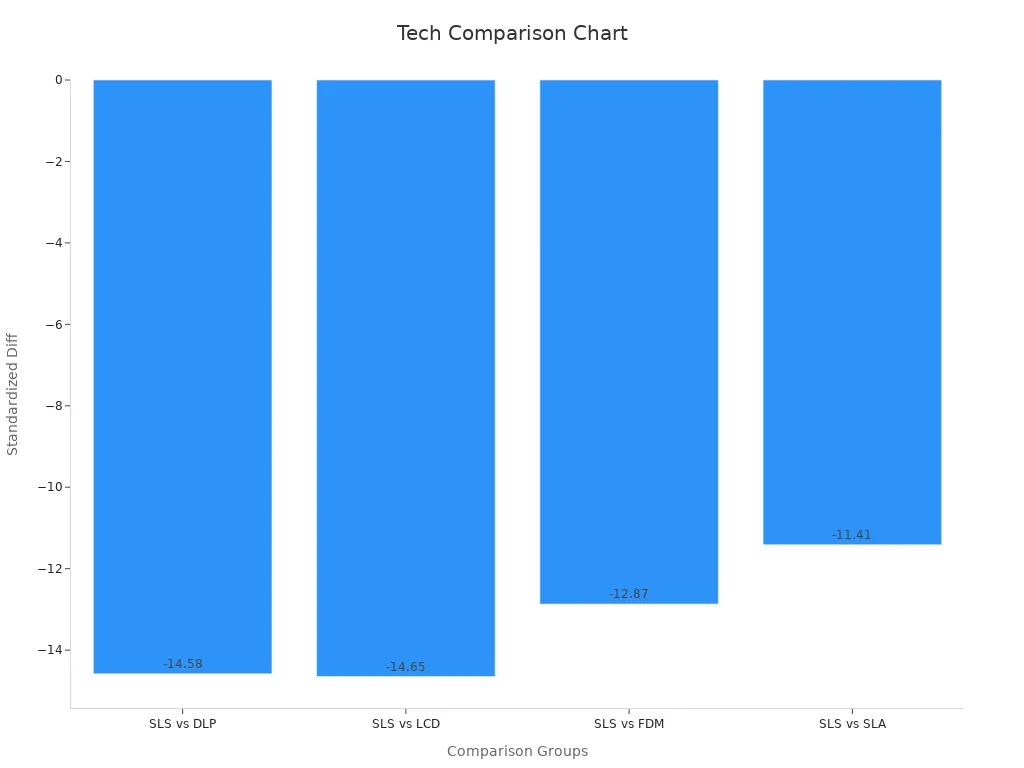
|
Comparison |
SMD |
95% CI |
Significance |
|---|---|---|---|
|
DLP vs SLA |
≈ 0 |
CI crosses zero |
Not significant |
|
DLP vs FDM |
≈ 0 |
CI crosses zero |
Not significant |
|
LCD vs SLA |
≈ 0 |
CI crosses zero |
Not significant |
Tip: Match your project to the printer’s strengths. For fine detail, pick SLA or DLP. For quick, strong parts, choose FDM. LCD works well for budget-friendly, detailed models.
FAQ
What is the easiest 3D printing technology for beginners?
You will find FDM printers the easiest to use. You load the filament, start the print, and remove the finished part. You do not need to handle messy resins or do extra cleaning.
Can I use the same materials in all 3D printers?
No, you cannot. FDM printers use plastic filaments like PLA or ABS. SLA, DLP, and LCD printers use liquid resin. You must choose the right material for your printer type.
How do I make my 3D prints smoother?
You can sand FDM prints or use a smoothing spray. For resin prints, adjust the layer height and clean the model well. Thinner layers give a smoother finish.
Which 3D printing method gives the strongest parts?
FDM printing gives you the strongest parts for most uses. You can pick tough filaments for extra strength. Resin prints look smoother but break more easily.
Do I need special safety steps for resin printers?
- Yes, you do.
- Wear gloves and goggles.
- Work in a room with good airflow.
- Wash your hands after handling resin.
- Always follow the safety tips in your printer’s manual.


Leave a comment
All comments are moderated before being published.
This site is protected by hCaptcha and the hCaptcha Privacy Policy and Terms of Service apply.