


Smoothing your PLA Filament prints enhances both their appearance and usability. Layer lines often detract from the final product, but proper techniques can eliminate them. You can achieve professional results by experimenting with methods tailored to your project. PLA smoothing transforms rough prints into polished creations, ensuring your designs stand out.
Key Takeaways
- Sanding and polishing help make PLA prints smooth. Begin with rough sandpaper, then use finer ones for better results.
- Adding primer and paint makes PLA prints look nicer. Use thick primer to cover lines, then add thin paint layers for a neat finish.
- Special methods like resin coating or vapor smoothing can improve prints. These make them stronger and give a perfect surface.
Sanding and Polishing for Smooth 3D Prints
Sanding and polishing are among the most effective methods for achieving smooth 3D prints. This technique allows you to refine the surface of your PLA prints, removing visible layer lines and imperfections. By following the right steps and using the appropriate tools, you can transform your prints into professional-quality pieces.
Tools and Materials for Sanding
To begin the sanding process, you need the right tools and materials. Here’s a list of essentials:
- Sandpaper: Use a variety of grits, starting with coarse (e.g., 120-grit) and progressing to finer grits (e.g., 400-grit or higher).
- Sanding Block or Sponge: These provide even pressure and help maintain flat surfaces.
- Water: Wet sanding reduces dust and provides a smoother finish.
- Protective Gear: Wear a dust mask and safety goggles to protect yourself from fine particles.
- Optional: A rotary tool with sanding attachments can speed up the process for intricate designs.
Tip: Always choose high-quality sandpaper to avoid tearing or uneven sanding.
Step-by-Step Sanding Process
Follow these steps to achieve a smooth surface on your PLA prints:
- Start with Coarse Sandpaper: Begin with 120-grit sandpaper to remove prominent layer lines. Sand in a circular motion for even results.
- Progress to Medium Grits: Move to 220-grit sandpaper to refine the surface further. This step helps eliminate scratches left by the coarse grit.
- Wet Sanding with Fine Grits: Use 400-grit or higher sandpaper with water. Wet sanding minimizes dust and creates a polished surface.
- Inspect Your Work: Periodically check the print under good lighting to ensure all imperfections are removed.
- Repeat if Necessary: For highly detailed prints, you may need to repeat the process with finer grits until satisfied.
Note: Avoid applying excessive pressure while sanding. Let the sandpaper do the work to prevent damaging the print.
Polishing Techniques for a Glossy Finish
Once the sanding process is complete, you can polish your print for a glossy finish. Here’s how:
- Apply a Polishing Compound: Use a plastic polishing compound or automotive polish. Apply it with a soft cloth or buffing pad.
- Buff the Surface: Gently buff the print in circular motions until it shines. A rotary tool with a polishing attachment can speed up this step.
- Seal the Surface: For added durability and shine, consider applying a clear coat or wax. This step also protects the print from scratches and wear.
Pro Tip: Polishing works best on prints that have been thoroughly sanded. Skipping the sanding process may result in uneven or lackluster results.
By mastering these techniques, you can elevate the quality of your PLA prints. Sanding and polishing not only improve aesthetics but also enhance the functionality of your designs.
Using Primers and Paints for PLA Smoothing
Priming and painting offer a versatile approach to smoothing PLA parts. These techniques not only fill layer lines but also enhance the visual appeal of your 3D prints. By using the right tools and following a systematic process, you can achieve a professional finish that rivals injection-molded parts.
Tools and Materials for Priming
To begin, gather the essential tools and materials for priming. These include:
- Primer Spray or Brush-On Primer: Choose a high-build primer designed for plastics.
- Sandpaper: Use fine-grit sandpaper (e.g., 400-grit) for surface preparation.
- Masking Tape: Protect areas you don’t want primed.
- Protective Gear: Wear gloves and a respirator to ensure safety during application.
Primers vary in performance based on their properties. Here’s a breakdown of typical specifications:
|
Property |
Value |
|---|---|
|
Mix Ratio By Volume |
2A:1B |
|
Pot Life |
10 minutes |
|
Cure Time |
3.5 hours |
|
Shore Hardness |
80 D |
|
Specific Gravity |
1.09 g/cc |
|
Mixed Viscosity |
350 cps |
|
Coverage |
1 oz covers 100+ square inches |
|
Tack Free Time |
2 hours |
|
Thin Film Recoat Time |
90 minutes |
|
Thin Film Working Time |
20 minutes |
Tip: Always work in a well-ventilated area to avoid inhaling fumes from the primer.
Applying Primer to Fill Layer Lines
Priming is a critical step in smoothing PLA parts. Start by cleaning the print to remove dust and oils. Apply the primer evenly across the surface, ensuring full coverage. The primer’s thickness helps fill minor imperfections and layer lines.
The primer is fairly thick and will further fill in any imperfections that you missed in the previous steps.
Allow the primer to dry according to the manufacturer’s instructions. Once dry, lightly sand the surface with fine-grit sandpaper to remove any uneven spots. Repeat the priming and sanding process if necessary to achieve a flawless base.
Painting for a Professional Finish
Painting adds the final touch to your PLA smoothing process. Select a paint compatible with plastics, such as acrylic or enamel. Apply thin, even coats using a spray can or brush. Multiple light layers prevent drips and ensure a smooth finish.
After painting, let the print cure completely before handling. For added durability, seal the paint with a clear coat. This step protects the surface and enhances its shine, giving your print a polished, professional appearance.
By combining priming and painting, you can transform your PLA prints into stunning creations. These techniques not only improve aesthetics but also provide a durable finish that withstands wear and tear.
Advanced Methods for PLA Smoothing
When basic methods like sanding and priming don’t meet your needs, advanced techniques can take your PLA prints to the next level. These methods not only enhance the appearance of your prints but also improve their durability and functionality. Let’s explore three advanced smoothing techniques that deliver professional results.
Epoxy Resin Coating for Durability
Epoxy resin coating is an excellent choice for achieving a smooth, durable finish on PLA prints. This method involves applying a thin layer of resin to the surface, which fills in layer lines and creates a glossy, protective coating.
Steps for Applying Epoxy Resin:
- Prepare Your Print: Clean the surface to remove dust and oils. Sand the print lightly to ensure the resin adheres properly.
- Mix the Resin: Combine the resin and hardener according to the manufacturer’s instructions. Work quickly, as the pot life (working time) is limited.
- Apply the Resin: Use a brush or spatula to spread a thin, even layer of resin over the print. Avoid pooling or dripping.
- Cure the Resin: Allow the resin to cure in a dust-free environment. Most resins take several hours to harden completely.
Tip: Use a rotating stand to ensure even coverage and prevent drips while the resin cures.
Epoxy resin coatings have been extensively tested for durability. Analytical techniques like ATR FTIR spectroscopy help evaluate the aging process of the resin, while studies show that epoxies can degrade under harsh conditions. Maintaining the integrity of the interface between the resin and the PLA surface is critical for long-term performance. Advanced tools like ESCA/TOFSIMS and MDSC ensure the quality of cured resins, making this method reliable for professional applications.
|
Evidence Description |
Findings |
Implications |
|---|---|---|
|
ATR FTIR spectroscopy advantages |
Characterizes surface functional groups and aging processes |
Effective for evaluating epoxy resin aging |
|
Anti-aging performance studies |
Epoxies degrade under harsh conditions |
Important for assessing long-term durability of coatings |
Heat Gun Smoothing Techniques
Using a heat gun is a quick and effective way to smooth PLA prints. This method involves carefully heating the surface of the print to soften and blend the layer lines, resulting in a smoother finish.
How to Smooth PLA with a Heat Gun:
- Set the Temperature: Adjust the heat gun to a low or medium setting. High temperatures can warp or damage the print.
- Test on a Scrap Piece: Practice on a spare print to get a feel for the heat gun’s effect on PLA.
- Apply Heat Evenly: Hold the heat gun 6–8 inches away from the print and move it in a sweeping motion. Avoid focusing on one spot for too long.
- Inspect the Surface: Check the print frequently to ensure you’re achieving the desired smoothness without overheating.
Heat treatment with a heat gun not only smooths the surface but also relieves internal stresses in the PLA, improving its mechanical properties. Controlled heating eliminates white discoloration and enhances the overall appearance of your print. This technique is ideal for achieving smooth 3D prints quickly and efficiently.
Safety Note: Always wear heat-resistant gloves and work in a well-ventilated area to avoid burns or inhaling fumes.
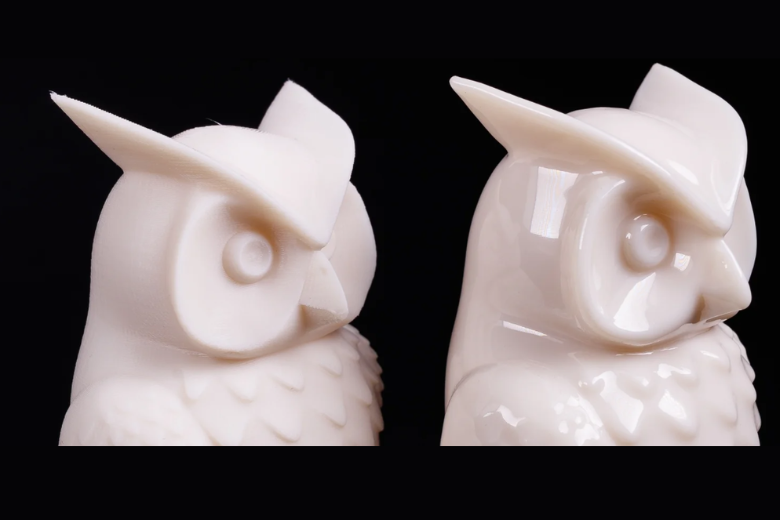
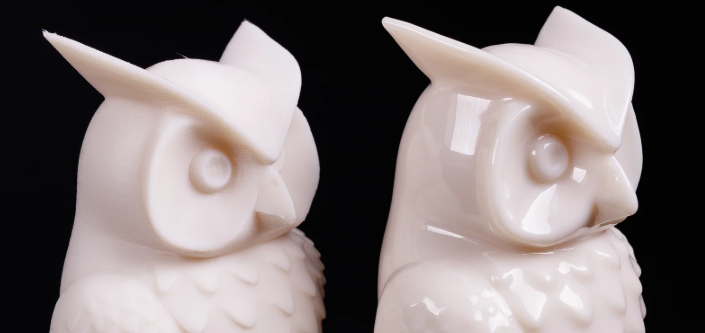
Solvent and Vapor Smoothing with Ethyl Acetate
Ethyl acetate is a powerful solvent that can dissolve and smooth PLA surfaces. This method involves exposing the print to ethyl acetate vapor, which softens the outer layer and blends the layer lines.
Steps for Vapor Smoothing:
- Prepare a Vapor Chamber: Use a glass or metal container with a tight-fitting lid. Place a small amount of ethyl acetate in the bottom.
- Suspend the Print: Hang or place the print inside the chamber, ensuring it doesn’t touch the solvent.
- Monitor the Process: Seal the chamber and let the vapor work for 5–15 minutes. Check frequently to avoid over-smoothing.
- Allow to Dry: Remove the print and let it air out in a well-ventilated area until the solvent evaporates completely.
Ethyl acetate is effective for smoothing PLA parts due to its ability to dissolve the material’s surface. It has low toxicity compared to other solvents, making it a safer option. However, it is flammable, so you must take precautions such as wearing gloves and ensuring proper ventilation.
Pro Tip: Experiment with exposure times to achieve the perfect balance between smoothness and detail retention.
By mastering these advanced smoothing techniques, you can elevate your PLA prints to a professional level. Whether you choose epoxy resin for durability, a heat gun for quick results, or ethyl acetate for a flawless finish, these methods offer versatile solutions for smoothing PLA parts.
General Tips for Successful PLA Smoothing
Choosing the Right Method for Your Project
Selecting the best smoothing technique depends on your project’s requirements. For functional parts, durability might take precedence, making epoxy resin or heat gun methods ideal. For decorative pieces, a polished finish achieved through sanding and painting may work better. Consider the size, complexity, and purpose of your print. For instance, intricate designs benefit from vapor smoothing, while flat surfaces respond well to sanding. Always test your chosen method on a scrap piece to ensure compatibility with your material and design.
Tip: Match your method to the level of detail and finish you want to achieve.
Avoiding Common Mistakes
Mistakes during the smoothing process can ruin your print. Avoid skipping preparation steps like cleaning or sanding, as these ensure better results. Applying too much heat or solvent can warp or over-smooth the surface, erasing fine details. Rushing through the process often leads to uneven finishes. Always follow the manufacturer’s instructions for tools and materials, and work patiently to achieve consistent results.
Note: Over-sanding can thin your print walls, compromising its strength.
Ensuring Safety During Smoothing
Safety should always be your priority. Wear protective gear like gloves, goggles, and a respirator when working with chemicals or heat. Ensure your workspace is well-ventilated, especially when using solvents like ethyl acetate. Keep flammable materials away from heat sources, and store chemicals securely. If using power tools, handle them with care to avoid accidents.
Safety Reminder: Never leave heat guns or solvents unattended during use.
Smoothing PLA prints enhances their appearance and functionality. Techniques like sanding, priming, and advanced methods such as epoxy coating or vapor smoothing offer versatile solutions. The table below highlights their effectiveness and safety considerations:
|
Smoothing Technique |
Effectiveness |
Safety Considerations |
|---|---|---|
|
Ethyl Acetate Vapor |
Lower toxicity compared to other solvents |
|
|
Heat Gun |
Fast method for removing layer lines |
Requires careful handling to avoid damage |
|
Chemical Smoothing |
Effective but involves hazardous chemicals |
Use in well-ventilated areas, PPE needed |
Experiment with these methods to find what works best for your project. Focus on preparation and safety to achieve polished, professional results.
FAQ
What is the best method for smoothing intricate PLA designs?
Vapor smoothing with ethyl acetate works best for intricate designs. It evenly smooths complex details without requiring manual effort like sanding.
Tip: Test exposure times to avoid over-smoothing.
Can I combine multiple smoothing techniques on one print?
Yes, combining methods like sanding and priming enhances results. Sand first to remove layer lines, then apply primer or paint for a polished finish.
Is PLA smoothing safe for functional parts?
Yes, but choose methods like epoxy resin or heat gun smoothing. These improve durability without compromising the structural integrity of functional parts.
Safety Reminder: Always follow safety guidelines when using heat or chemicals.

Leave a comment
All comments are moderated before being published.
This site is protected by hCaptcha and the hCaptcha Privacy Policy and Terms of Service apply.