


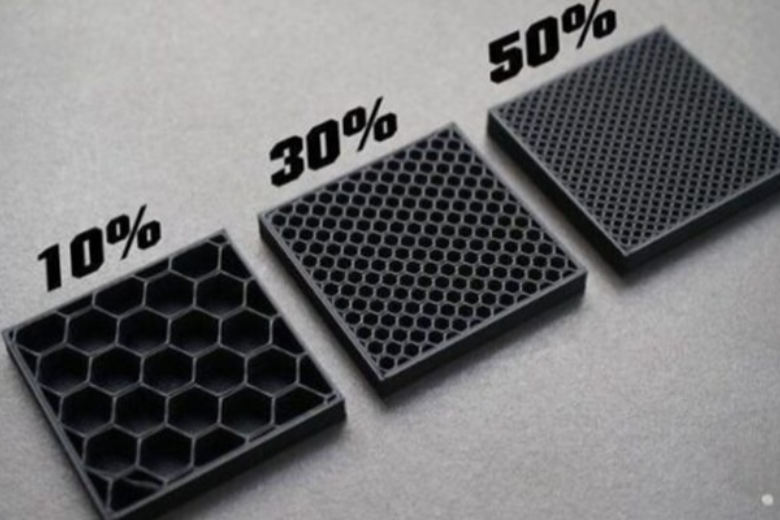
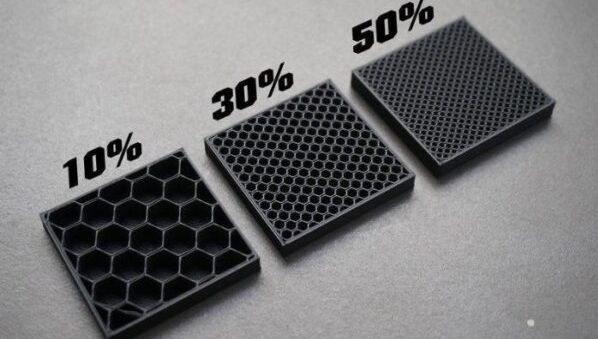
Infill density refers to the internal structure of a 3D printing part, expressed as a percentage. It determines how much material fills the interior. Higher infill density enhances strength and durability but uses more material. Studies show that at 50% infill density, honeycomb patterns yield the highest strength. Choosing the correct density ensures optimal 3D printing parameters for your project.
Key Takeaways
- Pick infill density based on how strong your 3D print needs to be. Higher densities (60% or more) make parts stronger for heavy use.
- Think about what your print will be used for. Use low density (10-20%) for decoration and medium density (30-50%) for parts needing both strength and efficiency.
- Try out different infill patterns and densities in slicer software. This helps save material while keeping the strength and look you want.
Key Factors for Choosing Infill Density
Strength and durability needs for the 3D printed part
When deciding on infill density, the strength and durability of your 3D printed part play a crucial role. Higher density levels, such as 80% or more, significantly improve mechanical properties. For instance, a study showed that increasing density from 20% to 80% resulted in a 13-26% improvement in strength. This makes high-density infill ideal for parts subjected to heavy loads or stress.
However, not all projects require maximum strength. For low-strength parts, a density of 20% provides a baseline level of durability while conserving material. The table below illustrates how different density levels correlate with mechanical improvements and design applications:
|
Infill Density |
Mechanical Properties Improvement (%) |
Design Application |
|---|---|---|
|
20% |
Baseline |
Low-strength parts |
|
80% |
13-26% improvement |
Moderate-strength parts |
|
100% |
Significant improvement |
High-strength parts |
By understanding your project's strength requirements, you can select an infill density that balances durability and material efficiency.
Purpose of the print: functional vs. decorative
The purpose of your 3D print determines the appropriate infill density. Functional parts, such as tools or mechanical components, often require higher density levels to ensure strength and rigidity. For example:
- 50-100% density: Essential for load-bearing applications or parts designed for heavy use.
- 15-50% density: Suitable for prototypes or standard prints needing moderate strength.
On the other hand, decorative items prioritize aesthetics over functionality. A low-density infill (0-15%) minimizes material use and print time, making it perfect for lightweight designs.
Tip: If you're unsure about the purpose of your print, start with a medium density (30-50%) to achieve a balance between strength and efficiency.
Material type and its compatibility with FDM printing
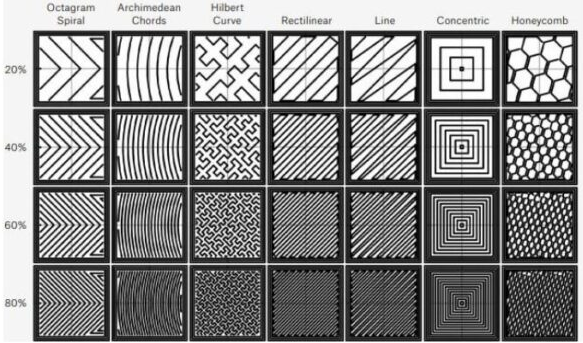
Different materials behave uniquely at various infill densities. For example, honeycomb patterns exhibit brittle behavior at higher densities, while rectilinear patterns provide superior tensile strength at 100% density. The table below highlights how infill patterns and densities affect material properties:
|
Infill Pattern |
Elongation Behavior at 40% Infill |
Elongation Behavior at 60% and 80% Infill |
Tensile Strength at 100% Infill Density |
|---|---|---|---|
|
Hilbert Curve |
Inferior elongation |
N/A |
N/A |
|
Honeycomb |
Brittle behavior |
Similar to Rectilinear and Concentric |
N/A |
|
Rectilinear |
N/A |
N/A |
34.31% higher than Hilbert Curve |
|
Concentric |
N/A |
N/A |
Max. 55.5 MPa |
When choosing a material, consider its compatibility with FDM printing and how it performs at your desired infill density. This ensures optimal results for your 3D printing project.
Print size, complexity, and design considerations
The size and complexity of your design also influence the choice of infill density. Larger prints with intricate details may require lower densities to reduce material usage and print time. Conversely, smaller, high-stress parts benefit from higher densities to enhance mechanical resistance.
Key findings from studies on design and complexity include:
- Infill patterns and density significantly impact mechanical resistance.
- Anisotropic behavior shows that pattern orientation does not greatly affect strength.
- Stress field optimization aligns material deposition with load paths, improving stiffness.
For optimal results, follow these steps:
- Use higher densities for improved mechanical resistance.
- Experiment with infill patterns to identify the best option for vibration damping.
- Adjust local density based on stress distribution using Functionally Graded Lattice Structures (FGLS).
By aligning your infill density with the size and complexity of your design, you can achieve a balance between strength, efficiency, and material usage.
Common Infill Density Levels and Their Uses
Low-density infill (10-20%) for lightweight and decorative prints
Low-density infill, ranging from 10% to 20%, is ideal for projects where weight reduction and material efficiency are priorities. This density level creates a sparse internal structure, making it perfect for decorative items or prototypes that do not require significant strength.
For example, if you are printing a vase or a figurine, a 10% infill density will suffice. It minimizes material usage and reduces print time while maintaining the visual appeal of the object. Lightweight designs like these benefit from the reduced internal structure, as they do not need to withstand heavy loads or stress.
Tip: Use adaptive infill patterns, such as gyroid or honeycomb, to enhance the aesthetics of your decorative prints while maintaining a lightweight structure.
Medium-density infill (30-50%) for balanced strength and efficiency
Medium-density infill strikes a balance between strength and material efficiency. This range, typically between 30% and 50%, is suitable for functional parts that require moderate durability without excessive material consumption.
The mechanical properties of medium-density infill make it a versatile choice. For instance, at 30% density, the ultimate tensile strength (UTS) reaches 8.03 MPa, while at 50%, it increases to 9.26 MPa. This improvement in mechanical properties ensures that your printed parts can handle moderate stress without compromising efficiency.
|
Infill Density (%) |
Young's Modulus (MPa) |
Ultimate Tensile Strength (MPa) |
Strain Percentage at UTS (%) |
|---|---|---|---|
|
30 |
Varies by pattern |
8.03 |
Varies by pattern |
|
50 |
Varies by pattern |
9.26 |
Varies by pattern |
Medium-density infill is ideal for applications like enclosures, brackets, or prototypes that need to balance strength and material usage.
Note: Gradual infill can further optimize material efficiency by increasing density only in areas that experience higher stress.
High-density infill (60% and above) for maximum strength and durability
High-density infill, starting at 60%, provides maximum strength and durability for printed parts. This density level creates a robust internal structure, making it suitable for load-bearing applications or parts subjected to heavy mechanical stress.
Increasing the density enhances mechanical properties like flexural strength (FS) and tensile strength (TS). Studies show that as infill density increases, interlayer bonding improves, resulting in significantly higher FS and TS. For instance:
- High-density infill enhances flexural strength due to better material distribution.
- Tensile strength increases proportionally with density, ensuring maximum durability.
You should use high-density infill for parts like gears, tools, or structural components that require exceptional strength.
Tip: To further improve mechanical properties, combine high-density infill with thicker walls and optimized print orientation.
Examples of projects suited for each infill density level
Different projects benefit from specific infill density levels based on their requirements. The table below provides examples of applications for each density range:
|
Infill Density |
Example Projects |
|---|---|
|
10-20% |
Decorative items, lightweight models |
|
30-50% |
Functional prototypes, enclosures |
|
60% and above |
Gears, tools, structural components |
By aligning the infill density with your project’s purpose, you can achieve the desired balance of strength, durability, and material efficiency.
Practical Tips for Optimizing Infill Density
Balancing infill density with material efficiency
Balancing infill density with material usage is essential for achieving optimal results in 3D printing. Higher density levels improve strength but consume more material, which increases costs and print time. For lightweight designs or decorative items, lower densities (10-20%) reduce material usage while maintaining structural integrity. Functional parts requiring moderate strength benefit from medium densities (30-50%), which strike a balance between durability and efficiency.
Different infill patterns also affect material efficiency. For example, honeycomb patterns perform well at medium densities but become brittle at higher levels. Rectilinear patterns offer consistent strength across densities, while concentric patterns deliver the highest tensile strength at 100% density. The table below compares the performance of various infill patterns:
|
Infill Pattern |
40% Infill Strength |
60% Infill Strength |
80% Infill Strength |
100% Infill Strength |
|---|---|---|---|---|
|
Concentric |
Strong |
Strong |
Strong |
Highest (55.5 MPa) |
|
Rectilinear |
Strong |
Strong |
Best Performance |
Strong |
|
Honeycomb |
Brittle |
Similar to Rectilinear |
Excellent |
Strong |
|
Hilbert Curve |
Weak |
Weak |
Weak |
Weak |
By understanding how density and infill patterns interact, you can optimize material usage without compromising the quality of your 3D printed part.
Testing infill patterns to enhance strength and aesthetics
Testing different infill patterns helps you find the best combination of strength and visual appeal. Patterns like gyroid and honeycomb create unique internal structures that enhance aesthetics while maintaining functionality. For parts requiring maximum strength, rectilinear and concentric patterns deliver superior mechanical properties.
You can experiment with patterns by printing small test pieces at varying densities. This allows you to observe how each pattern performs under stress and how it impacts the appearance of your print. Testing ensures that your chosen infill pattern aligns with your project’s goals, whether it’s durability or design.
Adjusting wall thickness and print orientation for better results
Wall thickness and print orientation significantly influence the strength and efficiency of your 3D printed part. Increasing wall thickness reduces reliance on infill density, as thicker walls provide additional support. For example, a part printed with 20% infill density and thicker walls can achieve similar strength to one with 50% density.
Print orientation also plays a role. Aligning the layers with the direction of stress improves mechanical resistance. For functional parts, orient the print to minimize weak points caused by layer separation. These adjustments complement your infill settings, ensuring better performance and material usage.
Using slicer software to preview and fine-tune infill settings
Slicer software offers powerful tools for optimizing infill settings. You can preview the internal structure of your print and adjust density, pattern, and placement before starting the print. Features like adaptive infill allow you to increase density only in areas that experience higher stress, reducing material usage while maintaining strength.
Use slicer software to experiment with different infill patterns and densities. For example, try combining gyroid infill with medium density for decorative prints or rectilinear infill with high density for functional parts. Previewing these settings ensures that your final print meets your expectations in terms of strength, aesthetics, and efficiency.
Tip: Regularly update your slicer software to access new features and improvements that enhance your 3D printing experience.
Infill density plays a vital role in determining the quality of your 3D printed part. Studies show that increasing infill percentage enhances tensile strength, making it essential for achieving desired mechanical properties. For example, concentric patterns at 40% and 60% infill outperform others, while rectilinear patterns at 100% deliver the best results.
Experimenting with different densities and patterns allows you to tailor the internal structure of your part to meet specific needs. Testing helps you find the right balance between strength and material usage, ensuring optimal results for every project. By understanding how infill density impacts durability and efficiency, you can create parts that excel in both functionality and design.
FAQ
What is the best infill density for FDM printing?
The best infill density depends on your project. For decorative prints, use 10-20%. For functional parts, 30-50% works well. High-strength parts need 60% or more.
How do infill patterns affect print quality?
Infill patterns impact strength and aesthetics. Rectilinear patterns offer consistent strength, while gyroid patterns enhance visual appeal. Test different patterns using slicer software settings.
Can I reduce material usage without compromising strength?
Yes, adjust infill density and wall thickness. Use adaptive infill settings in slicer software to increase density only in high-stress areas.


Leave a comment
All comments are moderated before being published.
This site is protected by hCaptcha and the hCaptcha Privacy Policy and Terms of Service apply.