


You can fix 3d printer over-extrusion by changing some settings. Try to lower your extrusion multiplier. Calibrate the filament diameter. Drop the print temperature. Check if your nozzle is worn out. Make sure you fine-tune slicer settings. Many beginners have 3d printing over-extrusion. You can solve it with small changes.
- Lower extrusion multiplier
- Calibrate filament diameter
- Adjust print temperature
- Inspect nozzle condition
- Fine-tune printer settings
Key Takeaways
- Decrease the extrusion multiplier and flow rate to stop blobs and thick layers. Make small changes first and do test prints to find good settings.
- Check the filament diameter often to make sure extrusion is correct. Measure the filament and change slicer settings to match its real size.
- Take care of your printer by cleaning the nozzle every week and checking settings every month. Regular care stops over-extrusion and makes prints look better.
Understanding 3D Printer Over-Extrusion
What Is Over-Extrusion In 3D Printing
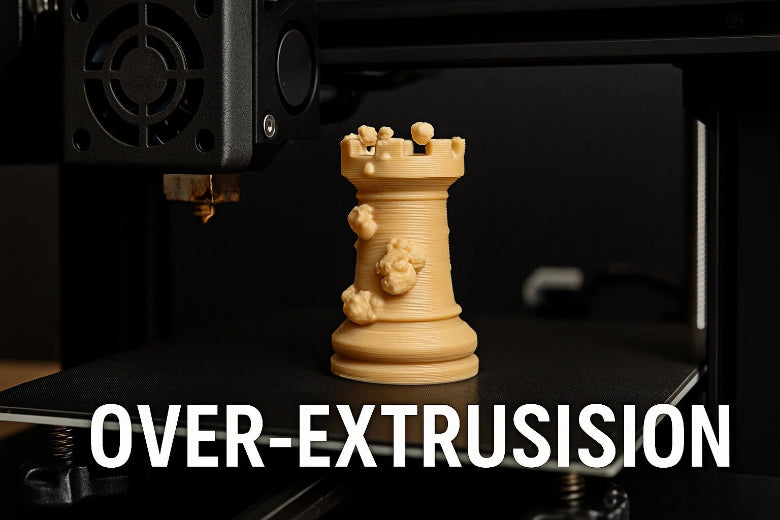
You might ask what over-extrusion is. It happens when your printer uses too much filament. This extra plastic can make the edges bulge out. Layers may look uneven or messy. If you see raised lines or droopy layers, it could be over-extrusion. The extruder calibration and flow rate are important for this problem. To fix over-extrusion, you need to notice these signs first.
Over-extrusion makes prints look messy or too big. The surface might feel rough or the part is larger than you wanted.
Common Symptoms Of Over-Extrusion
You can find over-extrusion by checking for these things:
- Blobs or bumps on the print
- Strings of plastic between parts
- Surfaces that look wavy or uneven
- Layers that are too thick
- Parts that are bigger than planned
If you see these, your printer uses too much filament. Over-extrusion can happen from wrong filament diameter, high temperature, or bad extruder calibration.
Why Over-Extrusion Affects Print Quality
Over-extrusion can mess up your print quality. Too much material can make layers not line up right. Moisture in the filament can make steam and cause problems. This can change the shape of your print and make it rough. If you want smooth and correct prints, you must control over-extrusion and check your settings.
Causes Of 3D Printing Over-Extrusion
Incorrect Flow Rate Calibration
You might see blobs or thick layers on your prints. These problems usually mean your flow rate is not set right. If your flow rate is too high, the printer uses too much filament. This happens when you set the slicer wrong. You can fix this by changing the flow rate and extrusion multiplier. Try using the Single-Wall Cube Test or check E-Steps first. This helps you save material and avoid bad prints.
Tip: Always look at your flow rate settings before you start a new print.
Filament Diameter And Settings Issues
Wrong filament diameter can cause extrusion problems. If the filament thickness changes, the printer gives out different amounts of plastic. This makes rough surfaces and makes it hard to get the right size for your print. You should check the filament diameter and change slicer settings to match the real size.
High Print Temperature
Printing too hot is a common reason for over-extrusion. If the nozzle is too hot, the filament melts too fast and makes strings or blobs. For PLA, keep the nozzle between 200°C and 220°C. PETG works best from 220°C to 250°C. ABS needs 210°C to 250°C. Lower the temperature if you see too much filament coming out.
Nozzle Wear Or Wrong Size
A worn or wrong-size nozzle can cause problems with extrusion. If the nozzle tip gets smaller or rough, the printer does not push out the right amount of filament. You might see holes or uneven spots in your prints. Change the nozzle if it is worn and clean it often to stop these problems.
|
Evidence Description |
Impact on Extrusion Volume |
|---|---|
|
Edge rounding |
Reduced flow rate |
|
Severe wear marks |
Increased resistance |
|
Poor filament flow |
Inconsistent extrusion |
Slicer And Firmware Settings
Bad slicer or firmware settings can make over-extrusion happen. If you set infill too high or use wrong retraction, extra plastic comes out. Acceleration and jerk control also change how much filament is used. Always check these settings to stop over-extrusion.
Stepper Motor And Z-Offset Calibration
Stepper motor mistakes and wrong Z-offset can cause over-extrusion. If stepper motors push too much filament or the nozzle is too close to the bed, you get surface problems. Check your calibration often to keep your prints looking good.
Remember, over-extrusion means your printer uses too much filament. To fix it, check every part of your printer setup.
Fixing Over-Extrusion: Step-By-Step Settings And Solutions
You can fix 3d printer over-extrusion by using easy steps. Each step helps with a different cause of the problem. Let’s look at the best ways to solve and check for 3d printing over-extrusion.
Lowering Extrusion Multiplier And Flow Rate
If you see blobs or thick layers, your settings might be too high. Here is how you can fix these problems: 1. Open your slicer software and find the extrusion multiplier or flow rate. 2. Set the extrusion multiplier between 0.9 and 1.1. Most filaments work best from 92% to 98%. 3. Change the flow rate to 90–110. Start at 95% and print a test cube. 4. Look at the print for over-extrusion. If you still see problems, lower the multiplier by 1–2% and try again. 5. Keep doing this until the layers look smooth and the print is the right size.
Tip: Make small changes when you adjust settings. Big changes can make new problems.
|
Adjustment Type |
Recommended Range |
|---|---|
|
Extrusion Multiplier |
|
|
Flow Rate |
90 to 110 |
Calibrating Filament Diameter
Wrong filament diameter can cause bad prints. You can fix this with a quick check: 1. Use calipers to measure your filament in three places. Write down the average size. 2. Put this number in your slicer’s filament diameter settings. 3. Mark 120 mm on your filament above the extruder. 4. Tell your printer to extrude 100 mm. 5. Measure how much filament was really used. If it is not right, change your E-steps in the firmware. 6. Do this again until the extruder uses exactly 100 mm.
Note: Good filament from trusted brands helps stop diameter problems.
Adjusting Print Temperature
Nozzle temperature changes how much filament comes out. Too hot can cause over-extrusion and stringing. Here is how to set the right temperature: 1. Check the best nozzle temperature for your material: - PLA: 190–220°C - PETG: 220–250°C - ABS: 220–250°C 2. Lower the nozzle temperature by 5–10°C if you see blobs or strings. 3. Print a small test object and check the layers. 4. Keep lowering in small steps until the print looks clean and strong.
|
Material |
Suggested Reduction |
|
|---|---|---|
|
PLA |
190-220°C |
5-10°C |
|
PETG |
220-250°C |
5-10°C |
|
ABS |
220-250°C |
N/A |
Tip: For PLA, start at 200°C. For PETG, try 230°C. For ABS, use 240°C. Change as needed for your printer.
Checking And Replacing The Nozzle
A worn or clogged nozzle can cause over-extrusion. You can fix this by cleaning and changing the nozzle: 1. Look at the nozzle for wear, clogs, or rough spots. 2. Clean the nozzle with a brass brush or use a cold pull. 3. Change the nozzle if you see damage or if cleaning does not help. 4. Pick the right nozzle size for your print. Standard is 0.4 mm. Smaller nozzles (0.2–0.3 mm) are good for fine details. 5. After changing, do a test print to check how it works.
Cleaning the nozzle every week helps stop problems and makes prints better.
Optimizing Slicer And Firmware Settings
Bad slicer or firmware settings can cause over-extrusion. You can fix these by making small changes: - Change extrusion temperature and flow percent in the slicer. - Adjust retraction settings to stop oozing and blobs. - Set pressure advance for smoother extrusion. - Lower infill percent if you see too much material inside the print. - Change layer height and print speed for better control.
Save your slicer profiles after good prints. This helps you not repeat old mistakes.
Calibrating Stepper Motors And Z-Offset
Stepper motor and Z-offset settings change how much filament comes out. Here is how you can fix these problems: 1. Move the hotend off the print bed. 2. Heat the hotend to 200°C. 3. Load filament and mark 200 mm from the entry. 4. Extrude 200 mm and measure how much came out. 5. Find the new E-step value and update your firmware. 6. Do the test again to check if it is right. 7. Change Z-offset by looking at the first layer. Make sure the nozzle is not too close or too far from the bed.
Use a probe for auto Z-offset if your printer has it. Manual leveling works for most beginners.
Fine-Tuning Infill, Retraction, And Bridge Flow Rate
Infill, retraction, and bridge flow rate settings are important for over-extrusion. You can fix problems by doing these steps: 1. Lower infill percent to use less material. Only use solid infill where you need it. 2. Set retraction distance to 1–2 mm for direct drive, 3–7 mm for Bowden. Use a speed of 20 mm/s or more. 3. Raise travel speed to 120 mm/s to stop filament drag. 4. Turn off or lower Z-hop to stop extra extrusion during moves. 5. Change bridge flow rate so filament does not sag or break. Test with small bridges and change flow rate as needed.
|
Infill Setting |
Effect on Over-Extrusion |
|---|---|
|
High Infill Percentage |
Can cause over-extrusion because too much material is used. |
|
Only Infill Where Needed |
Uses less material and can stop over-extrusion in some areas. |
|
Solid Infill Every N Layers |
Makes prints denser, which can cause over-extrusion if not balanced. |
|
Fill Angle |
Changing the angle can help parts stick together and change extrusion quality. |
|
Only Retract When Crossing Perimeters |
Can help stop ooze and extra material during moves. |
Retraction settings help stop oozing and extra filament during moves.
Long-Term Prevention And Maintenance
You can stop over-extrusion with regular checks and cleaning. Here are some easy things to do: - Clean the nozzle every week. - Check the extruder every month for damage. - Look at belts and pulleys for tightness and straightness. - Use good filament with the same diameter. - Calibrate extrusion and flow rate before big projects. - Keep filament dry to stop moisture problems.
Regular care makes your printer last longer and stops extrusion problems.
Troubleshooting Common Mistakes
Beginners sometimes make mistakes when fixing extrusion problems. Here is a table to help you avoid them:
|
Mistake |
Explanation |
|---|---|
|
Extrusion multiplier too high |
Makes layers too big and can clog the nozzle. |
|
Temperature set too high |
Makes filament flow too much and hard to control. |
|
Incorrect filament diameter settings |
Makes filament come out wrong and causes blobs. |
|
Changes how much filament comes out and makes prints look bad. |
Always check your settings before you start a new print. Small changes can make a big difference in how your printer works.
If you follow these steps, you can fix 3d printer over-extrusion and get smoother, better prints. Regular checks, cleaning, and careful setting changes will stop problems and help your printer work well.
You can fix over-extrusion by checking your printer settings. Make sure you measure the filament diameter. Do regular cleaning and care for your printer. Try making small changes to your settings. Print test cubes to see if things get better. It is okay if you do not get it right the first time. Keep trying and do the same steps each time. You will get better prints and save time and filament.
FAQ
What should you do first if you notice blobs or thick layers on your print?
Start by checking your extrusion multiplier and flow rate. Print a test cube to see if the problem is there. Lower these settings a little at a time. Keep changing them until the blobs or thick layers go away.
How often should you calibrate your extruder to prevent over-extrusion?
You should calibrate your extruder once a month. Doing this often helps stop over-extrusion. It also keeps your prints looking neat and smooth.
Can changing filament brands cause new extrusion problems?
Yes, different brands can have different filament diameters. Always measure new filament before you use it. Change your slicer settings to match the new filament size before printing.


