


You can manually level your 3D printer bed using simple tools like paper or a feeler gauge. Good 3D printer bed leveling helps your first layer stick and improves print quality. Experts say the bed stays level unless the printer moves. Manual leveling is a skill you can learn.
Key Takeaways
- Check and level your 3D printer bed often. This helps the first layer stick well and makes prints look better.
- Use easy tools like paper or a feeler gauge. These help you check the space between the nozzle and the bed at each corner.
- Clean and heat up the bed before you level it. This stops problems with sticking and helps your prints turn out nice.
Why 3D Printer Bed Leveling Matters
First Layer Adhesion and Print Quality
You want your 3D prints to look good and stick well to the bed. 3d printer bed leveling helps you get a smooth, even first layer. When you level the bed, you make sure the nozzle stays the same distance from the print surface everywhere. This step is important because it gives you strong first layer adhesion. If the nozzle is too close, it can scrape the bed. If it is too far, the plastic will not stick. You will see better results when you check and adjust bed leveling before each print.
Tip: Always check 3d printer bed leveling if you move your printer or change the bed surface.
Problems from Poor Bed Leveling
A poorly leveled bed causes many problems. You might see the edges of your print lifting off the plate. Sometimes, the print does not stick at all. Uneven first layers can ruin the whole print. Warping is another common issue. These problems happen when the bed is not flat or the nozzle is not the right distance from the bed. Cleaning the plate and leveling the bed can fix most of these issues.
Common issues from poor bed leveling:
- Prints do not stick
- Edges lift up
- Uneven layers
- Warping
When to Level a 3D Printer Bed
You should check 3d printer bed leveling often. Level the bed before your first print, after moving the printer, or if you see problems with your prints. Regular bed leveling keeps your printer working well. You will get better results and fewer failed prints. Make bed leveling a habit for every 3D printing session.
Tools for Manually Leveling a 3D Printer Bed
Paper Method vs. Feeler Gauge
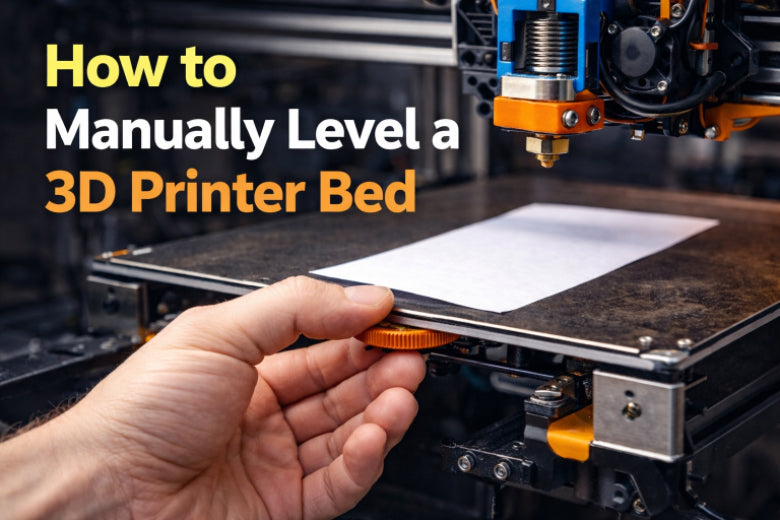
You can use paper or a feeler gauge to level your 3D printer bed. Both help you check the space between the nozzle and the bed. The paper method is easy for beginners. Take a piece of copy paper and slide it under the nozzle. Move the nozzle to each corner. Turn the screws until the paper drags a little. Use scissors to cut the paper if needed. The feeler gauge works almost the same way. It gives more exact measurements. Put the gauge blade between the nozzle and the bed. Adjust the screws until the blade fits just right.
|
Method |
Advantages |
Disadvantages |
|---|---|---|
|
Paper Method |
More accurate than automatic leveling; gives you more control over the final results; no need for a level bed to start with |
Time-consuming; requires more experience and knowledge; may require special tools or equipment |
|
Feeler Gauge |
Provides precise measurements; can be used for fine adjustments |
Requires careful handling; may not be as intuitive for beginners |
Tip: Try the paper method first to learn how bed leveling works.
Using a Straight Edge and Flashlight
A metal ruler helps you see if your bed is flat. Put the ruler on the build plate. Shine a flashlight along the ruler’s edge. If you see light under the ruler, your bed is not flat. This shows dips or bumps before you start leveling.
Other Helpful Tools
Other tools can make leveling easier:
- Metal tweezers: Clean dust or plastic from the bed and nozzle.
- Hardened steel springs: Help keep the bed steady while you adjust it.
- Pronterface software: Move the printhead to each corner for leveling.
- Cleaning cloth: Wipe the bed before you begin.
Note: Always heat your bed before leveling. Heat can change the bed’s shape. Leveling at printing temperature gives better results.
Preparing to Level a 3D Printer Bed
Workspace and Safety
Before you start leveling your 3d printer bed, set up a safe and clean workspace. Make sure your area has good lighting so you can see the bed and nozzle clearly. Keep your tools within reach. You should also follow these safety tips:
- Watch for any strange noises or smells from your printer. These can warn you about problems.
- Open a window or use a fan to keep the air fresh. This helps reduce fumes from heated plastic.
- Keep your hands away from moving parts while the printer is on.
- Have a fire extinguisher and a first aid kit nearby in case of emergencies.
Staying safe helps you focus on the task and prevents accidents.
Cleaning and Preheating the Bed
Cleaning and heating the bed are important steps before leveling your 3d printer bed. Dust, grease, or leftover plastic can stop prints from sticking. Use a soft cloth to wipe the bed. Remove any old filament or dirt. Next, preheat the bed to the temperature you use for printing. Metal parts expand when heated, which changes the distance between the nozzle and the bed. Leveling at the right temperature gives you better results.
- Clean the bed to remove oils, dust, and old filament.
- Preheat the bed to match your usual printing temperature.
Homing the Printhead
After cleaning and preheating, you need to home the printhead. Homing moves the nozzle to its starting position. This step makes sure the printer knows where the nozzle is. Use your printer’s control panel to select the “Home” or “Auto Home” option. Wait for the printhead to move to the front left corner or center. Now you are ready to start leveling your 3d printer bed.
How to Manually Level a 3D Printer Bed
Leveling your 3D printer bed by hand helps you get strong first layers and smooth prints. You do not need special tools or advanced skills. You only need patience and a few simple steps. Follow this guide to learn how to manually level a 3d printer bed and understand why each step matters.
Locating and Adjusting Bed Screws
You must find the bed screws before you start. Most 3D printers have four screws, one at each corner of the bed. Some models have three or five screws. These screws let you raise or lower the bed at each point. Look under the bed for large knobs or screws. They are usually easy to turn by hand.
Step-by-step process for locating and adjusting the bed screws:
- Turn off your printer and make sure the bed is cool if you have not preheated it yet.
- Look for the screws or knobs under each corner of the bed. Some printers have them in the front, back, or sides.
- If your printer uses software like Klipper, you can set the XY locations of each screw in the configuration file. This helps the printer move the nozzle to each screw automatically.
- Home the printhead so the nozzle knows its starting position.
- Move the nozzle to the first screw location. You can do this using your printer’s control panel or software.
- Place a piece of paper between the nozzle and the bed at the screw location.
- Turn the screw slowly. If you turn it clockwise, the bed moves down. If you turn it counterclockwise, the bed moves up. Adjust until you feel slight friction when moving the paper.
- Repeat this process for each screw. Make sure you visit every corner and the center if your printer has a screw there.
Tip: Always adjust one screw at a time. Do not rush. Small changes make a big difference.
Adjusting the bed screws sets the height of the bed at each point. This step matters because it helps you create a flat surface for printing. If you skip a screw or turn it too much, your bed will tilt and your prints will not stick well.
Using the Paper or Feeler Gauge at Each Corner
You need to check the gap between the nozzle and the bed at every corner. Use a thin sheet of paper or a feeler gauge. The paper method is simple and works well for beginners. The feeler gauge gives more precise results, but you can start with paper.
How to use the paper or feeler gauge:
- Move the nozzle to the first corner of the bed.
- Slide the paper under the nozzle. The paper should fit between the nozzle and the bed.
- Gently move the paper back and forth. You should feel slight resistance. The nozzle should not press hard on the paper, but it should not float above it either.
- If the paper moves too easily, the gap is too wide. Turn the screw to raise the bed.
- If the paper cannot move, the gap is too tight. Turn the screw to lower the bed.
- Repeat this process at each corner. Always use the same piece of paper or the same gauge thickness for every corner.
Note: Using the thinnest material, like regular copy paper, helps you set the correct Z-offset. This makes sure your first layer is even and sticks well.
Checking each corner matters because the bed can bend or tilt. If you only check one spot, you miss problems in other areas. Leveling all corners helps you avoid uneven layers and poor adhesion.
Repeating for Accuracy
You must repeat the leveling process for accuracy. After you finish all corners, go back and check them again. Adjusting one screw can change the height at other points. You may need to go around the bed two or three times.
Why repeating matters:
- The bed can shift as you adjust screws. Each change affects the whole surface.
- Going back to each corner helps you catch small errors.
- You get a more even bed and better print results.
How to repeat for best results:
- After you finish the first round, move the nozzle to each corner again.
- Check the paper or feeler gauge at each spot.
- Make small adjustments if needed.
- Repeat the process until you feel the same slight friction at every corner.
- Some printers let you add extra screw locations for fine tuning. If your printer has this option, use it for high precision leveling.
Tip: Most users need two or three rounds to get a perfectly level bed. Take your time and check every spot.
Repeating the process helps you avoid problems like warping, uneven layers, or prints that do not stick. Beginners often rush this step, but patience leads to better results.
Summary Table: Manual Bed Leveling Steps
|
Step |
What to Do |
Why It Matters |
|---|---|---|
|
Locate bed screws |
Find and identify all screws under the bed |
Sets up for accurate adjustments |
|
Adjust screws |
Turn screws at each corner using paper test |
Levels the bed for even printing |
|
Check with paper/gauge |
Slide paper or gauge under nozzle at corners |
Ensures correct nozzle distance |
|
Repeat leveling |
Go around all corners multiple times |
Improves accuracy and print quality |
Reminder: Always preheat your bed before leveling. Heat changes the shape of the bed and affects the gap between the nozzle and the surface.
You now know how to level a 3d printer bed by hand. This skill helps you get better prints and fewer failures. Practice adjusting the bed and checking all corners. You will see stronger first layers and smoother results.
How to Check Bed Leveling
Signs of a Properly Leveled Bed
You can check if your 3D printer bed is leveled by using a piece of paper. Slide the paper between the nozzle and the bed at each corner. You should feel slight friction when you move the paper. If you do not feel any resistance, the bed sits too low. If the paper cannot move, the bed sits too high. Each screw should apply equal pressure on the paper. This means the bed is flat and ready for printing.
Signs of a properly leveled bed:
- You feel gentle friction when moving paper under the nozzle.
- The paper slides with the same resistance at every corner.
- The nozzle does not press hard or float above the bed.
If the bed is over-leveled, the nozzle presses too hard, making it hard to move the paper. This can scratch the bed or block filament flow. If the bed is under-leveled, the nozzle sits too far away, and the paper moves freely. This causes poor adhesion.
Running a Test Print
After leveling, you should run a bed level test print. This test helps you see if the bed is truly flat and ready for a real project. Always preheat the bed before starting. Use a simple pattern, like a single-layer square or grid.
|
Explanation |
|
|---|---|
|
Check probe accuracy |
Make sure the nozzle touches each spot at the same height. |
|
Adjust Z-offset |
Use the paper method to set the right gap, especially if the nozzle has wear. |
|
Perform tests at print temperature |
Heat the bed to your usual print temperature before testing. |
|
Preheat the bed before printing |
This helps you spot any warping that could affect leveling. |
|
Avoid manual adjustments post-mesh |
Once you finish leveling, do not change screws during the test print. |
A bed level test print shows you if the first layer sticks well and looks even. You should run this test after every manual adjustment.
Inspecting the First Layer
Look closely at the first layer of your bed level test print. You want to see smooth, even lines across the bed. The lines should touch each other without gaps or rough spots. Good adhesion means the lines stay flat and do not lift at the edges. If you see bumps, gaps, or peeling, the bed needs more adjustment.
- Uniform lines show the bed is level.
- Smooth, even lines mean good print quality.
- No lifting or gaps means strong adhesion.
Careful inspection helps you catch problems early. You can fix issues before starting a long print. This step makes sure your 3D printer bed leveling gives you the best results.
Common Bed Leveling Mistakes
Over-Tightening or Loosening Screws
Many beginners struggle with the bed screws. If you tighten screws too much, you risk stripping the holes or making the bed uneven. Loose screws can cause the bed to wobble and ruin your print quality. You should turn each screw gently and stop when you feel slight resistance.
- Stripped holes make it hard to keep the bed level.
- Uneven screws lead to poor adhesion and rough prints.
- Different screw sizes can also cause problems with alignment.
Tip: Use steady hands and check each screw after adjusting. If a screw feels loose or too tight, fix it before printing.
Skipping Preheating or Cleaning
You might want to skip preheating or cleaning to save time, but this can cause problems. A cold bed changes shape when it heats up, so leveling on a cold surface leads to mistakes. Dust and leftover filament stop prints from sticking.
- Delayed heating increases the time needed for printing.
- Uneven heating causes inconsistent coating and poor first layers.
- Moisture or dirt can cause defects in your prints.
Always clean and preheat your bed before leveling. This step helps you avoid wasted time and failed prints.
Missing Bed Corners or Center
Some users only check one or two corners. You need to check all corners and the center for proper 3D printer bed leveling.
- Checking every spot ensures even resistance under the nozzle.
- Good coverage helps your prints stick everywhere.
- Skipping spots leads to weak adhesion and uneven layers.
Move the nozzle to each corner and the center. Test with paper or a gauge at every point.
Rushing the Process
If you rush, you miss small errors that can ruin your print. Take your time and repeat the leveling steps.
- Slow adjustments help you catch mistakes.
- Careful checks give you better results.
- Patience leads to smoother prints and fewer failures.
Leveling takes practice. Go slowly and check your work for the best results.
Troubleshooting Bed Leveling Issues
Nozzle Too Close or Far
You may notice that your first layer looks squished or does not stick at all. If the nozzle sits too close to the bed, the filament spreads out too much and may not extrude properly. This can scratch the bed or block the nozzle. If the nozzle sits too far, the filament will not stick and may look thin or wavy.
To fix this, use the paper method again. Slide the paper under the nozzle at each corner. Adjust the screws until you feel gentle friction. This helps you set the right gap for good 3D printer bed leveling.
Uneven First Layer
Sometimes, your first layer looks uneven. You might see some areas where the filament is squished flat and other spots where it barely touches the bed. This often happens when the bed is not level or the flow rate is not set correctly.
An uncalibrated bed can cause inconsistent surface textures and uneven extrusion. Over-extrusion makes the filament pile up, while under-extrusion leaves gaps. Check your bed leveling at all corners and the center. Make sure the nozzle moves smoothly and the paper test feels the same everywhere.
Bed Warping Solutions
Bed warping can ruin your print. You may see corners lifting or the print peeling off. To reduce warping, try these steps:
- Use a heated bed. Set the temperature for your filament (for example, 60-70°C for PLA).
- Add a brim or raft in your slicer to help prints stick.
- Slow down the first layer speed and use a thicker first layer.
- Level the bed carefully to keep adhesion even.
- Avoid sharp corners in your design to reduce stress.
These steps help you keep your print flat and stuck to the bed.
When to Seek Help
If you keep having problems after careful 3D printer bed leveling, ask for help. You can join online forums or local maker groups. Sometimes, the bed or nozzle may have damage you cannot fix alone. Getting advice from others helps you learn and solve tough problems.
Bed Leveling Maintenance Tips
How Often to Level a 3D Printer Bed
You should check your 3D printer bed leveling often. If you print every day, check the bed once a week. If you move your printer or change the bed surface, check it before your next print. Watch for signs like poor first layer adhesion or uneven prints. These signs tell you it is time to level the print bed again. Running a quick test print helps you spot problems early.
Tip: Make a habit of checking the bed after every few prints. This keeps your printer ready for the next project.
Preventing Bed Movement
A stable bed gives you better prints. You can prevent bed movement by tightening all screws and knobs gently. Do not over-tighten, or you might damage the hardware. Place your printer on a flat, sturdy table. Avoid bumping or moving the printer during or after prints. If your printer has springs under the bed, check them for wear. Replace weak springs to keep the bed steady.
- Tighten screws and knobs gently.
- Use a solid table or desk.
- Check springs for strength.
Note: A steady bed helps you keep your 3D printer bed leveling accurate for longer.
Cleaning and Inspecting Hardware
Clean your nozzle with a dry cotton cloth to remove leftover plastic. Scrape the print bed with a spatula or razor blade to clear off debris. Wipe the bed with a soft cloth before each print. Inspect the screws, springs, and bed surface for damage or wear. Replace any worn parts to keep your printer working well. Regular cleaning and inspection help you avoid print failures and keep your bed level.
- Clean the nozzle and bed before every print.
- Inspect hardware for signs of wear.
- Replace damaged parts as needed.
Keeping your printer clean and well-maintained makes 3D printer bed leveling easier and more reliable.
You can get good 3D prints if you do these things. First, tighten every screw on your printer. Next, adjust the build plate so it sits flat. Then, check the nozzle distance at each corner and in the center. Use an index card to test for a little drag. Practice these steps often. You will get better as you keep trying. Join online groups to find new tips and learn more tricks.
FAQ
How often should you check 3D printer bed leveling?
You should check 3D printer bed leveling before each new print or after moving your printer. Regular checks help you avoid failed prints.
What if your first layer does not stick?
Try cleaning the bed and repeating the paper test. Adjust the screws until you feel gentle friction. Good 3D printer bed leveling improves first layer adhesion.
Can you use any type of paper for leveling?
You can use regular copy paper for 3D printer bed leveling. The paper should slide under the nozzle with slight resistance. Avoid thick or glossy paper.


