


You can set your 3D printer’s flow rate by performing a 3D printer flow rate calibration using a single-wall test cube. Measure the wall thickness and adjust your slicer settings so the wall matches the correct size. The flow rate, also known as the extrusion multiplier, controls how much filament is pushed through the nozzle. If you do not calibrate the flow rate, you may experience under-extrusion or over-extrusion, leading to prints that are not the right size. Here is why this step is crucial:
- 3D printer flow rate calibration is as important as e-steps and Z-offset.
- Regularly checking helps you maintain the correct flow rate and achieve high-quality prints.
This process is quick and significantly improves your print results.
Key Takeaways
- Calibrating your 3D printer's flow rate is important. It helps you get prints that look good and are strong. You should check it often to keep your prints nice.
- Use a single-wall test cube to check wall thickness. Change your slicer settings after you measure the walls. This stops under-extrusion or over-extrusion.
- Always measure filament diameter before you calibrate. Filament size that changes can cause problems. Take a few measurements to make sure you are right.
- Recalibrate your flow rate when you use new filament. Do this if you see your print quality change. This helps your prints stay the same.
- Keep your printer clean and take care of it. Check and clean it often to stop clogs. This helps your flow rate stay correct.
Understanding Flow Rate in 3D Printing
What Is Flow Rate?
You might wonder what flow rate means for your 3D printer. In simple terms, flow rate is how much melted plastic your printer pushes out of the nozzle while it prints. Think of it like squeezing toothpaste from a tube—too much or too little changes the shape on your toothbrush. The printer needs to get this just right for every print.
Technically, flow rate in 3D printing is the volume of molten filament that comes out of the hotend and nozzle over a certain time. You measure this in cubic millimeters per second (mm³/s). When you set up your printer, you control this with the extrusion multiplier or flow setting in your slicer.
- Flow rate tells you how much material passes through a point in a set time.
- In 3D printing, it means the amount of melted filament coming out of the nozzle.
Why Calibrating Flow Rate Matters
Getting the optimal flow rate is key for strong, accurate prints. If you skip flow rate calibration, your prints can turn out messy or weak. You want your printer to lay down the right amount of plastic, so your cube or any other model has the correct size and shape.
Here’s a quick look at why calibrating flow rate matters:
|
Problem Type |
Description |
|---|---|
|
Flow rate setting error |
Overflow or gaps in the print if the setting is wrong. |
|
Oozing Filament |
Too much flow causes extra material to ooze out of the nozzle. |
|
Underextrusion |
Too little flow means not enough material for a solid print. |
If you see blobs, gaps, or rough surfaces, your flow rate might be off. Calibrating flow rate helps you avoid these problems and get the best results from your printer.
Signs of Incorrect Flow Rate
You can spot flow rate issues by looking at your prints. Here are some common signs:
- Over-extrusion: You see blobs, zits, or thick layers on your cube or other prints.
- Under-extrusion: You notice missing layers, weak infill, or gaps in the print.
- Poor surface quality: The print feels rough or uneven.
- Weak structure: The print breaks easily or feels flimsy.
Tip: If your test cube walls look too thick or too thin, check your flow rate settings. Small tweaks can make a big difference.
Understanding the importance of flow rate helps you get better prints and avoid wasted time and filament. With proper flow rate calibration, you set yourself up for success every time you start a new project.
Preparation for 3D Printer Flow Rate Calibration
Getting ready to calibrate flow rate is simple if you have the right things. Let’s go through the steps so you can stop over-extrusion and get good prints.
Tools and Materials Needed
Before you begin, collect these items:
- Digital calipers (to measure filament)
- Filament (the kind you want to use)
- Single-wall test cube file (STL)
- Slicer software (like Cura, PrusaSlicer, or Orca Slicer)
- Your 3D printer
- Notepad or phone (to write down numbers)
You might also use terminal software for more control:
|
Tool |
Purpose |
|---|---|
|
Pronterface |
|
|
Octoprint |
Terminal software for printer control |
Tip: Having everything ready helps you work faster and make fewer mistakes.
Measuring Filament Diameter
Filament diameter can change in different spots. If you skip this, you might get too much or too little plastic in your prints. Here’s how to measure it:
- Pull out about 1 meter of filament and make it straight.
- Use your digital caliper to check the diameter in a few places. Turn the filament a bit each time to be sure.
- Write down each number. Add them all together and divide by how many you took to find the average.
- Put this average into your slicer under filament settings.
- Make sure your caliper works well and be gentle with the filament.
- If your numbers are very different, your filament might have problems.
If the filament size changes a lot, you can get blobs or gaps in your print. Measuring carefully helps your printer use the right amount of plastic.
Slicer Setup Basics
Now, set up your slicer for calibration:
- Open your slicer and pick your printer profile.
- Find the calibration or flow rate tool. In Orca Slicer, go to the Calibration menu and choose Flow Rate.
- Slice the single-wall test cube and save the G-code.
- Print the test cube and get ready to check the wall thickness.
If you do these steps, you can stop over-extrusion and get better prints. Getting ready the right way makes calibration easier and works better.
Step-by-Step Guide to Calibrating Flow Rate
Ready to dial in your 3d printer flow rate calibration? This step-by-step guide to calibrating flow rate will walk you through each part of the process. You’ll use a single-walled test cube to make sure your printer lays down the right amount of filament. Let’s get started!
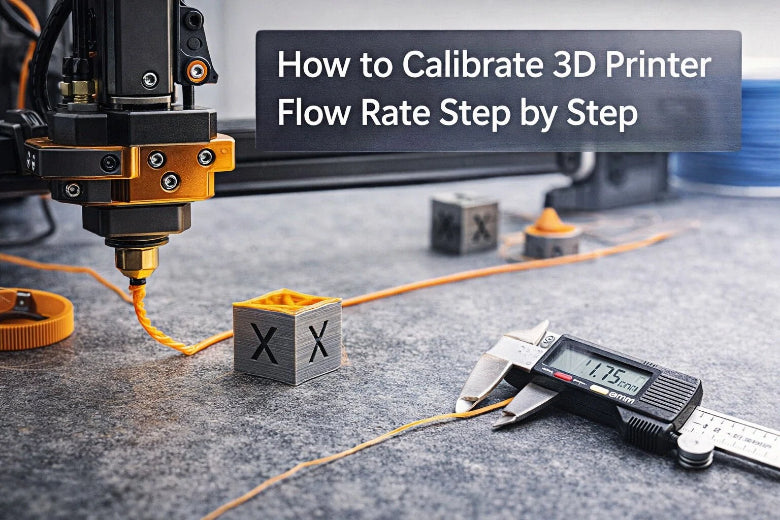
Print a Single-Wall Test Cube
You need a test object to begin flow rate calibration. The single-walled test cube is perfect for this job. Here’s how you set up and print it:
- Download a single-wall test cube STL file. You can find one like the Calibration Cubes by Max on Printables.com.
- Open your slicer software (for example, OrcaSlicer or Cura).
- Set these slicer settings:
- Layer Height: Use your usual setting, such as 0.2mm.
- Perimeters/Wall Loops: Set to 1. Double-check in the preview.
- Top Layers: Set to 0.
- Infill: Set to 0%.
- Vase (Spiralize) Mode: Turn this on if your slicer supports it.
- Line Width (Extrusion Width): Match your nozzle diameter (for example, 0.4mm).
- Print Speed: Use your normal wall speed.
- Initial Flow Rate: Set to 1.0 (100%) in the filament settings.
- Slice the model and send it to your printer.
- Print the cube. Wait for it to cool before removing it.
Tip: Always check your slicer preview to make sure you have only one wall and no infill. This helps you get accurate results for 3d printer flow rate calibration.
Measure Wall Thickness
After your test print finishes, grab your digital calipers. Measuring the wall thickness is the next step.
- Remove the cube gently once it’s cool.
- Measure the thickness at the center of each wall. Avoid corners and the first or last layers.
- Take three measurements per wall, for all four walls.
- Write down your results and calculate the average wall thickness.
Most slicers set the external perimeter thickness to match the nozzle diameter. For example, if you use a 0.4mm nozzle, your target wall thickness should be 0.4mm. If your measured thickness is higher or lower, you need to adjust flow rate.
Note: Measuring in the center of each wall gives you the most reliable numbers. This helps you avoid errors from uneven extrusion.
Calculate and Adjust Flow Rate
Now, you’ll use your measurements to adjust flow rate. Here’s how you do it:
|
Formula Component |
Description |
|---|---|
|
(Expected wall thickness ÷ Average measured wall thickness) × Current flow rate |
|
|
Expected wall thickness |
Usually matches your nozzle diameter (e.g., 0.4mm) |
|
Average measured thickness |
The average from your caliper readings |
Let’s look at a real example:
- Expected wall thickness: 0.4mm
- Average measured thickness: 0.45mm
- Current flow rate: 1.0
Calculation:
New flow rate = (0.4 ÷ 0.45) × 1.0 = 0.89
So, you should set your flow rate to 0.89 (or 89%) in your slicer’s filament profile.
Tip: Most printers work well with flow rates between 0.90 and 1.05. If your number is far outside this range, check your filament diameter and slicer settings.
Reprint and Verify Results
You’re almost done! After you adjust flow rate, print the single-walled test cube again.
- Use the same slicer settings as before, but update the flow rate value.
- Print the cube and let it cool.
- Measure the wall thickness again, just like before.
- Compare your new measurements to the target wall thickness.
If your measured thickness matches the expected value (for example, 0.4mm for a 0.4mm nozzle), your 3d printer flow rate calibration is complete. If it’s still off, repeat the process: adjust flow rate, print, and measure until you get it right.
Callout: When you adjust flow rate and reprint, look for improvements in print quality. You should see better layer adhesion, smoother surfaces, and no gaps in infill. This means your flow rate calibration worked!
You’ve now finished a full flow rate calibration using a single-walled test cube. This process helps you get consistent, high-quality prints every time. Remember to repeat these steps whenever you change filament or notice changes in print quality.
Slicer Notes and Troubleshooting Flow Rate Calibration
Adjusting Flow Rate in Cura
You can easily fine-tune your flow rate in Cura. Here’s a step-by-step guide for adjusting flow rate in slicer software:
- Open Cura and load your test model, like a single-wall cube.
- Set up your printer profile with the right nozzle size and filament temperature.
- Find the Flow setting under Material settings. Set it to 100% (or 1.0) to start.
- Slice your test print and send it to your printer.
- Watch the print closely. Look for smooth layers and good adhesion.
- After the print, measure the wall thickness with calipers.
- If the wall is too thick, lower the flow rate. If it’s too thin, raise it. Adjust in small steps, like 2-3%.
- Repeat the test until the wall matches your nozzle size.
PrusaSlicer and OrcaSlicer have similar steps. Look for the Flow or Extrusion Multiplier setting in the filament section. Always use a test print to check your changes.
Using Bambu Studio Auto-Calibration
Bambu Studio makes calibration easier with its auto-calibration feature. Here’s what happens:
- The printer checks the filament flow at the start of a print.
- It sets Pressure Advance automatically for your material.
- If you use the same filament again, it skips recalibration to save time.
- You get smoother surfaces and sharper corners, even at high speeds.
- Flow Dynamics helps control pressure during fast moves, so you see fewer blobs and cleaner details.
You don’t need to run a separate test. The slicer handles most of the work for you.
Common Calibration Mistakes
You might run into problems during calibration. Here are some common mistakes and how to avoid them:
- Forgetting to write down your test results. Keep notes for each test and setting.
- Skipping regular calibration. Check your flow rate every few months or when you change filament.
- Not cleaning your nozzle. Buildup can cause errors. Clean your printer often.
- Guessing instead of measuring. Always use calipers for accurate results.
- Not learning how your slicer works. Take time to explore the settings in your slicer.
Tip: If your test results seem off, double-check your filament diameter and slicer settings before making big changes.
With these tips, you can solve most flow rate issues and get better prints every time.
Tips and Maintenance for Flow Rate in 3D Printing
Recommended Flow Rate Ranges
You want to start with the right flow rate in 3d printing for each filament type. This helps you avoid problems like under-extrusion or blobs on your prints. Here are some good starting points:
- PLA: 95% to 105%
- PETG: 95% to 105%
- ABS: 95% to 105%
- TPU: Start at 100%. Adjust up or down by 5% if you see under-extrusion or too much plastic.
If you see thin walls, gaps, or weak prints, you might have under-extrusion. If your walls look thick or you see blobs, your flow rate in 3d printing could be too high.
Tip: Always check your slicer’s preview and your test prints. Small changes in flow rate can fix under-extrusion or messy layers.
Keeping Calibration Consistent
You can keep your prints looking great by following a few simple maintenance steps. These help your flow rate in 3d printing stay accurate and prevent under-extrusion.
|
Maintenance Practice |
Description |
|---|---|
|
Regular Inspection |
Look for worn parts or loose connections. |
|
Cleaning |
Clean your nozzle and extruder to stop clogs and under-extrusion. |
|
Monitor Conditions |
Watch your printer’s temperature and humidity. |
|
Record Keeping |
Write down your calibration results and changes. |
|
Software Updates |
Update your slicer and firmware for better performance. |
|
Training |
Learn about your printer’s best practices. |
Note: Dust, old filament, or a dirty nozzle can cause under-extrusion. Clean your printer often to avoid these problems.
When to Recalibrate
You should recalibrate your printer’s flow rate if you want strong, accurate prints. Here’s when you need to do it:
- Every time you start a new roll of filament, even if it’s the same brand and color.
- After you change the nozzle.
- When you adjust the printing temperature or speed.
- If you dry your filament and want to use it again.
- When you see under-extrusion, weak prints, or wrong sizes.
Environmental changes can also affect your results. Humidity and temperature shifts can change how your filament flows. If your workshop gets hot or damp, check your calibration more often.
Callout: If your prints are not strong or the size is off, under-extrusion might be the cause. Recalibrate to fix these issues fast.
By following these tips, you can avoid under-extrusion and keep your 3D prints looking sharp. Regular checks and small adjustments make a big difference.
When you calibrate your 3D printer’s flow rate, your prints get stronger and look better. You also use less filament and save time. This means you throw away less material and have fewer failed prints. If you calibrate often, your results stay the same, even when you change filament types.
“It’s a good idea because small changes in the filament can change how it flows.”
Once you finish flow rate calibration, you can try tuning pressure advance or changing the temperature to make your prints even better.
|
Next Steps |
Why It Matters |
|---|---|
|
Pressure advance tuning |
Makes corners smoother and details sharper |
|
Temperature adjustment |
Helps filament flow better and improves prints |
If you keep calibrating, your prints will get better every time! 🚀
FAQ
How often should I calibrate my 3D printer’s flow rate?
You should calibrate flow rate every time you switch filament brands or types. If you notice print quality changes, recalibrate. Regular checks every few months help keep your prints looking sharp.
What if my test cube wall thickness is never correct?
Check your filament diameter again. Make sure your slicer settings match your nozzle size. Clean your nozzle. Try a new test print. Small errors can add up, so double-check each step.
Can I use the same flow rate for all filaments?
No, you should not. Each filament type and brand can need a different flow rate. For example, PLA might use 98%, while PETG could need 102%. Always test and adjust for best results.
What tools do I need for flow rate calibration?
You need digital calipers, a single-wall test cube file, your slicer software, and your 3D printer. A notepad helps you track numbers. These tools make calibration easy and accurate.
Does flow rate affect print strength?
Yes! If your flow rate is too low, prints can be weak and break easily. Too high, and you get blobs or rough surfaces. Calibrating flow rate gives you strong, smooth, and reliable prints.


