


You can set how fast your printer’s head turns with jerk settings. Jerk is the sudden speed change when your printer moves. Changing jerk can make prints look better and keep the printer steady. 3d printer jerk settings explained: changing jerk helps you print quicker and stops issues like weak layers sticking together.
Key Takeaways
- Changing jerk settings can make prints look better. It helps stop problems like ringing and ghosting. If you use lower jerk values, prints come out smoother.
- You need to find the best jerk setting. It should balance speed and quality. Higher jerk speeds make prints faster. But they can also make surfaces rough.
- Lower jerk settings put less stress on your printer. This helps your printer last longer. It also makes it work more quietly.
3D Printer Jerk Settings Explained
What Is Jerk in 3D Printing?
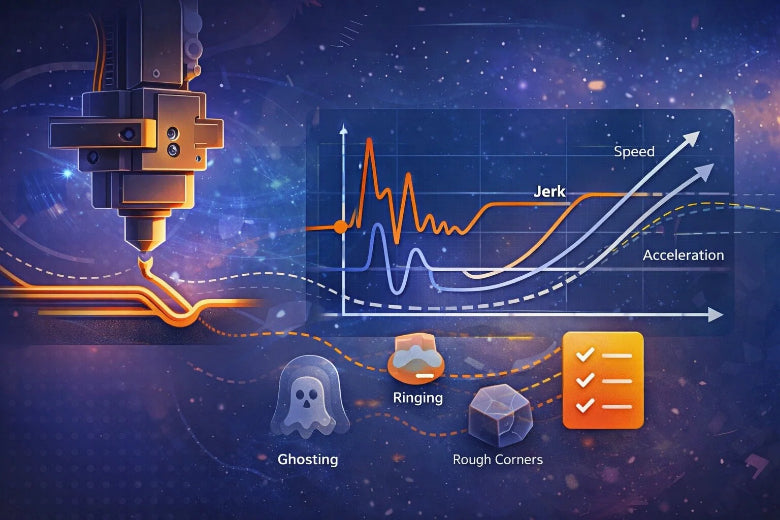
You might wonder what jerk means when you see it in your printer’s menu or firmware. Jerk is a technical term that describes how quickly your printer’s head can change direction or speed. In 3d printer jerk settings explained, jerk is the sudden shift in speed that happens when your printer moves from one direction to another. You set jerk in millimeters per second (mm/s), and it tells your printer how fast it can switch directions without stopping completely.
When you adjust jerk settings, you control the threshold for these quick changes. If you set a higher jerk value, your printer’s head will snap into new directions faster. If you set a lower jerk value, the movement will be smoother and slower. Jerk is not just about speed; it is about how quickly the printer can change its acceleration. This matters because every time your printer’s head turns a corner or starts a new line, it uses jerk to decide how fast it can make that change.
Tip: Jerk settings help your printer avoid stopping at every corner, which can make prints smoother and faster.
In technical terms, jerk is the rate at which acceleration changes. It is a key part of motion control in 3d printers. When you set jerk, you tell your printer how much sudden movement it can handle. This affects how your prints look and how your printer performs over time.
Jerk vs Acceleration and Speed
You may see jerk, acceleration, and speed listed together in your printer’s settings. These three terms work together, but each one controls a different part of your printer’s movement. Here is how they compare:
- Speed (Velocity): This is how fast your printer’s head moves at any moment. You set speed in mm/s. Speed controls the overall pace of printing.
- Acceleration: This is how quickly your printer’s head can change its speed. Acceleration is like the slope of a ramp; it tells your printer how fast it can go from slow to fast or vice versa.
- Jerk: This is the rate at which acceleration itself changes. Jerk settings decide how quickly your printer can switch from one acceleration value to another, especially when changing direction.
Let’s look at a practical example. Imagine your printer is drawing a square. At each corner, the head must stop moving in one direction and start moving in another. If you set a high jerk value, the printer will snap around the corner quickly. If you set a low jerk value, the printer will slow down more before turning. Acceleration controls how fast the printer speeds up or slows down between straight lines. Speed controls how fast the printer moves along each line.
Note: In 3d printer jerk settings explained, jerk is the setting that makes the biggest difference when your printer changes direction. Acceleration and speed matter most when your printer is moving in a straight line.
Here is a simple table to help you see the differences:
|
Setting |
What It Controls |
Example in Printing |
|---|---|---|
|
Speed |
Movement pace |
How fast the head moves |
|
Acceleration |
Rate of speed change |
How quickly the head speeds up or slows down |
|
Jerk |
Rate of acceleration change |
How quickly the head snaps into a new direction |
When you tune jerk settings, you balance speed and acceleration to get the best results. If you set jerk too high, your printer may shake or make rough movements. If you set jerk too low, your prints may take longer and corners may look rounded.
Why Jerk Settings Matter
Jerk settings play a big role in how your prints turn out. When you use 3d printer jerk settings explained, you can see the impact on print quality, machine stability, and even noise levels. Here are some reasons why jerk settings matter:
- Print Quality: If you set jerk too high, you may see unwanted lines, ringing, or ghosting on your prints. These artifacts happen because the printer’s head moves too quickly when changing direction. Lower jerk settings can make prints smoother and reduce these problems.
- Mechanical Stability: High jerk settings put more stress on your printer’s belts, motors, and frame. This can cause vibrations, loose parts, or even damage over time. Lower jerk settings help your printer last longer by reducing strain.
- Noise: When you set jerk too high, your printer may make loud snapping or shaking sounds. Lower jerk settings make your printer run quieter.
Users have found that adjusting jerk settings can fix issues like vertical lines or rough surfaces. If you notice ringing or ghosting on flat surfaces, lowering your jerk settings may help. Mastering jerk settings can reduce artifacts and improve print quality. Proper jerk settings also help prolong the life of your printer by reducing mechanical stress.
Tip: Understanding and adjusting jerk settings is crucial for getting high-quality prints. When you optimize jerk, your prints look better and your printer works more smoothly.
Jerk Settings and Print Quality
Jerk settings are important for how your 3d printers work. When you change jerk, you change how fast the printer’s head turns. This affects how smooth the prints look and how sharp the corners are. It also changes how much your printer shakes, how loud it is, and how long it lasts. Let’s see how jerk settings change print quality and accuracy.
Surface Finish and Corner Sharpness
You want your prints to look smooth and have sharp corners. Jerk settings help with both. If jerk is too high, the printer’s head turns very fast. This can make the surface look wavy or bumpy. If jerk is too low, the printer slows down at corners. This can make corners look swollen or not sharp.
- Jerk speed decides how fast the printer turns, which helps with sharp corners.
- Higher jerk speed helps the printer turn better, so corners look nicer.
- Lower jerk speed makes printing slower and can hurt corner quality.
- Setting jerk at 10 mm/s helps the printer move smoothly.
- Lower jerk settings can fix ghosting or wavy lines.
You need to find the right balance. If you want smoother prints, lower the jerk. If you want sharper corners, raise jerk a little. The highest jerk speed affects ringing more than acceleration. Changing jerk is a trade-off between less ringing and sharp corners.
Tip: If you see swollen corners or rough edges, change jerk settings a little. Print a test cube and look at the corners and surfaces. You will see how jerk changes print quality and accuracy.
Ringing, Ghosting, and Vibrations
Ringing and ghosting are common problems in 3d printing. You see these as lines or shadows near sharp turns. Jerk settings affect these problems a lot.
|
Evidence Type |
Findings |
Recommendations |
|---|---|---|
|
Study by The 3D Print General |
Jerk and acceleration settings change ghosting and ringing |
Lower jerk to 8-10mm/s and acceleration to 1500mm/s² to fix problems |
If jerk is too high, the printer’s head moves too fast at corners. This causes shaking that shows up as ringing or ghosting. Lower jerk settings help stop these problems. You get smoother prints and better accuracy.
- Jerk control helps fix surface problems by making speed changes smoother.
- Smoother turns mean fewer bumps or dents.
- Lower jerk settings make less shaking and noise.
- Good jerk settings lower impact forces, so your printer lasts longer.
You can change acceleration and jerk together to help your printer move smoothly. This lowers shaking and makes prints look better. If you see ghosting or ringing, lower jerk and print a test object. You will see better print quality.
Mechanical Stress and Noise
Jerk settings do more than change how prints look. They also change how your printer sounds and how long it lasts. Fast moves with high jerk make more shaking and noise. Your printer may rattle or make loud snaps. Smoother moves from lower jerk make less shaking and quieter printing.
- Lowering print speed and acceleration can make printing quieter.
- Smoother moves mean less rattling and shaking.
- Lower jerk settings lower stress on belts, motors, and frames.
Bad jerk settings can cause sudden moves and turns. This makes more shaking and can wear out your printer’s parts. When you change jerk settings, you help your printer move smoothly. This lowers the chance of damage and helps your printer last longer.
Note: If your printer is loud or shakes while printing, check jerk settings. Lowering jerk can make your printer quieter and last longer.
You want your printer to work well and your prints to look good. By tuning jerk settings, you get better print quality, accuracy, and help your 3d printers last longer. You also get smoother prints and a quieter workspace.
Tuning Jerk Settings for Optimal Results
Recommended Jerk Ranges
You want your 3d printers to make good prints. First, check what jerk values work best. Most people use these jerk settings:
|
Aspect |
|
|---|---|
|
Print Jerk |
8-20 |
|
Travel Jerk |
10-30 |
|
Infill Jerk |
10-25 |
|
Wall Jerk |
8-15 |
|
Top/Bottom Jerk |
8-15 |
High jerk values make printing faster. But they can cause lines or wear out your printer. Low jerk values slow down printing. They help prints look smoother and make less noise. Try to pick jerk values that balance speed and quality.
Adjusting Jerk in Firmware and Slicers
You can change jerk settings in firmware or slicer programs. Marlin lets you set jerk in its files. Klipper gives more options for advanced users. For slicers like Cura, PrusaSlicer, and OrcaSlicer, do this:
- Open your project in the slicer.
- Go to Preferences or Printer Settings.
- Look for Speed settings and find jerk and acceleration.
- Set jerk between 5 and 20 mm/s for quieter prints.
Tip: You can use Pronterface or Octoprint to change jerk with G-code.
Troubleshooting Jerk-Related Issues
Bad jerk settings can cause problems. High jerk makes prints rough and noisy. Low jerk slows down prints and makes corners round. Watch for these signs:
- Printer moves in a jerky way
- Extrusion is not steady
- Commands take longer to process
- Printer shakes or makes loud sounds
If you see these problems, change jerk settings again. Raise jerk for sharper corners and faster prints. Lower jerk for smoother surfaces and less noise. Good jerk settings help you get better prints and make your printer work well.
Advanced Jerk Settings Tips
Balancing Jerk, Acceleration, and Speed
You can make prints look better by balancing jerk, acceleration, and speed. Start by changing slicer settings a little at a time. Print something small and see how it looks. Use adaptive layers to print faster on easy parts. Slow down for detailed spots. Many people use acceleration at 3000 mm/s² for X and Y axes. They set jerk close to 10 mm/s. This helps stop problems and keeps prints smooth.
- Change one setting at a time and check print quality.
- Higher acceleration helps your printer reach top speed faster.
- Jerk control makes direction changes smoother and reduces surface flaws.
Customizing for Materials and Printers
Different printers and materials need different jerk settings. Heavy parts or flexible filaments need lower jerk to stop warping or missed steps. Keep Z-axis jerk low to avoid wobble. The table below shows how each setting affects your print:
|
Concept |
Units |
Impact on Print |
|---|---|---|
|
Jerk |
mm/s |
Makes corners sharper |
|
Acceleration |
mm/s² |
Makes movement smoother |
|
Material Compatibility |
N/A |
Helps layers stick |
- Lower jerk helps stop shaking and lowers print flaws.
- Higher jerk turns faster but can shake heavy parts.
- Material compatibility changes how much jerk a part can take.
Best Practices and Community Advice
Many people share jerk setting tips in forums. You can learn from their advice and stories. Some say PrusaSlicer handles jerk in a special way. Firmware with Junction Deviation may change results. The same settings can look different in other slicers.
"I printed a big moneybox using over 1KG filament. I did not change jerk or acceleration. You do not need to worry about this."
The community says to start with jerk values between 120 and 250 for good results. Lower values can slow prints and make corners bulge. Higher values may cause ringing and round corners. Always test your settings with a small print before making something big.
You can make your prints look better by changing jerk settings. This also helps your printer last longer. Try out different jerk values and see what happens to your prints.
When you learn how to set Velocity, Acceleration, and Jerk/Junction Deviation, your prints will have fewer problems. You will see less blobs and lines. Your print quality will get better.
Keep trying new settings and keep learning. This helps you get the best prints.
FAQ
What happens if you set jerk too high?
You may see ringing, ghosting, or rough surfaces. Your printer can shake more and make loud noises. Lower jerk settings help prevent these problems.
How do you know if your jerk settings are too low?
You might notice rounded corners or slow print times. Your printer may pause at sharp turns. Try raising jerk a little and check your results.
Do you need to change jerk settings for every print?
No, you do not need to change jerk settings every time. You should adjust them only if you switch materials or see print quality issues.


