


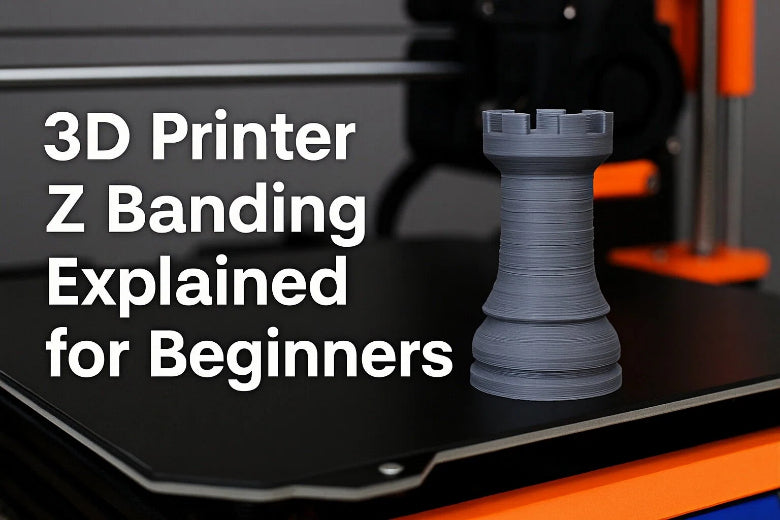
You may notice lines or ridges on your prints that look uneven or wavy. This common issue is called z banding. When 3D printer Z banding appears, it can make your printed objects look rough and less professional. You can understand the cause and fix it with simple steps.
Key Takeaways
- Z banding looks like lines or bumps on 3D prints. It happens when layers do not line up right during printing.
- Regular care is very important. Clean and oil the Z-axis and lead screw to stop problems that make Z banding happen.
- Change slicer settings for better prints. Make layer height fit the nozzle size. Check extrusion settings so filament comes out the same each time.
What is 3d printer Z banding
How Z banding looks on prints
When you use your 3D printer, you might see bumpy patterns or lines on your print. These lines look like ridges that repeat over and over. If you print a cylinder, you may see rings or bands around it. This problem makes the surface rough and not smooth. Z banding can show up on small prints and big prints. It is easier to notice on flat or smooth surfaces.
Tip: You can feel the raised bands if you touch the print. These bands can make your model look less neat.
Z banding vs Z wobble and other defects
You might mix up z banding with other problems like z wobble. Here is how you can tell the difference:
- Z banding looks like horizontal lines or bands from layers not lining up.
- Z wobble makes wavy or zigzag lines because of Z axis problems.
- Other defects, like layer shifting or ghosting, look different and do not make regular bands.
|
Defect Type |
Appearance |
Common Cause |
|---|---|---|
|
Z banding |
Horizontal bands or ridges |
Layers not lining up |
|
Z wobble |
Wavy or zigzag lines |
Z axis mechanical trouble |
|
Layer shifting |
Sudden step or offset |
Motor or belt problems |
Why beginners misidentify Z banding
You might think z banding is another surface problem. Many beginners believe any line or bump is z wobble or a slicer mistake. You should check if the bands are even and match the layer height. If the lines repeat in the same way, it is probably z banding. Looking closely helps you find the real problem and fix it faster.
- Z banding means there are horizontal lines or bands on your print.
- This happens when layers do not line up right during printing.
- Z banding is not the same as z wobble, which is a problem with the printer’s Z axis.
Causes of Z banding
Mechanical issues with Z axis
You may find that z banding often starts with mechanical problems. If your Z axis is not straight or has loose parts, your printer cannot move smoothly. You should check for bent rods, dirty bearings, or misaligned rails. Dirt or dust can block smooth movement. You can clean the bearings with a soft cloth. If you see wobbling or shaking, you may need to tighten the frame or adjust the rails. Leaving the coupler screws slightly loose can help the lead screw move without stress.
Tip: Always check for any play or movement in the Z axis before you start a print.
Lead screw and coupler problems
The lead screw helps your printer move up and down. If it is bent or dirty, you will see z banding on your prints. You should make sure the lead screw is straight and clean. If the coupler that connects the motor to the lead screw is too tight, it can cause binding. You can loosen the coupler screws just a little to let the lead screw self-align. This simple step can fix many z wobble and z banding issues.
Extrusion and temperature inconsistencies
Inconsistent extrusion can cause z banding. If your printer does not push out the same amount of filament each time, you will see lines or bands. You can:
- Calibrate your flow rate and temperature to match the filament.
- Set your outer wall speed to 40-60mm/s for better results.
- Use an outer wall acceleration of 3000mm/s².
- Lower the temperature to 210°C if you see rough bands.
You should use a spool holder to keep filament feeding smooth. These steps help you get consistent extrusion and reduce this 3d printing defect.
Slicer settings and layer alignment
Your slicer settings can also cause z banding. If your layer height does not match the nozzle size, you may see bands. You can:
- Adjust layer height for better surface quality.
- Choose the right nozzle size for your print.
- Calibrate extrusion settings for the correct amount of filament.
- Turn on smoothing features in your slicer to reduce visible bands.
You should always check your slicer settings before you start a new print. Careful setup helps you avoid z wobble and other problems in 3d printing.
Diagnosing and fixing Z banding
When you see lines or bands on your 3D prints, you need to find the cause and fix it. You can follow these steps to diagnose and repair z banding. This guide will help you check your printer, adjust settings, and solve this 3d printing defect.
Visual inspection steps
Start by looking closely at your print and your printer. You can spot many problems with your eyes and hands.
-
Check the print surface
Look for horizontal bands or ridges. Feel the surface with your fingers. If you notice regular lines that match the layer height, you may have z banding. -
Inspect the Z axis movement
Watch your printer as it moves up and down. The Z axis should move smoothly. If you see shaking or hear grinding noises, you may have a mechanical issue. -
Examine the lead screw
Look at the lead screw while the printer moves the Z axis. If the screw wobbles or bends, it can cause z banding. You can use the Control menu to move the Z axis slowly and watch for any movement in the bearing housings. If the housings move, the lead screw may be bent.
Tip: Use a flashlight to see small details. Clean dust and debris before you inspect.
Mechanical checks and adjustments
Mechanical problems often cause z banding. You can fix many issues with simple tools and careful steps.
Step-by-step guide to check and fix mechanical issues:
-
Check for loose screws and frame parts
Use a screwdriver to tighten all screws on the printer frame, especially around the Z axis. Do not overtighten. Leave the coupler screws slightly loose so the lead screw can self-align. -
Test the lead screw for straightness
Remove the lead screw and roll it on a flat surface. If it does not roll smoothly, it may be bent. Replace it if needed. -
Clean and lubricate bearings and rods
Wipe the Z rods and bearings with a soft cloth. Add a small amount of lubricant to help the axis move smoothly. -
Check the Z axis rails and alignment
Make sure the rails are straight and parallel. Misaligned rails can cause z wobble and z banding. -
Inspect the coupler and motor connection
Loosen the coupler screws slightly. This helps the lead screw move without stress and reduces binding. -
Observe bearing housings during movement
Move the Z axis from top to bottom using the Control menu. Watch the bearing housings. They should stay still. If they move, you may have bent leadscrews or misaligned parts.
Note: Many users fix z banding by loosening and retightening the screws that attach the plate to the Z rods after several hours of use.
Common mistakes and precautions
- Do not overtighten screws. This can cause binding and stress.
- Do not ignore dust or debris. Clean your printer regularly.
- Do not skip alignment checks. Misalignment leads to z wobble and z banding.
- Do not forget to check the lead screw after moving the printer or after long prints.
Slicer and software tweaks
Sometimes, slicer settings cause z banding. You can adjust these settings to improve your prints.
|
Effect on Z Banding |
|
|---|---|
|
Turn off Lift-Z option |
May help reduce Z banding |
|
Extrusion multiplier 0.9 |
Reduces horizontal layers slightly |
|
Extrusion multiplier 0.8 |
Almost eliminates visible layers |
You can open your slicer software and check these options:
-
Turn off the Lift-Z option
This setting lifts the nozzle between moves. Turning it off can help reduce z banding. -
Adjust extrusion multiplier
Lower the extrusion multiplier to 0.9 or 0.8. This reduces the amount of filament and makes layers smoother. -
Match layer height to nozzle size
Set the layer height to match your nozzle diameter. This helps layers line up and reduces bands. -
Calibrate extrusion settings
Test your printer with different flow rates. Find the setting that gives you consistent extrusion. -
Use smoothing features
Some slicers have options to smooth the outer walls. Turn these on for better surface quality.
Tip: Always save your slicer profile after making changes. Test with a small print before starting a big project.
Advanced troubleshooting tips
If you still see z banding after basic fixes, you can try these advanced steps:
- Move the Z axis using the Control menu and watch the bearing housings. If they move, check for bent leadscrews.
- Loosen and retighten the screws that attach the plate to the Z rods. Many users find this solves z banding after long use.
- If you have tried changing belts, screws, and firmware but still see z banding, focus on mechanical alignment and lead screw straightness.
- Downgrading firmware or changing slicer software does not always fix z banding. Mechanical issues are more common causes.
Note: Consistent extrusion is key to solving many 3d printing defects. Always calibrate your printer and check filament quality.
Common mistakes in advanced troubleshooting
- Do not skip mechanical checks when software tweaks do not work.
- Do not replace parts before checking alignment and movement.
- Do not ignore small movements in bearing housings. These can show hidden problems.
Summary of diagnosis and repair steps
You can fix 3d printer z banding by following these steps:
- Inspect your print and printer for visible bands and movement.
- Check and adjust mechanical parts, including lead screw, coupler, and bearings.
- Clean and lubricate moving parts.
- Adjust slicer settings for better layer alignment and extrusion.
- Try advanced troubleshooting if basic fixes do not work.
You can solve most z banding problems with careful inspection and simple adjustments. You will see smoother prints and fewer defects in your 3d printing projects.
Preventing Z banding
Maintenance routines
You can keep your printer working smoothly by following regular maintenance routines. Clean the Z-axis linear rod with a non-woven cloth. Move the cloth up and down to wipe away dust and debris. Use the same motion to clean the lead screw. Apply lubricant oil to the linear rod and use lubricant grease for the lead screw. Do not mix oil and grease. Check and lubricate the lead screw every three months. Choose recommended greases like Super Lube 92003 Silicone Lubricating Grease with PTFE or Lucas Oil 10533 White Lithium Grease. Use the oil from your accessory kit or buy it from the official website.
Delta printers need maintenance every 400 hours. Cartesian printers require it every 250 hours. Delta printers have a stable design, so they show less z banding. Cartesian printers are more likely to develop this issue because of their mechanical structure.
Daily checklist for Z axis
You can prevent 3d printer z banding by checking your printer before each print. Use this simple daily checklist:
- Inspect the Z axis rods and lead screw for dust or dirt.
- Make sure all screws on the frame and Z axis are snug, but not overtightened.
- Watch the Z axis move up and down. Look for smooth movement and listen for grinding sounds.
- Confirm the coupler screws are slightly loose to avoid z wobble.
- Check the alignment of rails and rods.
Tip: A quick check each day helps you catch problems early and keeps your 3d printing projects looking great.
Avoiding common mistakes
Many beginners make mistakes that lead to z wobble or poor print quality. You should avoid these errors:
- Do not skip cleaning and lubrication.
- Do not overtighten screws, which can cause binding.
- Do not ignore misalignment in the frame or rails.
- Do not mix lubricant oil and grease.
- Do not forget to check the coupler screws after moving the printer.
|
Mistake |
Result |
|---|---|
|
Skipping cleaning |
Increased z banding |
|
Overtightening screws |
Z wobble |
|
Mixing lubricants |
Poor lubrication |
You can prevent most issues by following these routines and checks. Consistent care helps you avoid 3d printer z banding and keeps your prints smooth.
You can make your 3D prints look nicer by fixing Z banding. Prints with clean layers look smoother and work well. Smoother layers mean you see fewer problems. Your prints will look better, and you will feel proud. You can fix Z banding by changing how fast the printer moves and checking extrusion. Doing these easy steps helps a lot. If you check and take care of your printer often, your prints will keep looking good.
FAQ
What causes Z banding on my 3D printer?
You often see Z banding from bent lead screws, loose couplers, or dirty rods. Poor slicer settings and inconsistent extrusion also cause Z banding.
How do I fix Z banding quickly?
You can clean and lubricate the Z axis, check for loose screws, and adjust your slicer settings. These steps help you get a fast Z banding fix.
Can slicer settings affect Z banding?
Yes. Wrong layer height, high extrusion multiplier, or Lift-Z settings in your slicer can cause Z banding. You should match layer height to nozzle size.


