


This guide is built for comparison-mode readers: dry boxes vs active dryers vs dehydrators vs ovens vs DIY cabinets, plus a few proven ways to combine them into a system that scales.
Key Takeaway: For bulk setups, the most reliable pattern is batch dry (heat + airflow) → sealed storage (low humidity) → print-from-dry for long jobs.
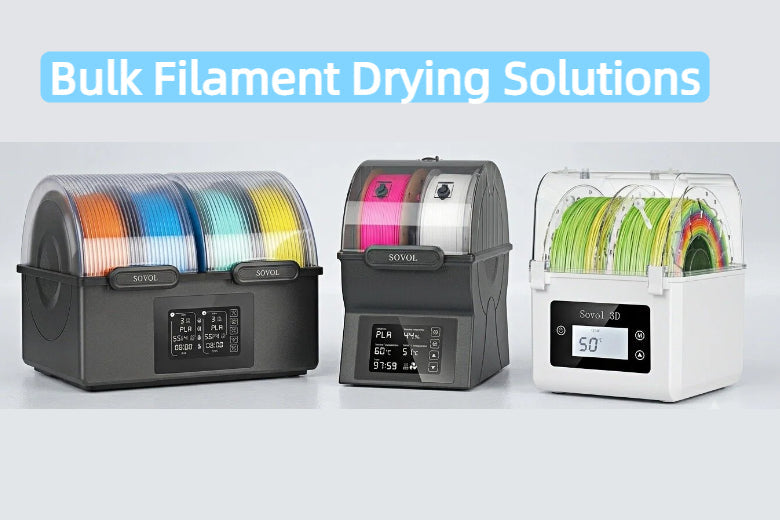
Drying vs storage (and why most “dry boxes” disappoint)
Let’s define the two jobs clearly:
- Drying = removing moisture that’s already inside the filament. This needs heat and usually airflow so water can leave the polymer and exit the chamber.
- Storage = preventing the filament from re-absorbing moisture. This needs an airtight container, a humidity indicator, and typically desiccant.
A lot of frustration comes from expecting storage to do drying. A sealed box with desiccant is great at keeping dry filament dry—but it’s often slow at pulling a truly wet spool back to “like new.”
If you want a deeper primer on when you should bother drying at all, Sovol’s overview is a good starting point: Do You Need a Filament Dryer for Your 3D Printer.
The evaluation criteria that matter for bulk (10–30 spools)
When you’re comparing methods, ignore the marketing and grade everything against these criteria:
- Throughput: how many spools per cycle, and how long a cycle realistically takes.
- Temperature control: can you set and hold a safe drying temperature (not just “warm-ish”)?
- Airflow path: does air actually move around the spool(s), or is it mostly stagnant heat?
- Risk profile: hot spots, overheating, spool deformation, DIY wiring risk, and “set-and-forget” safety.
- Storage integration: can you move spools from drying to low-humidity storage without re-wetting them?
- Workflow friction: how annoying is it to load/unload/route filament, especially when you’re rotating materials?
Comparison matrix: bulk filament drying solutions (what each is good at)
If you’re searching for a clean summary of dry box vs filament dryer tradeoffs, start here—then use the “recipes” later in this guide to scale it up to 10–30 spools.
|
Option |
Best at |
Capacity reality for 10–30 spools |
Pros |
Cons / red flags |
|---|---|---|---|---|
|
Passive dry box (airtight + desiccant) |
Storage |
High (cheap per spool) |
Simple, scalable, great “inventory parking” |
Slow at fixing truly wet filament; needs periodic desiccant maintenance |
|
Print-from dry box (feed-through) |
Keeping an in-use spool dry during long prints |
Low (usually a few spools) |
Prevents re-absorption mid-print; tidy workflow |
Not a high-throughput dryer; can give false confidence if spools started wet |
|
Active filament dryer (purpose-built heater + fan) |
Drying a small batch reliably |
Low–medium (often 1–4 spools/unit) |
Predictable, easiest “just works” path |
Scaling to 20 spools usually means multiple units or long queues |
|
Food dehydrator |
Bulk batch drying on a budget |
Medium (depends on model + spool fit) |
Great value per spool; airflow is the point |
Temperature accuracy varies; dedicate it to filament (not food). This “food dehydrator filament drying” approach works best when you verify real chamber temperature with a probe thermometer. |
|
Household oven |
“I need this dry today” batch drying |
Medium (physical space) |
Convenient, no extra device |
Highest overshoot/hot-spot risk; don’t trust the dial—verify temperature |
|
DIY heated cabinet |
Long-term scalable drying + storage if built well |
High (the whole point) |
Most scalable; can be tailored (shelves, sensors, routing) |
Safety depends on design; avoid flammables, poor wiring, blocked airflow |
A note on terminology: some makers use “filament dry cabinet” to mean an electronic dehumidifying storage cabinet (great for keeping spools dry), while others mean a heated, forced-air drying cabinet (great for batch drying). This article covers both ideas—just pay attention to whether the solution is primarily drying (heat/airflow) or storage (low humidity).
If you want a broader overview of methods (including oven/dehydrator/dry-box basics), Sovol’s roundup is a useful companion: 5 Proven Methods to Dry Wet Filament for Better 3D Printing.
Material-aware drying temperature guidance (PLA, PETG, ABS/ASA, TPU)
Two important rules before you pick a number:
- Always defer to the filament manufacturer when available. Brand-to-brand additives change how forgiving a spool is.
- Spool deformation is real. Even if a filament can tolerate heat, the spool might not.
Below are practical ranges from widely used references. Bambu Lab publishes a detailed, material-specific table in Dry Filament (Bambu Lab Wiki). 3devo also provides a straightforward comparison table in How To Dry Filament for 3D Printing (3devo).
|
Material |
Conservative bulk-drying range (typical) |
What to watch for |
|---|---|---|
|
PLA / PLA+ |
~40–55°C |
Too hot can soften/warp filament or the spool; if you see oval filament or “sticky” wraps, back off and verify chamber temperature |
|
PETG |
~50–65°C |
PETG can still print “okay” while wet but string like crazy; prioritize storage after drying |
|
ABS / ASA |
~65–85°C |
Higher temps are common; risk shifts to spool materials and uneven heating—forced-air convection helps stability |
|
TPU |
wide variation; start low and verify |
TPU behavior differs a lot by formulation; overheating risks deformation—use gentler settings first and extend time |
Siraya Tech’s guide also emphasizes staying below glass-transition temperatures and calls out practical storage practices after drying in How to Dry 3D Printer Filament at Home (Siraya Tech).
⚠️ Warning: Don’t trust a dial. For ovens, dehydrators, and DIY cabinets, measure the real chamber temperature with an independent thermometer or probe—especially for PLA.
Three bulk setup “recipes” (pick the one that matches your life)
These are intentionally brand-agnostic. The goal is repeatable results, not gadget collecting.
Recipe 1: Minimal but effective (best value)
Use this if: you want to dry a lot of spools without buying multiple filament dryers.
- Drying tool: a convection-style food dehydrator (forced air) that can fit multiple spools. This “food dehydrator filament drying” approach is popular because you get real airflow and decent throughput without buying several small dryers.
- Storage: 1–2 large airtight bins or a gasketed cabinet with shelves.
- Monitoring: a few cheap hygrometers (one per bin/cabinet zone).
- Moisture control: rechargeable desiccant (with a clear “recharge me” indicator).
Workflow:
- Batch dry the week’s “active” spools.
- Move them straight into airtight storage with fresh desiccant.
- Only pull a spool out when it’s going onto a printer.
Recipe 2: Modular workflow (least hassle day-to-day)
Use this if: you rotate materials often and hate digging through bins.
- Drying tool: 1–2 active filament dryers (small batch) for “I need this now.”
- Storage: a cabinet-style dry storage zone (bins, drawers, or a sealed cabinet).
- Printing: 1 print-from dry box per printer (or per “long print” machine).
Workflow:
- Storage cabinet = your inventory.
- Active dryer = your “prep station.”
- Print-from dry box = your “execution station.”
This setup tends to feel clean and repeatable: prep, store, print.
Recipe 3: Bulk-first cabinet (best for serious volume)
Use this if: you really do keep 20–30 spools “live” and want one system.
A sealed cabinet with:
- shelves that leave space between spools,
- humidity monitoring,
- desiccant capacity sized for the cabinet volume,
- optional gentle active drying capability (only if you can control temperature safely and evenly).
The cabinet approach wins on capacity, but only if you treat safety and temperature control like an appliance, not a weekend wiring experiment.
For a simple DIY dry-box approach (more storage than aggressive drying), Sovol’s walkthrough is a reasonable reference: How to Build an Efficient Filament Dryer Box with Budget-Friendly Materials.
A weekly routine that keeps 10–30 spools print-ready
This is the part most guides skip.
Step 1: Sort spools by “risk,” not by color
Make three zones:
- Zone A (high risk): TPU and anything that has been left out, plus spools that have failed recently.
- Zone B (medium risk): PETG and ABS/ASA you print often.
- Zone C (low risk): PLA you use quickly and store well.
Step 2: Dry in batches, then store immediately
If you dry a spool and then leave it sitting on a shelf for days, you’re paying for heat to undo what ambient humidity will redo.
Step 3: Print long jobs from a dry feed path
If your prints run overnight (or longer), the “during printing” moisture pickup can matter as much as the initial drying.
Step 4: Don’t guess—watch for symptoms
Wet filament often shows up as:
- audible popping/hissing at the nozzle,
- inconsistent extrusion,
- rough surfaces and extra stringing,
- weaker layer bonding than you expect.
When these symptoms appear, treat it as a workflow signal: either the spool wasn’t dried enough, or your “post-dry storage” isn’t actually dry.
Safety checklist for bulk drying (especially ovens/dehydrators/DIY cabinets)
- Verify real temperature (probe/thermometer), not just the knob setting.
- Avoid hot spots: forced-air convection is safer and more uniform than stagnant heat.
- Don’t overload: crowding kills airflow and makes results uneven.
- Consider a filament-only dehydrator: Siraya Tech explicitly warns against returning a dehydrator used for filament back to food use in their drying guide.
- Don’t run high-risk setups unattended: if your setup isn’t built like an appliance, treat it like a project.
FAQ
Do I need to dry PLA if I store it indoors?
Sometimes. PLA is often less hygroscopic than materials like nylon, but indoor RH can still cause stringing and surface issues over time. If you’re troubleshooting print quality, drying is a fast variable to eliminate.
Is desiccant enough to dry a wet spool?
Desiccant is excellent for keeping filament dry. It can help over time, but for a spool that’s clearly wet, heat + airflow will be faster and more reliable.
What humidity should I aim for inside storage?
This is really a filament storage humidity question: you don’t need “lab dry,” but you do want “consistently dry.” The practical target is whatever your setup can hold steadily at low RH without constant maintenance. A hygrometer gives you the feedback loop.
Can I dry filament in my kitchen oven?
It can work, but it carries more risk than purpose-built or convection drying tools because ovens can overshoot at low setpoints. If you do it, verify temperature with an independent thermometer and avoid unattended runs.
Next steps
If you want one thing to do today: build your three-zone workflow (high/medium/low moisture risk) and start tracking “last dried” dates. It’ll save you more failed prints than any single gadget.
Want more troubleshooting like this? Check Sovol’s practical guide: Filament Storage Tips to Prevent Stringing and Jams.


