


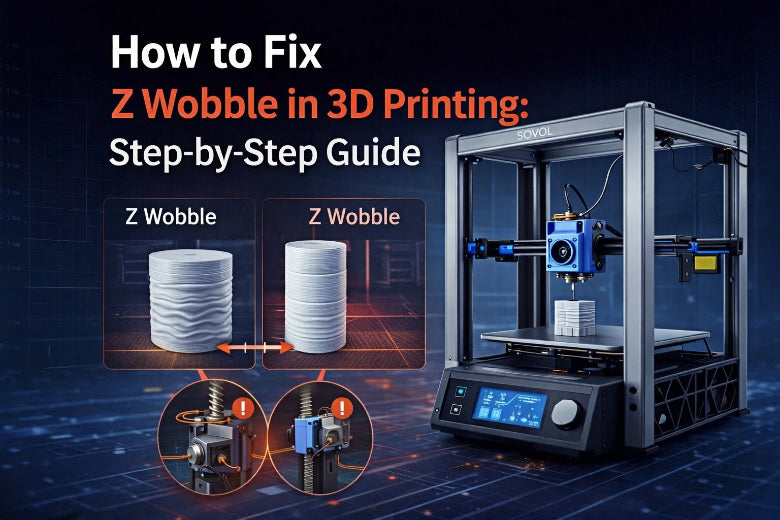
Z wobble happens when your 3D printer’s Z-axis moves unevenly. This problem causes visible lines or waves on your printed objects. If you let Z wobble 3D printing issues go unfixed, your models may look rough and lose detail. Fixing z wobble helps you produce smoother, more accurate prints every time.
Tip: Look for repeating patterns or ridges on your prints. These signs often mean your Z-axis needs attention.
Key Takeaways
- Z wobble makes layers uneven and shows lines on prints. Finding it early helps your prints look better.
- Look for bent lead screws and parts that do not line up. Fixing these things can stop Z wobble.
- Clean and oil the Z-axis parts often. This care helps your printer work well.
- Use a checklist before you print. Check the parts to find small problems before they get worse.
- Think about upgrades like decouplers for more stability. These upgrades can stop Z wobble for a long time.
What Is Z Wobble in 3D Printing
Z Wobble Explained
Z wobble happens when your printer’s Z-axis does not move smoothly. You may notice this problem in your 3d printing projects if the vertical movement of the printer head is not straight. Z wobble is a mechanical issue that causes the printer head to shift slightly as it moves up. This shift creates uneven layers on your prints.
- You can feel lines running vertically on your printed objects.
- These lines often follow a regular pattern up the sides of your model.
- The problem comes from the Z-axis, which controls the up-and-down movement.
If the Z-axis is not aligned, the printer head may move in a zigzag or wavy path. This movement leads to visible lines or patterns on your prints. You can think of it like stacking plates on a tilted table. The stack will lean and become unstable.
Effects on Print Quality
Z wobble 3d printing issues can lower the quality of your prints. You may see wavy or zigzag lines on the surface. These lines make your models look less smooth and can hide fine details. Uneven layers can also make your prints weaker.
- Z wobble can cause diagonal lines or repeated z banding patterns.
- The surface of your print may feel rough to the touch.
- Small details may disappear because of the wobble.
Understanding z wobble helps you find and fix these problems early.
Common Visual Signs
You can spot z wobble by looking for certain patterns on your prints. The most common signs include:
- Vertical lines that repeat at regular intervals
- Diagonal lines across the surface
- Wavy or zigzag patterns that follow the Z-axis movement
- Repeated z banding that looks like rings or bands around your model
If you see these signs, your printer may have a wobble problem. Catching these symptoms early helps you improve your 3d printing results.
Identifying Z Wobble and Z Banding
Recognizing Z Wobble Symptoms
You can spot z wobble by looking for certain patterns on your 3d printing projects. Wobble often shows up as wavy or zigzag lines that run up the sides of your print. These lines repeat at regular intervals. You may also feel roughness when you touch the surface. If you see these signs, your printer’s z-axis may not move smoothly.
Here is a simple checklist to help you diagnose z wobble 3d printing problems:
|
Diagnostic Method |
Description |
|---|---|
|
Inspect Z axis for bent or misaligned lead screws |
Check for any physical misalignment that could cause z wobble. |
|
Clean and lubricate rods and nuts |
Make sure the z-axis moves smoothly to prevent defects. |
|
Secure build plate and resin vat |
Confirm both parts are firmly in place to avoid print inconsistencies. |
|
Look for periodic horizontal lines in prints |
These lines can show z wobble or bent rods during the printing process. |
Tip: Always check your printer’s z-axis before starting a new print. This habit helps you catch problems early.
Z Wobble vs Z Banding
You may confuse z wobble with z banding, but they are different issues. Z banding appears as horizontal lines or bands. These bands happen when layers do not align properly. Z wobble, on the other hand, creates wavy or zigzag lines. These lines come from problems with the z-axis.
- Z banding: Horizontal lines or bands from layers not lining up.
- Z wobble: Wavy or zigzag lines caused by issues with the z-axis.
You can use these differences to tell which problem you have. Look closely at your print’s surface. If you see straight bands, you likely have z banding. If you see wavy lines, you likely have z wobble.
Other Similar Print Issues
Other print problems can look like z wobble or z banding. Ringing and ghosting are two common issues. Ringing shows as ripples near sharp corners. Ghosting appears as faint echoes of shapes on flat surfaces. These problems usually come from vibrations or loose parts, not from the z-axis.
You can use this quick guide to tell them apart:
- Z wobble: Wavy or zigzag lines, repeats up the print.
- Z banding: Straight horizontal bands, layers do not align.
- Ringing: Ripples near corners, caused by vibrations.
- Ghosting: Faint shapes on flat areas, often from loose belts.
Knowing these differences helps you fix the right problem and improve your 3d printing results.
Causes of Z Wobble
Bent Lead Screws
Bent lead screws are a common cause of z wobble. If a lead screw bends, the z-axis cannot move smoothly. The printer’s nozzle may shift a little as it goes up or down. This shifting makes layers uneven and leaves marks on your prints. You can check for a bent lead screw by turning it slowly with your hand. If the screw moves side to side or wobbles, it is probably bent. Getting a new lead screw can help your printer move smoothly again.
Misaligned Z-Axis
A z-axis that is not straight can cause z wobble and z banding. You might see repeating marks or ridges on your prints. The z-axis may move too far in one direction if it is not lined up right. Sometimes, the sliders on the z-axis are at different heights. This can cause problems when the printer starts. Watch the z-axis as it moves to spot misalignment. Use a spirit level or digital gauge to line up the z-axis and tighten the lead screw.
- If the z-axis wobbles, you may see repeating marks.
- Misalignment can make horizontal ridges called z banding.
- Make sure z-axis parts are lined up to stop these problems.
Loose or Improper Couplers
If couplers are loose or not installed right, they can cause z wobble. This lets the z-axis move in ways it should not. It can also make problems like backlash and hysteresis worse.
Check that the couplers between the motor and lead screw are tight. If they move or bend, your printer may show signs of wobble.
Z Motor and Frame Issues
Problems with the z motor or frame can also cause z wobble. If the z motor is not held tightly, it may shake or move while printing. A frame that is loose or not stable can make the whole printer shake. This leads to uneven layers and z banding. Always make sure the motor and frame are tight before you print.
Extruder and Filament Path Problems
Issues with the filament path can also cause z wobble and z banding. If the filament does not move smoothly, it can pull on the printhead and make it misaligned. Filament that is not the same thickness or a clogged nozzle can change how much plastic comes out. This affects layer height and print quality.
|
Evidence Description |
Cause of Z Wobble |
|---|---|
|
If the filament does not feed evenly, it can pull the printhead and cause misalignment. |
|
|
Filament that changes thickness can make extrusion uneven and affect layer height. |
Filament diameter inconsistency |
|
A clogged nozzle can make extrusion uneven and cause z wobble. |
Clogged nozzle affecting filament flow |
Tip: Always check the filament path and nozzle before you start a new 3d print.
Fixing Z Wobble Step by Step
Z wobble 3D printing problems can seem overwhelming, but you can solve them with careful troubleshooting. Follow these steps to identify and fix the most common causes of wobble and z banding. Each step helps you improve your 3D printing results and keep your printer running smoothly.
Clean Nozzle and Filament Path
A clogged nozzle or a blocked filament path can cause uneven extrusion. This leads to inconsistent layers and may look like z wobble or z banding.
Why this matters:
When the nozzle or filament path is dirty, the printer cannot push out plastic evenly. This can make the layers shift or bulge, creating visible lines or patterns.
How to check and fix:
- Heat the nozzle to printing temperature.
- Use a cleaning needle or filament to clear any blockages.
- Remove the filament and inspect it for dust or debris.
- Check the extruder gears for built-up plastic or dust.
- Run a cold pull if you suspect a deep clog.
Tip: Always use clean, dry filament and store it in a sealed container to prevent dust and moisture.
Inspect and Replace Lead Screws
Bent or damaged lead screws are a leading cause of z wobble. Over time, most lead screws develop slight bends that affect the smooth movement of the z-axis.
How to identify the problem:
- Remove the lead screw from your printer.
- Roll it on a flat surface. If it wobbles or does not roll straight, it is bent.
- Watch the lead screw as the printer moves the z-axis. If it moves side to side, it may need replacement.
How to fix:
- Replace any bent lead screws with new, straight ones.
- Lubricate the lead screws with a recommended grease, such as white lithium or silicone-based grease.
- Adjust the tightness of the trapezoidal nuts. Too tight or too loose can cause wobble.
- Consider using decouplers or a more robust guide system to reduce the impact of minor bends.
Best practices for lead screw care:
Align Z-Axis Components
- Inspect lead screws regularly for bends.
- Lubricate them to keep movement smooth.
- Adjust nuts to prevent wobble.
- Explore design changes that make the system less sensitive to small bends.
Misaligned z-axis parts can cause the printer head to move unevenly, leading to z wobble and z banding.
How to check alignment:
- Use digital calipers to measure the distance from the base of the printer to the smooth rod on both sides.
- Make sure both sides match. If not, adjust until they do.
- Gently adjust the z motors so the rods are parallel to the base.
- Level the x-axis to the y-axis base by ensuring it is square.
Step-by-step alignment:
- Measure from the base to the smooth rod on both sides.
- Adjust the z motors to make the rods parallel.
- Level the x-axis to the y-axis base.
- Check for mechanical issues and adjust travel speeds if needed.
Note: Proper alignment prevents uneven movement and reduces the risk of z wobble.
Secure Z Motor and Couplers
Loose z motors or couplers can introduce unwanted movement. This can cause the z-axis to shift during printing, resulting in visible lines or patterns.
How to identify the issue:
- Listen for rattling or clicking noises during z-axis movement.
- Check if the coupler between the motor and lead screw moves or bends.
- Gently wiggle the z motor and coupler. They should not move.
How to fix:
- Tighten all screws and bolts around the z motor and coupler.
- Make sure the coupler is properly attached to both the motor and the lead screw.
- If the coupler is damaged or worn, replace it.
Community-recommended solutions:
|
Solution Type |
Description |
|---|---|
|
Tightening Screws |
Ensure all screws and bolts are tight to prevent z wobble issues. |
|
Straight Lead Screws |
Check the straightness of lead screws to minimize wobble. |
|
Design Modifications |
Consider decoupling lead screws from lateral motion to reduce wobble. |
|
Z-Wobble Eliminators |
Some users use devices like magnetic plates separated by ball bearings. |
Lubricate and Tighten Z-Axis
Friction in the z-axis can cause uneven movement. This leads to z wobble and poor print quality.
How to check and fix:
- Wipe down the z rods and bearings with a clean cloth.
- Apply a small amount of recommended lubricant, such as:
- BX-300/F series grease
- Silicone lubricating grease with PTFE
- White lithium grease
- Rub the lubricant up and down the threaded rods or leadscrews.
- Tighten all screws on the printer frame, especially around the z-axis.
Beginner tip:
Lubricate the z-axis every few months or after long printing sessions. This keeps movement smooth and reduces wear.
Check X-Axis and Extruder Parts
Problems with the x-axis or extruder can also cause z wobble and z banding. Loose or misaligned parts may shift during printing.
How to check:
- Make sure the toolhead sits properly on the x-carriage.
- Check that belt holders under the bed are tight.
- Remove the x-axis belt and tighten it in the notch, then reassemble and adjust the tension.
- If the x-axis is skewed, loosen the mounting screws attaching the z-axis to the y-axis. Place the printer on a level surface and snug the screws back up.
- Inspect the extruder for worn or damaged parts.
Quick checklist:
- Toolhead seated correctly
- Belt holders tight
- X-axis belt tensioned
- Mounting screws snug
- Extruder parts in good condition
Tip: Regularly check these parts to prevent new issues from developing.
Perform PID Autotune
Temperature swings can cause inconsistent extrusion, which may look like z banding or wobble. PID autotune helps your printer maintain stable temperatures.
How to perform PID autotune:
- Power on your printer.
- Set the cooling fan to 100% using the command
M106 S255. - Install and open a printer control program like Pronterface.
- Connect your printer to your computer with a USB cable.
- In the program, select the correct port and baud rate, then click ‘Connect’.
- Type
M503to display current PID settings. - Start hotend tuning with
M303 E0 S210 C8. - When tuning finishes, enter new values with
M301. - For the heated bed, use
M303 E-1 S60 C8and enter new values withM304. - Save new settings with
M500. - Verify the settings by typing
M503again.
Why this helps:
Stable temperatures mean more consistent extrusion. This reduces the risk of z banding and improves overall print quality.
By following these steps, you address the most common causes of z wobble and z banding in 3D printing. Each solution targets a specific problem area, making fixing z wobble easier and more effective. Regular maintenance and careful inspection help you prevent wobble and keep your prints looking their best.
Preventing Z Wobble Long-Term
Regular Inspection Tips
You can prevent z wobble by checking your printer regularly. Start by inspecting the Z axis rods and lead screw for dust or dirt. Clean these parts with a non-woven cloth, moving it up and down to remove debris. Watch the Z axis as it moves. Listen for grinding sounds. These noises can signal a problem. Make sure all screws on the frame and Z axis feel snug, but do not overtighten them. Check the alignment of rails and rods. Confirm that coupler screws are slightly loose. This helps avoid unwanted wobble during 3d printing.
Tip: Lubricate the lead screw every three months with the right grease. Use oil for the linear rod, but do not mix the two types of lubricant.
Maintenance Checklist
A simple checklist helps you keep your printer running smoothly and free from wobble. Review these items before each print session:
- Secure the build plate tightly to stop rattling.
- Tighten all belts so they feel springy, not loose.
- Look for bent or wobbly rods. Upgrade to thicker leadscrews if needed.
- Lubricate guide rods and threaded rods for smooth movement.
- Move the bed back and forth. It should glide without friction.
You can use this checklist to catch small issues before they cause bigger problems.
Upgrade and Assembly Advice
Proper assembly and smart upgrades help prevent z wobble for the long term. When you assemble your printer, loosen the screws holding the trapezoidal nut, Z-motor, and Z-top. Move the Z-axis up and down or run a Z-axis test. While the heatbed is down, tighten the trapezoidal nut and Z-top parts. When the heatbed is up, tighten the Z-motors. For extra stability, consider using decouplers or building a stronger guide system with two large diameter rods per leadscrew. Some users switch to a kinematic system to reduce the effects of bent leadscrews. Always keep lead screws well-lubricated. This step makes a big difference in print quality and helps prevent z wobble from returning.
You can fix Z wobble by following a few simple steps. Start by checking for bent lead screws, misaligned parts, and loose couplers. Clean and lubricate the Z axis often. Regular maintenance keeps your 3d printing projects smooth and reduces surface marks. When you inspect your printer and learn new skills, you improve print quality and prevent future problems. Stay curious and keep your printer in top shape for the best results.
FAQ
What is the main cause of Z wobble in 3D printers?
You often see Z wobble when the lead screw bends or the Z-axis parts do not line up. Loose couplers or motors can also cause this problem. Regular checks help you spot these issues early.
How do I know if my printer has Z wobble or Z banding?
Look for wavy lines that repeat up the sides of your print. Z banding shows as straight horizontal bands. Diagnosing z banding means checking for layer misalignment, while Z wobble usually comes from mechanical problems.
Can Z wobble damage my 3D printer?
Z wobble does not usually damage your printer, but it can lower print quality. If you ignore it, you may see rough surfaces and weak spots in your models. Fixing it keeps your 3d printing results smooth.
How often should I maintain my Z-axis to prevent wobble?
You should inspect and clean the Z-axis every few months. Lubricate the lead screw and check for loose parts. Regular care helps you avoid problems and keeps your prints looking good.
Will upgrading parts always fix Z wobble?
Upgrading parts can help, but you must also check alignment and tightness. Sometimes, simple cleaning or adjusting solves the problem. Always try basic fixes before buying new parts.


