


You can build a 3d printing classroom by following practical steps to integrate 3d printing into your daily teaching. When you bring 3d printing into k-12 schools, you help students turn ideas into real objects, which makes education much more engaging. Choosing the right equipment, organizing your classroom for safety, and planning for hands-on learning all matter. Many studies show that students in a 3d printing classroom improve their critical thinking, gain stronger STEM skills, and enjoy a collaborative learning experience. In k-12 schools, 3d printing in the classroom supports education by making lessons interactive and helping students understand difficult concepts.
Key Takeaways
- Choose easy-to-use, safe 3D printers with enclosed build areas and educational discounts to protect students and fit your budget.
- Use PLA filament for safe, low-odor printing that is beginner-friendly and eco-friendly, avoiding harmful materials like ABS.
- Organize your classroom with good lighting, ventilation, and a central station for tools and filaments to keep the space safe and efficient.
- Create lesson plans that connect 3D printing projects to curriculum goals, encouraging teamwork, creativity, and hands-on learning.
- Manage students and workflow with clear safety rules, smart scheduling, and cloud-based tools to keep projects organized and fair.
3D Printing Classroom Essentials
Choosing 3D Printers
When you start building a 3D printing classroom, choosing the right 3d printer is the most important step. You want a printer that is easy to use, safe for students, and reliable for daily projects. FDM printers work best for K-12 education because they are simple and safe. Look for models with fully enclosed build areas, UL certification, and PIN-locked access. These features protect students from hot parts and moving components.
Here are the top features you should consider:
|
Feature Category |
Key Features Highlighted |
|---|---|
|
Ease of Use |
Pre-assembled or easy-to-assemble kits, automatic bed leveling, touchscreen controls |
|
Safety |
Enclosed build area, auto-shutdown, active airflow, PIN-locked access |
|
Reliability & Quality |
Consistent print quality, filament sensors, AI-driven failure detection |
|
Noise Level |
Quiet operation for a focused classroom |
|
Build Volume & Speed |
Enough space and speed for multiple student projects |
|
Classroom Management |
Remote monitoring, print queue management, teacher and student onboarding resources |
|
Budget & Maintenance |
Options from budget-friendly to premium, with ongoing material costs considered |
Many schools choose Sovol printers, such as the Sovol SV08, because they are durable, user-friendly, and offer strong support for education. Other recommended brands include Bambu Lab, MakerBot, and Formlabs. Some brands, like Sovol, provide special discounts for students and teachers, making it easier for schools to invest in 3d printing technology.
|
Brand |
Key Reasons for Recommendation in Education |
|---|---|
|
Sovol SV08 |
Affordable, reliable, easy to maintain, education discounts available |
|
Bambu Lab X1E |
High precision, fast, user-friendly, strong safety features |
|
MakerBot SKETCH |
ISTE-certified, cloud-based collaboration, large build volume |
|
Formlabs Form 4 |
Excellent print quality, wide material range, streamlined workflow |
|
Voron 2.4 Kit |
Hands-on assembly, deep learning value, strong community support |
Tip: Always check if the manufacturer offers educational pricing or bundles. This can help your school save money and get extra support.
Selecting Filaments and Materials
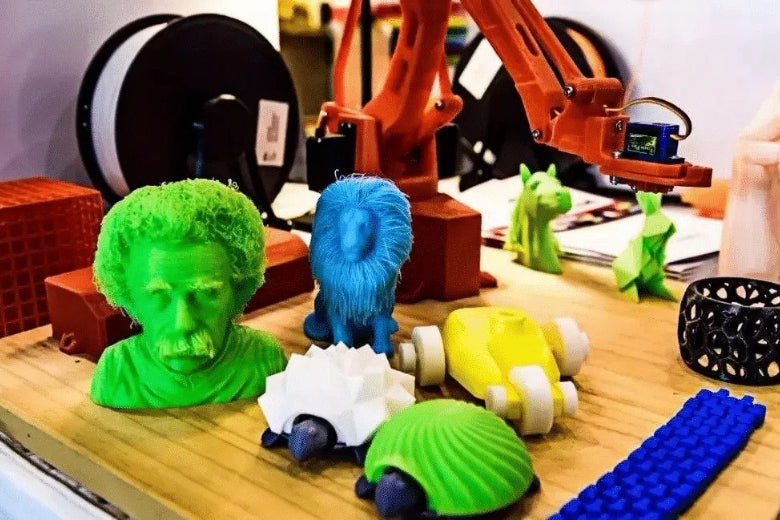
The filament you choose affects both safety and print quality in your classroom. PLA is the best choice for most education settings. It is non-toxic, biodegradable, and produces very little odor or fumes. PLA is also easy to print, which helps students succeed with their first projects. PETG is another safe option if you need stronger or more heat-resistant parts, but it requires a bit more tuning. ABS is not recommended for most classrooms because it releases harmful fumes and needs special ventilation.
Here is a quick comparison of the most common filaments:
|
Filament |
Cost per kg (USD) |
Printing Temperature |
Warping |
Ease of Use |
Odor |
Suitability for Classroom |
|---|---|---|---|---|---|---|
|
PLA |
~$15 |
190-220°C (low) |
Minimal |
Very easy, beginner-friendly |
Low odor |
Ideal: affordable, easy, low warping, eco-friendly |
|
ABS |
~$10 |
220-250°C (high) |
High, needs heated bed/enclosure |
Difficult, prone to warping |
Strong odor |
Less suitable: printing challenges, ventilation needed |
|
PETG |
~$15-20 |
230-250°C (high) |
Low to moderate |
Moderate, needs tuning |
Low odor |
Moderate: stronger, more complex to print |
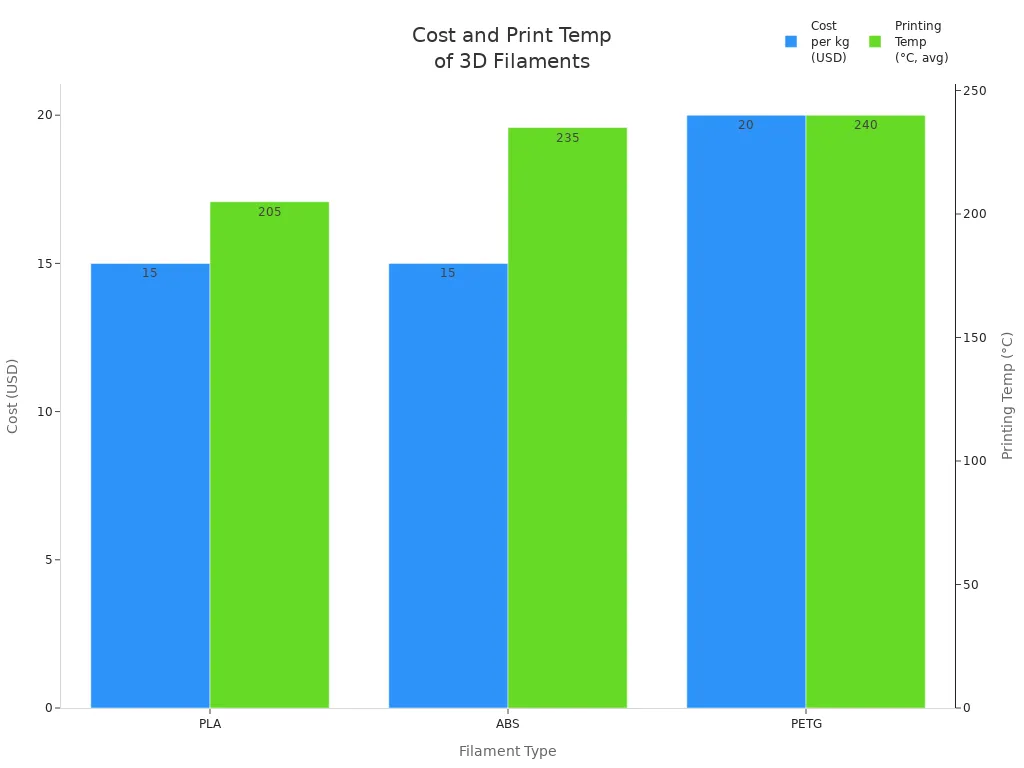
Note: PLA is widely available in many colors and brands, making it perfect for creative education projects. It does not require a heated bed, which saves energy and reduces costs.
Safety and Maintenance
Safety is a top priority when you bring 3d printing technology into the classroom. Always use non-toxic, low-emission materials like PLA. Set up your printers in a well-ventilated area to reduce any risk from fumes. Train students on how to use the printers safely, including loading filament, starting prints, and basic troubleshooting. Supervise students at all times and never allow them to change settings without permission.
Follow these safety guidelines:
- Use only approved materials and check their safety data sheets.
- Wear gloves and safety goggles when handling hot parts or chemicals.
- Keep the workspace clean and organized to prevent accidents.
- Never leave printers running unattended.
- Update safety protocols regularly and stay informed about new developments.
Regular maintenance keeps your printers running smoothly and safely. Clean the print bed after every use, clear the nozzle to prevent clogs, and lubricate moving parts. Calibrate the printer often, especially after moving it or changing materials. Document all maintenance activities and use reminders for routine tasks. For complex repairs, contact professional support or use official resources.
Tip: Treat maintenance as part of your classroom routine. Involve students in simple tasks to teach responsibility and technical skills.
By focusing on these essentials, you create a safe, efficient, and inspiring environment for education. You help students explore new ideas and build real-world skills with 3d printing technology.
Organizing the 3D Printing Classroom
Space and Layout
When you plan your 3D printing classroom, start by thinking about how students will move and work together. Arrange tables and printers so everyone has enough room to collaborate and learn safely. Place printers on sturdy surfaces away from high-traffic areas. This helps prevent accidents and keeps your equipment secure. You can group workstations to encourage teamwork or set up individual stations for focused tasks. Leave open pathways for easy supervision and quick access to emergency exits.
Tip: Use clear labels and signs to help students find tools and supplies quickly.
Lighting and Ventilation
Good lighting and ventilation are essential for a safe and productive classroom. Bright, even lighting lets students see details when they work on their projects. Natural light works well, but you can also use LED fixtures for consistent brightness.
Ventilation matters even more when you have several 3D printers running. Printers release ultrafine particles and gases that can affect health. To reduce these risks, make sure your classroom has at least 4 to 6 air changes per hour. Open windows and doors when possible, and use exhaust fans or air purifiers with HEPA filters. Place printers near exhaust vents to keep the air clean. Avoid eating or drinking near the printers, and always wash hands after use. Regularly clean dust with a wet cloth or HEPA vacuum.
Central Filament and Tool Stations
Setting up a 3d printing station with a central area for filament and tools makes your classroom more efficient. Store all filaments in sealed containers to keep them dry and organized. Use shelves or bins for tools like spatulas, tweezers, and cleaning brushes. A central station saves time and helps students find what they need without searching. If you have multiple printers, plan for extra supplies and maintenance kits. This approach keeps your classroom running smoothly and supports every student’s project.
Integrate 3D Printing in the Classroom
Lesson Plan for 3D Printing
A strong lesson plan for 3d printing helps you connect hands-on activities with your curriculum goals. You can start by setting clear objectives for each project. For example, you might want students to learn about geometry by designing 3d models or explore scientific concepts by printing molecular structures. When you align your lesson plans with standards, you make sure students gain valuable skills and knowledge.
- Assess student learning by evaluating the design process, the 3d printing process, and the final printed object.
- Manage resources by keeping printers in good condition, tracking filament use, and setting clear rules for student access.
- Require students to use personal protective equipment like gloves and safety glasses.
- Teach safe equipment use and maintain good ventilation in your classroom.
- Encourage teamwork through group projects, peer reviews, and class discussions.
- Integrate 3d printing projects with math, science, and language arts to support cross-disciplinary learning.
- Motivate creativity with open-ended challenges and design competitions.
Tip: Start with small projects such as keychains or nameplates. These help students build confidence and learn the basics before moving to more complex designs.
Research shows that when you integrate 3d printing in the classroom, students become more engaged and motivated. For example, a study found that students using 3d printed models in biology learned more and enjoyed the lessons compared to those using traditional materials. This approach helps students understand difficult topics and increases their interest in STEM subjects.
Incorporate 3D Printing into Curriculum
You can incorporate 3d printing into your curriculum by designing projects that match your learning standards. Many schools use 3d printing to teach STEM and STEAM subjects. For example, you might have students use Tinkercad to design and print parts for robotics kits or create architectural models. These activities help students develop technical skills and support problem-solving and critical thinking.
Here are some best practices for designing a 3d printing curriculum:
- Use beginner-friendly software like Tinkercad for design and Cura for slicing.
- Choose safe materials such as PLA filament for students' first 3d printing project.
- Set up a dedicated 3d printing station with organized supplies and clear safety rules.
- Plan cross-disciplinary projects that blend science, math, art, and engineering.
- Work with other teachers to design a curriculum that connects different subjects.
- Use real-world project examples, such as prosthetic limbs or renewable energy models, to show students the impact of their work.
- Encourage students to solve problems and iterate on their designs.
A well-designed curriculum supports hands-on learning and helps students see the value of their work. Studies show that students who participate in 3d printing projects develop stronger problem-solving skills and become more interested in STEM careers. When you design a curriculum that includes 3d printing, you give students the chance to learn by doing and to collaborate with their peers.
Project Management Tools
Managing multiple 3d printing projects in a classroom can be challenging. You can use cloud-based tools to organize student work, track progress, and manage print queues. Platforms like Tinkercad, 3DPrinterOS, and Basecamp make it easy for students and teachers to collaborate.
|
Tool/Feature |
Description |
|---|---|
|
Students share and group designs, prepare print batches, and review each other's work. |
|
|
Basecamp |
Assign tasks, manage files, set deadlines, and track project progress for individuals or groups. |
|
Google Classroom Integration |
Organize student designs, manage print schedules, and provide feedback. |
|
3DPrinterOS |
Submit 3d models, monitor print jobs, and manage multiple printers from any device. |
Note: Cloud-based platforms allow students to submit designs from anywhere. This supports remote learning and keeps everyone involved, even if some students are not in the classroom.
You can motivate students by treating each 3d printing project as a challenge or reward. For example, you might hold a design contest or let students print their favorite model after completing a lesson. These strategies promote responsibility, teamwork, and creativity.
Cloud-based tools also help you keep track of student progress. You can create folders for each student, assign tasks, and monitor print jobs. Features like version history and check-ins make it easy to see how students improve over time. This organization supports education goals and prepares students for future careers where project management is important.
Tip: Involve students in troubleshooting and printer maintenance. This builds problem-solving skills and teaches responsibility.
When you integrate 3d printing in the classroom, you create a dynamic environment where students learn by doing, collaborate with others, and develop skills for the future. By using the right lesson plans, curriculum design, and project management tools, you help students succeed in education and beyond.
Managing Students and Workflow
Grouping and Scheduling
You can maximize student participation in your 3D printing classroom by using effective grouping strategies. The classroom jigsaw method works well for learning activities. You divide students into Home Teams and Expert Groups. Each student becomes an expert on one part of the 3D model or process. After learning in their Expert Group, students return to their Home Team to teach others. This approach ensures every student takes part and values each person’s contribution. It also supports different learning styles and helps students with sensory needs.
To make sure all students have enough time with the printers, you should use smart scheduling:
- Prioritize print jobs by length, material, and deadlines.
- Limit long print jobs during busy times.
- Use cloud-based management tools like 3DPrinterOS for job assignments and remote monitoring.
- Track printer use to plan maintenance and resource sharing.
- Place printers in accessible spots for easy interaction.
- Give students access to design software and free resources.
- Maintain printers often and consider combining 2D and 3D print management.
These steps help balance demand and give every student a fair chance to use the equipment.
Rules and Safety Protocols
Clear rules and safety protocols keep your classroom safe and organized. You should:
- Set up a well-ventilated printing area away from hazards.
- Keep a fire extinguisher nearby.
- Train students on printer use and risks like burns or fumes.
- Require gloves and safety goggles.
- Keep the workspace clean and free of clutter.
- Inspect printers before use and fix problems quickly.
- Make rules for printer use and material handling.
- Supervise students at all times.
- Do not allow food, drinks, or gum near printers.
- Remind students to wash hands after printing.
Review and update these protocols often. This routine builds responsibility and keeps everyone safe.
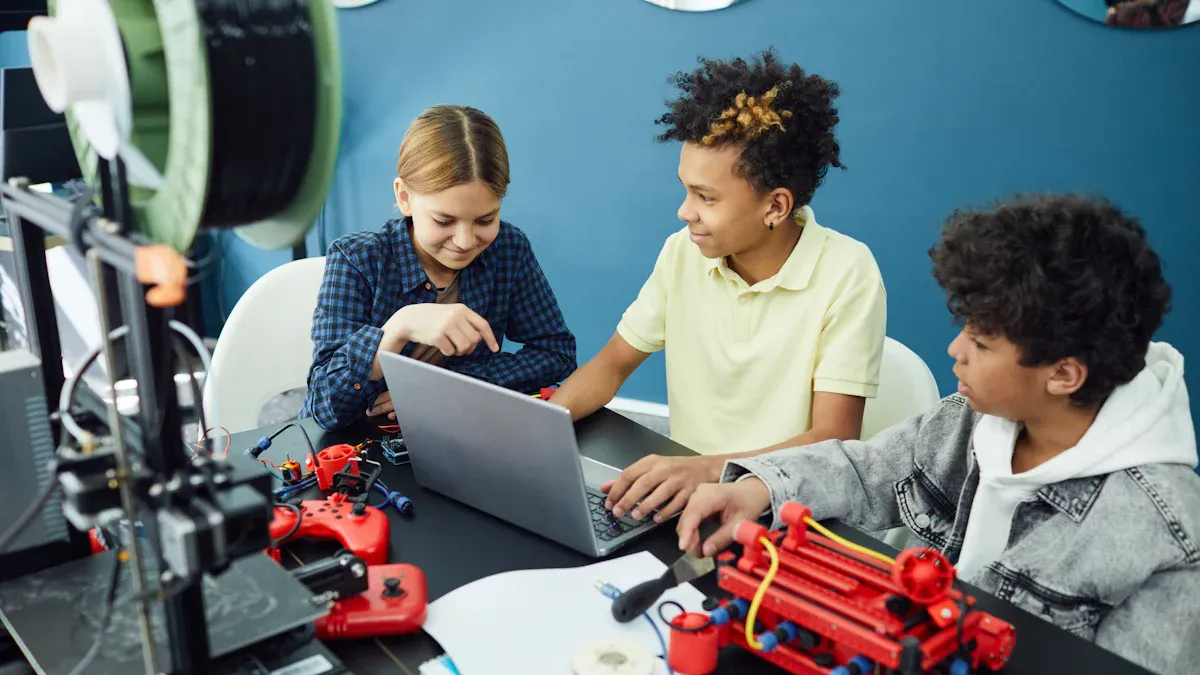
Collaboration and Hands-On Learning
Encouraging collaboration and teamwork leads to better learning outcomes. When students work together on 3D printing projects, they build hand-eye coordination and confidence with technology. They learn to solve problems by troubleshooting issues and adjusting designs. Working with CAD software and printers gives students real-world skills. Teachers who join in the learning process create a supportive environment. You can use group projects, peer reviews, and shared challenges to keep students engaged. The table below shows the benefits of hands-on and collaborative learning in 3D printing:
|
Benefit Category |
Description and Impact |
|---|---|
|
Hand-eye Coordination |
Students improve coordination by setting up and adjusting printers. |
|
Creative and Critical Thinking |
Designing models and solving print issues boosts imagination and problem-solving. |
|
Confidence with Tools & Tech |
Direct use of printers and software builds confidence for future technology use. |
|
Troubleshooting Skills |
Students learn to diagnose and fix problems, which strengthens problem-solving. |
|
Exposure to CAD and Programming |
Students gain experience with modeling and basic programming. |
|
Active Learning & Collaboration |
Teamwork and active engagement improve critical thinking and attention. |
|
Visual and Tactile Learning Aids |
3D printed objects help students understand concepts through hands-on learning. |
You create a positive classroom culture by supporting collaboration and hands-on activities. This approach prepares students for future challenges and careers.
Overcoming Challenges in 3D Printing Classroom
Budget and Funding
You may face budget constraints when starting a 3D printing classroom. Many schools overcome this by seeking grants and building partnerships. The MakerBot Grant Guides for 2024 and 2025 list over 40 grants, awards, and scholarships for educators. These guides help you find funding for printers, materials, and professional development. The MakerBot Gives Back Grant Program supports K–12 educators who want to add 3D printing to their classrooms. You can also use sites like Grants 4 Teachers and Grants.gov to search for more opportunities.
Here are common ways schools secure funding:
- Apply for grants using guides and checklists.
- Partner with local businesses for support.
- Start fundraising campaigns.
- Invest in high-quality supplies to reduce waste and save money.
Tip: When applying for grants, request precise amounts and use strong statistics to make your case.
Teacher Training
You need proper training to run a successful 3D printing classroom. The MakerBot Certification™ Program offers a self-paced, online course for educators. This program covers printer operation, troubleshooting, curriculum creation, and classroom integration. You earn professional development credits and receive badges as you progress. The program supports multiple languages and gives you access to hundreds of lesson plans and design challenges. Many teachers also attend 3d printing workshops to build confidence and learn new skills.
Troubleshooting and Support
Technical issues can slow down your classroom. Common problems include printer jams, mechanical errors, and short printer lifespan. You can solve these by regular cleaning, preventive maintenance, and timely part replacement.
|
Technical Issue |
Description |
Solution |
|---|---|---|
|
Printer jams and misprints |
Wasted time and materials |
Clean after use, replace nozzles |
|
Mechanical errors |
Frustration and downtime |
Preventive maintenance, replace parts |
|
Short printer lifespan |
Outdated equipment |
Budget for upgrades and replacements |
|
Communication delays |
Slow project coordination |
Use centralized management tools |
You can also manage print backlogs by increasing printer numbers and teaching students to handle print tasks. Many teachers use 3d printing workshops and daily meetings to review prints and solve problems together. Encourage students to check their designs before printing to reduce errors.
Building a 3d printing classroom starts with choosing safe equipment, organizing your space, and planning engaging lessons. You can see real benefits when students use 3d printing classroom projects to explore history, science, and art in new ways. Teachers often find that collaboration grows as roles shift and students take the lead.
- Join online communities like Thingiverse Education or MakerBot webinars for lesson ideas and support.
- Use resources such as the MakerBot Educators Guidebook and professional development videos to keep your 3d printing classroom up to date.
Start small and expand your setup as you gain experience. Hands-on learning and teamwork will help your students succeed.
FAQ
What are the main benefits of adding 3D printing to my classroom?
You give students hands-on experience with real-world technology. 3D printing helps them understand STEM concepts, boosts creativity, and encourages teamwork. Students learn problem-solving skills that prepare them for future careers.
How should I plan my classroom space for 3D printing?
You need sturdy tables, clear walkways, and good lighting. Place printers away from busy areas. Set up a central station for tools and filament. Always keep safety in mind.
Tip: Use signs and labels to help students find supplies quickly.
Which 3D printer works best for schools?
You should choose a user-friendly, enclosed printer like the Sovol SV08. This model offers strong safety features and easy maintenance. Sovol provides special discounts for students and teachers, making it a smart choice for education.
Where can I find teaching resources and training for 3D printing?
You can access free lesson plans and tutorials from sites like Tinkercad and MakerBot Education. Sovol’s website also offers guides and support. Many teachers join online communities to share tips and project ideas.
How do I apply for Sovol’s educational discounts?
Visit Sovol’s official website and look for the education discount page. Fill out the application form with your school details. Sovol will review your request and send you a special offer.
Want to learn more? Click here to explore Sovol’s education discounts and recommended printers!


