


You can stop layer separation 3D print causes by drying your filament. Additionally, you can change the print and bed temperature. Lowering the print speed can also help. Make sure to clean the hot end before you print. If you have a heated enclosure, use it. You can also apply a brim or glue on your print. These easy steps help address layer separation 3D print causes and quickly improve your print quality. Try these tips and see stronger, smoother prints next time.
Key Takeaways
- Dry your filament before you print. This stops bubbles and weak spots. Keep it in a sealed bag with desiccant. This keeps out moisture.
- Change the print and bed temperatures for your filament type. The right temperature helps layers stick together. This lowers the chance of layer separation.
- Print slower to let layers stick better. This stops gaps and makes your print stronger.
- Make sure the print bed is level for good bed adhesion. Use a brim or glue stick to help. A strong first layer is very important for good prints.
- Clean and take care of your printer often. This stops clogs and keeps extrusion steady. A clean printer gives you better prints.
What is layer separation
Definition and signs
You may notice that your 3D prints sometimes split apart between layers. This problem is called layer separation. In 3D printing, layer separation happens when the layers do not bond well to each other. The final part can break or split along these weak spots. Good bonding between layers is important for strong and reliable prints.
You can also think about layer separation as the vertical distance the nozzle moves between each layer. If the printer does not set this distance correctly, the layers may not stick together. For single-layer prints, this gap is the space between the nozzle and the bed. When you print more layers, the printer adds a small offset because the new layer is thinner than the first gap.
You can spot 3d print layer separation by looking for certain signs:
- Cracks that run along the layers
- Clean cuts that bend upward or show warping
- Parts that break easily when you handle them
Tip: If you see cracks or splits between layers, check your print settings and filament quality first.
Layer separation vs other print defects
You might confuse layer separation with other common 3D printing problems. Each defect has its own cause and appearance.
- Layer separation happens when layers do not bond well. This usually comes from low extruder temperature or too much cooling.
- Warping shows up when the edges of your print lift off the bed. Uneven cooling and shrinkage cause this problem.
- Stringing looks like thin strands of filament stretched between parts of your print. This happens when the nozzle leaks filament during travel moves.
Knowing the difference helps you fix the right problem and improve your print quality.
Layer separation 3D print causes
Knowing the main layer separation 3D print causes helps you stop weak prints and wasting filament. You can fix most problems by changing printer settings, checking your materials, and taking care of your printer. Here are the most common reasons for layer delamination and how they affect the bond between layers.
Incorrect temperature settings
Temperature is very important for making 3D print layers stick together. If the print temperature is too low, the filament will not melt enough. This makes it hard for the layers to stick and causes weak spots. If the temperature is too high, you might see stringing, oozing, or burnt filament. These problems also make the layers weaker.
You can tell if temperature is a problem by looking for cracks or splits between layers. These gaps usually go sideways and make the print easy to break. You might also see rough or bumpy surfaces, which means the filament did not flow well.
To fix this, check what temperature your filament needs. For PLA, start at 200°C and change it a little at a time. For PETG, try between 230°C and 250°C. ABS works best at 240°C to 260°C. Keep the chamber temperature between 25°C and 35°C so the print does not cool too fast. If you see under-extrusion, raise the nozzle temperature by 5°C until the layers stick well.
Note: The right temperature stops fast cooling, which can cause layer delamination and weak bonds.
Poor bed or layer adhesion
Bed adhesion is the base for every good print. If the first layer does not stick to the bed, the rest of the print will not be stable. Bad bed adhesion can cause warping, parts coming off, and layer delamination, especially in tall prints.
You can spot bed adhesion problems if the first layer peels up, curls at the edges, or moves during printing. These signs show up before you see layer separation higher in the print.
To make bed adhesion better, level your print bed and clean it before you print. Use a brim or raft to make the first layer bigger. For ABS and Nylon, set the bed temperature higher (90°C to 110°C) to stop fast cooling and shrinking. For PLA, a bed temperature of 50°C to 60°C works well. You can also use glue stick or hairspray to help the filament stick to the bed.
Tip: Good bed adhesion lowers the chance of layer delamination and helps each new layer stick well.
Print speed and cooling issues
Print speed and cooling are big reasons for layer separation 3D print causes. If you print too fast, the filament does not have enough time to stick to the last layer. This makes the layers weak and can cause cracks or gaps. Printing too fast can also cause under-extrusion, making the layers even weaker.
You can see speed problems if the layers look thin, break easily, or have lines and gaps. Too much cooling can make the layers harden before they stick, causing delamination.
To fix this, slow down your print speed. For PETG, printing at 30-50 mm/s works best. Slower speeds help the filament stick and flow better. Set your print cooling fan to run slower or turn it off for the first few layers. This stops fast cooling and helps the layers stick. If you see stringing, lower the fan speed a little at a time until it looks right.
Note: Slower print speeds and careful cooling help each layer stick well, so you get fewer gaps and stronger prints.
Filament quality and moisture
Filament quality is important for stopping layer separation 3D print causes. Wet filament is a common problem, especially with ABS, PETG, and Nylon. When filament takes in water from the air, the water turns to steam when you print. This steam makes bubbles and weak spots in the layers, causing poor bonds and layer delamination.
You can tell if your filament is wet if you hear popping sounds or see bubbles and rough spots on your print. Prints made with wet filament often feel weak and break easily. Under-extrusion and uneven flow can also mean there is moisture.
To stop this, always keep filament in a dry box or sealed bag with desiccant. Dry your filament before printing if you think it is wet. For ABS and PETG, dry at 60°C for 4-6 hours. Using dry filament makes strong bonds and lowers the chance of layer delamination, under-extrusion, and bad print quality.
Tip: Storing and drying filament the right way helps keep layers strong and stops layer delamination.
Hardware and mechanical factors
Problems with your printer can also cause layer separation 3D print causes. Things like uneven extrusion, under-extrusion, or a clogged hot end make weak layers and cause delamination. Loose belts, old gears, or a dirty nozzle can change how the filament comes out.
You can spot hardware problems if you see uneven layers, missing parts, or sudden changes in print quality. Under-extrusion shows up as thin or missing layers that do not stick well.
To fix these problems, clean your hot end and check for clogs often. Tighten belts and look at gears to see if they are worn out. Calibrate your extruder to make sure the filament flows right. Replace old parts when needed. Keeping your printer in good shape helps every layer stick and stops layer delamination.
|
Issue Type |
Description |
|---|---|
|
Extrusion Inconsistency |
The amount of filament coming out changes. |
|
Stringing |
Thin strands of filament between parts. |
|
Under-Extrusion |
Not enough filament, making weak layers. |
Note: Taking care of your printer and checking it often stops hardware problems that can cause under-extrusion, weak bonds, and layer delamination.
By learning about these main layer separation 3D print causes, you can take easy steps to make your prints better. Focus on temperature, bed adhesion, print speed, filament quality, and taking care of your printer to get strong, good prints and avoid layer delamination.
Easy fixes for layer separation
You can fix most layer separation problems with simple changes. Each step helps with a different cause. This makes your prints stronger and helps layers stick better. Try these steps to get better results.
Adjust temperature and bed settings
Set the right temperature for the nozzle and bed. This helps the filament melt and stick to each layer. If the temperature is too low, layers will not bond well. If it is too high, you might see stringing or burnt filament.
- Set the nozzle temperature for PLA between 190°C and 220°C. For ABS, use 240°C to 260°C. PETG works best at 230°C to 250°C.
- Keep the heated bed at 60°C for PLA. For ABS, set the bed to 90°C to 110°C. PETG needs a bed temperature around 70°C to 80°C.
- Raise the build plate temperature if the first layer does not stick. This helps the first layer stay in place.
- Use a sticky surface or glue stick on the bed for extra grip.
- Change the hot-end temperature in small steps. Raise it by 5°C if you see cracks or weak spots.
- Watch the hot-end temperature while printing. Make sure it stays steady so your print quality does not change.
- Control cooling by changing the fan speed. Fast cooling helps PLA, but slow cooling is better for ABS and PETG.
Tip: Always check the best temperature for your filament. Small changes in temperature can help layers stick much better.
Dry and store filament properly
Wet filament can make bubbles, weak spots, and bad layer bonds. You need to keep your filament dry to stop layer separation.
- Store filament in a sealed bag with desiccant. This keeps water away.
- Use a dry box or cabinet to keep humidity low.
- Dry filament before printing if you think it is wet. For ABS and PETG, dry at 60°C for 4-6 hours.
- Do not bake filament in the oven unless you watch the temperature. Too much heat can ruin filament.
- Special dryers or smart cabinets keep filament dry and good for printing.
- Check for popping sounds or rough spots on filament. These signs mean you should dry it before use.
Research shows that humidity hurts filament and print quality. Smart cabinets keep humidity low and make prints better. Old ways like desiccants or air conditioners do not work as well and need more care.
Note: Dry filament makes prints stronger and lowers the chance of layer separation.
Lower print speed and fan
Print speed and cooling change how well layers stick. Printing too fast or cooling too quickly can make weak layers and cause separation.
|
Action |
Benefit |
|---|---|
|
Lower print speed |
|
|
Adjust fan speed |
Controls cooling to prevent premature solidification |
|
Reduce airflow |
Prevents layers from cooling before they stick |
- Set print speed between 30-50 mm/s for PETG and ABS. For PLA, you can go up to 60 mm/s, but slower speeds help with tricky prints.
- Lower the fan speed for the first few layers. This keeps the filament warm and helps it stick.
- Do not use too much airflow. Too much cooling can make layers harden before they stick.
- If you see weak layers, lower print speed and fan speed a little at a time.
- Good cooling control helps layers stick well. Fast cooling is good for PLA, but slow cooling is better for ABS and PETG.
When you print slowly, the nozzle stays on each layer longer. This helps layers bond and stops separation. Good cooling makes sure layers do not get hard too soon.
Tip: Balance print speed and cooling for the best results. Slow down if you see cracks or gaps between layers.
Clean hot end and maintain printer
A clean and well-kept printer helps stop layer separation. Dirt, clogs, or old parts can make layers weak.
- Turn off the power before cleaning the hot end. This keeps you safe.
- Heat the nozzle to the last used filament’s temperature. This softens any leftover plastic.
- Use a brass brush or nozzle tool to clean the outside.
- Do a cold pull to clear deep clogs inside the nozzle.
- Use a thin needle or cleaning filament to unclog the nozzle.
- Check the hot end for damage or wear. Replace parts if needed.
- Watch the heating part to keep the right temperature.
- Check belts and gears for tightness and wear. Replace old parts to keep extrusion smooth.
- Make sure heat moves well between parts for good printing.
|
Maintenance Practice |
Benefit |
|---|---|
|
Hot end cleaning |
Less filament residue, fewer clogs |
|
Heating element monitoring |
Maintains correct printing temperature |
|
Thermal interface management |
Improves heat transfer and print quality |
Note: Cleaning and taking care of your printer helps it work well and stops layer separation.
Use brims, glue, or heated enclosures
You can make layers stick better and stop separation with brims, glue, or a heated enclosure.
- Add a brim or raft to your print. This makes the first layer stick better to the bed.
- Use a glue stick or hairspray on the build plate for extra grip.
- Use a heated enclosure to keep the air warm around your print. This stops warping and helps layers bond, especially for ABS, PETG, and PC blends.
- Heated enclosures make the area warmer, which helps some filaments stick better and makes prints stronger.
- For PLA, a heated enclosure is not always needed, but it can help with tall or tricky prints.
- Watch your print when using an enclosure. Some filaments work better than others, and too much heat can change how the print looks.
Studies show heated enclosures help ABS, PC blends, and ASA stick better. Brims and glue sticks also help the first layer stick and stop layer separation.
Tip: Use brims and glue for small prints or tricky materials. Try a heated enclosure for big or tall prints that need extra strength.
By following these easy fixes, you can stop most layer separation problems. Change the temperature, keep filament dry, control speed and cooling, clean your printer, and use brims or enclosures for better sticking. These steps help you get strong, reliable prints every time.
Stronger layer bonds and prevention
Reduce layer height
You can make your prints stronger by reducing the layer height. Thinner layers help the material melt and bond better. This creates stronger layer bonds and lowers the risk of separation. Use the table below to see how layer height affects print strength:
|
Layer Height (mm) |
Strength Result |
Recommendation |
|---|---|---|
|
Best strength |
Use for strong, detailed prints |
|
|
0.2 |
Good strength (for 0.4mm nozzle) |
Do not exceed this for a 0.4mm nozzle |
|
0.3 - 0.4 |
Lower strength, more failures |
Avoid for parts that need a stronger bond |
Set your layer height to about 80% of your nozzle diameter. For a 0.4mm nozzle, use 0.15mm or 0.2mm layers.
Material-specific tips (PLA, ABS, PETG)
Each filament type needs special care for best results. You can use these tips for PLA, ABS, and PETG:
|
Tip |
PLA |
ABS |
PETG |
|---|---|---|---|
|
Yes |
Yes |
Yes |
|
|
Nozzle Temperature |
200–220°C |
240–260°C |
230–250°C |
|
Print Speed |
40–60 mm/s |
30–50 mm/s |
30–50 mm/s |
|
Heated Bed |
50–60°C |
90–110°C |
70–80°C |
|
Enclosure |
Optional |
Strongly recommended |
Helpful for tall prints |
Slow down your print speed for better bonding. Raise the nozzle temperature in small steps if you see weak layers. Use a heated enclosure for ABS and PETG to keep the print warm and reduce warping.
Avoid common mistakes
Many beginners make the same errors that lead to layer separation. You can avoid these mistakes:
- Printing too fast or too hot causes rough surfaces and weak layers.
- Skipping bed leveling leads to poor adhesion.
- Setting the wrong Z-offset prevents the first layer from sticking.
- Ignoring nozzle temperature calibration causes gaps or blobs.
- Using wet or low-quality filament creates bubbles and weak spots.
- Not understanding layer height can make prints rough or slow.
You can also try advanced methods for a stronger bond. Friction welding and using a soldering iron can join parts and melt seams. Cross-layer mechanical anchoring and temperature differential extrusion help layers stick better. These methods work well for tough prints or repairs.
Tip: Check your settings before every print. Small changes can prevent most problems and give you reliable results.
Troubleshooting checklist
Step-by-step diagnosis
You can solve layer separation by following a clear diagnostic process. Use these steps to find the root cause:
- Check your hardware. Make sure all printer parts are secure and connected. Look at the build plate, belts, and extruder.
- Level the build plate. Use the paper test to check for even resistance across the bed. Adjust until you feel the same drag everywhere.
- Inspect the Z-axis. Run a Z-axis test to spot any motor or mainboard issues.
- Examine your filament or resin. Use dry, high-quality filament. For resin printers, stir the resin if it has been sitting for a day or more.
- Clean the build surface. Remove all residue, stickers, or films. A clean bed helps the first layer stick.
- Monitor temperature settings. Check nozzle and bed temperatures. Make sure they match your material’s needs.
- Review print speed and cooling. Lower print speed and adjust fan settings if you see cracks or gaps.
- Look for under-extrusion. Check for clogs in the hot end and make sure the filament feeds smoothly.
Tip: Identify where delamination happens. If it occurs at the base, focus on bed adhesion. If higher up, check temperature and cooling.
Quick fixes to try
You can often fix layer separation with these simple actions:
- Calibrate the build plate before each print.
- Clean and dry the build surface.
- Dry your filament or use fresh, well-mixed resin.
- Increase nozzle temperature by 5°C if layers look weak.
- Lower print speed and reduce fan speed for better bonding.
- Add a brim, raft, or use glue stick for extra adhesion.
- Use an enclosure to keep temperature stable.
- Reduce layer height for stronger bonds.
- Tighten belts and check for worn parts.
- Enable Z hop and adjust retraction to prevent collisions.
Quick Reference Table
|
Problem Area |
What to Check or Do |
|---|---|
|
Level bed, clean surface, use brim |
|
|
Temperature |
Adjust nozzle/bed temp, use enclosure |
|
Filament/Resin |
Dry filament, mix resin, store well |
|
Print Speed/Cooling |
Lower speed, reduce fan, slow lifts |
|
Hardware |
Tighten belts, clean hot end, check Z |
Keep this checklist handy. You can quickly diagnose and fix most layer separation issues by following these steps.
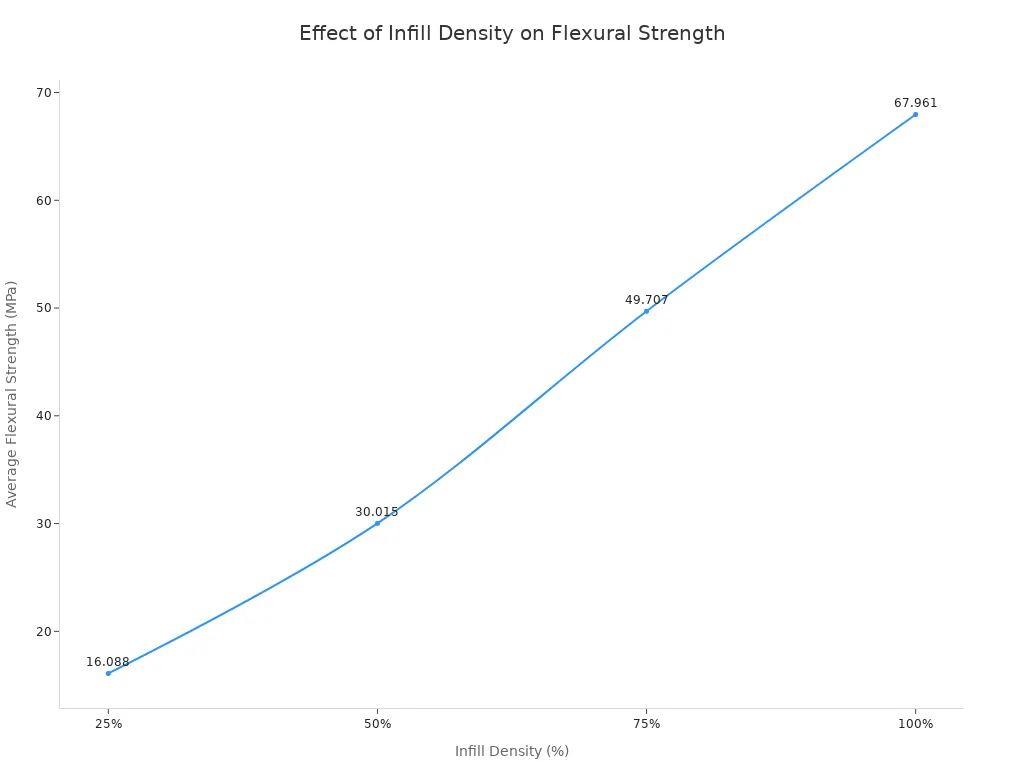
You can stop layer separation by changing a few printer settings. Work on calibration, temperature, and retraction for better prints. Studies show that higher infill density makes prints stronger:
|
Infill Density (%) |
Average Flexural Strength (MPa) |
|---|---|
|
25 |
16.088 |
|
50 |
30.015 |
|
75 |
49.707 |
|
100 |
67.961 |
Keep your troubleshooting checklist close by. You learn something new with every print. Small changes can make your prints stronger and smoother.
FAQ
What causes layer separation in 3D printing?
Layer separation happens when layers do not bond well. You might set the temperature too low, print too fast, use wet filament, or have poor bed adhesion. Mechanical issues like loose belts or a clogged nozzle can also cause this problem.
How do I fix weak layer bonding?
You can fix weak bonding by raising the nozzle temperature, slowing down the print speed, and drying your filament. Make sure the bed is level and clean. Use a heated enclosure or add a brim for better adhesion.
Does filament moisture affect print quality?
Yes, moisture in filament causes bubbles and weak spots. You should store filament in a dry box or sealed bag with desiccant. Dry the filament before printing if you hear popping sounds or see rough surfaces.
Why does my print crack in the middle but not at the base?
Cracks in the middle often mean the print cooled too quickly or the nozzle temperature was too low. The base usually stays warmer from the heated bed, so layers bond better there.
Should I always use a heated enclosure?
You do not always need a heated enclosure. Use one for materials like ABS or PETG, especially for tall prints. It helps keep the print warm and reduces warping and layer separation.


