


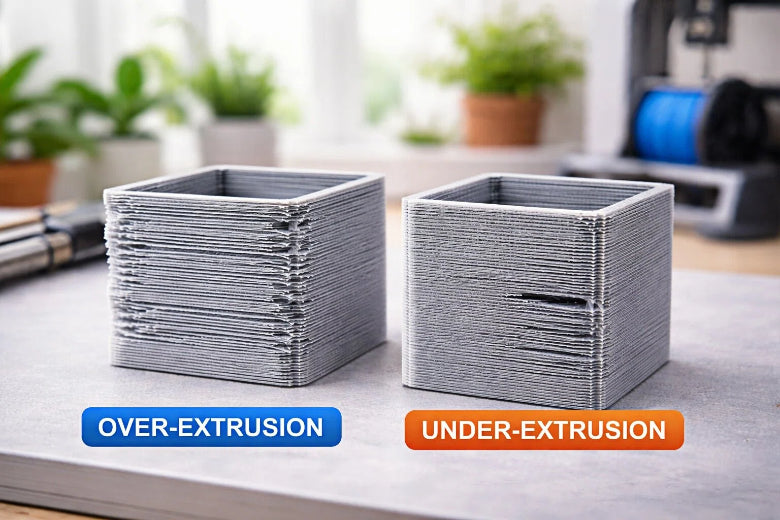
The main difference in over extrusion vs under extrusion 3D printing is the amount of filament being pushed out during the print. In over extrusion vs under extrusion 3D printing, over extrusion happens when too much material is extruded, while under extrusion occurs when there isn’t enough filament coming out. You can usually identify over extrusion vs under extrusion 3D printing by looking for certain signs: over extrusion often causes blobs or rough spots on your print, whereas under extrusion leads to weak prints or visible holes.
Understanding over extrusion vs under extrusion 3D printing is important because each issue affects print quality differently:
- Many users notice stringing and over extrusion vs under extrusion 3D printing quickly, but under extrusion can be harder to spot even though it weakens the print.
- Automated tools can help detect subtle issues like layer separation, which are often related to over extrusion vs under extrusion 3D printing, and guide you in fixing them.
- Since over extrusion vs under extrusion 3D printing have different visual cues, learning to recognize each one will help you produce stronger and better-looking prints.
Both over extrusion vs under extrusion 3D printing can be fixed by following the right troubleshooting steps and paying close attention to your printer’s performance.
Key Takeaways
- Over extrusion happens when too much filament comes out. This can make blobs and rough spots on your print. Look at your printer settings to stop this from happening.
- Under extrusion is when not enough filament comes out. This makes weak prints with holes or gaps. Check your nozzle and filament often for clogs.
- If you spot over or under extrusion early, you can save time and filament. Use a flashlight to look for problems while printing.
- You can fix over and under extrusion by changing flow rate, temperature, and slicer settings. Make small changes and test your print each time.
- Cleaning and checking your 3D printer often is important. Clean the parts and check the settings to stop extrusion problems.
What Is Over Extrusion?

Over Extrusion Definition
Over extrusion happens when the printer uses too much filament for each layer. This means extra material comes out. It can cause problems like less detail, drooping, and stringing. Sometimes, layers look thicker than normal. The print might bulge in some spots. Over extrusion makes it hard to get sharp corners or smooth sides.
Visual Symptoms of Over Extrusion
You can find over extrusion by checking your prints for certain signs. The table below lists the most common symptoms:
|
Blobs or zits on the outside |
|
Stringing or oozing between parts |
|
Rough and uneven walls |
|
Layers that look thick or squished together |
|
Model bulging or losing detail |
If you see these problems, your printer may be using too much filament.
Common Causes
Many things can cause over extrusion. The temperature might be set too high. This makes the filament flow too easily. The filament diameter setting could be wrong. The extrusion multiplier might be set too high. Here are some common causes:
- Wrong temperature settings
- Incorrect filament diameter
- Bad extrusion multiplier settings
Checking these settings can help you fix over extrusion.
Effects on Print Quality
Over extrusion changes print quality in many ways. Too much filament makes your print lose shape and detail. Extra material can make blobs and rough spots. The surface can look messy. Studies show over extrusion also lowers accuracy. Layers may not line up right. The surface can feel uneven. This happens because extra filament messes up how layers stack. It leads to a weaker and less exact print.
Tip: If you see blobs, rough walls, or thick layers, check your printer’s extrusion settings soon.
What Is Under Extrusion?
Under Extrusion Definition
Under extrusion happens when the printer does not use enough filament. This means less plastic comes out than needed. The layers do not fill in all the way. The print can be weak and break easily. You might see thin spots or missing pieces. The printer cannot make strong objects if this happens. Both small and big prints can have this problem.
Visual Symptoms of Under Extrusion
You can find under extrusion by checking your prints for signs:
- Layers look thin or are missing
- Holes show up in the print
- Gaps make the print easy to break
- Missing layers: flat spaces with no plastic
- Pockmarks and gaps: tiny holes or web shapes
- Weak, spongy parts: soft and crumble when touched
If you see these signs, your printer may not use enough filament.
Common Causes
Many things can cause under extrusion. The nozzle might be blocked. This stops filament from coming out. Sometimes, the filament size setting is wrong. The extrusion multiplier might be too low. Filament that changes size can also cause problems. Bad extrusion settings make it hard for the printer to work right.
- Blocked nozzles
- Filament size changes
- Wrong extrusion settings
To fix it, you can:
- Look at the nozzle for clogs.
- Check the filament for bumps or thin spots.
- Watch the printer during a test print.
Effects on Print Quality
Under extrusion hurts print quality a lot. Not enough filament leaves gaps between lines. The layers get weak and break fast. Air pockets inside make the part easy to snap. Thin walls and small details break first. If you want strong prints, fix under extrusion quickly.
Tip: Check your printer often for under extrusion. This helps keep your prints strong and looking good.
Over Extrusion vs Under Extrusion 3D Printing
When you use 3d printing, you might hear about over extrusion vs under extrusion 3d printing. These problems look different and happen for different reasons. They also change how your print turns out. You should learn to spot the signs and know what causes them. This helps you fix your prints and get better results.
Comparison Table
The table below lets you compare over extrusion vs under extrusion 3d printing. It shows the symptoms, causes, and effects of each problem side by side.
|
Feature |
Over Extrusion |
Under Extrusion |
|---|---|---|
|
Definition |
Too much filament comes out |
Not enough filament comes out |
|
Visual Symptoms |
Blobs, stringing, thick layers, bulging |
Gaps, thin layers, missing sections, holes |
|
Common Causes |
High temperature, wrong filament diameter, |
Clogged nozzle, low extrusion multiplier, |
|
|
high extrusion multiplier |
filament inconsistencies |
|
Effects on Print Quality |
Loss of detail, rough surface, weak corners |
Weak prints, fragile parts, poor layer bonding |
|
Ease of Detection |
Easier to spot due to visible defects |
Harder to notice, but prints break easily |
You can see over extrusion vs under extrusion 3d printing have different signs. Over extrusion usually makes blobs or thick layers. Under extrusion often causes gaps or missing parts. Both problems can mess up your print if you do not fix them.
Quick Identification Tips
You can tell the difference between over extrusion vs under extrusion 3d printing by looking for a few main signs. Experts say you should check these things:
- Over extrusion often leaves blobs or zits on the surface. You might see stringy bits between parts and layers that look too thick.
- Under extrusion usually makes gaps between lines of filament. You may notice thin layers, missing spots, or weak places that break when touched.
- Over extrusion is easier to see because the extra material stands out. Under extrusion can be hard to spot because the print might look okay at first, but it feels weak or breaks fast.
- If you see rough, bumpy walls or bulging corners, think about over extrusion. If you find holes, tiny marks, or missing layers, check for under extrusion.
- Always watch your first few layers. Problems with over extrusion vs under extrusion 3d printing often show up early.
Tip: Use a flashlight to check your print from different sides. This helps you see blobs, gaps, or missing spots you might not notice in normal light.
When you know what to look for, you can spot over extrusion vs under extrusion 3d printing before your print fails. This helps you keep your print quality good and save time and material.
Fixing Over Extrusion
When you notice over extrusion in your 3D prints, you can take several steps to fix it. You want to make sure your printer uses the right amount of filament for each layer. The following tips will help you adjust your settings and improve your print quality.
Adjusting Flow Rate
You should start by checking your flow rate. The flow rate controls how much filament your printer pushes out. If the flow is too high, you will see uneven lines and wrinkling on the top and bottom surfaces. To correct over extrusion, lower the flow rate value and run a new test print. Make small changes, usually between 0.03 and 0.05, to see how your print improves. Adjusting the flow rate is important for accurate results. If you set the flow too low, you might cause under-extrusion, which leads to gaps in your print.
- Lower the flow rate in small steps.
- Watch for changes in surface quality.
- If you see wrinkling or blobs, reduce the flow rate again.
Tip: Always test your new flow settings with a small print before starting a big project.
Calibrating Temperature and Speed
Temperature and speed also affect flow. If your nozzle temperature is too high, the filament will flow too easily, causing over extrusion. Try lowering the temperature by 5–10°C if you see blobs or strings. Print a small object and check the layers. Adjust the temperature again if needed. Printing too fast can also increase flow problems. Slow down the print speed to give the filament time to cool and settle.
- Lower the nozzle temperature if you see extra flow.
- Reduce print speed for better control.
Slicer Settings and Filament Checks
Your slicer settings play a big role in controlling flow. Check your flow rate and extrusion multiplier before each print. Set the extrusion multiplier between 0.92 and 0.98 for most materials. Start with a flow rate of 95% and print a test cube. If over extrusion continues, lower the multiplier by 1–2% and test again.
You should also measure your filament diameter in three places with calipers. Enter the average value into your slicer. Mark 120 mm on your filament above the extruder, then command the printer to extrude 100 mm. Measure how much filament actually moves. Adjust your E-steps in the firmware if needed.
- Check infill and retraction settings.
- Make sure acceleration and jerk controls are set correctly.
- Always use accurate filament measurements for better flow control.
Note: Careful slicer adjustments and regular filament checks help you avoid over extrusion and keep your prints looking sharp.
Fixing Under Extrusion
Checking for Clogs and Hardware Issues
You can fix under extrusion by checking your printer parts. First, look at the nozzle for clogs. Make sure the filament path is clear. The extruder should hold the filament tight. Check the tension to be sure. Clean the nozzle and feeding parts to remove dirt. Look at the gears and motor for damage. Heat the nozzle to the right temperature. Try to push filament through by hand. If it does not move, clean the nozzle with a thin needle or do a cold pull. Check your slicer’s extrusion settings to see if they are right.
If you take off the nozzle from the hotend, put it back the right way. Tighten the nozzle when it is hot. Leave a small space between the nozzle and heater block. This stops clogs and leaks.
Clean and check your printer often to stop under extrusion. Change old parts if problems keep happening. Always make sure your filament is dry and not tangled.
Adjusting Flow, Temperature, and Retraction
You can fix under extrusion by changing your printer settings. Change the flow rate in your slicer to fit your filament. If the flow is too low, raise it a little and test print. Set the nozzle temperature to match your filament. If it is too cool, layers will not stick well and under extrusion can happen. Change retraction settings with care. Too much retraction can grind the filament and block the nozzle. Too little can make stringing and blobs. Make travel speed faster to stop leaks and help print quality.
- Raise the flow rate if you see gaps or thin layers.
- Set the nozzle temperature high enough for smooth extrusion.
- Adjust retraction to stop grinding and clogs.
These steps help you get strong layers and better prints.
Filament Quality and Storage
Filament quality is important for stopping under extrusion. Filament can soak up water from the air. This can make layers weak and cause bubbles. Keep your filament dry with humidity between 35% and 50%. Keep the temperature steady to protect the filament. Dry filaments that soak up water to less than 0.1% moisture before use. Always check for knots or tangles before you load filament.
Good storage keeps your filament working well. You can stop many under extrusion problems by using dry, good filament. Good filament helps you get strong prints every time.
Preventing Extrusion Issues
Maintenance and Calibration
You can stop most extrusion problems with regular care. Clean your printer often and make sure it is set up right. This helps you avoid over extrusion and under extrusion. The table below shows how often to do each job:
|
Maintenance Task |
Frequency |
|---|---|
|
Clean nozzle and heat block |
Before every print |
|
Lubricate rails and bearings |
Regularly |
|
Inspect mechanical parts |
Monthly |
|
Replace worn belts, nozzles, PTFE |
As needed |
|
Adjust belt tension |
As needed |
|
Use high-quality filament |
Always |
Check the print bed and filament before you start printing. Clean the bed and look for dust or loose parts. Make sure you have enough filament. Lubricate moving parts every week. Tighten screws to keep the printer steady.
Tip: Cleaning the nozzle and rails helps your printer work well and last longer.
Slicer Best Practices
Slicer settings are important for stopping extrusion problems. You can change the flow rate and extrusion multiplier to fix prints. Calibrate the extrusion multiplier so your printer uses the right amount of filament. Adjust the flow setting to fix small problems without changing the firmware. These steps help you avoid blobs and gaps.
- Change the flow rate for small fixes.
- Calibrate the extrusion multiplier for better filament use.
- Adjust the flow setting to stop over or under extrusion.
Note: Even small changes in slicer settings can help your print look better.
Monitoring for Early Signs
Watch your prints closely to catch problems early. Many people use a camera to see blobs, gaps, or layer shifts. Cameras let you check your print from different sides. Some smart systems use computer vision or AI to find mistakes before you see them.
- Watch the first layers for trouble.
- Use a camera to check prints from all sides.
- Try smart tools that spot problems early.
Tip: Finding problems early saves time and filament. Stop the print if you see extrusion issues.
You can see the main differences in this table:
|
Type of Extrusion |
Symptoms |
Common Causes |
|---|---|---|
|
Under-extrusion |
Prints break easily; gaps; missing pieces |
Nozzle is blocked; wrong settings |
|
Over-extrusion |
Blobs; stringy lines; thick layers |
Too much flow; temperature is high |
Finding problems early helps you fix them fast. This makes your printer work better. You can stop problems by doing these things:
- Keep your printer clean and parts tight
- Check the temperature and use test cubes
- Oil moving parts often
Watch for early signs so your prints stay strong and look good!
FAQ
What is the fastest way to spot over extrusion?
You can spot over extrusion by looking for blobs or thick layers. Bulging corners are another sign. These problems show up early in the print. Shine a flashlight on your print from different sides to see them better.
Can under extrusion damage my 3D printer?
No, under extrusion will not hurt your printer. It only makes your prints weaker or missing pieces. Your printer parts will stay safe even if you have under extrusion.
How often should I calibrate my extrusion settings?
You need to calibrate your extrusion settings when you use a new filament brand or type. Doing this often helps stop both over extrusion and under extrusion.
What slicer setting helps most with under extrusion?
- Turn up the flow rate a little.
- Make the nozzle hotter if you need to.
- Look at the extrusion multiplier.
These steps help your prints come out smoother and stronger.
Does filament quality affect extrusion problems?
Yes! Bad or wet filament can cause over extrusion and under extrusion. Always keep your filament dry and check for knots before you print.


