


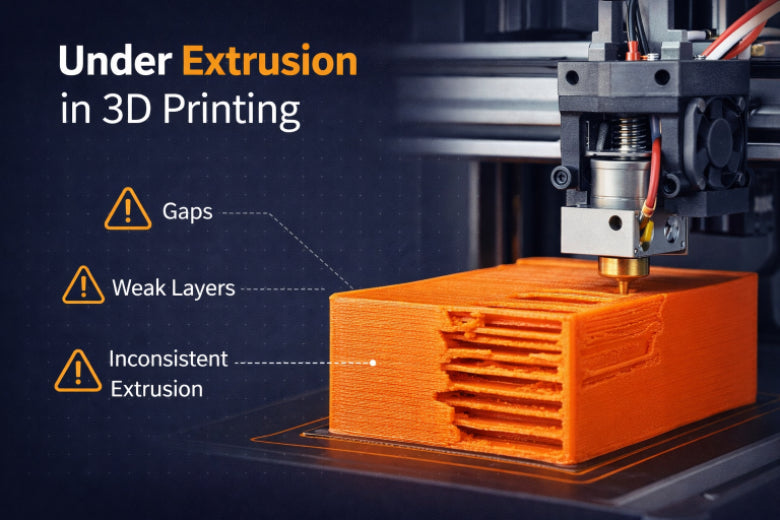
You might encounter 3D print under extrusion when 3D printing. This is a common problem that indicates your printer is not pushing out enough plastic. 3D print under extrusion occurs if the machine cannot move the filament effectively. You may notice thin layers or missing parts, and there can be visible holes in the structure. Gaps caused by 3D print under extrusion can make your print weak.
- Thin or missing layers
- Visible holes in the structure
- Gaps that make the print weak
Easy steps can help you fix 3D print under extrusion. These steps will also enhance the appearance of your prints.
Key Takeaways
- You can spot under-extrusion by looking for thin layers, gaps, and weak spots in your prints. These signs show your printer is not using enough filament.
- Change slicer settings like print speed, temperature, and extrusion multiplier to help filament flow better. Even small changes can really improve your print quality.
- Regular maintenance is important. Clean the nozzle, check the gears, and make sure the filament is good. This helps stop under-extrusion before it starts.
Identifying 3D Print Under Extrusion
Visual Signs of Under-Extrusion
You can spot under-extrusion by looking for certain clues in your 3d prints. The most common signs include:
- Missing layers: You may see horizontal gaps where the printer did not lay down plastic.
- Pockmarks and gaps: The top surface might have small holes or look webbed instead of solid.
- Weak, spongy parts: The print feels light and crumbles easily when you touch it.
These symptoms show a lack of extruded material. If you notice these problems, you are likely dealing with under extrusion.
Distinguishing Under Extrusion from Clogs
You might confuse under extrusion with a clogged nozzle. Both issues cause poor prints, but they are different. Here is how you can tell them apart:
- Under-extrusion often creates thin walls and weak infill, but the printer still pushes out some filament.
- A clog usually stops the filament completely or causes sudden stops in extrusion.
- If you see some plastic coming out but with gaps and weak spots, you likely have under extrusion, not a full clog.
Layer Adhesion and Weak Infill
Poor layer adhesion is a key sign of under-extrusion. Check your print for these symptoms:
|
Symptoms |
Description |
|---|---|
|
Thin Walls |
Walls look much thinner than expected and may break easily. |
|
Inconsistent Layer Lines |
Layers look uneven or wavy. |
|
Gaps and Holes |
Spaces appear where filament should be. |
|
Blobs and Zits |
Small bumps form as the flow of plastic changes. |
Common Print Failures
Under-extrusion in 3d printing leads to rough, incomplete, and weak prints. You may see visible gaps between layers. If you print a small cube and notice spaces between the outlines, this points to under extrusion. Always check for these signs before moving to the next troubleshooting step.
Causes of Under Extrusion in 3D Printing
Slicer Settings Issues
Under-extrusion can happen if slicer settings are wrong. These settings tell your printer how to use filament. If you print too fast, the filament may not melt right. If the nozzle is not hot enough, the plastic will not flow well. Retraction settings are important too. If retraction is set too high, it can block the filament. The extrusion multiplier controls how much plastic comes out. Even small mistakes in these settings can cause big problems.
|
Slicer Setting |
Issue Description |
Solution Description |
|---|---|---|
|
Print Speed |
Printing too fast stops the filament from melting. |
Slow down the print speed for better results. |
|
Printing Temperature |
A cool nozzle keeps filament from melting well. |
Make the nozzle hotter by 5–10°C. |
|
Retraction Settings |
Too much retraction blocks the filament. |
Lower retraction by about 1mm. |
|
Flow Rate (Extrusion Multiplier) |
Wrong value causes under extrusion. |
Raise the flow rate by 2–5% to close gaps. |
You should check and change these settings when you calibrate your printer.
Hardware Problems
Mechanical parts can also cause under-extrusion. Gears can wear out and slip. This means they do not hold the filament well. Bowden tubes can get blocked and stop the filament. You should look at the gears and clean them often. Change any broken gears to keep things working. Take out the Bowden tube and clean it with a sponge or cloth. This stops blockages and helps the filament move.
Filament Quality and Diameter
Bad filament can cause under-extrusion. If the filament is not the same size, you might see gaps or rough spots. Uneven filament can mess up your print and waste plastic. You should measure the filament size when you calibrate. Use good quality filament spools. Keep filament dry so it does not get wet.
Environmental and Maintenance Factors
Room temperature and humidity can change how your printer works. If the air is wet, the filament can soak up water. This makes layers weak. Hot rooms can make some plastics break down. This leads to bad prints. Keep your workspace cool and dry. Clean the nozzle and update firmware often. This helps stop under-extrusion.
Multiple Causes Combined
Sometimes, more than one thing causes under-extrusion. You may need to check slicer settings, hardware, filament, and your workspace. Fixing each thing step by step helps you solve the problem.
How to Fix Underextrusion Step by Step
You can fix underextrusion in 3d printing by following easy steps. Each step helps you find and fix the problem. This guide gives you simple ways to solve underextrusion.
Basic Checks and Quick Fixes
Start with easy checks before changing settings or taking things apart. These quick steps can show you what is wrong.
|
Check |
Description |
|---|---|
|
Isolate Problematic Sections |
Use your slicer’s cut tool to look at certain parts of the model. See if underextrusion is still there. |
|
Test Different Flow Patterns |
Change the first layer’s flow pattern to circles. This helps you see if there are mechanical problems. |
|
Check Mechanical Issues |
Look at the nozzle and other parts for anything blocking the filament. |
Check the filament size and make sure it matches your slicer. If you see gaps or thin layers, slow down the print speed. Make the nozzle hotter by 5–10°C. These quick fixes often help with simple extrusion problems.
Cleaning and Replacing the Nozzle
A dirty or clogged nozzle causes many underextrusion problems. You need to clean or change the nozzle to help the filament flow.
When you change the nozzle, do not turn the heat block. If the heat sink fits tight in the extruder, you will not have trouble. You can put a small piece of teflon or tape on top of the heat sink for a better fit. After you tighten the nozzle, leave a small gap between the nozzle and the heat block. This stops leaks.
To clean the nozzle, heat it up and use a soft brush or needle to get out dirt. If cleaning does not work, put in a new nozzle. This step often fixes underextrusion and makes prints look better.
Adjusting Retraction and Extrusion Multiplier
Retraction and extrusion multiplier settings control how much filament comes out. Wrong settings can cause underextrusion.
- Lower the retraction distance by 1mm. This helps stop blockages.
- Make the retraction speed a little faster. This keeps the filament moving.
- Change the extrusion multiplier in your slicer. Raise it by 2–5% to push out more filament and close gaps.
The extrusion multiplier is important for filament flow. If it is too high, you get blobs and too much plastic. If it is too low, you see gaps and not enough plastic. Calibrate the extrusion multiplier to stop problems like too much material or missing layers. Always test your settings with a small print before a big one.
Inspecting and Replacing Gears
Worn or loose gears can cause underextrusion. You need to check the gears and change them if needed.
- Take off the extruder cover.
- Look at the gears for damage or missing teeth.
- Clean the gears with a soft brush.
- Put in new gears if they are broken.
Clean gears hold the filament better and stop extrusion problems. Checking gears often keeps your printer working well.
Checking Filament and Bowden Tubes
Filament quality and Bowden tube shape affect extrusion. You should check both to fix underextrusion.
- Measure the filament with calipers. Make sure it matches your slicer.
- Use good filament for better results.
- Look at the Bowden tube for blocks or damage.
- Take out the tube and clean it with a soft cloth.
If the filament feels rough or breaks easily, get new filament. A clean Bowden tube helps the filament move without getting stuck.
Updating Firmware and Print Profiles
Sometimes, firmware updates or new print profiles cause underextrusion. You can fix this by resetting and updating your printer.
- Do a factory reset after updating firmware. This puts settings back to normal and fixes flow rate problems.
- Update your print profiles to match the new firmware.
- Check all settings after a reset. Make sure flow rate, temperature, and retraction are right for your filament and printer.
-
Tip: Always test a small print after updating firmware or profiles. This helps you see underextrusion before you start a big project.
- One user had underextrusion after a firmware update. They fixed it by doing a factory reset.
- Another user found that a reset after firmware changes made prints work again.
Performing a Cold Pull
A cold pull is an easy way to clean your nozzle and hotend. It pulls out stuck or burnt stuff and fixes small clogs.
A cold pull works best when the nozzle is only a little blocked and some filament still comes out. Use PLA filament for cold pulls because it cleans the nozzle tip well.
Steps for a cold pull:
- Heat the nozzle to printing temperature.
- Put in PLA filament and push out a little.
- Cool the nozzle to about 90°C.
- Pull the filament out fast. It will bring dirt with it.
Use a cold pull when you see thin gaps or underextrusion. Doing cold pulls often keeps your nozzle clean and stops big clogs.
- The cold pull works well for small clogs. It makes lines sharper and layers stick better.
- You do not need to take your printer apart for a cold pull.
- Doing cold pulls often keeps extrusion smooth and stops underextrusion.
Regular Maintenance Tips
Regular maintenance stops underextrusion and keeps your printer working well.
- Clean your printer often to get rid of dust and dirt.
- Lubricate moving parts like rods and bearings so they move smoothly.
- Check parts for damage or wear.
- Watch filament quality to stop clogs and keep extrusion even.
You should also calibrate your printer often. First layer calibration helps you see underextrusion early. Good maintenance and calibration fix underextrusion before it ruins your prints.
Note: Keep your workspace clean and dry. Store filament in airtight boxes to stop moisture problems.
By following these steps, you can fix underextrusion and make your 3d prints better. Each solution fixes a different cause and helps you solve underextrusion fast. Use these tips and setting changes to keep your 3d prints strong and smooth.
Slicer Settings That Cause Under-Extrusion
You can solve many under extrusion problems in 3d printing by adjusting slicer settings. These print settings control how much filament your printer pushes out, how fast it moves, and how hot the nozzle gets. If you set these values wrong, you may see 3d print under extrusion, gaps, or weak layers.
Flow Rate and Extrusion Multiplier
Flow rate and extrusion multiplier decide how much filament comes out of the nozzle. If you set the extrusion multiplier too low, you get under extrusion and gaps in your print. If you set it too high, you see blobs and rough surfaces. Many users fix under-extrusion by raising the flow rate from 95% to 100%. You should check your slicer settings and adjust the extrusion multiplier until your layers look solid.
- Adjust the extrusion multiplier in small steps (2–5%).
- Test with a small print after each change.
- Keep the flow rate steady in your start G-code.
Nozzle Temperature
Nozzle temperature affects how well the filament melts and flows. If the temperature is too low, you get poor flow and under-extrusion. If it is too high, you may see stringing or burnt filament. Use the right temperature for your material:
|
Material |
Nozzle Temp (°C) |
|---|---|
|
PLA |
180-220 |
|
ABS |
230-250 |
|
TPU |
220-245 |
For PLA, try 190–220°C. Lower temperatures give smooth surfaces, while higher ones improve layer bonding.
Print Speed and Acceleration
Print speed and acceleration change how fast your printer moves. If you print too fast, the extruder cannot keep up, causing under extrusion. Slow down your print speed if you see gaps or weak layers. Make sure your hotend can melt filament fast enough for your chosen speed.
Tip: Start with a slower speed and increase it only after you see strong, solid layers.
Layer Height and Line Width
Layer height and line width affect how much filament you need for each layer. If you set these values too high, your printer may not push out enough filament, leading to under-extrusion. Match your layer height and line width to your nozzle size for best results.
Retraction Settings
Retraction settings control how much filament pulls back during moves. If you set retraction distance too high, you may block the filament and cause under extrusion. Lower the retraction distance by 1mm and increase retraction speed slightly to keep the flow smooth.
Note: Always test adjustment of print settings with a calibration print before starting a big project.
|
Impact on Under-Extrusion |
|
|---|---|
|
Temperature |
Incorrect temperature can lead to poor filament flow. |
|
Speed |
High speeds may not allow enough filament to be extruded. |
|
Extrusion Amount |
Misconfigured extrusion settings can cause gaps in layers. |
You can fix under-extrusion by careful adjustment of print settings. Check each setting and make small changes until your prints look strong and smooth.
Hardware Issues That Lead to Under Extrusion
Clogged or Dirty Nozzle
Under-extrusion can happen if your nozzle is clogged or dirty. When the nozzle gets blocked, filament cannot move easily. This makes it hard for plastic to come out. Blockages inside the nozzle cause weak layers and gaps. Cleaning or changing the nozzle usually fixes this. If you see thin walls or holes, check for a clog. You can use a cold pull to remove dirt and help the filament flow again.
- Too much resistance in the nozzle stops filament from moving.
- Blockages inside the nozzle lead to under-extrusion.
- Cleaning or changing the nozzle helps fix the flow.
Worn Extruder Gears
If the extruder gears are worn out, under-extrusion can happen. You might not get any warning from the printer. Small gear problems can get worse over time. Look for uneven flow, thin walls, or gaps in your prints. Blobs and rough lines can also mean gear trouble. If you notice these signs, check the gears and replace them if needed.
- No warnings from the printer
- Uneven filament flow
- Thin walls and gaps in prints
- Blobs on the print surface
Bowden Tube Blockages
Blockages in the Bowden tube can cause under-extrusion and bad prints. You might see bumpy or rough lines while printing. Dirt or friction inside the tube can stop the filament. Bends or kinks in the tube also make extrusion uneven. If the filament skips or feels stuck when you push it, check the Bowden tube for blockages.
- Uneven extrusion and print quality
- Filament does not move smoothly
- Skipped spots during printing
Extruder Tension
Extruder tension controls how tight the gears hold the filament. If the tension is too loose, the filament slips and causes under-extrusion. If it is too tight, the filament can get squished and block the flow. Adjust the tension so the filament moves without slipping or getting stuck.
Tip: Try feeding filament by hand to test tension. You should feel steady pressure, not slipping or grinding.
Stepper Motor Problems
Stepper motors move the extruder and control filament flow. If the motor skips steps or gets too hot, you might see under-extrusion. Listen for clicking or sudden stops while printing. Check the motor wires and cooling to keep the flow steady.
|
Hardware Failure |
Description |
|---|---|
|
The shaft might be too short and not connect right. Fix it if it bends or moves. |
|
|
Nozzle plugs |
This is common and can be fixed with a cold pull to clear the nozzle. |
You can fix under-extrusion by checking each hardware part. Clean the nozzle, look at the gears, clear the Bowden tube, set the right extruder tension, and check the stepper motor. These steps help the filament flow well and make your 3d prints better.
Filament Problems and Under-Extrusion
Filament problems can make your prints have under-extrusion. You should check your filament before you start printing. Wet filament, wrong size, or bad storage can cause weak layers and gaps. If you know how filament works, you can fix under-extrusion.
Wet or Moist Filament
Wet filament can cause under-extrusion and bad prints. Water in the filament turns to steam in the hotend. This makes bubbles, gaps, and clogs in the nozzle. You might see weak layers and rough spots on your print. The table shows what happens when filament gets wet:
|
Finding |
Description |
|---|---|
|
Filament Diameter Increase |
Filament can get 5% bigger if kept in a wet place. |
|
Nozzle Clogging |
Wet filament can block the nozzle when water turns to steam. |
|
Adhesion Alteration |
Wet filament can change how layers stick by up to 68%. |
|
Mechanical Property Deterioration |
ABS gets weaker if moisture goes from 0.1% to 0.6%. |
You can dry filament in a warm oven or use a filament dryer. Always keep filament in sealed boxes to stop under-extrusion.
Inconsistent Diameter
Filament that is not the same size can cause under-extrusion. Your printer needs the filament to be the right size. If it is too thick, it can jam the extruder. If it is too thin, you get gaps and weak spots. Use calipers to check the size before you use it. Good filament helps you stop under-extrusion and keeps your settings right.
Material-Specific Issues
Different filaments act in their own ways. PLA does not soak up much water, but ABS and nylon do. Some filaments need hotter nozzles to stop under-extrusion. Always look at the print settings for your filament. If your filament is wet, you can use thinner layers to make prints stronger.
Storage and Handling
Good storage stops under-extrusion. Keep filament dry and out of the sun. Use sealed bags with desiccant packs inside. Handle filament gently so it does not bend or break. Good storage keeps filament ready for printing and helps you avoid under-extrusion.
Tip: Check your filament before you print. Make sure it is dry, clean, and the right size. This helps you get strong and smooth prints.
Test Prints to Verify Fixes
Recommended Test Patterns
You can use test prints to check if you fixed under-extrusion. Simple patterns help you see changes in your printer. Try printing a single-wall cube, a thin-walled cylinder, or a calibration line. These shapes show gaps, weak spots, and rough surfaces. You can spot under extrusion quickly with these patterns. Use the same print settings for each test so you can compare results.
- Single-wall cube
- Thin-walled cylinder
- Calibration line
Tip: Print a small test first. You save time and filament while checking for under-extrusion.
Signs of Improvement
Look for clear signs that your fixes worked. Strong layers, smooth surfaces, and solid walls mean you solved under-extrusion. You should see no gaps or holes. The print should feel sturdy when you touch it. If you changed print settings, check if the layers look even. Good adhesion between layers shows you fixed under extrusion.
|
Sign |
What It Means |
|---|---|
|
No gaps or holes |
Under-extrusion is gone |
|
Smooth surfaces |
Print settings are correct |
|
Strong walls |
Filament flows well |
When to Try the Next Step
If you still see under extrusion after a test print, move to the next troubleshooting step. Change one thing at a time, like nozzle temperature or flow rate. Print another test after each change. You can fix under-extrusion by adjusting print settings, cleaning hardware, or checking filament. Keep testing until you see strong, smooth prints. You will learn how each fix affects your 3d printing results.
Note: Always record your changes. This helps you track what solved under-extrusion and makes future troubleshooting easier.
Common Mistakes When You Fix Under-Extrusion
When you try to fix under-extrusion, you can make mistakes. These mistakes can slow you down. If you know about these errors, you can avoid them. This helps you fix under-extrusion faster.
Overcorrecting Settings
You might want to change many slicer settings at once. This is not a good idea. If you raise the extrusion multiplier too much, you get new problems. Too much flow makes blobs and rough spots. If the nozzle is too hot, it can burn filament. Change only one setting at a time. Test with a small print before making more changes.
Tip: Make small changes to see what works best. Moving slowly gives better results.
Changing Too Many Variables
If you change lots of things together, you will not know what worked. You may change print speed, temperature, and retraction all at once. This makes it hard to find the real problem. Change one thing, print a test, and check what happens.
Common variables people change:
- Print speed
- Nozzle temperature
- Retraction distance
- Extrusion multiplier
Skipping Maintenance
You might forget to clean the nozzle or check the gears. Dust, clogs, and worn parts can cause under-extrusion. If you skip maintenance, the problem comes back. Clean the hot end, check the gears, and set the right tension.
|
Maintenance Task |
Why It Matters |
|---|---|
|
Clean nozzle |
Gets rid of clogs and dirt |
|
Stops gears from slipping |
|
|
Inspect heatbreak unit |
Prevents design problems |
Ignoring Filament Issues
You may only look at printer settings and forget about filament. Wet filament, wrong size, or bad quality can cause under-extrusion. Always check your filament before you print. Dry it, measure the size, and keep it in a sealed box.
Note: Good filament helps you stop under-extrusion and makes prints strong.
Quick Checklist to Fix Under-Extrusion
Step-by-Step Troubleshooting List
You can solve under extrusion in 3D printing by following a simple checklist. This list helps you find and fix under-extrusion quickly:
- Inspect your print for gaps, thin layers, or weak spots.
- Check the filament diameter and quality before loading it.
- Clean the nozzle to remove any blockages that cause under-extrusion.
- Adjust slicer settings like flow rate, temperature, and retraction.
- Examine extruder gears for wear or slipping.
- Look at the Bowden tube for bends or dirt.
- Dry your filament if you suspect moisture.
- Run a test print to see if under extrusion improves.
- Repeat steps as needed until your print looks strong and smooth.
Tip: Change only one setting at a time. This makes it easier to see what fixes under-extrusion.
Essential Tools
You need the right tools to fix under extrusion. These tools make troubleshooting easier and help you prevent under-extrusion in future prints.
- FM1 - Filament Maintainer keeps filament clean and ready.
- FD1 - Filament Dryer removes moisture from filament.
- Calipers measure filament diameter for accuracy.
- Soft brush cleans gears and nozzle.
- Needle or cleaning kit clears nozzle blockages.
|
Tool Name |
Purpose |
|---|---|
|
FM1 |
Maintains filament quality |
|
FD1 |
Dries filament |
|
Calipers |
Checks filament diameter |
|
Soft brush |
Cleans gears and nozzle |
|
Needle/Kit |
Removes nozzle clogs |
When to Seek Help
If you still see under-extrusion after trying these steps, you may need help. Ask for advice in online forums or from local makers. You can contact support for your printer if you cannot solve under extrusion. Sometimes, a professional can spot problems you missed.
Note: Do not hesitate to ask for help. Fixing under extrusion can take time, but you will learn more with support.
You can solve under-extrusion if you follow each step. Doing regular maintenance stops under extrusion from happening. Always look at your printer for signs of under extrusion. Use the checklist and test prints to find under-extrusion early. If you need more help, join online groups or read guides.
- Clean your printer often so you do not get under-extrusion.
- Dry your filament to keep under extrusion away.
- Change slicer settings if you notice under extrusion.
- Test prints help you see if under-extrusion is fixed.
- Ask for help if under extrusion does not go away.
FAQ
What causes under extrusion in 3D printing?
Under extrusion can happen if the nozzle is clogged, slicer settings are wrong, filament is bad, or extruder gears are worn out.
How do you fix under extrusion quickly?
To fix under extrusion fast, clean the nozzle, check if the filament is the right size, slow down the print speed, and make the nozzle hotter by 5–10°C.
Can wet filament lead to under extrusion?
|
Problem |
Result |
|---|---|
|
Wet filament |
Gaps and weak layers |
You should dry your filament before you print. This helps stop under extrusion in 3D printing.


