


In 3D printing, understanding print acceleration vs speed 3D printing is crucial for achieving optimal results. Print speed refers to how quickly the printer moves the nozzle along each axis, while print acceleration vs speed 3D printing highlights how fast the printer ramps up to its set speed or slows down. The key difference is that speed determines the maximum pace, whereas acceleration dictates how quickly you reach that pace. Mastering both print acceleration vs speed 3D printing is essential for producing strong, accurate prints efficiently. Think of it like driving: speed is your steady cruising rate, and acceleration is how quickly you get up to that rate.
- Increasing print speed can reduce mechanical strength, but your material selection also plays a significant role.
- The orientation of the build plate impacts strength more than print acceleration vs speed 3D printing.
- Printing with the Y-axis orientation generally yields better impact and tensile strength.
Key Takeaways
- Print speed shows how fast the nozzle moves. Acceleration tells how quickly it gets to that speed. You need to balance both for the best prints.
- If you use higher print speeds, layers can be weaker. Surfaces might look rough. Try different speeds to see what works best for your material.
- Change acceleration settings to stop shaking. This helps make prints look better. Lower acceleration can give more detail. But it might make printing take longer.
- Each material needs its own speed and acceleration settings. Always look at the recommendations for the best results.
- Before you start big projects, test new speed and acceleration settings. Use small prints first to check quality and save time.
Print Acceleration vs Speed in 3D Printing
What Is 3D Printing Speed?
3D printing speed is how fast the printer’s nozzle moves when it lays down material. This speed is measured in millimeters per second (mm/s). When you pick a print speed, you tell the printer how quickly to move as it prints. The speed you choose changes how long your print takes and how well each layer sticks together.
Printing speed is not only about the print head moving fast. It also depends on how quickly the extruder pushes out filament and how the material cools. If you set the speed too high, you might get weak layers, rough surfaces, or even nozzle jams.
Here is a table that shows how top 3D printing companies explain important movement words:
|
Term |
Definition |
|---|---|
|
Velocity |
The speed at which the print head or extruder moves at any given time. |
|
Acceleration |
The limit on how fast the printer can change its velocity, represented as the slope of the line. |
|
Jerk |
The rate at which acceleration changes, indicating how quickly the printer can adjust its speed. |
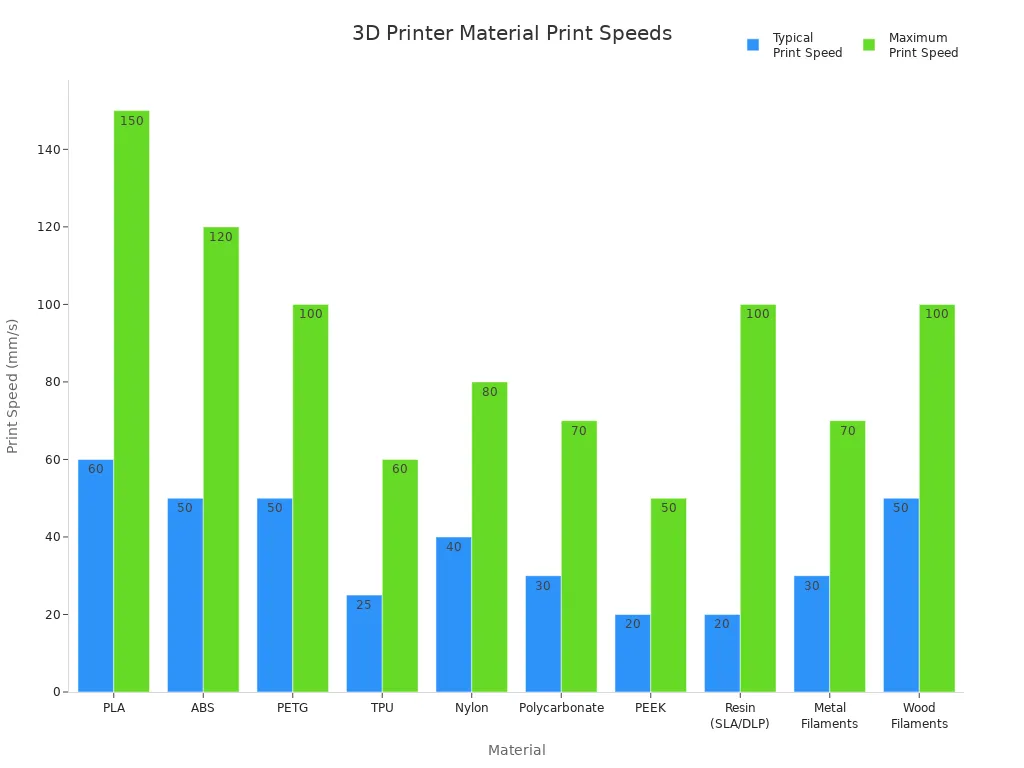
Different printers and materials have their own best speed ranges. For example, PLA works well at 50-70 mm/s, but flexible materials like TPU need slower speeds. Here is a chart that compares normal and top print speeds for popular materials:
Print speed affects the whole printing process, including:
- Pre-processing stage: Getting the printer and model ready.
- Build stage: The time spent printing the object.
- Post-processing stage: Taking off supports and cleaning the print.
Many things change the best print speed for your project:
- Nozzle diameter: Bigger nozzles print faster but with less detail.
- Slicer settings: Lower infill and simple patterns make prints faster.
- Material properties: Some materials need slower speeds for good results.
- Trade-offs: Faster speeds can lower quality, but slower speeds give more detail and strength.
What Is Print Acceleration?
Print acceleration tells the printer how quickly it can go from a stop to its set speed or slow down before a turn. You can think of acceleration like how fast a car speeds up after a red light or slows down before a curve. In 3D printing, acceleration is measured in millimeters per second squared (mm/s²).
When you change acceleration, you control how fast the print head gets to its top speed. High acceleration makes the printer move faster between points, but this can cause shaking or vibrations. These shakes can make your print look bad with lines or ghosting. Lower acceleration makes the printer move smoother, which helps print quality but takes more time.
Acceleration settings control how quickly the print head can speed up or slow down. In FDM 3D printing, acceleration means how fast the printer goes from a stop to its top speed or slows down before turning. High acceleration can make prints faster but may cause shaking, which hurts print quality. Low acceleration means longer print times but smoother prints.
Most desktop printers use acceleration between 10–20 mm/s², but some advanced printers can use higher values, especially Delta or CoreXY machines.
Key Differences and Relationship
Knowing about print acceleration vs speed 3d printing helps you get better prints. Here are the main differences:
- Print speed is the fastest the print head can go.
- Print acceleration is how quickly the print head gets to that speed or slows down.
Print speed is like your speed on a highway, and print acceleration is how fast you get to that speed after stopping at a light. If you set a high print speed but low acceleration, your printer will take longer to reach its top speed, especially on short moves. This means the printer might never reach the speed you set, so the print takes longer.
The main reason for that is the 3D printer’s acceleration. Even at 30mm/s, we only manage to maintain 69% (1k acc) vs 85% (3k acc) of the set target speed. This shows that acceleration significantly impacts the ability to maintain speed and quality during printing.
Here are some important things to remember about print acceleration vs speed 3d printing:
- Print speed changes how fast your print finishes and can change quality.
- Print acceleration changes how quickly your printer turns or speeds up, which affects detail and smoothness.
- Both settings work together. If you want faster prints, you need to balance both speed and acceleration.
- Different printers and materials need different settings for the best results.
Many people think faster print speed always means faster prints, but that is not true. If your acceleration is too low, your printer will not reach the set speed on short moves. Also, printing at top speed can cause problems like weak layers or ringing. Materials like PLA and ABS can handle higher speeds, but flexible or special filaments need slower, careful settings.
When you change print acceleration vs speed 3d printing, you should think about the printer type, the material, and how much detail you want. For big, simple prints, you can use higher speeds and acceleration. For small, detailed parts, lower settings will give you better results.
Tip: Always test new settings with a small print before starting a big project. This helps you find the best balance between speed, acceleration, and print quality.
By learning about print acceleration vs speed 3d printing, you can make better choices and get great prints every time.
Impact of Speed and Acceleration Parameters
Effects on Print Quality
Changing speed and acceleration changes how your 3D print looks. Printing speed is how fast the nozzle moves to make each layer. If you use a slow speed, the print cools better and looks more detailed. Fast speeds can make layers uneven and the surface rough.
Acceleration is also important. It tells the printer how quickly it can speed up or slow down. If acceleration is too high, the printer might shake. This shaking can make lines or waves on your print. Lower acceleration helps the printer move smoothly and keeps details sharp.
Here is a table that shows what happens at different speeds:
|
Speed (mm/s) |
Effect on Dimensional Accuracy |
Effect on Surface Finish |
|---|---|---|
|
20 |
Tight tolerances, minimal deformation |
Improved cooling, better solidification |
|
40 |
Optimal bonding, reduced thermal gradients |
Enhanced surface quality |
|
60 |
Greater errors in Z-axis height |
Increased surface undulation, potential sagging |
Slower speeds give you better accuracy and smoother prints. Faster speeds save time but can lose detail.
Researchers have used special computer models to study these effects. For example:
- One study used an LSTM network to see how infill patterns change machine acceleration.
- The adaptive cubic infill pattern changed the accuracy of printed parts a lot.
- The model was very good at predicting acceleration, so the results are reliable.
You should pick speed and acceleration based on your print. Detailed prints need slow speeds and low acceleration. Simple shapes can use faster settings.
Effects on Print Time
Speed and acceleration also change how long printing takes. If you print faster, your object is done sooner. But if acceleration is too low, the printer may not reach top speed on short moves. This can make the print take longer.
Here is a table that shows the trade-offs:
|
Acceleration Setting (mm/s²) |
Trade-off Description |
|---|---|
|
1000-3000 |
Prints faster, but may cause ghosting or ringing |
- High acceleration helps the printer get to top speed quickly and saves time.
- Low acceleration slows things down but can make prints look better.
- You can use different speeds for different parts, like infill or walls, to save time and keep the outside nice.
If you want a quick prototype, use high speed and lower detail. For parts that must fit together or look good, use slow speed and low acceleration.
Common Issues (Ringing, Ghosting)
Wrong speed and acceleration can cause print problems. Two common issues are ringing and ghosting. These look like wavy lines or shadows near corners.
- High acceleration and jerk can make the printer shake. This shaking causes ghosting, which looks like repeated patterns on the print.
- Fast speed can also cause too much material to come out, making edges messy.
- Loose belts, screws, or a shaky table can make these problems worse.
Here is a table that shows how different printers use speed and acceleration:
|
Printer Type |
Print Speed (mm/s) |
Acceleration (mm/s²) |
Jerk (mm/s) |
|---|---|---|---|
|
Cartesian |
40-60 (outer walls) |
500-1500 |
8-12 |
|
Delta |
50-70 (outer walls) |
1000-2000 |
10-15 |
|
CoreXY |
50-70 (outer walls) |
1000-2000 |
10-15 |
You can lower ringing and ghosting by using lower acceleration and jerk. For example, using 1900 mm/s² for the Y-axis can help. Some people use 2500 mm/s² if their printer is stable, and this can also help with ghosting.
Tip: Always check your printer’s belts and screws before changing speed or acceleration. A steady printer gives better prints.
If you see layers moving, weak spots, or rough surfaces, try lowering speed and acceleration. Always test new settings with a small print before making something big.
How to Speed Up 3D Prints Safely
Balancing Speed and Acceleration
You can speed up your 3D prints without losing quality by making careful changes to speed and acceleration. Start with medium print speeds and slowly increase them. Set acceleration to about 500 mm/s² for smoother prints. Keep jerk values between 5-10 mm/s for steady movement. Input shaping helps reduce vibrations. Adjust cooling fan speeds to prevent shaking.
Try printing several test objects at different acceleration and jerk settings. Look for ghosting, ringing, or rough spots. Lower acceleration gives smoother corners and better details. Higher acceleration prints faster but may cause more defects.
You can also change layer height and nozzle size in your slicer settings. Thicker layers and bigger nozzles finish prints quickly but lose fine details. Thinner layers and smaller nozzles give smoother surfaces but take longer. This approach helps you find optimal 3d print speeds for your project.
Tip: Always make small changes and test before printing a large object.
Adjusting for Different Printers and Materials
Different printers and materials need different settings. FDM printers work well with jerk settings of 10-20 mm/s. Start with lower acceleration to avoid quality issues. Gradually increase jerk to find a balance between speed and print quality.
|
Setting |
Description |
Recommended Range |
|---|---|---|
|
Acceleration |
Controls how quickly the printer accelerates to its set speed. Higher values can reduce print time but may introduce artifacts. |
1000-3000 mm/s² |
|
Jerk |
The initial speed change when the printer starts moving. Higher values can reduce layer time but may affect quality. |
10-20 mm/s (start low) |
Materials also affect how to speed up 3d prints. Use this table to guide your settings:
|
Filament Type |
Recommended Travel Speed (mm/s) |
|
|---|---|---|
|
PLA |
40–150 |
120–200 |
|
PETG |
30–80 |
100–150 |
|
ABS |
30–60 |
120–150 |
You should adjust head movement speed based on the material. PLA allows faster speeds, while PETG and ABS need slower settings for good results.
Troubleshooting and Fine-Tuning
If you see print quality problems, try these steps:
- Reduce print speed to help layers stick better.
- Adjust cooling fan speed so layers cool before the next one prints.
- Calibrate your printer to prevent missed steps from overheating motors.
You can fine-tune your settings by following these steps:
- Open your slicer software.
- Find the speed and acceleration settings.
- Set jerk to 5 mm/s and acceleration to 800 mm/s².
- Print a small test object.
- Check for ghosting, ringing, or rough spots.
- Write down your settings and results.
- Change one setting at a time and print again.
This process helps you find the best balance for your printer and material. As you learn more, you will see the future of 3d printing speed depends on smart adjustments and careful testing.
Note: Always document your changes. This makes it easier to repeat good results and avoid past mistakes.
You now know how print speed and acceleration are different. Print speed is how fast the printer moves when it lays down filament. Acceleration is how quickly the printer gets to its top speed or slows down. Both settings change how your print looks and how fast it finishes.
- If you make print speed higher, you can finish prints faster, but layers might not line up or stick well.
- Check what your printer can handle before you change print speed or maximum speed.
- Using higher acceleration makes prints finish sooner, but it can make the printer shake or leave marks.
- If you balance print speed and acceleration, your prints will turn out better.
- Changing print speed and maximum speed for each material helps layers stick and look smooth.
- Picking the right print speed and maximum speed for every print stops stringing and under-extrusion.
- Trying different print speed and maximum speed settings helps you get better prints, saves time, and makes prints stronger.
Test new print speed and maximum speed on small prints first. Look for any changes in how the print looks. Write down what works best. When you learn about print speed and maximum speed, your 3D prints will always be better.
FAQ
What is the difference between 3d printing speed and acceleration?
You set 3d printing speed to control how fast the nozzle moves. Acceleration tells the printer how quickly it reaches that speed or slows down. Both affect print quality and time. You need to adjust both for the best results.
How does 3d printing speed affect print quality?
When you increase 3d printing speed, you finish prints faster. High speed can cause rough surfaces or weak layers. Lower speed gives you smoother prints and better details. You should test different speeds to find what works best for your project.
Why is acceleration important in 3D printing?
Acceleration controls how quickly your printer changes speed. If you set acceleration too high, you may see shaking or ghosting. Low acceleration gives you smoother prints but takes more time. You need to balance acceleration and speed for strong, accurate prints.
What happens if I set maximum printing speed but keep acceleration low?
If you set maximum printing speed but use low acceleration, your printer will not reach the top speed on short moves. This means your print will take longer. You should match acceleration with your speed settings for efficient printing.
Tip: Always test new 3d printing speed and acceleration settings with a small print before starting a big project.
Can I use the same speed and acceleration for all materials?
No, you should not use the same speed and acceleration for every material. PLA works well at higher 3d printing speed and acceleration. Flexible or special filaments need lower speed and gentle acceleration. Always check the recommended settings for your filament.
|
Material |
3d Printing Speed (mm/s) |
Acceleration (mm/s²) |
|---|---|---|
|
PLA |
50–70 |
1000–2000 |
|
TPU |
20–30 |
500–1000 |
|
ABS |
30–60 |
1000–1500 |


