


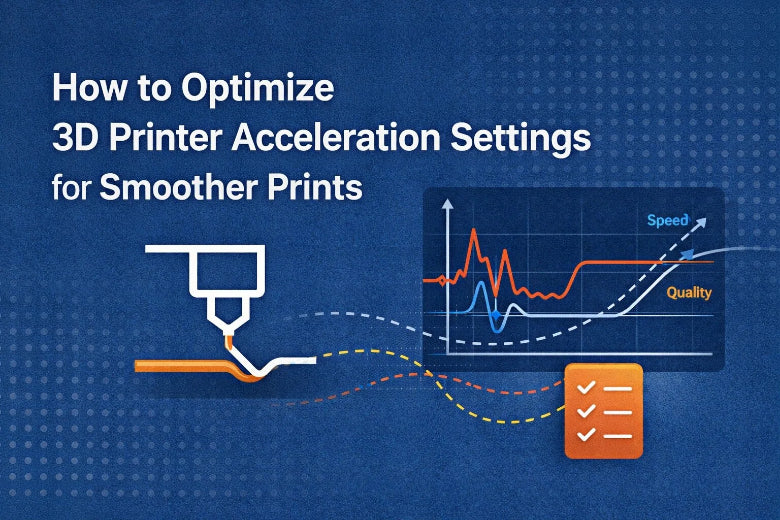
You control how fast your printer accelerates and slows down with 3d printer acceleration settings. These settings help you decide how quickly your printer changes speed during 3d printing. If you choose values that are too high, your prints may look rough. Too low, and prints take much longer. Finding the right balance helps you get smoother results and better quality.
Key Takeaways
- Changing acceleration settings helps you balance speed and quality. You need to find the best numbers to stop rough prints.
- High jerk settings can make lines and bumps on prints. Set jerk between 5 and 10 mm/s for smoother moves.
- Try calibration prints to test different acceleration settings. This helps you find the best settings for your printer.
- Do regular maintenance like checking belt tightness and cleaning. This makes your printer last longer and gives better prints.
- Always write down your settings and results. This helps you remember changes and make better prints next time.
Understanding 3D Printer Acceleration Settings
What Is Acceleration in 3D Printing
You use 3d printer acceleration settings to change how fast your printer speeds up or slows down. These settings control how quickly the print head moves faster or slower. In FDM 3d printing, acceleration means how fast the printer goes from stopped to its top speed or slows down before turning. This can change how fast your printer works and how good your prints look.
Here is a simple table to help you with the main words:
|
Parameter |
Definition |
|---|---|
|
Maximum speed |
The fastest the print head can move on each axis. |
|
Direction change speed |
The top speed allowed before the printer turns. |
|
Acceleration |
How quickly speed changes between direction change speed and max speed. |
If you set acceleration too high, your printer might shake or move too much. If it is too low, your prints will take more time to finish.
Tip: Good acceleration settings help your printer last longer and make your prints look better.
How Acceleration and Jerk Affect Quality
Acceleration and jerk settings work together to make your printer move smoothly. Jerk is how fast your printer can change speed right away without speeding up slowly. If jerk is set too high, you might see lines or bumps on your prints. Many people see wavy lines or ripples if jerk is not set right. Changing jerk can help you get smoother corners and better surfaces.
-
-
Lines or bumps
-
Less sharp details
-
-
Balanced jerk settings can:
-
Make prints look better
-
Hide some mistakes
-
Common Print Defects from Incorrect Settings
Wrong 3d printer acceleration settings can cause common print problems. You might see:
- Wavy lines near sharp corners (ringing)
- Faint shapes on flat parts (ghosting)
- Rough spots or small mistakes at high speeds
Slower perimeter speeds can help fix these problems. Lower speeds let the filament stick better and flow more smoothly, which helps your prints look nicer. You may see smoother prints and fewer mistakes when you use the right settings.
Print Speed vs Quality: Finding the Right Balance
How Acceleration Impacts Print Speed
You can change how fast your printer moves by changing 3d print speed and acceleration. When you use higher acceleration, the printer head gets to its top speed faster. This helps you finish 3d prints quicker and saves time. The acceleration and jerk settings in your slicer change both speed and quality. If you set them right, you can make prints faster without losing too much detail.
- Acceleration settings tell your printer how fast it can reach its top speed.
- Jerk settings help the printer turn smoothly, which makes prints more accurate.
- Changing these settings is important for the best print speed and quality.
If you want to print faster, you need to find a good balance between speed and quality. Higher acceleration lets you print faster, but it can also make the printer shake more. This can hurt print quality if you set it too high.
Quality Trade-Offs with Faster 3D Printing
When you make your printer go faster, you might see changes in your prints. Higher print speeds can make the printer shake and move less exactly. This can cause rough spots or small mistakes. Slower speeds help your prints look better because they let the printer make better details and stronger layers. Simple models can be printed faster, but detailed models need slower speeds to look good.
|
Acceleration Setting (mm/s²) |
Trade-off Description |
|---|---|
|
1000-3000 |
Can make prints faster but may cause ghosting or ringing. |
- If you print faster, you might see ghosting or ringing on your prints.
- Slower speeds give you smoother surfaces and better details.
- Always look at your prints for problems when you change speed settings.
Recommended Acceleration Ranges
You can use these normal acceleration ranges for most desktop 3d printers:
|
Printer Type |
Acceleration Range |
|---|---|
|
Typical |
10–20 mm/s |
|
Delta/CoreXY |
Higher than typical |
The type of material you use also changes how fast and good your prints are. High-speed PLA and Speed Plus Resin work well for faster prints. The kind of filament, layer height, and nozzle size all change 3d print speed and quality. For example, PLA works well at 40–150 mm/s, and PETG works best at 30–80 mm/s.
Tip: Use a bigger nozzle and thicker layers to print faster, but use smaller nozzles and thinner layers for better details.
To get the best print speed and quality, start with the recommended acceleration values. Try different speeds and check your prints. Change your settings until you find the right balance for your project.
How to Adjust 3D Printer Acceleration Settings
Tuning your 3d printer acceleration settings helps you print faster and smoother. You change these settings in slicer software. This guide shows you how to find slicer settings and use test prints for better results.
Accessing Settings in Slicer Software
Most slicers let you change acceleration and jerk settings. Each slicer has a different way to do this. Here is a table that shows how some slicers work:
|
Slicer Software |
Acceleration Settings Approach |
Additional Features |
|---|---|---|
|
PrusaSlicer |
Advanced settings available |
Calibration Menu, Custom Scripts |
|
Bambu Studio |
Advanced settings, remote control focus |
Quick slicing |
|
Cura |
Extensive customization, manual adjustments required |
Third-party printer support, custom scripts |
To change acceleration and jerk in Cura, do these steps:
- Open your project in Cura.
- Go to Preferences.
- Click Configure taken settings.
- Find the Speed section.
- Change Max Acceleration and Jerk values.
Start with jerk at 5 mm/s and acceleration at 800 mm/s². PrusaSlicer and Bambu Studio have similar options in advanced or speed menus.
Note: Slicer updates can change how you set these options. Always look for new choices after updating. If you use special firmware, make sure slicer settings match your printer’s controls.
Step-by-Step Tuning for Faster 3D Printing
Use these steps to tune your 3d printer acceleration settings for faster printing:
- Adjust Print Speed Settings: Set your print speed in the slicer. Higher speeds print faster but may lower quality.
- Change Acceleration and Jerk Settings: Raise or lower acceleration and jerk. These control how fast the print head starts and stops. Make small changes and check your prints.
- Modify Layer Height: Use bigger layer heights to print faster. This saves time but may lose detail.
- Save and Slice: Save your changes and slice your model.
- Run Test Prints: Print a small test object. Look for ghosting, ringing, or rough spots.
- Document Results: Write down your settings and what you see in each test print.
- Repeat as Needed: Change one setting at a time and print again. This helps you find the best speed and quality.
Tip: Test one change at a time. This helps you see what works best.
Here is a checklist to help you test and write down your changes:
- Make a test plan before starting.
- Set up your test data and models.
- Check your printer before testing.
- Test each script or scenario for problems.
- Look at your test prints for quality issues.
- Make sure your printer is ready for testing.
- Set the test run time if needed.
- Change runtime settings if needed.
- Watch system use during testing.
- Write down any slicer changes you make.
Using Calibration Prints for Optimization
Calibration prints show how acceleration and jerk settings change your printing. Print simple shapes like cubes or towers to test your settings. Each print shows how your printer handles speed and movement.
Here is a table that shows how different acceleration settings change print quality:
|
Acceleration Setting (mm/s²) |
Observed Effect on Print Quality |
Notes |
|---|---|---|
|
300 |
Minimal ghosting |
Gentle acceleration, better corners |
|
400 |
Slight ghosting |
Good balance of speed and quality |
|
500 |
Noticeable ghosting |
Some ringing may appear |
|
600 |
Increased ghosting |
Artifacts become more visible |
|
700 |
Significant ghosting |
High acceleration affects quality |
|
800 |
Severe ghosting |
Excessive ringing and artifacts |
Print several test objects at different acceleration and jerk settings. Look for ghosting, ringing, or rough spots. Lower acceleration gives smoother corners and better details. Higher acceleration prints faster but may cause more defects.
Tip: Use a bigger nozzle and thicker layers to print faster. Use a smaller nozzle and thinner layers for better detail.
You can also change layer height and nozzle size in slicer settings. These changes affect speed and quality. Thicker layers and bigger nozzles finish prints quickly but lose fine details. Thinner layers and smaller nozzles give smoother surfaces but take longer.
Test prints help you see how your changes work. Always write down your slicer settings and test results. This helps you find the best 3d printer acceleration settings for your needs.
Troubleshooting and Best Practices
Identifying Acceleration-Related Print Issues
You may notice some common problems when you adjust acceleration settings. These issues often show up as print defects. Use the table below to help you spot and fix them:
|
Error Message |
Common Solutions |
|---|---|
|
Unable to start print job |
1. Save images as bitmap if in jpeg format. |
|
|
2. Disable hardware acceleration in printer software settings. |
|
|
3. Make sure you select the correct printer for the print job. |
|
|
4. Install the latest printer driver if problems continue. |
|
|
5. For network printers, install a second driver locally and use the printer's IP address. |
You might also see ghosting, ringing, or rough edges on your prints. These often mean your acceleration or jerk settings are too high. Lowering these values can help you get better print quality and smoother surfaces.
Tips for Consistent Quality and Speed
You can follow these tips to keep your prints looking good and finishing on time:
- Start with medium print speeds and slowly increase them.
- Set acceleration to about 500 mm/s² for smoother prints.
- Keep jerk values between 5-10 mm/s for steady movement.
- Use input shaping to reduce vibrations.
- Adjust cooling fan speeds to prevent shaking.
Acceleration and jerk settings play a big role in print stability. High acceleration can make your printer move roughly, which leaves marks on your prints. Lowering these settings can improve quality and help your printer last longer.
Tip: Always test new settings with a small print before starting a big project.
Long-Term Stability for 3D Printing
To keep your printer running well over time, you need to care for both your machine and your settings. Here are some best practices:
- Check belt tension often to stop slipping and keep prints accurate.
- Update your printer's firmware to get better performance and stability.
- Clean the build plate before each print and check for damage.
- Clean your printer after each print and do a deep clean every month.
- Lubricate moving parts and clean nozzles to catch problems early.
Experienced users know that fine-tuning acceleration and jerk settings helps the print head move better. This leads to faster prints and fewer problems like poor layer adhesion. When you understand how each setting affects your printer, you can control the process and get the best detail and print quality every time.
You can get smoother prints if you change your 3D printer acceleration settings one step at a time. Always try to keep speed and quality balanced for the best prints. Test new settings, write down what you change, and make changes for each project. Taking care of your printer often helps it work well and stops many problems. The table below shows how good habits help your printer last longer and work better:
|
Benefit |
Description |
|---|---|
|
Maintenance helps your printer last longer. |
|
|
Optimizes Performance |
Regular care gives you better print results. |
FAQ
What are 3D printer acceleration settings?
Acceleration settings let you control how fast the printer head speeds up or slows down. These settings help you choose between printing faster or getting better quality. Good acceleration settings stop shaking and make the surface look nicer.
How do I know if my acceleration settings are too high?
You might see wavy lines or ghosting on your prints. Sometimes, the printer shakes or makes loud sounds. If this happens, try lowering your acceleration settings. Always look at your test prints for problems.
Can I use the same acceleration settings for all materials?
No, you cannot use the same settings for every material. PLA can handle higher acceleration. PETG and ABS need lower acceleration for good prints. Always test new materials with calibration prints first.
Where do I change acceleration settings in my slicer?
You can find acceleration settings in the advanced or speed part of your slicer software. Look for choices called "Acceleration" or "Jerk." Change these numbers before you slice your model.
Do acceleration settings affect printer lifespan?
Yes, lower acceleration settings help your printer last longer. They put less stress on belts and motors. Your prints stay smooth and your printer stays in good shape with regular care.


