


You can make your printer work well by using a simple 3d printer lubrication guide. Lubricating often stops parts from wearing out and keeps prints correct. If you use too much lubricant, printed parts can get weaker after some time, so always use the right amount. Anyone can learn this routine.
Key Takeaways
- Lubricating your 3D printer often helps it work well and last longer. Try to lubricate every month or two, or after printing for 50 to 100 hours.
- Pick the correct lubricant for each part. PTFE-based grease is good for lead screws. Light oil works best for guide rods.
- Clean your printer before you put on lubricant. This helps the lubricant stick better and stops dust from making problems.
Why Lubrication Matters For 3D Printers
Benefits Of Regular Lubrication
You want your 3D printer to work well and last a long time. Lubrication helps a lot. When you use the right lubricant, your printer moves easier. Check out this table to see how regular lubrication helps your printer:
|
Benefit |
Description |
|---|---|
|
Reduction of Friction |
Lubrication lowers friction between moving parts. This makes the printer run smoother. |
|
Prevention of Wear |
Lubrication helps parts last longer by stopping too much rubbing. |
|
Enhancement of Output Quality |
Lubrication helps prints look better by keeping movements steady. |
You will also hear less noise when your printer is working. Lubrication keeps rods, bearings, and lead screws moving quietly. Here’s what happens:
- Lubrication cuts down friction between moving parts.
- Movements become smoother and more exact.
- Print quality stays good and your printer lasts longer.
You will not hear as many squeaks or feel vibrations. Your printer works better and your prints look nicer.
Risks Of Skipping Maintenance
If you do not lubricate, your printer can have problems.
Lubrication stops squeaks and vibrations that happen when you use your printer a lot. It also helps all the moving parts work together smoothly. If you forget to do this, friction goes up. This can make your prints look bad and wear out your printer faster.
You might hear loud sounds or see the axes shake. More friction can make parts get hot and swell, so prints look bent. Rubbing all the time wears out parts, making them loose and causing print mistakes. If you do not take care of your printer, it will not last as long and your prints will not look as good.
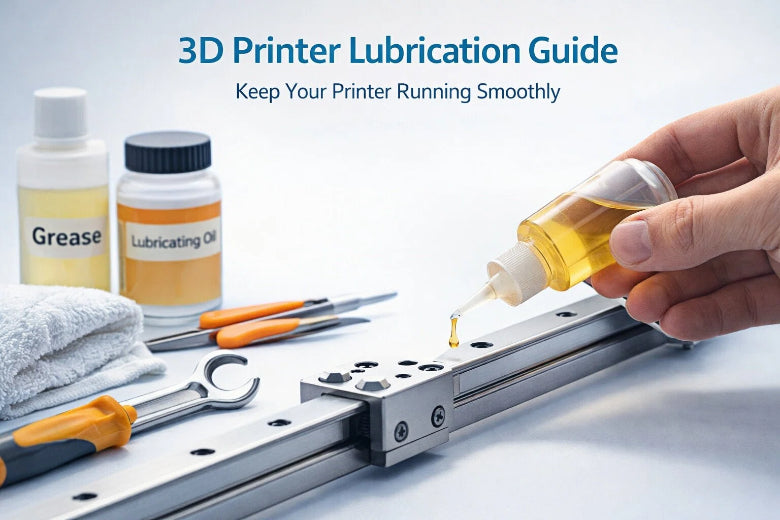
3d Printer Lubrication Guide: Tools, Parts, And Safety
Essential Tools And Lubricants
You need the right tools and materials needed before you start. Grab a soft brush for dust, a brass brush for nozzles, and a lint-free cloth with isopropyl alcohol for cleaning surfaces. For lubrication, choosing the right lubricant makes a big difference. Check out this table to see which types of lubricants work best for different parts:
|
Lubricant Type |
Where to Use |
|---|---|
|
PTFE-based grease |
Lead screws, rails |
|
Light oil |
Guide rods |
|
Super Lube Oil/Grease |
General lubrication |
|
Rods, bearings |
|
|
Lucas white lithium grease |
Bondtech gears |
You can use greases for leadscrews unless the nut is plastic. Oils work well for rods. Tri-Flow is great for rods and bearings.
Parts To Lubricate On Your 3D Printer
You want your printer to run smoothly. Focus on these parts:
- Linear rails
- Rods
- Bearings
- Ball screws
- Lead screws
- Extruder assembly (gears and filament drive)
Lubricating these parts reduces friction and wear. Your Z-axis especially needs attention because it moves up and down a lot.
Safety Precautions Before You Start
Safety precautions help you avoid accidents. Always unplug your printer and let it cool down. Clean all surfaces before you apply lubricant. Use gloves if you want to protect your hands. Make sure you follow your printer’s manual for specific instructions.
Tip: Never lubricate parts while the printer is powered on. This keeps you safe and prevents damage.
Step-by-step Guide: How To Lubricate Your 3D Printer
If you want your printer to last longer and work better, you need a 3d printer lubrication guide that anyone can follow. This step-by-step guide will walk you through each part of the process. You’ll learn how to lubricate your 3d printer, avoid common mistakes, and keep your machine in top shape. Let’s get started!
Power Down And Prepare
Before you do anything, make sure your printer is safe to work on. Here’s how to get ready:
- Place your printer on a stable, flat surface. This keeps it from moving while you work.
- Turn off your printer and unplug it from the wall. Wait for it to cool down.
- Check for any damage or loose parts. Tighten any screws or bolts if needed.
- Remove any covers or panels that block access to the rails, rods, or bearings. Be gentle so you don’t break anything.
- Gather your tools: a soft brush, lint-free cloth, isopropyl alcohol, and your chosen lubricant (like PTFE-based grease or white lithium grease).
Tip: Always unplug your printer before starting any maintenance routine. This keeps you safe and protects your printer.
Clean Rails, Rods, And Screws
Clean parts help the lubricant stick and work better. Here’s what you should do:
- Use a soft brush to sweep away dust and debris from the rails, rods, and screws.
- Dampen a lint-free cloth with isopropyl alcohol. Wipe each part until it looks clean and shiny.
- For stubborn grime, use a brass brush gently.
- Let everything dry before you move to the next step.
Note: Cleaning first is a key part of any 3d printer lubrication guide. Dirt and old grease can cause problems if you skip this step.
Apply Lubricant Evenly
Now you’re ready to apply lubricant. Proper lubrication means using just enough—not too much, not too little. Here’s how to lubricate 3d printer parts the right way:
- Start with a small amount of lubricant. Too much can attract dust and cause issues.
- Use an applicator, lubricant pen, or wear a rubber glove to spread the lubricant. Don’t use your bare hands.
- Apply lubricant drops at intervals along the rods and rails.
- Spread the lubricant evenly by moving the applicator back and forth.
- Test the lubricant on one axis first to make sure it works well with your printer.
|
Tool or Applicator |
Best Use |
|---|---|
|
Lubricant pen |
Precise application on rods |
|
Grease gun |
Even spreading on lead screws |
|
Prusa applicator set |
Universal use for all components |
Lubricate Z-Axis And Bearings
The Z-axis and bearings need special attention. Here’s a simple step-by-step tutorial:
- Clean the Z-axis lead screws and bearings with isopropyl alcohol.
- Apply a small amount of PTFE-based grease or white lithium grease to the lead screws and bearings.
- Rotate the lead screws by hand to spread the lubricant.
- Move the print head or bed up and down to help distribute the grease.
- Wipe off any extra lubricant with a clean cloth.
Note: Never use WD-40 on your printer. It can damage the components. Stick to lubricants made for 3d printer lubrication.
Move Parts To Distribute Lubricant
After you apply lubricant, you need to spread it out. Here’s how to lubricate 3d printer parts for even coverage:
- Move the print bed back and forth along the Y-axis guide rail.
- Slide the print head along the X-axis.
- Raise and lower the Z-axis.
- Repeat these movements a few times. This helps the lubricant reach every spot.
Tip: Listen for squeaks or rough spots. If you hear or feel anything odd, add a tiny bit more lubricant and move the parts again.
Avoiding Excess Oil And Common Mistakes
Proper lubrication means not using too much oil or grease. Here are mistakes to avoid:
- Don’t over-lubricate. Extra oil can attract dust and cause uneven movement.
- Always check for loose screws or parts before you start.
- Clean the extruder feeder wheels. Dust here can cause jams.
- Don’t over-tighten screws after maintenance. This can damage your printer.
|
Issue |
Description |
|---|---|
|
Too much oil can make parts move unevenly. |
|
|
Increased wear |
Over-lubrication can actually wear out parts faster. |
|
Potential damage |
Thick or extra oil can harm your printer’s components. |
Maintenance Frequency And Tips
How often should you lubricate your 3d printer? It depends on how much you use it. Here’s a quick guide:
|
Lubricant Type |
Recommended Frequency |
|---|---|
|
PTFE (Teflon) Spray |
Every 1–2 months |
|
Silicone Oil |
Every 3–6 weeks |
|
Synthetic Grease |
Every 4–6 months |
|
Dry-Film Lubricant |
Every 6+ months |
|
White Lithium Grease |
Monthly |
- Lubricate every 50–100 hours of printing or every 1–2 months if you print a lot.
- Clean after every print to keep dust and grime away.
- Check for loose nuts and bolts during each maintenance routine.
- Inspect rods, bearings, and screws for wear or damage.
- Keep your print bed clean with isopropyl alcohol.
- Learn basic maintenance tasks like tightening screws and cleaning feeder wheels.
Maintenance tips: Stick to a regular schedule. This keeps your printer running smoothly and extends its life.
You now have a complete 3d printer lubrication guide. With this step-by-step guide, you know how to lubricate 3d printer parts, avoid mistakes, and keep your machine in great shape. Make this part of your regular maintenance routine for the best results!
You can keep your printer running smoothly with these simple steps:
- Pick the right lubricant.
- Power off and clean your printer.
- Apply lubricant to rails, screws, and bearings.
- Reassemble and test.
- Set a routine.
Regular lubrication reduces friction, improves print quality, and extends your printer’s life.
FAQ
How often should you lubricate your 3D printer?
You should follow the 3d printer lubrication guide every 1–2 months or after 50–100 hours of printing. Regular 3d printer maintenance keeps your machine running smoothly.
What lubricant works best for 3D printers?
PTFE-based grease or light oil works well for most parts. Always check your printer manual before you choose a lubricant for your 3d printer maintenance routine.
Can you use WD-40 on your 3D printer?
No, you should not use WD-40. Stick to lubricants made for 3d printer lubrication guide. WD-40 can damage your printer’s components and affect print quality.


