


A Z seam in 3D printing is a small line or mark that runs up the side of your print. You see this line where each new layer begins and ends. The print head stops and starts at the same spot for every layer, which leaves a slight bump or scar. You might notice it most on smooth surfaces. Z seam 3D printing can make your finished object look less perfect, but you can learn how to spot and manage it.
Key Takeaways
- A Z seam is a vertical line on your 3D print where each layer starts and stops. It can affect the appearance of your model.
- You can manage Z seams by adjusting slicer settings. Options like 'Random' or 'Sharpest Corner' can help hide or spread out seams.
- Rotating your model in the slicer can place the seam on a less visible side, improving the overall look of your print.
- Proper retraction and extrusion settings are crucial. They help prevent blobs or gaps that make seams more noticeable.
- Experiment with different settings and techniques to find what works best for your specific print. Practice leads to better results.
What is a Z seam in 3D printing?
Z seam definition and appearance
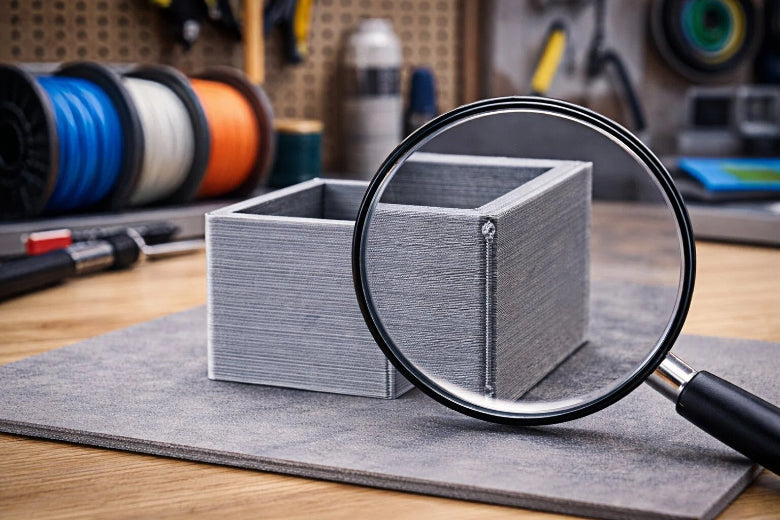
You might notice a thin, vertical line running up the side of your 3d printing project. This line is called a Z seam. Some people also call it a seam, a zit, or a scar. The Z seam forms where the printer starts and stops each layer. You can think of it like a tiny bump or scratch that appears in the same spot on every layer. If you look closely at your print, you may see this line standing out, especially on smooth or shiny surfaces.
Tip: If you run your finger along the side of a finished print, you can often feel the Z seam as a slight ridge.
Where Z seams show on prints
The Z seam usually appears as a straight line from the bottom to the top of your object. You will see it most clearly on tall, smooth shapes like cylinders or figurines. Sometimes, the seam looks like a series of small dots or blobs stacked on top of each other. The way the Z seam shows up depends on the type of object you print.
Here is a simple table to help you see how Z seams look on different 3d printing projects:
|
Object Type |
Z Seam Appearance |
|---|---|
|
Figurines |
More pronounced seams due to aesthetic needs |
|
Mechanical Parts |
Less visible seams depending on design |
If you print a figurine, you may notice the Z seam more because you want the surface to look smooth and perfect. On mechanical parts, the seam might not matter as much, especially if the design hides it or if the part will not be seen.
When you learn about z seam 3d printing, you start to notice these lines and marks. You can use this knowledge to improve your prints and make them look better.
Why does a Z seam occur?
Layer changes and nozzle movement
When you use 3d printing, the printer builds your object one layer at a time. The print head moves around the shape, laying down melted plastic. At the end of each layer, the print head must stop and then move up to start the next layer. This action creates a spot where the printer starts and stops the flow of material. You see this spot as a line or mark on your print.
The movement of the print head during these layer changes can make the Z seam more visible. If the printer does not move smoothly or if there are small mechanical issues, you might notice lines or bumps at the same spot on every layer. These lines show up because the printer repeats the same path for each layer. The seam position stays in one place unless you change the settings.
You can think of the seam position as the place where the printer "takes a breath" before starting the next layer. If the printer always starts in the same spot, the seam position forms a straight line up the side of your print. This line can affect how your object looks, especially if you want a smooth finish.
Extrusion pause and seam formation
The Z seam also forms because of how the printer handles the flow of plastic. When the print head finishes a layer, it pauses the extrusion, pulls back the filament a little, and then moves to the next starting point. This pause and movement can leave a small blob or gap. If the printer pushes out too much plastic, you get a bump. If it does not push out enough, you see a small hole.
The way the printer handles filament retraction plays a big role in seam formation. Here are some important points:
- Proper retraction settings help reduce Z seam visibility by stopping extra plastic from leaking out during moves.
- Improper retraction settings can make Z seams worse. You might see under-extrusion or extra blobs along the seam position.
- Changing the seam position can help hide the seam or spread it out so it is less noticeable.
The seam position also depends on how well the layers stick together. Good interlayer bonding helps make the seam less obvious. If the layers do not bond well, the seam can look rough or weak.
The main causes of Z seams are the way the printer starts and stops each layer, the movement of the print head, and how the printer handles the flow of plastic. By understanding these steps, you can see why Z seams appear during 3d printing and how the seam position affects your finished object.
Z seam 3D printing effects
Visible lines and surface marks
When you look closely at a 3d printing project, you might spot a visible z seam running up the side. This seam often appears as thin lines or tiny defects that break up the smooth look of your print. You may also notice blobs or zits along the seam. Blobs look like small lumps of extra material, while zits appear as tiny dots. Both can collect where each layer starts and ends, making the seam stand out even more. This material accumulation can affect the surface finish of the model, especially if you want a clean, polished finish.
The type of model you print changes how much you notice the seam. On smooth, round shapes like vases or figurines, seam visibility increases because there are no corners to hide the line. Prints with sharp edges or corners can help disguise the seam, making it less obvious. Some materials, like shiny or light-colored filaments, also make the seam easier to see. If you use matte or dark materials, the seam might blend in better.
Tip: If you want a better finish, try rotating your model in the slicer so the seam falls on a less visible side.
When Z seams matter
Z seam 3d printing effects can matter a lot, depending on what you plan to do with your print. If you print a display piece or a part where looks are important, a visible seam can ruin the finish. For example, a figurine with a seam on the face will not look as good. If you print parts that need to fit together, a large seam can stop them from joining properly. This is because the seam adds extra thickness in one spot.
You can often ignore the seam if the part will be hidden or used for testing. Many people do not worry about seam visibility on mechanical parts or inside surfaces. You should focus on seam placement and finish when you want a smooth look or need precise fits. Z seam 3d printing can affect both the appearance and function of your prints, so knowing when to care about it helps you get the results you want.
Controlling Z seam in 3D printing

Slicer settings for seam placement
When you want to control the look of your prints, you need to understand how slicing software handles seam settings. Slicing software lets you choose where the Z seam appears by changing seam settings. These settings help you decide if you want the seam to line up in one place or spread out across your print.
Here are some common seam settings you will find in slicing software:
- Nearest: This setting places the seam on the closest edge of each layer. You can hide the seam in sharp corners or inside angles.
- Aligned: The seam lines up from bottom to top, following the same path. This setting uses layer start point alignment, which gives your print a uniform look.
- Random: The seam moves to different spots on each layer. This setting spreads out the seam, making it less visible but sometimes causing small bumps.
- Rear: The seam always goes to the back of the print. This works well if you want to hide the seam on a side that faces away.
- Seam gap distance: You can adjust the gap between the start and end of each layer to make the seam less noticeable.
- Staggered inner seams: This setting shifts the seam inside the print, making a zigzag pattern that can make your part stronger.
- Scarf joint placement: The printer overlaps the seam, which can hide it better but may take more time.
You can also find seam settings like "user specified," "shortest," and "sharpest corner" in some 3d printing software. Each option gives you more control over seam placement and helps you improve print quality.
Tip: Try different seam settings in your slicing software to see which one gives you the best results for your project.
Tips to minimize or hide Z seams
You can use several solutions to make Z seam 3d printing less visible and improve the quality of your prints. Here are some easy tips:
- Rotate your model: Place the seam on a less visible side by turning your object in the slicer.
- Use random seam settings: Spread the seam out so it does not form a straight line. This can help hide the seam, but sometimes you may see small zits.
- Choose aligned seam settings: If you want a neat look, keep the seam in one place using layer start point alignment. This works well for models with corners.
- Hide the seam in corners: Use the nearest or sharpest corner seam settings to tuck the seam into a spot where it is hard to see.
- Check your extrusion and retraction settings: Too much or too little plastic can make the seam stand out. Adjust these settings to avoid blobs or gaps.
- Optimize print settings: Try changing print speed or temperature, but remember that these changes may not always improve seam visibility.
- Keep your printer well-calibrated: A stable printer and good calibration help you get the best quality and reduce seam problems.
Here is a table showing how different seam settings affect your print:
|
Seam Setting |
Appearance |
Best Use Case |
|---|---|---|
|
Aligned |
Straight, uniform seam |
Models with corners |
|
Random |
Scattered, less visible seam |
Smooth, round objects |
|
Nearest |
Seam hidden in corners |
Mechanical parts, figurines |
|
Rear |
Seam at the back |
Display models |
If you follow these tips and try different seam settings in your slicing software, you can control Z seam 3d printing and get better quality prints. Remember, every model is different, so test your settings to find what works best for you.
You now know that a Z seam is a mark that appears on your 3d printing project because the print head starts and stops each layer. You can manage these seams by trying slicer settings like 'Sharpest Corner' or 'Random' to hide or spread out the marks. Many beginners learn by experimenting and using resources such as beginner 3D printing classes or blogs. Z seams are normal, and you can improve your results with practice. Keep learning and enjoy your printing journey!
FAQ
What is the easiest way to hide a Z seam?
You can rotate your model in the slicer. Place the seam on a side that does not show. Many slicers let you pick the seam location. Try the "rear" or "sharpest corner" setting for best results.
Can I remove Z seams after printing?
You can sand the seam gently with fine sandpaper. This helps smooth out bumps or lines. For best results, use light pressure and check your progress often.
Do all 3D printers make Z seams?
All FDM 3D printers create Z seams. The seam forms where the print head starts and stops each layer. You can reduce the seam, but you cannot remove it completely.
Will changing filament color affect the Z seam?
|
Filament Color |
Seam Visibility |
|---|---|
|
Light |
High |
|
Dark |
Low |
|
Matte |
Lower |
|
Shiny |
Higher |
Darker and matte filaments hide seams better. Shiny or light colors make seams easier to see.


