


This guide is organized as a workflow rather than a shopping list, so you can see where each tool fits between loading filament and putting a finished part on the shelf.
Quick Checklist: The 3D Printer Tools Worth Knowing First
|
Tool category |
Common tools |
Main task |
When to use it |
|---|---|---|---|
|
Print removal |
Thin spatula, scraper |
Lift a cooled print off the build plate |
After the plate reaches room temperature |
|
Gripping |
Tweezers, needle-nose pliers, flush cutters |
Pick fine debris, pull supports, hold parts |
Support removal and part handling |
|
Cleaning |
Brushes, nozzle-cleaning needle |
Clear dust and plastic crumbs; open a partial clog |
Plate prep and hotend maintenance |
|
Shaping |
Files, sandpaper, deburring tool |
Smooth layer lines, burrs, and hole edges |
Post-processing |
|
Cutting |
Hobby blade, deburring tool |
Trim support scars and stringing |
Fine cleanup after supports come off |
|
Measuring |
Digital caliper |
Check filament diameter, part size, hole fit |
Before and after printing |
|
Storage |
Bag, case, labeled container |
Keep sharp tools sheathed and findable |
After every session |
A spatula here means a thin, flat blade you slide under a print. A deburring tool is a small handle with a pivoting blade that shaves sharp edges and leftover material. A caliper is a measuring tool with jaws and a sliding scale.

Treat this as a menu, not a mandatory list. A printer with a flexible build plate may barely need a spatula, while a model with dense tree supports will make tweezers and flush cutters earn their place.
The Main Tool Categories, Explained Simply
Each category below exists because it solves one recurring task. Skip the ones that don't match how you print.
3D Print Removal Tools: Spatulas and Scrapers

A removal tool's job is to break the bond between part and plate without cracking either one. The sequence matters more than the tool: let the plate cool, check whether the part has already released, then slide a thin spatula under one edge at a low angle with steady pressure. Forced prying is how plates get gouged and bases get warped. Flexible steel plates often let prints pop off with little or no tooling, so the right approach depends on your build surface and material. For surface care between prints, see our 3D printer maintenance guide.
Pliers, Tweezers, and Gripping Tools
These look similar but do different jobs. Tweezers handle fine work: plucking a stray blob, pulling a thin support tip out of a cavity, holding a small part while you inspect it. Needle-nose pliers have long tapered jaws for reaching into tight spots and gripping stubborn support trees. Flush cutters are side-cutting pliers that leave a nearly flat cut, useful for snipping support pillars and trimming filament tails.
Cleaning Brushes and Nozzle-Cleaning Tools

A brush sweeps dust and plastic crumbs off the build plate and around the hotend before they end up embedded in a first layer. A nozzle-cleaning needle clears a partial clog by pushing softened material out. Follow the printer manufacturer's procedure and make sure the tool and surrounding area are safe to handle before cleaning. Our 3D printer maintenance guide covers the sequence; there is no single cleaning interval that fits every machine.
Files, Sandpaper, and Deburring Tools
Deburring means removing sharp edges and leftover material from a printed part. A file takes down a lump fast; sandpaper smooths a surface or blends layer lines; a deburring tool is effective for cleaning up modeled holes and for removing support material from edges, as Dassault Systèmes describes. Sanding throws dust, so work in a ventilated space.
Blades and Support-Removal Tools
A hobby blade trims support scars, stringing, and thin flash that a file would tear rather than cut. Cut away from your body, keep the blade sharp, and retract or sheath it the moment you're done. The safety section below covers handling in more detail.
Measuring Tools Such as Digital Calipers
A digital caliper has four measurement surfaces: outside jaws for widths and diameters, inside jaws for holes and slots, a depth rod for pockets, and a step face for height differences. Repeatability matters more than the last decimal; resolution is not the same as accuracy, as 3D Printing by Kevin notes. Use it for filament diameter, calibration cubes, and hole sizes. When a printed part doesn't fit, the measurement you take is the starting point for judging whether the cause is shrinkage, an undersized hole, or a clearance issue in the design.
Storage and Organization Tools
A bag, case, or labeled container keeps blades sheathed, stops small parts from vanishing, and means the next print starts in seconds instead of a search. It is the least glamorous category and the one you'll notice most.
How These Tools Fit Into a Complete Print Workflow
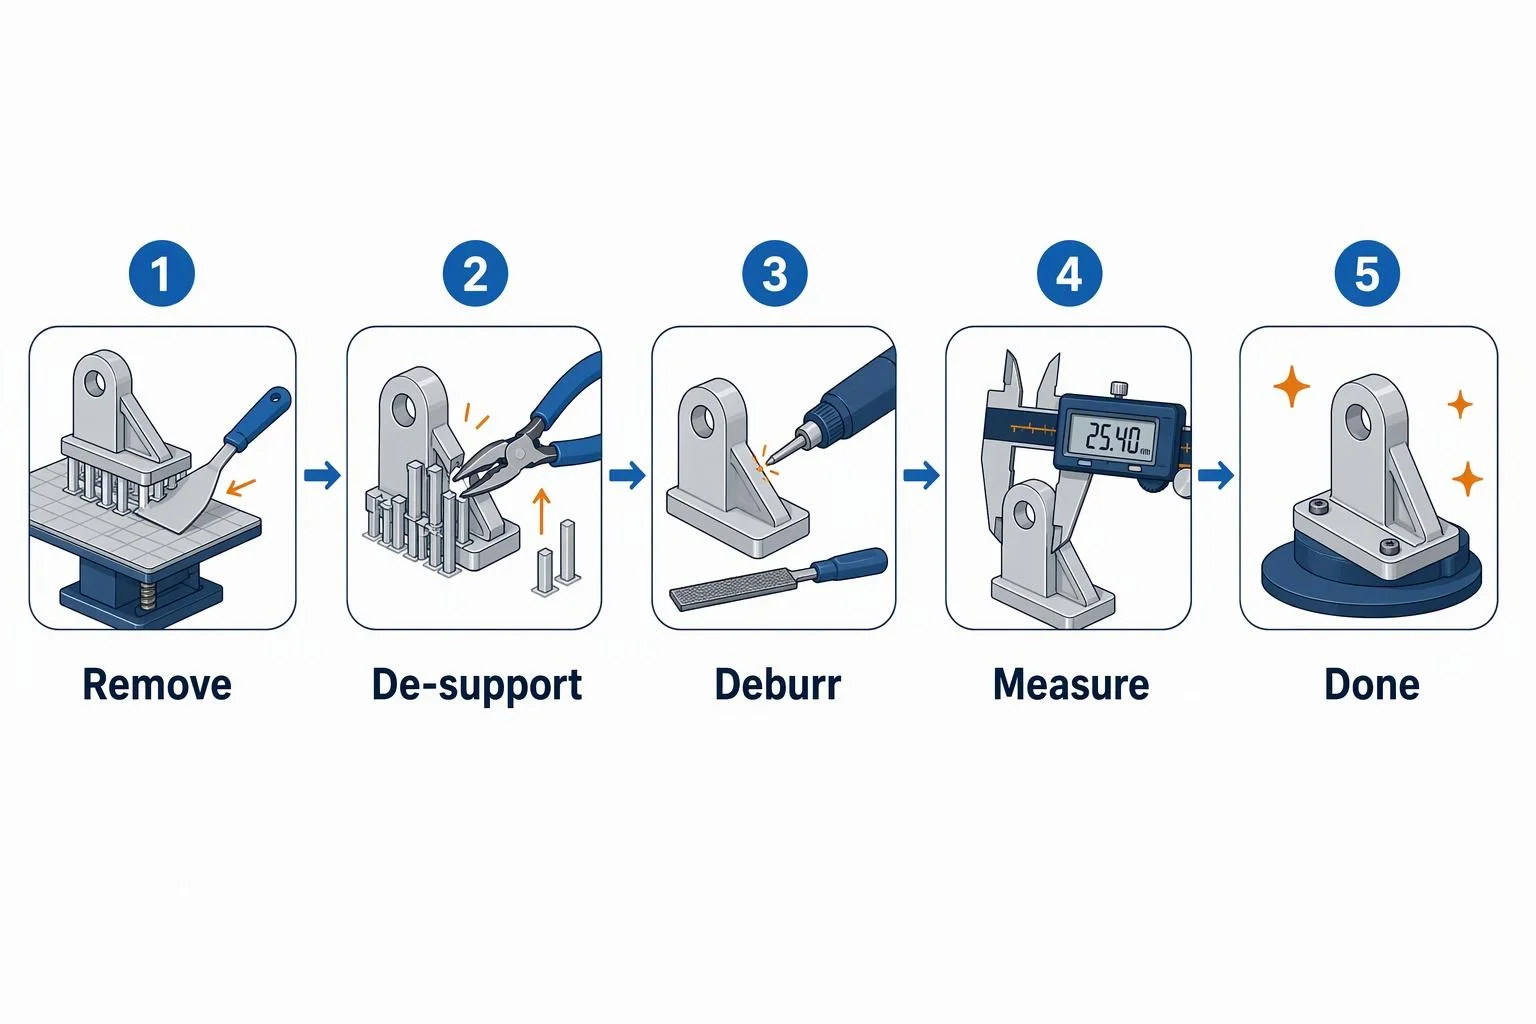
Tools make more sense as steps in a sequence than as a pile of gadgets. Exact steps vary by printer and material.
Before and During the Print
Brush the plate clean, check filament diameter with calipers if a spool is behaving oddly, and review the slicer preview before committing to a long print. Watch the first layer for adhesion and early stringing. If intervention is necessary, pause the printer and wait until the toolhead and build area can be accessed safely. Never reach into a moving printer.
Removing the Finished Print
Let the plate cool, check whether the part has released on its own, then work a spatula under one edge at a low angle. Force is the enemy here; wait time depends on material and plate type.
Removing Supports, Measuring, and Finishing
Start with pliers or flush cutters on the big structures, then move to tweezers, a blade, and a deburring tool for the fine cleanup. Wear eye protection; small support fragments snap off with real speed. Then measure at room temperature — a warm part can read larger than it will once cooled — and compare the result to your target to judge whether the gap is calibration, shrinkage, or a design clearance issue. Brush off dust, file or sand burrs, and deburr holes; a hidden bracket doesn't need the same treatment as a visible enclosure.
Storing Tools After Use
Sheath blades, wipe tools clean, and return everything to its bag or case. A clean bench and a complete kit make the next session start on the right foot.
Buying Tools Individually vs. a Complete 3D Printer Tool Kit
Neither route is wrong, and plenty of experienced users end up with a mix of both. The decision usually comes down to how much you already own, how much variety your printing involves, and whether hunting down six separate items sounds like fun or friction.
|
Consideration |
Buying individually |
Complete 3D printer tool kit |
|---|---|---|
|
Control over what you get |
High — pick each tool and quality level |
Fixed selection, though you can add to it |
|
Upfront effort |
Several purchases, often from different sellers |
One purchase, one delivery |
|
Cost efficiency |
Cheaper if you need only two or three tools |
Better value per tool when you use most of the set |
|
Organization |
You supply the case or drawer |
Usually includes a bag or case |
|
Risk |
Low commitment per item |
Some pieces may sit unused |
Buying individually makes sense if you already own calipers from another hobby, or if your printer's removable build plate means you rarely reach for a scraper. A kit makes more sense when you are starting from nothing and would rather spend an evening printing than shopping.
One option in that second category is the Sovol 36 Pcs 3D Printer Tool Kit, a 36-piece set that packs into a portable storage bag. It groups tools for print removal, cleaning and repair, and finishing and surface cleanup, and the product page shows items such as pliers, tweezers, brushes, files, sandpaper, deburring tools, replacement blades, a spatula, and a digital caliper. The kit covers many common categories described above, but check the current product listing and choose tools based on your own printer and workflow. Treat it as a starting inventory you can grow into rather than a set where all 36 pieces apply to every job.
Troubleshooting: When a Tool Task Isn't Going Smoothly
Most tool problems trace back to one of three things: the part or plate is still warm, the wrong tool is doing the job, or the underlying print settings need attention. The table below pairs each common symptom with a plausible cause and a practical next step. Where a fix points back to the printer rather than the tool, the 3D printer maintenance guide is the better place to continue.
|
Problem |
Likely cause |
Tool or fix |
|---|---|---|
|
Print is difficult to remove |
Plate still hot, or first layer squished too close |
Let the plate cool fully; use a thin spatula at a low angle; recheck first-layer height |
|
Supports are hard to separate |
Supports printed too dense, or interface gap too tight |
Grip large structures with pliers, pick fine remnants with tweezers, adjust support settings next time |
|
Edges have burrs |
Layer seams, oozing, or support contact points |
Run a deburring tool or file along the edge with light pressure |
|
Small debris remains on the model |
Stringing, dust, or loose support fragments |
Brush the surface, then pick stubborn bits with tweezers |
|
A printed part does not fit |
Shrinkage, hole undersizing, or insufficient clearance in the design |
Measure with calipers and compare against the target; check slicer shrinkage compensation before redesigning |
|
Tools become difficult to find or store |
No fixed home for small, sharp items |
Return every tool to a bag or labeled case after each session |
If a part resists removal even after cooling, stop prying and look at your first-layer settings instead. Force damages plates and prints far more often than patience does. For nozzle, plate, and motion-system upkeep, our 3D printer maintenance guide covers the routine.
Safety Basics for Working With 3D Printer Tools
None of these tools is especially dangerous on its own, but blades, hotends, and moving gantries deserve respect — and post-processing is where most small accidents happen. The KAUST guidelines for working with 3D printers note that the finishing stage, including support removal and sanding, is when accidents and exposures are most likely, so slow down there rather than rushing the last five minutes of a print job.
- Handle blades and sharp tools deliberately. Cut away from your body, keep your fingers out of the blade's path, use a sharp blade rather than a dull one that needs force, and retract or sheath the tool the moment you finish. The CCOHS guidance on sharp blades also recommends storing blades securely and disposing of broken ones in a puncture-resistant container.
- Let hot surfaces cool first. The nozzle and bed stay hot well after a print ends. The NIH 3D printing safety plan advises turning off, unplugging, and cooling the printer before cleaning, maintenance, or repair work.
- Avoid excessive force when removing prints. Prying hard can crack the part, gouge the build surface, or send a tool slipping toward your hand. Cooling and a low-angle spatula solve most stubborn prints.
- Keep tools away from children. Small parts, needles, and blades are choking and cut hazards. Store the kit out of reach and supervise any young maker using the printer.
- Wear eye protection when removing supports or cutting material. Snapped support fragments fly, and the KAUST guidelines specifically flag small broken pieces as an eye hazard during support removal.
- Leave electrical repairs to qualified people. If a fault involves wiring, the power supply, or the mainboard, contact the manufacturer or a qualified technician rather than opening the electronics bay yourself.
FAQ
These are the questions new FDM owners ask most often about tools. Short answers below; the sections above cover the reasoning.
What tools do I need to start 3D printing?
Most beginners can cover common FDM tasks with a thin removal spatula, tweezers and pliers (including a pair of flush cutters), a cleaning brush, a deburring tool or file, and a digital caliper. Which of those you actually reach for depends on your printer, the models you print, and whether your parts use supports or need finishing work.
Do I need a complete 3D printer tool kit?
No — a kit is a convenience, not a requirement. Buying individually makes sense if you already own calipers from another hobby or rarely need a scraper, while a complete set is more appealing when you are starting from nothing. Either way, expect some pieces to sit unused until a job calls for them.
What tool is best for removing prints from the build plate?
There is no single best tool, because the answer depends on your build surface and material. Let the plate cool, check whether the part has already released, then slide a thin spatula under one edge at a low angle with steady pressure. Flexible steel plates often let prints pop off with little or no tooling, and forcing a part is more likely to gouge the plate than to help.
Why is a digital caliper useful for 3D printing?
A digital caliper covers outside widths, inside widths, depths, and step heights, which is enough for filament diameter checks, calibration cubes, and hole fit. Repeatability matters more than the last decimal, since resolution is not the same as accuracy. Measure at room temperature and take more than one reading before you change a setting.
How should I store 3D printer tools?
Sheath or retract blades, wipe tools clean, and return everything to a bag, case, or labeled container after each session. A fixed home keeps sharp edges out of reach and makes the next print start faster.
Conclusion: Start With the Tasks You Actually Do
The best 3D printer tools are the ones that match the work in front of you. If you print simple PLA models on a removable plate, a spatula, a pair of tweezers, and a brush may carry you for months. Add calipers when fit starts to matter, a deburring tool when you care about surface finish, and pliers when your models grow supports. Build the set around your tasks rather than around a checklist, and store it in one place so each session starts clean.
If you would rather begin with an organized set than assemble one piece at a time, the Sovol 36 Pcs 3D Printer Tool Kit bundles print removal, cleaning and repair, and finishing tools in a portable bag — a practical starting point you can supplement as your printing grows.