


You want your prints to stick well and come off easily, right? The best 3d printing build plate for you depends on your filament and how much adhesion or easy removal you need. When you choose the right build plate, you set yourself up for smoother printing and less hassle.
Key Takeaways
-
Pick a build plate that works with your filament. This helps prints stick better and look good. For example, glass is good for PLA. Textured PEI works well for PETG.
-
Think about how easy it is to take off prints. Magnetic and flexible plates make removal fast and safe. You do not need tools to remove prints.
-
Clean your build plate often for strong sticking. Wipe it with isopropyl alcohol to keep off grease and fingerprints.
Why Your 3D Printing Build Plate Matters
Adhesion and Print Quality
When you start a print, the first thing you want is for your model to stick to the build plate. If the adhesion is weak, your print might slide around or even pop off before it finishes. That leads to failed prints and wasted time. The type of 3d printing build plate you choose can make a big difference. For example, glass build plates give you a smooth, glossy finish, while textured PEI helps your prints grip the surface better. Some build surfaces work better with certain filaments, like PLA or ABS. You can also use brims, rafts, or skirts to boost adhesion strength. Heated beds and adhesives like glue sticks or hairspray help keep your print in place and reduce warping. Picking the right build plate means you get cleaner prints and fewer surprises.
Tip: If you want to avoid warping, try using a heated bed or textured PEI. These options help keep your print flat and stuck during the whole process.
Removal and Workflow
Getting your print off the build plate can be tricky. If the adhesion is too strong, you might damage your model or the build plate. Magnetic and flexible build surfaces make removal easier because you can bend or lift them to pop your print off. With glass, you often need to wait for the bed to cool down before your print releases. If your print is stuck, gently lift a corner or use a scraper. Sometimes, dipping the build surface in water or applying alcohol helps loosen things up. Choosing the right build plate saves you time and keeps your workflow smooth. You spend less time fighting stuck prints and more time creating.
Note: If you use materials like TPU, which stick really well, match your build plate to your filament. That way, you avoid tough removals and keep your prints looking great.
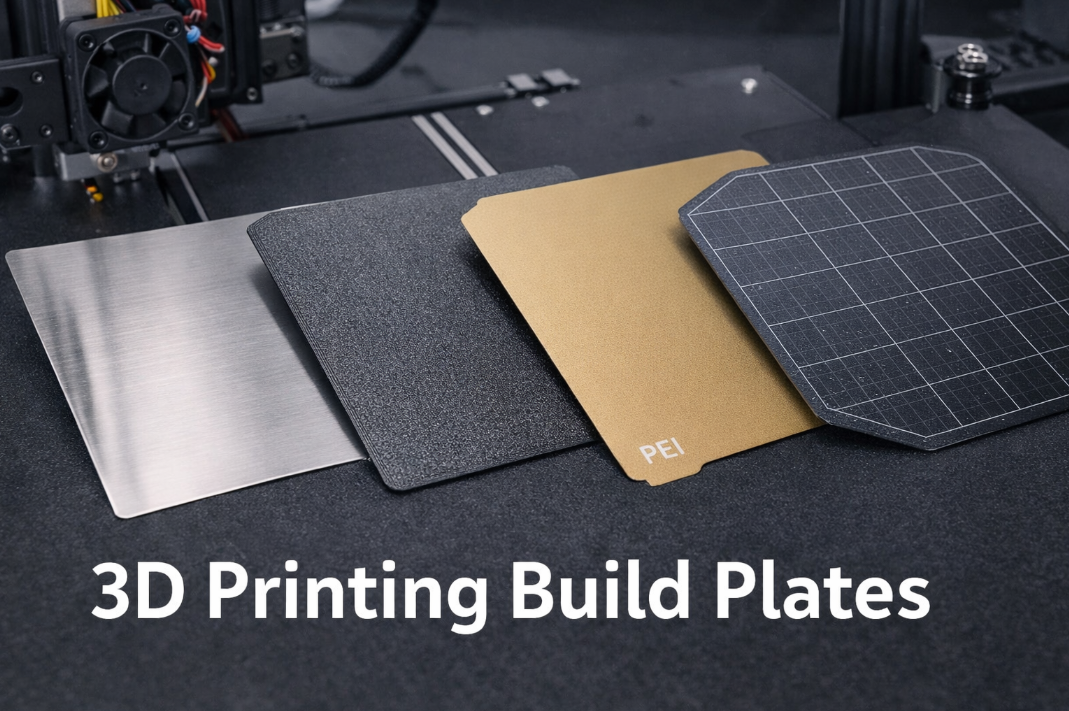
Comparing Popular 3D Printer Build Plate Types
Glass Build Plate
You might notice that many printers come with a glass build plate. Glass build plates give you a super flat and uniform surface. This helps you get a perfect first layer, which is key for a successful print. If you want a smooth and glossy finish on the bottom of your model, glass is a great choice. You can clean it easily, and it works with different adhesives if you need extra stickiness. Glass does not expand much when heated, so your prints stay accurate and flat. This makes it perfect for projects where you need exact measurements.
However, glass can break if you drop it or use too much force. Sometimes, you need to add glue or hairspray for better adhesion, especially with tricky filaments. If you want a high-quality finish and care about accuracy, a glass build plate is a solid pick.
Tip: Always let the glass cool before removing your print. The model will pop off more easily, and you avoid cracks.
Textured PEI and PEX Build Plate
Textured PEI and PEX build plates are popular for their strong grip and durability. You do not need glue for most materials. The textured surface helps your prints stick well, even with tough filaments like PETG. PEX can handle higher temperatures than PEI, so you can print with materials like ABS and Polycarbonate without worrying about the surface melting.
-
Textured PEI gives you reliable adhesion for many filaments.
-
The surface is tough and easy to clean.
-
PEX works well for high-temp materials and resists damage.
-
Textured PEI is great for PETG, making removal easier and preventing damage.
You might find that textured PEI is not always the best for PLA, but you can adjust your settings to make it work. If you want strong adhesion and a surface that lasts, try a textured PEI or PEX build plate.
Smooth PEI Build Plate
A smooth PEI build plate gives you a flat, even surface. This helps your prints stick well and gives the bottom of your model a nice, smooth look. You can use almost any filament, but PLA works especially well. Here is a quick look at the pros and cons:
|
Feature |
Description |
|---|---|
|
Great adhesion with almost all materials, especially PLA |
|
|
Surface Finish |
Results in a smooth bottom surface for prints |
Smooth PEI has excellent mechanical properties and resists wear. You do not need glue or tape. However, sometimes ABS or PETG can stick too well, making removal tough. You might need a glue stick as a release agent. Be gentle when removing prints to avoid damaging the soft surface.
Garolite Build Plate
Garolite build plates are made from fiberglass and epoxy. They give you a smooth build surface and work well for high-quality prints. Garolite resists warping and curling, which helps your prints stay flat. When the bed cools, your prints come off easily. This saves you time and keeps your models safe.
-
Garolite works best with nylon and nylon-based filaments like NylonX and NylonG.
-
You can also use it with PLA, PETG, and TPU.
-
It is lightweight and offers strong adhesion.
-
The surface is easy to clean and maintain.
If you print with engineering filaments or want a reliable, warp-free experience, garolite is a smart choice.
Magnetic and Flexible Build Plate
Magnetic and flexible build surfaces make your life easier. You can remove prints without tools—just bend the plate, and your model pops off. This design speeds up your workflow and reduces downtime. You do not risk damaging the bed or your print. Magnetic plates also help with first-layer adhesion, so your prints start off right.
-
Quick part removal means you can start your next print faster.
-
Less chance of scratching or breaking the build plate.
-
Great for busy makers or production environments.
If you want a hassle-free experience and value speed, a magnetic and flexible build plate is a great upgrade for your 3d printer build plate.
Note: No matter which build plate you choose, keep it clean. Wipe it with isopropyl alcohol to remove grease and fingerprints. This keeps your adhesion strong and your prints looking sharp.
Key Factors in Choosing the Best Build Plate
When you start choosing the best build plate for your 3d printer bed, you want to think about more than just what looks cool. You need to match your build plate to your filament, your workflow, and the finish you want. Let’s break down the most important factors so you can pick the right build plate for your needs.
Material Compatibility
Material compatibility is the first thing you should check. If your filament does not match your build surface, you might see poor adhesion or warped prints. Each filament type interacts differently with the build plate. Here are some things to keep in mind:
-
PLA works well with glass and smooth pei build plates. You get a glossy finish and strong grip.
-
ABS needs a heated bed and surfaces like BuildTak or Kapton tape to prevent warping.
-
PETG likes glass and pei spring steel. You can use a glue stick or hairspray for enhanced adhesion.
-
Nylon sticks best to pei glass beds with PVA glue or garolite.
-
TPU grips well on textured pei and magnetic plates.
-
Polypropylene can be tricky, but some specialized build surfaces help.
You also want to watch your bed temperature. For filaments with a softening temperature below 60 ℃, like PLA, keep your heatbed below 45 ℃. PETG has a glass transition temperature between 60 ℃ and 80 ℃, so set your bed below 60 ℃ to avoid warping. Material compatibility helps you get strong adhesion and better print quality.
Adhesion Strength
Adhesion strength decides if your print stays put or slides off. If your first layer does not stick, your whole print can fail. Different build plates offer different levels of grip. Textured pei and powder coated pei give you enhanced adhesion for tough filaments like PETG and TPU. Smooth pei works great for PLA and gives a polished finish. BuildTak and Kapton tape help ABS stick at high temperatures.
Here’s a quick table to show which build plate works best for each filament:
|
Filament Type |
Recommended Build Plate Material |
Additional Notes |
|---|---|---|
|
Nylon |
PEI glass beds with PVA glue |
Easy part removal when cooled; BuildTak enhances grip |
|
TPU |
Textured PEI |
Solid grip and easy removal; magnetic plates work well |
|
ABS |
BuildTak, Kapton Tape |
Excellent adhesion at high temperatures; reusable |
|
PETG |
Glass, PEI Sheets |
Smooth surface for great adhesion; glue stick helps |
If you want the best results, balance adhesion strength with ease of removal. Too much grip can make it hard to get your print off the build plate.
Surface Finish
The print surface you choose affects how your model looks. Glass gives you a shiny, smooth bottom layer. Textured pei and powder coated pei create a matte finish and help with grip. Garolite offers a clean, flat surface for engineering filaments. Polypropylene build plates work for special projects where you need flexibility.
If you want a polished look, go for glass or smooth pei. If you care more about grip and easy removal, textured pei or magnetic plates are better. The build surface also helps keep your print stable during temperature changes, so your model stays accurate.
Tip: If you want a specific finish, test different build plates with your favorite filament. You might find a new favorite look!
Ease of Print Removal
Ease of removal saves you time and keeps your prints safe. Some build plates make it simple to pop your model off. Magnetic and flexible plates let you bend the surface, so your print comes off without tools. A plastic razor scraper helps lift parts, prime lines, and skirts without sending them flying. Sharp blades slip under corners and lift parts off easily, especially for PETG on pei build plates.
If you print a lot, you want a build plate that makes removal quick and easy. You spend less time fighting stuck prints and more time creating new things.
Note: Always let your build plate cool before removing prints. This helps with easy removal and protects your model.
When you focus on material compatibility, adhesion strength, surface finish, and ease of removal, you set yourself up for success. Choosing the best build plate means you get reliable prints, smooth workflow, and the finish you want every time.
Matching 3D Printer Bed to Filament and Goals

Best Build Plate for PLA, ABS, PETG
Choosing the right build plate for your filament makes printing easier. Here’s what works best for the most common materials:
-
PLA sticks well to glass or smooth PEI. You get a shiny finish and easy removal.
-
ABS needs a heated bed. Try BuildTak or Kapton tape to stop warping.
-
PETG loves textured plates. These give you a great surface finish and make part removal simple after cooling. Some users also like engineering plates for PETG because they work without issues.
PETG prints best with a hotend temperature between 220-250°C and a bed temperature of 50-80°C. Its sticky nature means it grabs onto many surfaces, so you have options.
Choosing for Detail or Easy Removal
You want your prints to look sharp and come off the bed without a fight. Here’s how different build surfaces help:
|
Adhesion |
Removal |
|
|---|---|---|
|
PEI |
Excellent, releases after cooling |
Easy—just bend the plate |
|
Flexible/Magnetic |
Strong, holds tight |
Very easy—bend and pop off |
|
SuperTack |
Ultra-strong, even at low temps |
Hard—may need tools |
PEI sheets let your prints pop off once they cool. Flexible and magnetic plates make removal a breeze by letting you bend the plate. SuperTack gives strong adhesion but can make removal tricky.
Tips for Upgrading Your Build Plate
Ready to boost your 3d printing build plate performance? Try these tips:
-
Upgrade to a LayerLock powder-coated PEI plate for scratch resistance and easy flex removal.
-
Use a flexible or magnetic build surface for quick swaps and less downtime.
-
If you print with polypropylene, look for a plate made for its compatibility.
Tip: If you switch filaments often, keep extra build plates handy. You can swap them out fast and keep your workflow smooth.
When you pick a build plate, think about your filament and what you want from your prints.
-
Clean your bed often for strong adhesion.
-
Try different surfaces to find your favorite.
|
Aspect |
Why It Matters |
|---|---|
|
Adhesion |
Keeps prints in place |
|
Removal |
Saves time and effort |
|
Finish |
Affects print quality |
Choose what fits your needs best!
FAQ
What build plate works best for beginners?
You should try a smooth PEI or glass plate. Both give easy adhesion and simple removal. You will get reliable results with PLA.
How do you clean your build plate?
Wipe your plate with isopropyl alcohol and a soft cloth. You keep prints sticking well and avoid greasy spots.
Tip: Clean your plate before every print for best results!
Can you switch build plates for different filaments?
Yes! You can swap plates to match your filament. Use textured PEI for PETG, glass for PLA, and garolite for nylon.


