


You will see that PLA is easier to print than PETG, especially when considering PLA vs PETG printing settings. This is particularly true if you are just starting with 3D printing. PLA and PETG require different settings for temperature and the bed. The table below highlights the main differences:
|
Feature |
PLA |
PETG |
|---|---|---|
|
Printing Temperature |
190°C - 240°C |
230°C - 250°C |
|
Heated Bed Requirement |
Not required |
Required (70°C - 90°C) |
|
Print Speed |
50-70 mm/s (up to 150 mm/s) |
40-60 mm/s |
|
Stringing Issues |
Fewer issues |
More prone to stringing |
|
Detail Quality |
Sharp details |
Less sharp corners |
|
Beginner Friendliness |
High |
Moderate |
- PLA is simple to use. It works at lower temperatures and does not need a heated bed.
- PETG is harder for new users. It needs more heat and can create more strings.
You will get helpful tips to print better with both materials, taking into account the PLA vs PETG printing settings.
Key Takeaways
- PLA is easy for beginners to use. It prints at lower temperatures. You do not need a heated bed for PLA. This makes it simple for new users.
- PETG is stronger than PLA. It is also more flexible. Use PETG for parts that face heat or stress.
- Change print settings with care. Start with the suggested temperatures and speeds for each material. This helps stop problems like stringing and warping.
- Good bed adhesion is very important. Clean the print bed before you start. Use glue or a textured surface for better results. This is extra helpful with PETG.
- Try both materials to learn more. Each one has special features. Test them to see which is best for your projects.
PLA vs PETG Overview
Material Properties
PLA and PETG are not the same. PLA is made from plants, so it is a bioplastic. PETG is made from oil and has glycol in it. PLA can break down in nature, but PETG cannot. PLA prints fast and makes hard parts. These parts are good for things you use once. PETG is stronger and bends more. You can use PETG for things that need to last longer.
|
Property |
PLA |
PETG |
|---|---|---|
|
Composition |
Bioplastic from plant-based materials |
Oil-based polyester with glycol |
|
Biodegradability |
Biodegradable |
Not biodegradable |
|
Strength |
Lower strength |
Higher strength and durability |
|
Flexibility |
Less flexible |
More flexible |
|
Printability |
Rigid, low cost, fast printing |
Good printability, less brittle |
|
Resistance |
Less resistant to water and chemicals |
Water, chemical, and fatigue resistant |
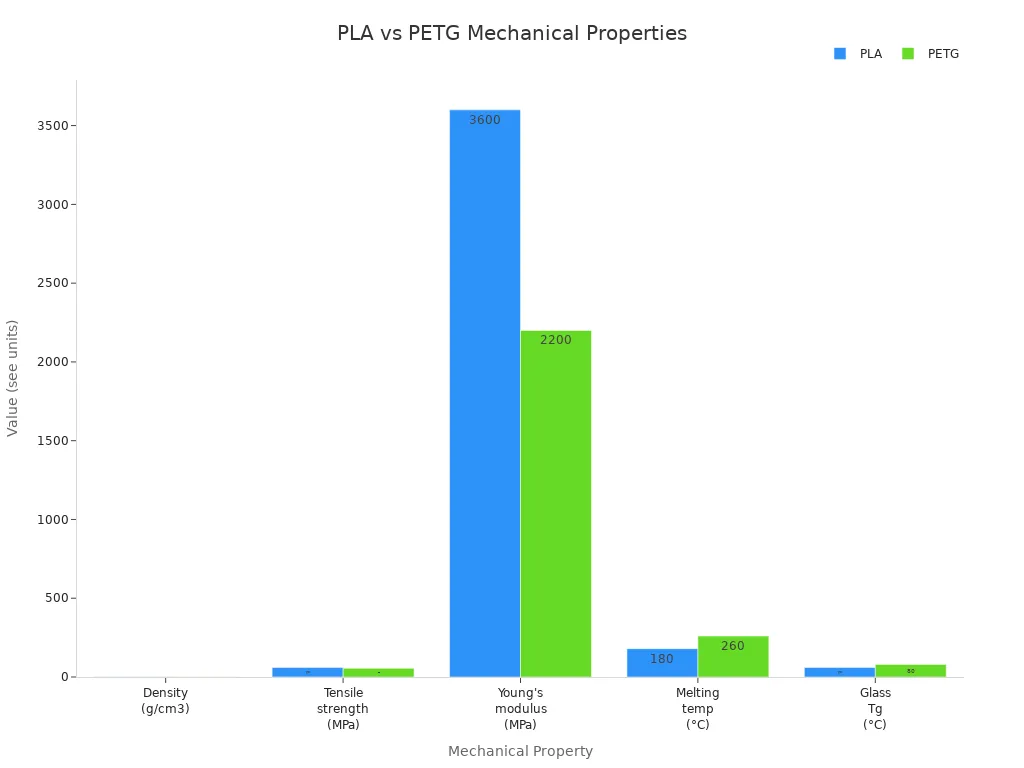
PETG bends when you push it, but PLA breaks. PETG keeps its shape in heat up to 75°C. PLA gets soft at about 55°C. The chart below shows how strong and tough each one is.
Tip: Pick PETG if your part needs to handle heat or stress. Use PLA for simple or pretty things.
Pros and Cons for Beginners
PLA is better for people who are new to 3D printing. It works at lower heat. You do not need a heated bed. PLA almost never warps. It comes in lots of colors and does not smell much.
|
Advantages |
Disadvantages |
|---|---|
|
Biodegradability |
Low heat resistance |
|
Low warping tendency |
Brittleness |
|
Ease of use |
Limited outdoor durability |
|
Low printing temperature |
Post-processing challenges |
|
Minimal odor |
|
|
Wide color range |
|
PETG is stronger and does not get ruined by water or chemicals. You can use PETG outside or for things that need to work well. But PETG is harder to print. It needs more heat and can make stringy messes.
|
Advantages of PETG |
Disadvantages of PETG |
|---|---|
|
Good impact resistance |
Low surface hardness and easy to damage |
|
Low shrinkage, reducing warping |
Recycling feasibility is questionable |
|
Chemical resistance |
3D printing process defects such as wiredrawing and hygroscopic interference |
- Choose PLA if you want easy printing and bright colors.
- Pick PETG if you need strong, bendy, and weather-proof parts.
Similarities Between PETG and PLA
Shared Features
PETG and PLA have many things in common. Both are good for desktop 3D printing. You can use them with most FDM printers. You do not need special tools to print them. They come in lots of colors. Some are even see-through. Both are cheap ways to start 3D printing at home or school.
Here is a table that shows how they compare:
|
Feature |
PLA |
PETG |
|---|---|---|
|
Brittleness |
Brittle, shatters under shock |
Tougher, deforms under stress |
|
Flexibility |
Harder, more brittle |
More flexible |
|
Creep Resistance |
Tends to creep over time |
Less prone to creep |
|
Heat Stability |
Low, deforms in heat |
Better heat resistance |
|
Aging |
Becomes brittle over time |
Maintains properties longer |
You can print both at about the same speed. They use close to the same extrusion temperatures. Most printers can switch between them with small changes. You do not need to buy a new printer or spend a lot.
Tip: PLA and PETG are easy to find and not expensive. You can try both without spending much money.
When to Use Either
You can use PLA or PETG for many projects. Their similarities make them good for beginners and hobby users. Here are some times when you can use either one and still get good prints:
- You want to print with a material that works at almost the same temperature. Most printers only need a small setting change.
- You need a part in a certain color or want it clear. Both PLA and PETG have many color choices.
- You want to save money. PLA and PETG are both cheap for FDM printing.
- You want to make models, test parts, or decorations that do not need to be strong or handle heat.
The things that are the same for PETG and PLA help you pick what you need. You do not have to worry about big changes in how you print. You can try both and see which one you like more.
PLA vs PETG Printing Settings
When you start 3D printing, understanding the differences in PLA vs PETG printing settings helps you get better results. Both materials need specific print settings for good prints. You will see that ease of printing depends on how well you set up your printer. Let’s look at the main print settings for each material.
Nozzle and Bed Temperature
You need to set the right temperature for your nozzle and bed. This affects how well your filament melts and sticks to the build plate. PLA vs PETG printing settings for temperature are not the same. PLA uses lower print temperature and bed temperature. PETG needs higher settings for both.
Here is a table that shows the recommended nozzle and bed temperature ranges for PLA and PETG:
|
Filament |
Nozzle Temperature (°C) |
Bed Temperature (°C) |
|---|---|---|
|
PLA |
190 - 220 |
0 - 60 |
|
PETG |
220 - 260 |
70 - 90 |
You should start with these print settings and adjust if you see problems. For PLA, a nozzle temperature of 200°C and bed temperature of 60°C works for most prints. PETG prints best at a nozzle temperature of 240°C and bed temperature of 80°C.
Temperature changes can affect print quality. If you use a low nozzle temperature, your print may look weak or layers may not stick. If you use a high nozzle temperature, you may see stringing or blobs. The bed temperature helps prevent warping and keeps your print stuck to the bed. If the bed is too hot, your print may stick too much and be hard to remove.
|
Temperature Type |
Recommended Range |
|
|---|---|---|
|
Nozzle Temperature |
220°C - 260°C |
Affects layer adhesion, stringing, and print integrity. Lower temperatures may lead to weak prints, while higher temperatures can cause stringing or blobs. |
|
Bed Temperature |
70°C - 90°C |
Prevents warping and ensures print adhesion. Adjustments may be needed based on the bed material to avoid over-adhesion. |
Tip: Always check your filament packaging for the best print temperature and bed temperature. Start with the middle of the range and change by 5°C if you see problems.
Print Speed and Cooling
Print speed and cooling are important for ease of printing. PLA vs PETG printing settings for speed and cooling are different. PLA prints faster and needs more cooling. PETG prints slower and needs less cooling.
Here is a table with the best print settings for speed and cooling:
|
Setting Type |
Recommended Value |
|---|---|
|
Print Speed (General) |
30-60 mm/s |
|
Print Speed (Detailed) |
40 mm/s |
|
Cooling (First Few Layers) |
0% |
|
Cooling (General Printing) |
30-50% |
|
Cooling (Detailed Features) |
70-100% |
For PLA, you can use a print speed of 50 mm/s for most prints. If you want sharp details, slow down to 40 mm/s. Set your cooling fan to 100% after the first few layers. This helps PLA keep its shape and gives you crisp corners.
PETG needs slower print speed, around 40 mm/s. Use less cooling, about 30-50%. Too much cooling can make PETG brittle or cause poor layer bonding. For the first few layers, turn off the cooling fan. This helps PETG stick to the bed.
|
Material |
Notes |
|
|---|---|---|
|
PLA |
100% fan speed |
Essential for fine details, especially in small parts. |
|
PETG |
Moderate cooling |
Excessive cooling can compromise layer bonding. |
Note: If you see stringing with PETG, lower the print temperature or reduce the cooling fan speed. For PLA, increase cooling for better details.
Bed Adhesion Tips
Good bed adhesion makes printing easier. PLA vs PETG printing settings for bed adhesion are not the same. PLA sticks well to most surfaces. PETG needs extra help to avoid sticking too much or not enough.
Follow these steps for better bed adhesion:
- Level your bed before every print. This gives you an even surface.
- Clean the build plate. Remove dust, oil, or old glue.
- Use a glue stick or hairspray for PETG. This helps PETG release after printing.
- Adjust the nozzle distance. PETG works best with a slightly larger gap than PLA.
- Use a brim for both materials. This increases surface contact and helps with adhesion.
- Slow down the first layer speed. This lets the filament bond better with the bed.
- Turn off the cooling fan for the first few layers. This keeps the bed warm and helps with sticking.
You can use different build surfaces for better adhesion. PETG works best on textured surfaces, especially for large prints. PLA sticks well to smooth surfaces. Heated beds help PETG stick and make prints easier to remove. Investing in a good build surface helps with ease of printing, especially for PETG.
Tip: If your print does not stick, clean the bed and try a glue stick. If PETG sticks too much, use a textured surface or a thin layer of glue.
Quick Reference Table: PLA vs PETG Printing Settings
Here is a checklist for PLA vs PETG printing settings. Use this table to set up your printer for each material.
|
Setting |
PLA |
PETG |
|---|---|---|
|
Nozzle Temperature |
190 - 220°C |
220 - 260°C |
|
Bed Temperature |
0 - 60°C |
70 - 90°C |
|
Print Speed |
50 mm/s (up to 70 mm/s) |
30 - 50 mm/s |
|
Cooling Fan |
100% after first layers |
30-50%, off for first layers |
|
Bed Adhesion |
Smooth surface, no glue |
Textured surface, glue stick |
|
First Layer Speed |
Normal |
Slow |
|
Brim |
Optional |
Recommended |
You can use these print settings for most prints. Adjust if you see problems like warping, stringing, or poor adhesion. Ease of printing improves when you follow these steps and use the right settings for each material.
Tip: Keep a notebook of your best PLA vs PETG printing settings. Write down what works for your printer and filament. This helps you get better prints every time.
Print Results and Common Issues
Surface Finish
PLA and PETG prints look different. PLA prints are smooth and shiny. The edges are sharp and the colors are bright. Most people do not need to fix PLA prints much. PETG is also shiny, but the edges are not as sharp. You might see more small marks on PETG prints. PETG often needs more work to look nice.
|
Filament |
|
|---|---|
|
PLA |
Smooth, glossy, crisp edges, vibrant colors, minimal post-processing needed |
|
PETG |
Glossy but less crisp, slightly flexible, more visible imperfections, requires more effort for post-processing |
Tip: Use PLA if you want sharp details and a clean look. For PETG, sanding and polishing can help make it look better.
Strength and Durability
Strength is important when picking a filament. PLA is strong when you pull on it. It can break if you bend or drop it. PLA is stiff and brittle. PETG bends more and does not break as easily. PETG can take hits and is good for tough jobs. PETG works well outside or for parts that need to last.
|
Material |
Average Tensile Strength (MPa) |
|---|---|
|
PLA |
59.9 ± 2.9 |
|
PETG |
54.9 ± 2.6 |
|
Property |
PLA |
PETG |
|---|---|---|
|
Impact Resistance |
Brittle, can crack easily |
More flexible, absorbs shock |
|
Heat Resistance |
Melts at lower temperatures |
Handles higher temperatures |
|
UV Resistance |
Degrades under sunlight |
Resists UV damage |
|
Flexibility |
Stiff, does not bend much |
Flexible, can bend without breaking |
- PETG is good for parts that need to bend or take heat.
- PLA is best for stiff and pretty things.
Stringing and Warping
Stringing and warping are common problems. PETG can make thin strings between parts. This happens because PETG stays melted longer. PLA does not string as much, but it can still happen. Warping means the print lifts or curls at the edges. PETG can warp more, especially on big prints. PLA usually sticks well, but a bad first layer can cause warping.
|
Issue Type |
Material |
Description |
Solutions |
|---|---|---|---|
|
Stringing |
PETG |
Oozes and creates strings due to viscosity and prolonged molten state. |
Increase retraction, lower temperature, enable retraction settings, dry filament. |
|
Stringing |
PLA |
Less prone to stringing but can still occur. |
Adjust retraction settings, control temperature, ensure effective cooling. |
|
Warping |
PETG |
Can warp, especially on larger prints, leading to poor bed adhesion. |
Set bed temperature, adjust fan speed, use adhesives, apply brims or rafts. |
|
Warping |
PLA |
Generally good adhesion but can warp if the first layer isn't perfect. |
Set bed temperature, clean bed, ensure proper first layer settings. |
- Lower the print temperature and increase retraction to stop stringing.
- Use a heated bed set to 70°C to 80°C to stop warping.
- Try slicer features like coasting and wiping for cleaner prints.
Note: Always dry your filament and check your printer settings before you start a new print.
PETG vs PLA: Switching and Troubleshooting
Common Mistakes
When you switch from PLA to PETG, you might run into problems if you do not change your setup. Many beginners make the same mistakes. Here is a step-by-step list to help you avoid the most common issues:
- Clean your print bed well to remove any old PLA residue.
- Use a glue stick or Windex on the bed to help PETG stick, but not too much.
- Adjust your Z-offset by about 0.2mm for PETG. This helps the first layer stick without squishing.
- Lower the cooling fan speed at the start of your PETG print. Too much cooling can cause rough layers.
- Use different print surfaces for PLA and PETG. This prevents cross-contamination and sticking problems.
- Clean the nozzle before switching back to PLA. PETG can leave residue that affects PLA prints.
- Try a silicone sock on your nozzle to keep heat steady.
- Watch your extrusion rate. PETG can skip if the flow is too high.
Tip: Always check your printer settings before you start a new print. Small changes can make a big difference in petg vs pla results.
Troubleshooting Tips
You may face different issues with petg vs pla. Here are some common problems and how to fix them:
|
Issue |
Reason/Problem |
Solution |
|---|---|---|
|
Poor Interlayer Adhesion |
Low print temperature or too much cooling |
Raise PETG temperature by 5–10°C, reduce fan speed |
|
Nozzle Clogging |
High temperature or low Z-offset |
Lower PETG temperature, check nozzle height, clean nozzle |
|
Rough Surface |
Over-extrusion or low Z-offset |
Lower flow rate, raise Z-offset slightly |
|
General Printing Issues |
Printing too fast or over-extrusion |
Slow print speed to 55mm/s or less, reduce flow in 5% steps |
|
Filament Care |
Wet filament or poor storage |
Store PETG dry, dry filament in oven at 60°C for 6 hours |
For PLA, you might see prints not sticking, uneven first layers, or stringing. Fix these by cleaning the bed, leveling it, adjusting first layer height, and slowing the first layer speed. If you see stringing, lower the nozzle temperature, dry your filament, and adjust retraction settings.
Note: Petg vs pla troubleshooting often comes down to careful setup and small adjustments. Take notes on what works for your printer and filament.
Practical Tips for PETG and PLA
Best Practices for PLA
You can get great results with PLA if you follow a few simple steps. PLA is easy to use, but you need to keep it dry and set your printer correctly.
- Store your filament in airtight containers. This keeps out humidity and dust.
- Keep your filament in a dry place. Try to keep the humidity below 50%.
- Use a filament dry box if you live in a humid area.
- Label your spools and use older ones first. This helps you avoid old, brittle filament.
- Organize your filament on shelves to prevent tangling and deformation.
- Use a hygrometer to check humidity levels near your filament.
- Print at around 200°C for most PLA brands.
- Turn your cooling fan to 100% after the first two layers. This helps with sharp details.
- Fine-tune retraction speed and distance in your slicer. This reduces stringing.
- Try a heated bed to improve adhesion and reduce warping.
- Experiment with slicer settings for the best results.
Moisture is your enemy. If your PLA feels brittle or prints look rough, dry your filament before printing.
Best Practices for PETG
PETG needs a bit more care than PLA. You can avoid common problems by following these tips.
- Set your nozzle temperature between 230°C and 250°C. This helps PETG flow and stick well.
- Keep your bed temperature between 70°C and 80°C. This prevents warping and helps prints stick.
- Start with a print speed of 30-60 mm/s. Slow down for detailed parts.
- Use 30-50% fan speed. Turn off the fan for the first layers to help with adhesion.
- Clean your bed with isopropyl alcohol before each print.
- Use a release agent, like glue stick, to prevent PETG from sticking too much.
- Adjust retraction settings: 5-7 mm for Bowden, 2-4 mm for direct drive, with a speed of 35-40 mm/s.
- Always wear a mask when sanding PETG prints. Clean prints after each grit to remove dust.
- Practice on test prints before using heat on your final project.
PETG can stick too well to the bed. Use a thin layer of glue stick or a textured surface to make removal easier.
Choosing Between PLA and PETG
Decision Guide
You need to pick the best filament for your project. First, think about where you will use your printed part. Also, think about how you will use it. Each material has things it is good at and things it is not. The table below shows how they compare:
|
Factor |
PLA |
PETG |
|---|---|---|
|
UV Resistance |
Deteriorates under sunlight |
Withstands outdoor conditions |
|
Flexibility |
Rigid and brittle |
Superior flexibility |
|
Impact Resistance |
7 kJ/m² |
7-14 kJ/m² |
|
Temperature Resistance |
Softens above 60°C |
Heat deflection 70-78°C |
|
Environmental Impact |
Biodegradable |
Recyclable |
|
Cost |
More affordable |
Slightly more expensive |
- PLA is good for things inside that do not bend or get hot.
- PETG is better for outside, bendy, or strong parts.
Tip: Pick PETG if your part will be outside or in the sun. Use PLA for simple, pretty, or cheap prints.
Use-Case Recommendations
You can choose your filament based on what you want to make. Here are some ideas to help you pick:
- PLA is great for models, toys, and school projects. It is easy to print and costs less.
- PETG is good for tool handles, outdoor signs, or parts that need to bend.
- If you use PLA as support for PETG, it comes off easily and looks nice.
- Do not use PETG as support for PLA. It can stick too much and cause trouble.
- Do not use PLA in closed printers that get hot. It can get soft and block the nozzle.
- PETG may not stick well in open printers in cool rooms. Make the bed hotter or use glue.
Follow these tips to get the best prints for your project. Always think about where you will use your part, how much it costs, and if it needs to be strong or bendy.
You see clear differences between PLA and PETG when you start printing. PLA is affordable and easy for rapid printing. You get bright details and smooth 3d prints. PETG gives you strong, durable printing for parts that need to handle stress or heat. Use PLA for quick prototypes and decorative printing. Choose PETG for long-lasting printing and functional 3d prints. Try both materials and adjust your printing settings. You learn more with each print. Explore online guides and forums to improve your printing results.
FAQ
What is the easiest material for 3d printing as a beginner?
You will find PLA the easiest material for 3d printing. It melts at lower temperatures and sticks well to most beds. You do not need a heated bed. PLA works well for models and simple functional projects.
Can PETG be used for functional and durable parts?
You can use PETG for functional parts that need to last. PETG bends without breaking and resists water. Many users choose PETG for durable parts like tool handles or outdoor signs in 3d printing.
Why does PETG cause stringing during 3d printing?
PETG stays melted longer than PLA. This can cause thin strings between sections of your print. You can reduce stringing by lowering the print temperature, increasing retraction, and keeping your filament dry during 3d printing.
How do I improve bed adhesion for PETG in 3d printing?
You should clean your bed before every print. Use a glue stick or hairspray for PETG. Adjust the nozzle height and slow down the first layer. These steps help PETG stick better during 3d printing.
Is PLA strong enough for functional projects in 3d printing?
PLA works for many functional uses, but it breaks easily if bent or dropped. You should use PETG for functional projects that need more strength or flexibility in 3d printing.


