


Which workflow gives me the fewest failed prints per month for the least amount of babysitting?
That’s what this comparison is really about. “Nozzle swapping” (quick-swap nozzles, tool-changing, multi-tool systems) isn’t just a hardware feature. It changes how you handle:
- different nozzle sizes for speed vs detail
- abrasive filaments (nozzle wear)
- support material
- multi-colour prints
- maintenance and downtime
Below is a decision framework that compares nozzle swapping vs single nozzle approaches (and where tool-changing 3D printer and multi-filament add-ons fit) without pretending there’s one perfect answer for every shop.
Key Takeaway: If you change materials/nozzles often and hate purge waste, tool-changing/nozzle-swapping systems can be worth the complexity. If most of your prints are one material and you value “just works,” a solid single-nozzle setup still wins on simplicity.
Key takeaways
- Single-nozzle systems are simplest and often the most predictable, but multi-colour/multi-material usually means purge waste and more tuning.
- Tool-changing / nozzle-swapping systems reduce cross-contamination and can cut the “purge tower problem,” but add mechanical and calibration complexity.
- If you mostly want two materials (e.g., model + support), IDEX can be a practical middle ground.
- If you’re deciding between ecosystems, it’s useful to understand IDEX vs MMU tradeoffs: dual independent tools vs single-nozzle load/unload switching.
Nozzle swapping vs single nozzle: quick comparison table
|
Criteria |
Single nozzle (standard) |
Single nozzle + purge-based switching (AMS/MMU style) |
Tool-changing / nozzle-swapping (automatic) |
|---|---|---|---|
|
Best for |
Reliable mono-material printing |
Multi-colour prints with minimal hardware changes |
Frequent material/nozzle changes; cleaner multi-material workflows |
|
Waste |
Low |
High (purge towers/blocks) |
Low (less reliance on purging) |
|
Failure modes |
Clogs, wear, basic tuning issues |
Load/unload jams, grinding, purge tuning |
Docking/alignment, more moving parts |
|
Maintenance |
Low |
Medium |
Medium–high |
|
Tuning burden |
Low–medium |
High (especially for clean colour transitions) |
Medium (upfront), then lower once stable |
The core question: what are you changing, and how often?
Before you compare “systems,” answer these two questions honestly:
- How often do you need a different nozzle size or material in the same week?
- Do you need true multi-material (different polymers, different support material), or are you mostly doing colour?
Many advanced users think they need multi-material, but they actually need one of these:
- a faster way to switch between 0.4 mm and a larger nozzle for throughput
- better support removal (sometimes solvable with slicer strategy, not a second material)
- less time spent purging and re-tuning after changes
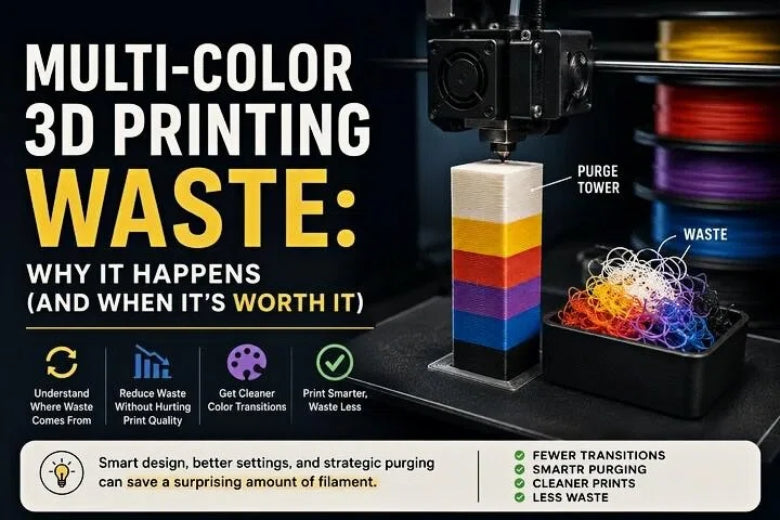
Evaluation criteria 1: filament purge waste (time and money)
If you’ve ever run a multi-colour print and ended up with a pile of “poop,” you already understand the downside of single-nozzle switching: the printer has to push mixed filament out of the hotend until the next colour/material is clean.
Hackaday’s 2023 article on purge reduction notes that purge waste can become massive on models with lots of colour changes, and discusses mitigation tactics like purging into infill/support and reducing purge volume per transition where possible (Hackaday’s 2023 write-up on reducing purge ‘poop’).
Where tool-changing/nozzle-swapping helps is simple: you’re not trying to “wash out” a shared nozzle path every time. Snapmaker’s 2025 buyer’s guide frames it as an architectural advantage: an inactive tool can be isolated while the active tool prints, reducing the need for heavy purging (Snapmaker’s 2025 tool-changer buyer’s guide).
Practical rule of thumb:
- If you do multi-colour occasionally and can tolerate waste, purge-based switching can be fine.
- If you do multi-material often (or you’re printing small batches where waste hurts), purge-based switching becomes the bottleneck fast.
Evaluation criteria 2: reliability and “stupid failures”
Advanced users can handle tuning. What burns you out are the failures that feel random:
- a filament tip that won’t reload cleanly after an unload/load cycle
- heat creep that shows up only after repeated swaps
- an oozing nozzle that drags a string across a surface you cared about
A plain single-nozzle system has fewer moving parts and fewer transition events. That’s why it often feels more predictable.
Purge-based switching adds a lot of mechanical events (load/unload, cut, retract, feed, purge). Each event is another chance for a failure.
Tool-changing/nozzle-swapping systems trade that for a different class of failure: alignment, docking, tool offsets, or mechanical tolerances. When they’re dialed in, they can be very consistent. When they’re not, you can end up troubleshooting a mechanism rather than a print.
⚠️ Warning: If you already struggle with basic extrusion consistency (partial clogs, under-extrusion, inconsistent flow), adding frequent swaps usually makes the problem louder—not quieter.
Evaluation criteria 3: maintenance and nozzle wear
Nozzles are consumables. If you print abrasives (carbon fibre blends, glow, wood-filled), wear becomes a workflow issue.
With a single nozzle, you either:
- swap nozzles manually (more downtime), or
- accept that your “one nozzle does everything” setup will drift over time.
With nozzle swapping/tool changing, the appeal is obvious: dedicate a hardened nozzle to abrasives and keep a clean brass nozzle for everything else.
But don’t ignore the hidden maintenance:
- more hotends/nozzles to keep clean
- more heaters/thermistors/fans that can fail
- more calibration states to keep consistent
If you enjoy maintaining a machine (and many advanced FDM users do), this is a feature. If you just want output, it’s a cost.
Evaluation criteria 4: speed (not the number on the spec sheet)
People compare printers on max speed, then wonder why their shop still feels slow.
In reality, system overhead often dominates:
- purge towers take time
- repeated heat cycles for manual swaps take time
- failed prints take the most time
Tool-changing and nozzle-swapping can be faster in “real throughput” when it prevents waste and failures, even if the motion system isn’t meaningfully faster.
Evaluation criteria 5: print quality (especially transitions)
If you’re printing functional parts, quality isn’t just surface finish. It’s repeatability:
- does the part come out the same on the third run?
- do your supports behave consistently?
- does the interface between materials behave the way you expect?
Purge-based switching can produce good results, but you may need to tune purge volumes and transition behaviour to avoid contamination.
Tool-changing/nozzle swapping generally gives you cleaner transitions because you’re not depending on a shared melt path to be “washed out” every time.
Where IDEX fits (the underrated middle option for multi-material FDM)
A lot of people compare “single nozzle” vs “tool changer” and skip the middle.
IDEX (independent dual extruder) setups can be a sweet spot when:
- you mostly need two materials (model + support, rigid + flexible)
- you want less purge waste than single-nozzle switching
- you don’t need 4–8 colours/materials
It’s still extra hardware to maintain, but it can avoid the load/unload loop that makes some purge-based systems feel fragile.
Decision tree: who should choose which?
Choose single nozzle if…
- 80–90% of your prints are one material/colour
- you value reliability and fast troubleshooting over automation
- you mainly change nozzle sizes a few times a month, not daily
Choose purge-based multi-filament switching (AMS/MMU style) if…
- you want multi-colour for visual parts and you accept purge waste
- you’re mostly switching similar materials (e.g., PLA-to-PLA)
- you’re willing to tune purge settings to improve transitions
Choose tool-changing / nozzle-swapping if…
- you frequently switch materials or nozzle types and want less cross-contamination
- you print small batches where purge waste feels painful
- you’re comfortable maintaining a more complex mechanism
- you care about repeatability across multiple material/nozzle setups
How to make your choice work better (regardless of system)
Here are the practical moves that reduce pain in any setup:
- Keep filament dry. Wet filament makes every system look unreliable.
- Standardise two or three nozzle “profiles.” (For example: detail, general, abrasive.) Treat them like tools, not random swaps.
- Treat transitions as a calibration task. Don’t troubleshoot transitions mid-project.
- Fix basic extrusion issues first. If your baseline flow isn’t consistent, everything else gets harder.
If you’re looking for a deeper refresher on multi-colour workflows, Sovol has a clear explanation of methods and why purging happens in the first place (Sovol’s explainer on how multi-color FDM works). If you’re already running purge-based switching and want to reduce waste, their guide on practical tactics is also useful (reduce filament purge waste).
Next steps
If you want one simple takeaway: choose the system that reduces your most common failure mode.
- If your pain is purge waste and messy transitions, tool-changing/nozzle-swapping will feel like relief.
- If your pain is mechanical troubleshooting, a well-tuned single-nozzle setup will keep you printing.
And if you’re dealing with inconsistent flow, clogs, or under/over-extrusion, it’s worth solving that baseline first—those issues show up more often once you start changing tools and materials (fix under- and over-extrusion issues).


