


You know 3D prints can fail at any skill level. Maybe you see a rough surface or a tangled mess on your build plate and wonder why 3d prints fail so often. Studies show 73% of beginners run into issues like this. Understanding what really causes these problems helps you print with confidence.
Key Takeaways
- Make sure the print surface is clean and the bed is level before you start printing. This stops prints from coming off or moving around.
- Check and clean the nozzle often to stop extrusion problems. Use good filament and try settings on small prints to make sure the flow is right.
- Adjust your printer a lot to keep it working well. Good calibration stops too much or too little filament and makes prints look better.
Why 3D Prints Fail: Main Issues and Solutions
When you begin 3D printing, you may ask why 3d prints fail so much. The answer is not always easy. Many problems look alike but have different reasons. Let’s look at the main causes of 3d prints fail and ways to stop them.
Bed Adhesion Failures
Bed adhesion failures are a top reason for 3d prints fail. If your print does not stick, your project can get ruined. You might see a thin pancake of plastic, a thick slab stuck, or nothing after waiting.
|
Category |
|
|---|---|
|
Adhesion Failures |
Prints not sticking, thick slab stuck, thin pancake on the plate. |
Why does this happen?
Bed adhesion problems often come from a dirty surface or wrong nozzle height. If the plate is dirty, the first layer will not hold. If the nozzle is too far, the filament will not stick. If it is too close, the filament may squish and block the nozzle.
Technical reasons include:
- Dust, oil, or glue left on the bed.
- Wrong nozzle height adjustment.
- Uneven build plate.
- Wrong bed or nozzle temperature.
Prevention strategies:
🛠️ Tip: Clean and set up your printer often.
- Clean the bed with alcohol before each print.
- Level the bed and check it often.
- Adjust the nozzle height so the first layer is just right.
- Use glue sticks, tape, or brims for tricky materials.
- Match bed and nozzle temperatures to your filament.
|
Technique |
Description |
Success Rate |
|---|---|---|
|
Bed Leveling |
Makes sure the bed is flat and even. |
High |
|
Cleaning the Print Bed |
Removes stuff that stops prints from sticking. |
High |
|
Temperature Adjustment |
Sets bed and nozzle heat for your material. |
Medium-High |
|
Adhesion Aids (Glue, Brims) |
Adds extra help for prints to stick. |
Variable |
If your print lifts or slides, stop and check these things. Most failed 3d prints start with bad bed adhesion.
Extrusion Issues and Under/Over-Extrusion
Extrusion problems are another big reason for 3d prints fail. You may see gaps, weak spots, or blobs of plastic. Sometimes, the printer stops pushing out filament, or pushes out too much.
|
Symptoms of Under-Extrusion |
Root Causes of Under-Extrusion |
|---|---|
|
Clogs in the nozzle |
Misaligned printer |
|
Not enough material flow |
Wrong nozzle size |
|
Weak grip on filament |
Worn drive gears |
|
Filament tangling |
Wet filament |
|
Poor first-layer adhesion |
Wrong print settings |
|
Overheating of filament |
Bad cooling fan |
Why does this happen?
Under-extrusion means not enough filament comes out. Over-extrusion means too much comes out. Both can ruin your print. These problems can come from a clogged nozzle, bad filament, or wrong settings.
Technical reasons include:
- Dirty or blocked nozzle.
- Worn drive gears or loose grip.
- Wet or tangled filament.
- Wrong extrusion multiplier or flow rate.
- Uneven filament diameter.
Prevention strategies:
- Clean your nozzle often.
- Use dry, good filament with even diameter.
- Make sure the extruder grips the filament well.
- Test your settings on small prints first.
- Change your slicer’s flow rate if you see gaps or blobs.
Note: If you see stringing or oozing, lower the nozzle temperature, speed up printing, or change retraction settings. Dry filament and a clean nozzle help too.
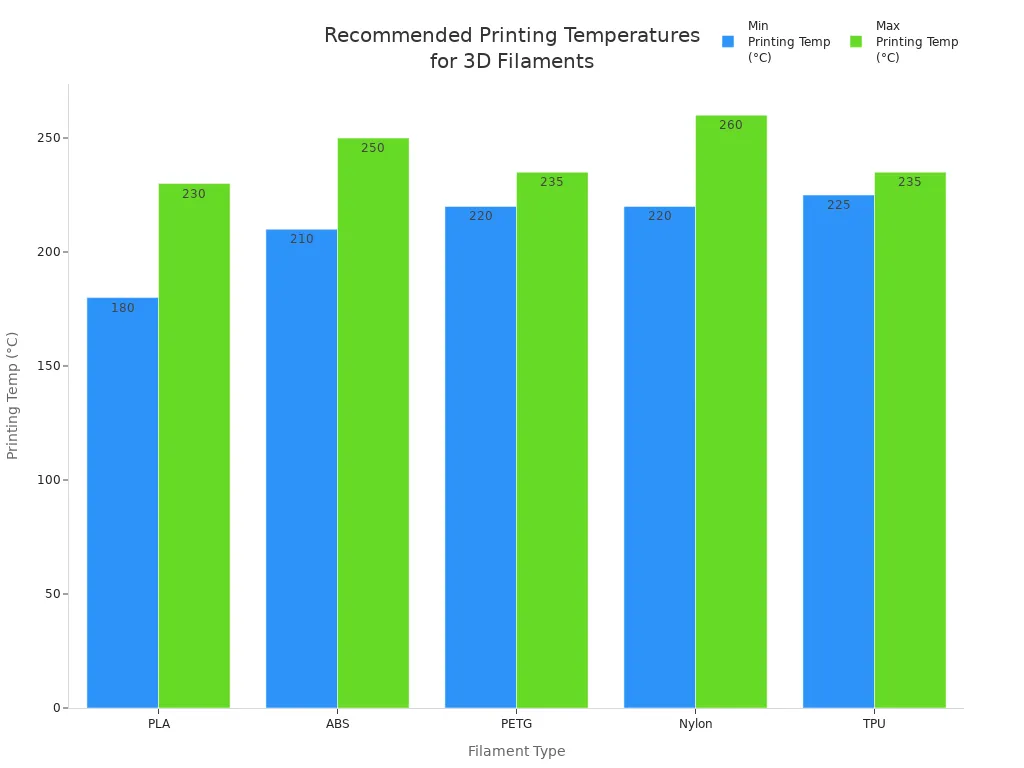
Temperature and Overheating Problems
Temperature problems can cause many types of 3d prints fail. If the temperature is too high or low, you may see warping, shifting, or melted features. Sometimes, the print looks fine but falls apart later.
Common temperature issues:
- Warping or curling at corners.
- Layers not sticking together.
- Small features melting or changing shape.
- Under-extrusion from soft filament.
|
Filament |
Bed Temp (°C / °F) |
Ambient Temp Recommendations (°C / °F) |
Notes |
|
|---|---|---|---|---|
|
PLA |
180–230°C / 356–446°F |
Optional: 60–80°C / 140–176°F |
20–25°C / 68–77°F |
Too much heat may soften filament before extrusion. |
|
ABS |
210–250°C / 410–482°F |
50–100°C / 122–212°F |
40–50°C / 104–122°F |
Use an enclosure to stop warping and layer separation. |
|
PETG |
220–235°C / 428–455°F |
Optional: 60–80°C / 140–176°F |
Slightly above room temp |
Prints well at room temp; warmer air can help. |
|
Nylon |
220–260°C / 428–500°F |
50–100°C / 122–212°F |
Warm environment |
Enclosure helps stop warping and drafts. |
|
TPU |
225–235°C / 437–455°F |
Optional |
Room temperature (20–25°C / 68–77°F) |
Keep away from drafts for good prints. |
Prevention strategies:
- Always check the right temperature for your filament.
- Use an enclosure for ABS or Nylon to keep heat steady.
- Avoid drafts and quick temperature changes.
- Watch for overheating on small parts and lower the temperature if needed.
Mechanical and Motion Failures
Mechanical problems can make your 3d prints fail in ways that look like other problems. You may see layers moved to one side, jagged edges, or a print that stops halfway.
|
Issue Type |
Explanation |
|---|---|
|
Loose Belts |
Loose belts may slip and cause layers to move. |
|
Pulley Issues |
Loose screws can stop pulleys from turning right. |
|
Electrical Problems |
Not enough power can make motors lose steps and shift layers. |
Why does this happen?
Loose belts, pulleys, or motors can slip or miss steps. This makes the print shift or stop. Sometimes, electrical problems or overheating can also make the printer lose its spot.
Prevention strategies:
- Check belt tightness before each print.
- Make sure pulleys and screws are tight.
- Keep motors and electronics cool and clean.
- Lubricate moving parts to stop friction.
- Clean the platform and check for dirt after each print.
|
Maintenance Practice |
Description |
|---|---|
|
Regular cleaning |
Clean the platform after each print to remove dirt. |
|
Inspections |
Check cartridges for leaks and make sure the tank is clean. |
|
Proper lubrication |
Lubricate moving parts to keep them working well. |
|
Software updates |
Update software to keep your printer working right. |
|
Professional maintenance |
Get help for hard problems you cannot fix yourself. |
|
Detailed record keeping |
Keep notes on printer performance to find and fix problems. |
Tip: Start with easy checks like tightening screws and cleaning fans. Keep spare parts ready for quick fixes.
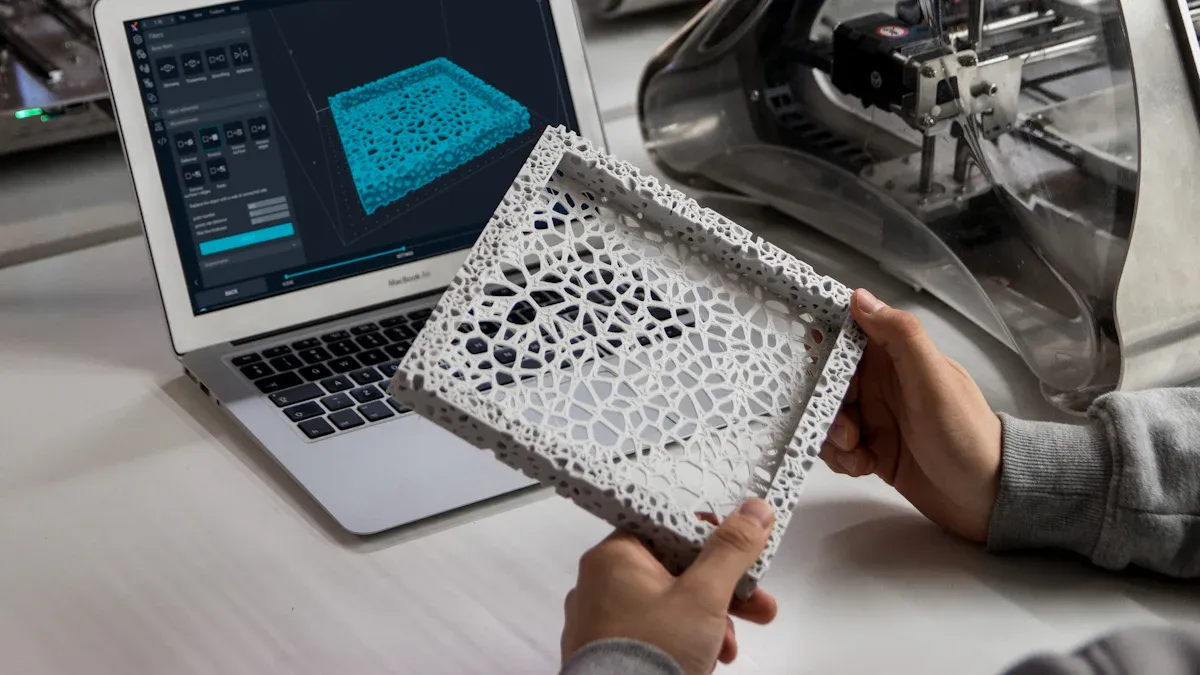
Model Preparation and Slicing Issues
Bad model preparation and slicing mistakes are sneaky reasons for 3d prints fail. You may see prints that come off the bed, shift layers, or fall apart. Sometimes, the model looks good on your computer but fails in real life.
Common slicing and preparation issues:
- First layer does not stick.
- Layers shift or move.
- Not enough support for overhangs.
- Wrong orientation or size.
|
Evidence Description |
Impact on 3D Print Success |
|---|---|
|
Picking the right print direction makes prints better, cheaper, and faster. |
Improves accuracy and lowers costs, helping prints succeed. |
|
Different directions need different layers and supports. |
Shows why print direction matters for quality. |
|
Surface roughness is important for a good model. |
Rough surfaces can hurt model quality and success. |
Prevention strategies:
- Check your model’s direction before slicing.
- Use the right layer height and wall thickness.
- Look at the sliced preview for missing layers or gaps.
- Add supports for overhangs.
- Make sure your model is watertight and has no errors.
Note: Slicing software is important. Learn its settings and check every preview.
Support Structures and Calibration
Support structures and calibration are key for good 3D printing. If you skip these steps, you will see why 3d prints fail again and again. Hard models need supports for overhangs and bridges. Calibration keeps your printer working well.
|
Function |
Description |
|---|---|
|
Supports parts during printing so they do not fall. |
|
|
Preventing Deformation |
Holds new layers in place to stop warping. |
|
Enabling Complex Geometries |
Lets you print cool designs that need support. |
Why does this matter?
Without supports, overhangs and bridges can sag or fall. Without calibration, you get under- or over-extrusion, warping, or misalignment.
Prevention strategies:
- Add supports in your slicer for parts that hang in the air.
- Remove supports carefully after printing.
- Calibrate your printer often. Check bed leveling, nozzle height, and extruder steps.
- Keep a log of your settings and good prints to spot patterns.
Tip: Calibrating often gives you better prints and fewer failed 3d prints.
By learning why 3d prints fail, you can find problems early and fix them before your project is ruined. Each step, from preparation to calibration, helps you avoid common problems and get better results every time.
Troubleshooting Process: Diagnosing and Preventing Failures
Similar Symptoms, Different Root Causes
You might see cracks or gaps in your print. The real reason can be hard to find. Sometimes, the same problem comes from different things. For example, cracks between layers can mean your print cooled too quickly. It can also mean your material shrank as it cooled. If a part breaks easily, it might be from too much cooling or weak layer bonding. Look at this table to see how the same problem can have different causes:
|
Symptom |
Possible Causes |
Suggested Corrections |
|---|---|---|
|
Layers crack or bend |
Rapid cooling, material contraction |
Adjust temperature, reduce fan, use enclosure |
|
Brittle between layers |
Too much cooling |
Lower fan speed, increase print speed |
|
Under-extrusion, wrong filament diameter |
Adjust extrusion, check filament |
|
|
Melting look |
Over-extrusion, wrong settings |
Adjust extrusion, check slicer |
Compounding Minor Issues
Small problems can build up fast. Maybe you use old filament or ignore size rules. A weak stl file can also cause trouble. These mistakes can mix with poor machine care or dirt. This can lead to big failures. Under-extrusion, warping, or layers not lining up can stack up. This hurts your printer’s accuracy and the final print.
- Material expiration
- Low dimensional accuracy
- Build failures from jams or poor positioning
Systematic Troubleshooting Steps
A good plan helps a lot. Don’t just guess what is wrong. Try these steps:
- Check your print settings in the slicer.
- Fix retraction settings to stop nozzle problems.
- Use a heated bed and close the printer for steady heat.
- Add brims or rafts for parts that hang out.
- Change build plates if warping keeps happening.
Looking for clues and checking for problems early helps you find the main cause. This way, you do not make the same mistake again.
Prevention-Focused Workflow
Keep your work area safe and neat. Always follow safety rules and handle materials carefully. Clean your space often. Good care and smart habits stop most problems. Remember, having a good process is important. Stick to it for better prints every time.
Tip: Stopping problems before they start is best. A steady routine and regular checks keep your prints strong and accurate.
You get better results when you look for the root cause of a failed design instead of just fixing what you see. A methodical approach helps you spot design problems early and keeps your prints strong. Here’s what you gain:
- You solve design issues for good, not just for now.
- You stop design mistakes from coming back.
- You save time and money on every design.
- You enjoy printing more because your design works.
When you use these habits, you feel less frustrated and see your design ideas come to life.
FAQ
Why does my 3D print keep coming off the bed?
You might have a dirty bed, wrong nozzle height, or low temperature. Clean the bed, level it, and check your settings before you start.
How do I stop stringing between parts of my print?
Try lowering the nozzle temperature or increasing retraction in your slicer. Dry filament helps, too. Test small changes until you see less stringing.
What should I do if my print looks weak or breaks easily?
Check your layer height and wall thickness. Use the right temperature for your filament. Make sure layers stick together by adjusting print speed and cooling.


