


But the first time you see “Copy/Duplicate” and “Mirror” in a profile, it’s not obvious what you’re actually getting.
- Are they just “print two things at once” modes?
- Do they work like multi-color printing?
- Why do they sometimes fail even when your single-head prints are fine?
This guide is a straight, practical breakdown for advanced FDM makers: what each mode does, what it costs you (usually build area and calibration tolerance), and how to decide in under a minute.
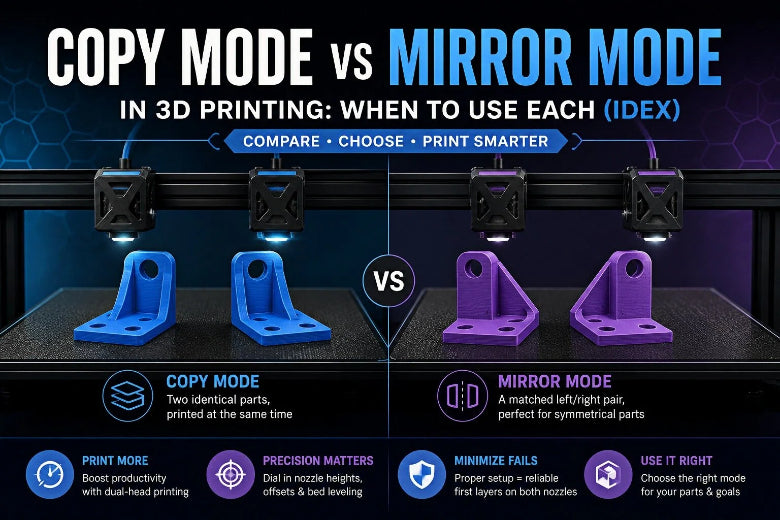
Copy mode vs mirror mode: the 30‑second answer
If you’ve been searching for duplication mode vs mirror mode, this table is the cleanest way to separate them.
|
Question |
Copy (Duplication) mode |
Mirror mode |
|---|---|---|
|
What do you get? |
Two identical parts, printed at the same time |
A matched left/right pair (the second part is mirrored) |
|
When it shines |
Small-batch throughput: brackets, jigs, molds, repeats |
Symmetrical parts: enclosures, cosplay halves, left/right mounts |
|
Biggest constraint |
Your usable bed is effectively split (width shrinks) |
Same split—often with an even tighter safe boundary |
|
What usually breaks it |
First-layer mismatch between toolheads (Z parity / leveling / offsets) |
Same + placement mistakes around the centerline |
Key Takeaway: Copy mode is “two of the same.” Mirror mode is “left and right.” Everything else is calibration, placement, and collision math.
First: what makes these modes possible (IDEX in plain English)
IDEX stands for Independent Dual EXtrusion: two separate toolheads that can move independently (typically along X), while sharing other motion (often Y). That independence is what enables synchronized dual-head printing without bolting two nozzles together.
If you want a high-level refresher on how IDEX works and why these modes exist in the first place, MatterHackers’ explainer on Independent Dual Extrusion (IDEX) printers (2021) is a good overview.
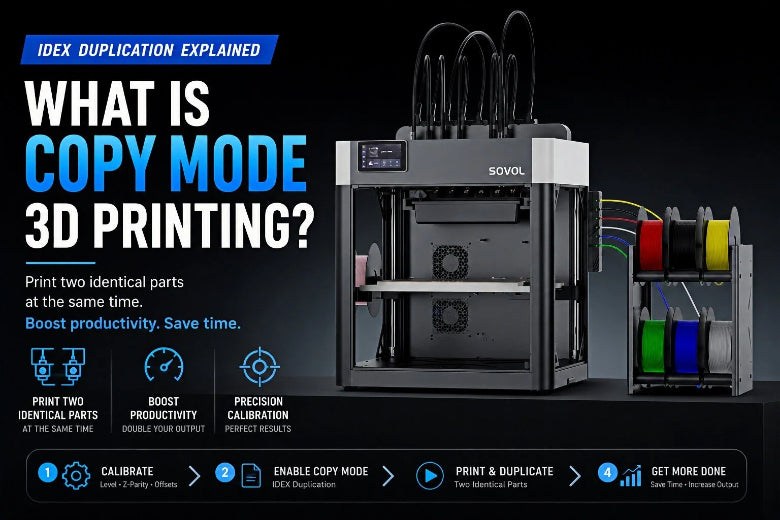
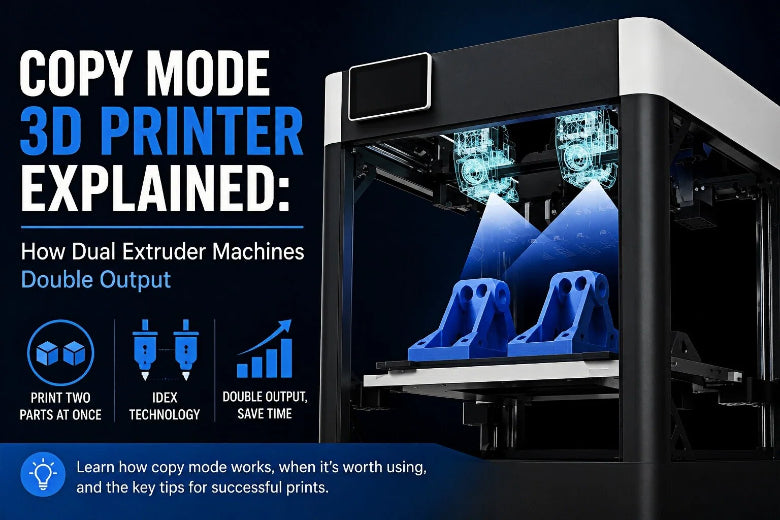
What copy mode is (and what it’s not)
Copy mode (also called duplication mode) means both toolheads run the same toolpath in sync, producing two identical parts in one job.
If you’re Googling “copy mode 3d printer,” this is typically what people mean on an IDEX machine—often described as IDEX copy mode.

It’s not the same as:
- Multi-color printing (where two tools take turns on one part)
- “Two separate prints” on one bed (where a single tool prints two objects sequentially)
In copy mode, the printer is behaving like two synchronized printers running side-by-side.
When copy mode is worth it
Copy mode is a great fit when:
- You need two (or more) of the same part and you’d rather spend time calibrating once than printing twice.
- Your parts are small enough to sit comfortably inside a “two-up” build envelope.
- You care about throughput more than maximizing the size of one part.
What mirror mode is (and what it’s not)
Mirror mode runs the same synchronized idea, but the second part is a mirrored version of the first. You’ll also see this described as “mirror mode 3d printing” or IDEX mirror mode.

Raise3D’s training article—“Brief Introduction of Duplication Mode and Mirror Mode”—states it bluntly: duplication prints the same orientation twice; mirror prints a mirror-symmetrical pair.
When mirror mode is worth it
Mirror mode shines when you need matched pairs and you don’t want to:
- manually mirror the model,
- re-check orientation,
- and risk subtle asymmetry (especially with complex geometry).
Examples makers actually run into:
- Left/right brackets
- Symmetrical enclosure halves
- Molds that need a mirrored mate
- Cosplay armor pieces that come as mirrored sets
The real tradeoff: usable build area (why “width shrinks”)
Here’s the part that surprises people: both modes usually reduce your usable build width.
Why? Because the printer has to maintain a safe separation between toolheads and keep each tool inside a defined motion zone. Practically, it becomes “half a bed per head,” plus a keep-out region.
Raise3D also notes a specific consequence: in some implementations, mirror mode can have a smaller printable boundary than duplication mode, and slicing can fail if the model exceeds that boundary.
Practical takeaway:
- If your model is long in X, you’re more likely to hit limits or collisions.
- If you orient the longest dimension along Y, you usually make these modes easier to run.
Calibration reality check: the 3 things that matter
Copy and mirror modes are brutally honest. They don’t care that your single-head prints look fine.
1) Your two nozzles must be the same effective Z height
If one nozzle is even slightly higher/lower than the other, only one can be “perfect” on the first layer.
Firmware-level documentation explains why this is non-negotiable. Duet3D’s RepRapFirmware guide on configuring an IDEX printer points out that when printing with multiple carriages simultaneously, you need equal nozzle heights—otherwise you can only truly dial in one nozzle’s first layer.
2) Your bed needs to be flat enough across the whole two-up area
Even if your printer has mesh leveling, simultaneous dual-head printing may not benefit equally from compensation across both tool positions.
Duet3D’s same IDEX configuration note highlights a key limitation: bed compensation can only adjust nozzle height for a single X position, which is why a bed that’s “good enough” for one tool can still cause trouble in copy/mirror modes.
3) Your toolhead offsets must be dialed
You need accurate X/Y offsets (and any relevant carriage offsets) so that the printer knows where the second nozzle actually is relative to the first.
If offsets are off, you’ll see symptoms like:
- one copy shifted,
- one nozzle starting too close to the edge,
- or unexpected travel paths that get uncomfortably close.
Setup workflow (slicer‑agnostic)
Different slicers and firmwares expose these features differently. Some printers toggle modes on the machine; others have a slicer “print mode” selector.
But the success pattern is consistent.
Step 1: Prove each tool works in single mode
Before you do anything fancy:
- Run a simple first-layer square with Tool A.
- Run the same with Tool B.
If Tool B can’t produce the same first layer quality alone, copy/mirror mode will amplify the problem.
Step 2: Match nozzle Z height and calibrate offsets
Use your printer’s calibration wizards if available. If you prefer DIY calibration, do it in this order:
- Get bed leveling consistent
- Match nozzle Z height
- Calibrate nozzle-to-nozzle X/Y offsets
Step 3: Choose the mode based on the outcome you need
- Need two identical parts? Choose copy/duplication mode.
- Need a left/right pair? Choose mirror mode.
Step 4: Place the part like you’re avoiding collisions (because you are)
Rules of thumb that work across stacks:
- Copy mode: place the part inside one tool’s safe region; the second part is generated as an offset copy.
- Mirror mode: place the part close to the centerline so the mirrored copy doesn’t get pushed out of bounds.
- Keep the part’s X footprint conservative; prefer Y length.
Step 5: Watch the first 3–5 layers
The fastest way to waste time is “trusting the preview” and walking away.
In these modes, stop early if you see:
- one nozzle printing too high/low,
- one side not sticking,
- or obvious oozing blobs that will become collisions.
Common failure modes (and quick fixes)
Failure mode A: One side has a perfect first layer, the other doesn’t
Likely cause: Z mismatch between nozzles, or the bed isn’t flat enough across both tool areas.
Quick fixes:
- Re-check nozzle Z parity before touching flow.
- Re-run your leveling routine and test a two-up first layer again.
Failure mode B: The model “fits,” but travel gets sketchy near the middle
Likely cause: the real keep-out zones are tighter than your mental model, or your placement is too aggressive.
Quick fixes:
- Reduce X footprint (rotate the part so its long dimension is in Y).
- Move the part closer to the safe center of one tool region.
Failure mode C: Blobs/stringing build up and eventually get hit
Likely cause: ooze from an idle nozzle or messy retractions.
Quick fixes:
- Dry filament if it’s borderline.
- Use more conservative travel/retraction.
- Clean nozzles before the run; don’t start “already dirty.”
Failure mode D: The mirrored pair isn’t what you expected
Likely cause: you needed a rotated pair or a different symmetry axis—not a mirror.
Quick fixes:
- Confirm the symmetry you actually need (mirror across a plane vs rotate 180°).
- Do a quick visual sanity check before committing to a full print.
Which mode should you use? (simple decision rules)
Use copy/duplication mode if:
- you’re printing repeatable parts in small batches,
- the part is comfortably “half-bed sized,”
- and you’re willing to treat calibration as the price of throughput.
Use mirror mode if:
- you’re printing symmetrical left/right components,
- you want perfect pairing without manual mirroring mistakes,
- and your model fits the (often smaller) mirror boundary.
If you’re mostly doing multi-material prints (not two-at-once), you may also want to zoom out and compare architectures. For example, an IDEX vs toolchanger comparison highlights where each approach is worth the complexity; see SOVOL’s IDEX vs tool changer guide for a practical overview.
FAQ
Is copy mode the same as duplication mode?
Yes—most brands use “copy” and “duplication” interchangeably: two identical parts at the same time.
Does mirror mode save filament?
Not directly. It saves time by printing both halves in one job. Filament use is mostly about the model and your print settings.
Why do these modes feel harder than normal printing?
Because you’re asking the printer to behave like two machines at once, and both need a perfect first layer at the same time. Small mismatches that are survivable in single mode become failures here.
Do I need a specific slicer to use these modes?
Not necessarily. Some printer profiles expose copy/mirror as a setting; others enable it in firmware or on-printer menus. What matters most is calibration and safe placement.
Key takeaways
- Copy mode vs mirror mode is simple: identical copies vs mirrored pairs.
- Expect a smaller usable build area in both modes—design and orient parts accordingly.
- These modes reward fundamentals: bed consistency, nozzle Z parity, and accurate offsets.
Next steps
If you want a deeper walk-through on copy/duplication mode (including practical calibration order), you can use SOVOL’s guide to IDEX duplication “copy mode” as further reading.
And if you’re deciding whether IDEX is the right approach for your workflow overall, this SOVOL explainer on what copy mode is on a 3D printer pairs well with the architecture comparison above.


