


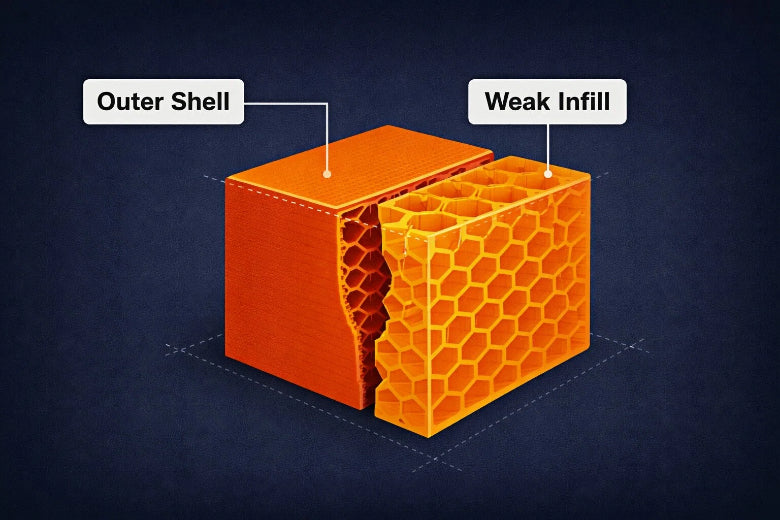
You might notice your 3d print weak infill when your finished part feels flimsy or breaks easily. Infill is the inner support structure that gives your print its shape and strength. If you want better 3d print infill strength, you need to know how infill density affects your results. For example, bumping up infill from 25% to 100% can boost tensile strength by 168%, but it also makes parts less flexible. Check out this table:
|
Infill Density (%) |
Tensile Strength Increase (%) |
Percentage of Elongation Reduction (%) |
|---|---|---|
|
25 |
N/A |
N/A |
|
50 |
N/A |
N/A |
|
100 |
168 |
20.34 |
You can fix weak infill with simple steps and keep your prints strong every time.
Key Takeaways
- Set your infill percentage to at least 30% for stronger prints. Higher infill makes prints stronger but less bendy.
- Pick the best infill pattern. Patterns like gyroid or cubic give better support than simple line patterns.
- Clean your nozzle often and make sure your print bed is level. This helps the print stick well and stops weak infill.
- Try different settings with small test prints. Change infill density and patterns to see what works best for you.
- Keep your filament in a dry place. Wet filament can make infill weak and lower print quality.
Identifying 3D Print Weak Infill
Signs of Weak Infill
You can spot weak infill early if you know what to look for. When you check your print, pay attention to these signs:
- The infill looks thin, patchy, or under-extruded.
- You see a spongy or soft appearance inside the print.
- The part feels fragile and breaks when you bend or twist it.
- The model collapses under weight or stress it should handle.
- The outer layers sag or bend because the inside does not support them.
Tip: If your print feels lighter than expected or you notice gaps inside, you might have a 3d print weak infill problem.
Quick Infill Strength Tests
You do not need fancy tools for testing infill strength. Try these simple tests at home:
- Visual inspection: Look for gaps, uneven layers, or poor bonding in the infill.
- Bend test: Gently bend or twist the part. If it snaps or feels weak, the infill is not strong enough.
- Compression test: Press down on the print. A strong infill should hold its shape under light pressure.
- Tensile test: Pull on a small section until it breaks. Weak infill will snap with little force.
These tests help you tell weak infill apart from other print problems, like layer shifting or stringing.
Diagnostic Checklist
Use this quick checklist to spot weak infill before it ruins your print:
- Does the infill look thin, patchy, or spongy?
- Does the part feel fragile or break easily?
- Do the outer walls sag or bend?
- Are there visible gaps or poor bonding inside?
- Did the print collapse under normal use?
If you checked any of these, you likely have a weak infill issue. Catching these signs early helps you fix problems before your next print.
Causes of Weak Infill in 3D Printing
When you run into weak infill, it usually comes from a few main areas. Let’s break down what can go wrong and how each part affects your print.
Infill Settings and Patterns
Your slicer settings play a huge role in how strong your print turns out. If you set a low infill percentage, your part will feel hollow and weak. Picking the wrong pattern can also cause trouble. Some patterns, like lines, don’t support weight as well as others, like grid or gyroid. If you print too fast, the printer might not lay down enough plastic, leading to under extruded infill.
Here’s a quick look at how different settings affect your print:
|
Parameter |
Impact on Weak Infill |
|---|---|
|
Low density = weak, hollow prints |
|
|
Infill Pattern |
Some patterns leave gaps or weak spots |
|
Print Speed |
High speed can cause poor bonding |
|
Extrusion Width |
Too narrow = less support |
Tip: Try increasing your infill percentage or switching to a stronger pattern if you notice your 3d print weak infill.
Material and Extruder Issues
The type of filament you use and the health of your extruder matter a lot. Wet or old filament can cause weak infill because moisture makes the plastic bubble and break. If your nozzle is clogged or your extruder slips, you’ll see gaps and poor bonding inside your print.
Check out this table for how material and extruder choices affect strength:
|
Factor |
Effect on Infill Strength |
|---|---|
|
Filament Quality |
Wet or brittle filament = weak infill |
|
Nozzle Clogs |
Causes gaps and under-extruded infill |
|
Extruder Temp |
Too low = poor bonding, too high = stringy |
|
Layer Height |
Thick layers may not bond well |
If you see weak infill, check your filament for moisture and make sure your nozzle is clean.
Slicer and Environmental Factors
Your slicer software can sometimes cause weak infill if settings are off. For example, if you set the overlap too low, the infill won’t bond to the walls. If your printer runs in a cold or humid room, you might see even more problems.
Here’s a table showing how environment affects infill strength:
|
Factor |
Effect on Infill Strength |
|---|---|
|
Temperature |
Higher temps (up to 90°C) reduce warping and boost strength |
|
Humidity |
Wet filament can cut strength by up to 70% in some directions |
Note: Always store your filament in a dry place and print in a room with stable temperature to avoid weak infill.
If you pay attention to these causes, you can spot and fix weak infill before it ruins your print.
3D Print Infill Strength: Settings and Patterns
Infill Percentage and Pattern Types
When you want to fix weak infill, start by looking at your infill percentage. This setting controls how much plastic fills the inside of your print. If you use a low infill percentage, your part may feel hollow and break easily. For most functional parts, you should use 30% to 50%. If you need your print to handle heavy loads, try 40% to 60%. For very high-stress parts, go up to 80% or even 100%. A good starting point is 50%.
|
Infill Percentage |
Application |
|---|---|
|
30% - 50% |
Most functional parts |
|
40% - 60% |
Load-bearing designs |
|
80% - 100% |
Very high-stress parts |
|
50% |
Good starting baseline |
|
30% - 40% |
Medium stress applications |
You also need to pick the right pattern. Some patterns, like lines or zigzag, print fast but give weak infill. Others, like grid, cubic, or gyroid, create strong infill patterns that boost 3d print infill strength.
Infill Speed and Extrusion Width
Print speed and extrusion width can make or break your infill. If you print too fast, the plastic may not stick well, causing weak infill. Slow down your infill speed for better bonding. Try to keep it at or below 60 mm/s for most printers.
Wider extrusion widths help the lines stick together. They press more plastic into each layer, making the inside stronger. But if you go too wide, you might see rough surfaces or other problems. Always test a small part first.
- Use a wider extrusion width for better bonding.
- Keep infill speed moderate to avoid weak infill.
- Watch for rough surfaces if you go too wide.
Pattern Comparison: Grid, Gyroid, Cubic
Not all patterns are equal. Some give you more strength and impact resistance. Here’s a quick look at the most common ones:
|
Infill Pattern |
Strength |
Impact Resistance |
Printing Speed |
|---|---|---|---|
|
Gyroid |
Exceptional, even at low density |
Highest |
Slower |
|
Cubic/Grid |
Good, supports impacts |
Moderate |
Faster |
- Grid: Easy to print, gives moderate strength, works for most parts.
- Cubic: Spreads stress in all directions, great for structural pieces.
- Gyroid: Balances strength and weight, best for impact resistance, but prints slower.
If you want to avoid weak infill, choose gyroid for tough, shock-absorbing parts. Use cubic or grid for strong, everyday prints. For decorative items, a lower infill percentage and a simple pattern work fine.
Tip: Always match your infill percentage and pattern to your part’s job. Testing different settings helps you find what works best for your needs.
Fixing Weak Infill: Step-by-Step Solutions
When you spot 3d print weak infill, you can fix it with a few simple changes. Let’s walk through each step so you can boost your 3d print infill strength and get reliable results every time.
Adjusting Infill and Extrusion Settings
You can solve most weak infill problems by tweaking your infill percentage and calibrating the extruder. Here’s a step-by-step process you can follow:
-
Level the Bed
Start by making sure your print bed is flat. A level bed helps the first layer stick well, which supports the rest of the print. -
Calibrate the Extruder
Test your extruder to make sure it pushes out the right amount of filament. Calibrating the extruder stops gaps from forming in the infill and helps you avoid 3d print weak infill. -
Adjust Slicer Settings
Set your infill percentage based on your needs. For most prints, use 20-30%. If you want more 3d print infill strength, bump it up to 50% or higher. Try patterns like gyroid or honeycomb for extra support. -
Control Print Speed and Temperature
Slow down your print speed to 40-50 mm/s. This gives the filament time to bond and fill gaps. Match your nozzle temperature to your filament type. For PLA, use 190-210°C. For PETG, try 230-250°C. -
Use Quality Filament
Always use dry, high-quality filament. Wet or old filament can cause weak infill and ruin your print. -
Experiment with Settings
Print small test models to see what works best for your printer and material. Adjust your infill percentage and extrusion settings until you find the sweet spot.
Tip: If you still see gaps, try a lower layer height. This helps each layer stick better and boosts overall strength.
Improving Bed Adhesion and Nozzle Health
You can’t get strong infill without a clean nozzle and good bed adhesion. Here’s what you should do:
- Clean your nozzle before every print. This keeps the filament flowing smoothly and stops gaps or uneven layers that lead to weak infill.
- Wipe down the print bed to remove dust or dirt. Even a little debris can mess up the first layer.
- Use a glue stick or a special print surface to help the first layer stick. Good adhesion keeps the print from warping or shifting.
- Level the bed carefully. Make sure the nozzle touches the bed evenly across the whole surface.
If you notice your print peeling up or the first layer looking rough, stop and fix the bed adhesion. A strong first layer sets the stage for better 3d print infill strength.
Optimizing Print Speed and Temperature
Print speed and temperature play a big role in fixing weak infill. Here’s how you can optimize them:
- Increase your nozzle temperature in small steps, about 5°C at a time. This helps the filament melt and bond better, filling in gaps and boosting infill strength.
- Keep your print speed moderate. Printing too fast can cause under-extrusion and weak infill. Try 40-50 mm/s for most materials.
- Adjust the flow rate if you see over-extrusion (blobs) or under-extrusion (gaps). Calibrate the flow rate every time you change filament or nozzle size.
Note: If you see gaps in your infill, slow down and raise the temperature a bit. This simple change often fixes the problem.
Retraction and Extrusion Multiplier Tips
Retraction and extrusion settings can make or break your infill. If you see gaps between the infill and the outer walls, try these steps:
- Increase the infill/perimeter overlap in your slicer to 10–15%. This helps the infill bond tightly to the walls and stops weak infill from forming.
- Check your extrusion multiplier. Calibrating the extruder ensures you get the right amount of filament for each layer.
- Slow down your infill speed. This gives the filament more time to bond and fill every gap.
A strong 3D print needs seamless bonding between the infill and the walls. If you notice gaps, focus on your overlap and extrusion settings. You can also reduce extrusion settings if you see too much plastic building up, but always test with small prints first.
Pro Tip: Don’t forget to check your retraction settings. Too much retraction can cause gaps, while too little can lead to stringing. Find the balance that works for your printer and material.
By following these steps, you can fix 3d print weak infill and get the 3d print infill strength you need. Remember to adjust your infill percentage, calibrate the extruder, and keep your nozzle and bed clean. Test different settings until you find what works best for your setup. With a little patience, you’ll see stronger, more reliable prints every time.
Preventing Weak Infill in Future Prints
Maintenance and Calibration
You can avoid weak infill by taking care of your 3D printer. Clean your printer often so dust does not block the nozzle or stick to the bed. Check the belts and gears for damage. Replace them if you see any problems. Always level your bed and set the nozzle height correctly. This helps layers stick together and keeps prints even.
A quick checklist for your routine:
-
Clean the nozzle and bed before you print.
-
Look at belts and gears for damage.
-
Level the bed and set the nozzle height.
-
Store filament in a dry box.
Calibration is important too. When you calibrate extrusion settings, you control how much material comes out. This stops too little or too much plastic from printing. Bed leveling helps layers stick and stops gaps in the infill. Temperature control keeps filament strong and sticky.
|
Aspect of Calibration |
Effect on Infill Reliability |
|---|---|
|
Extrusion Settings |
Controls material flow, stops too little or too much plastic. |
|
Bed Leveling |
Makes layers stick, reduces gaps in infill. |
|
Temperature Control |
Keeps filament strong for better prints. |
Material and Setting Choices
Pick the right filament and settings for each print. Good filament gives better results. Store filament in a dry box to keep out water. For strong parts, use at least 50% infill. Choose strong patterns like gyroid or triangular. Thicker walls make your print last longer.
|
Setting |
Recommendation |
Impact on Strength |
|---|---|---|
|
Infill Density |
At least 50% |
Makes prints strong for heavy use |
|
Infill Patterns |
Gyroid, Triangular |
Spreads stress, makes prints stronger |
|
Wall Thickness |
Thicker walls preferred |
Adds more strength to your print |
Testing and Iteration
Testing helps you find the best settings for your printer. Print small test pieces with different infill percentages, patterns, and overlap. Bend or press them to see which one is strongest. Write down your results so you remember what works. When you test and change your settings, you get stronger prints every time.
|
Step |
Description |
|---|---|
|
1 |
Print test pieces with different infill and patterns |
|
2 |
Test each piece for strength and use |
|
3 |
Change settings based on your tests |
|
4 |
Keep notes for future prints |
Tip: Keep testing and changing your infill percentage and patterns. This helps you avoid weak infill and get strong prints for every project.
You can fix weak infill by checking your settings, using the right infill pattern, and keeping your printer in top shape. Regular calibration and testing help you avoid common mistakes like poor adhesion or wrong percentages. Patterns like gyroid or cubic boost strength without wasting material. Try new settings, test small prints, and keep learning. Strong prints start with good habits—give your next project the support it deserves!
FAQ
What causes weak infill in my 3D prints?
You might see weak infill if your infill percentage is too low, your nozzle is clogged, or your filament has absorbed moisture. For example, printing with wet PLA can make the inside of your part look spongy and break easily.
How can I increase the strength of my 3D printed parts?
Try raising the infill percentage, using a stronger pattern like gyroid, and slowing down your print speed. You can also add more wall lines. These changes help your parts handle more stress, like holding up a heavy book or supporting a shelf.
Why does my infill not stick to the outer walls?
If you notice gaps between the infill and the walls, check your slicer’s infill overlap setting. Increase it to 10–15%. Also, make sure your nozzle is clean and your bed is level. This helps the infill bond tightly to the walls.
What is the best infill pattern for strong prints?
For most projects, gyroid or cubic patterns work well. They spread force evenly and resist impacts. If you print a tool handle or a bracket, these patterns help your print stay strong and last longer.
Can I fix weak infill after printing?
You can’t fix weak infill inside a finished print, but you can reinforce the outside with glue or epoxy. For future prints, adjust your settings and use dry filament to avoid the same problem.


