


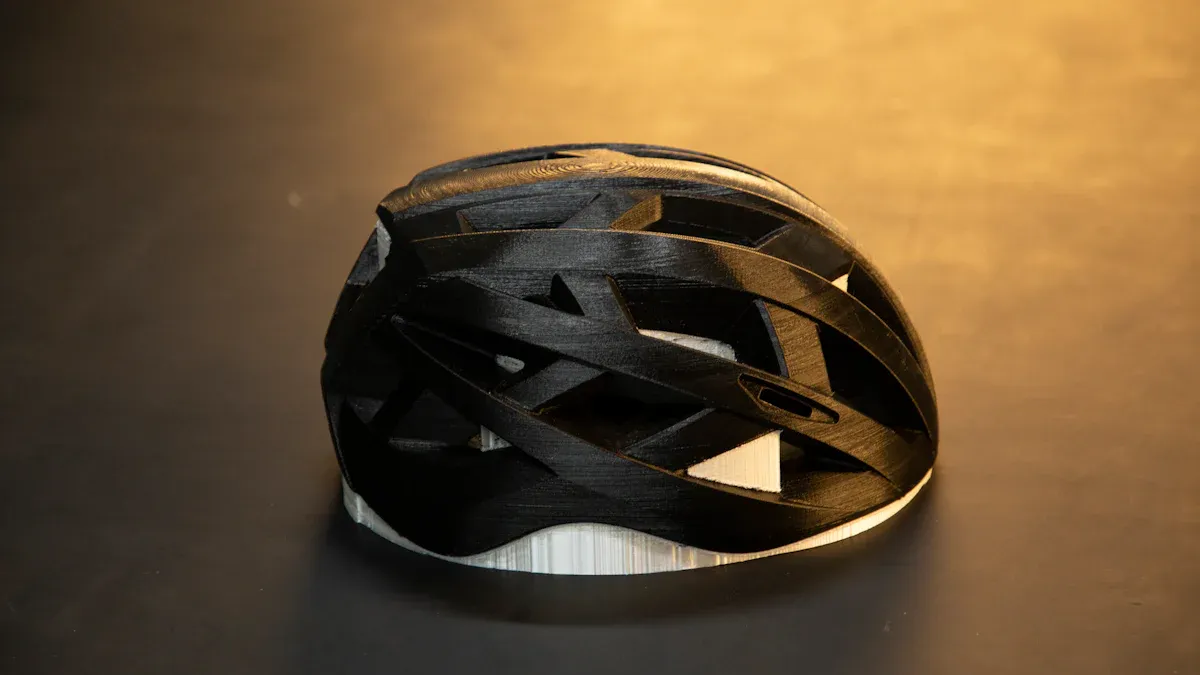
Printing a full size helmet with a regular 3D printer can feel overwhelming. You might wonder how to print full size helmet parts that actually fit and look great. This guide gives you the confidence to tackle 3d printing a cosplay helmet, no matter your experience level. You get a step by step approach that makes the printing process simple. Whether you want a helmet for cosplay or a custom project, you will see how to print a cosplay helmet that looks seamless. Achieving the right fit and safety matters, and this guide helps you reach a professional result with your full size helmet.
Key Takeaways
Begin with a good 3D model from trusted places. This helps the helmet fit well and look nice. Use the 2-2-2 rule to check the fit. Put 2 fingers above your eyebrows. Put 2 fingers at the sides. Put 2 fingers under the chin strap. Cut big helmet models into smaller pieces. This makes it easier to print on normal 3D printers. Make sure to cut along natural seams. Add things like pins or keys to help line up the parts. This helps you put them together without gaps. Check your helmet’s fit and condition often. Change your helmet every five years to stay safe.
How to Print Full Size Helmet: Step by Step
Printing a full size helmet can feel like a big challenge, especially if you have a small 3D printer. Most helmets are much larger than the average print bed. You need to split large 3D models into smaller parts, keep everything organized, and make sure the pieces fit together perfectly. This step by step guide will walk you through the entire process, from finding the right model to adding alignment features for a seamless finish. You will learn how to print full size helmet parts that look professional and fit just right for your diy helmet project.
Find and Prepare the 3D Model
You want to start with a high-quality 3D model. Not all helmet files are created equal. Some have better detail, structure, and fit than others. Look for models from trusted sources. Here’s a quick table of popular brands and where you can find their helmet models:
|
Brand |
Model |
Link |
|---|---|---|
|
Riddell |
AXIOM 3D |
|
|
VICIS |
ZERO2 MATRIX |
|
|
CCM |
Super Tacks X Helmet Senior |
|
|
Kask |
Elemento Bike Helmet |
|
|
Schutt |
F7 Pro |
|
|
Hard Head Veterans |
Micro Lattice Helmet Pads |
You can also find many free and paid helmet models on sites like Thingiverse, MyMiniFactory, and CGTrader. Always check reviews and print photos from other users before you download. This helps you avoid models that are hard to assemble or don’t fit well.
Tip: Organize your files in folders by project. Rename each part clearly so you know which piece goes where. This will save you time later.
Scale for Proper Fit and Safety
Getting the right fit is the most important part of any diy helmet project. If your helmet is too small, it won’t go on your head. If it’s too big, it won’t stay in place. You want your helmet to feel comfortable and safe. Here’s a step by step way to scale your helmet:
- Use cosplay callipers. Print a set of callipers and measure your head from front to back, side to side, and top to bottom.
- Try 3D sizing heads by Budwin. Download a 3D head model that matches your measurements. Place your helmet model over it in your slicer to check the fit.
- Use your slicer’s scaling tools. Most slicers let you adjust the size of your model by percentage. Increase or decrease until the helmet fits your measurements.
You should also follow the 2-2-2 rule for helmet fit. This rule helps you check if your helmet sits right on your head. Here’s what it means:
|
Rule Component |
Description |
|---|---|
|
2 fingers above eyebrows |
The helmet’s brim should rest about 2 fingers above your eyebrows. |
|
2 fingers gap at the side |
The gap between the helmet and your head should allow no more than 2 fingers’ width at the side. |
|
2 fingers under chin strap |
The chin strap should fit snugly, permitting 2 fingers to pass underneath. |
Try your helmet on after printing a test ring or small section. This lets you check the fit before you print the whole thing. If it feels off, adjust the scale and try again.
Note: Always wear a liner or padding inside your helmet for extra comfort and safety.
Split Large 3D Models for Small Printers
Most home 3D printers have a small print bed. You can’t print a full size helmet in one piece unless you have a very large printer. You need to split large 3D models into smaller parts. This step by step process will help you do it right:
- Open your helmet model in a program like Meshmixer, Blender, Tinkercad, Fusion 360, or Cura.
- Use the cut or split tool to divide the helmet into sections that fit your printer bed.
- Avoid cutting through detailed areas or thin spots. Try to split along natural seams or panel lines.
- Make sure each part is strong enough to print and assemble. Split at strong points, not at weak or thin areas.
- Check that each piece fits on your printer bed. This saves time and material.
- Here’s a quick list of best practices:
- Use free tools like Meshmixer, Blender, or Tinkercad to cut the model.
- Don’t cut through detailed parts.
- Split at strong points.
- Maximize your printer bed space.
Tip: Print a small test piece first to check your settings and fit before printing all the parts.
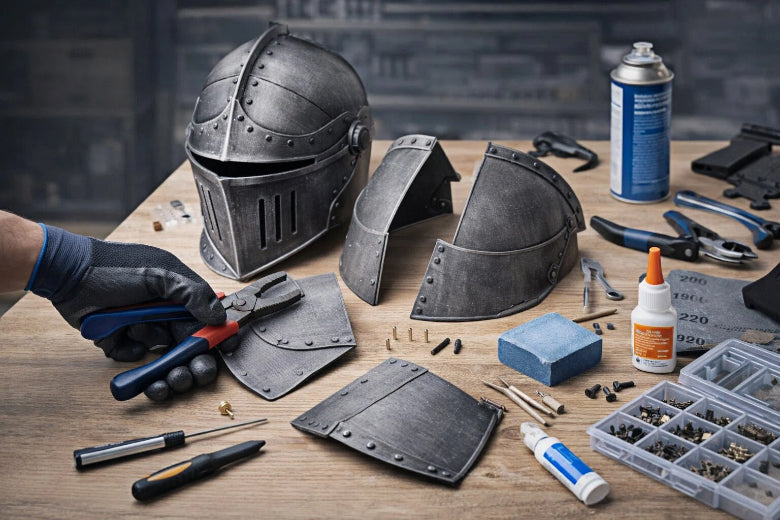
Add Alignment Features
When you split large 3D models, you want the pieces to line up perfectly during assembly. Alignment features make this easy. You can add pins, keys, or holes to your model. These help you assemble 3D printed parts without gaps or misalignment.
- Design alignment pins into your print. These guide the pieces together and keep them straight.
- Drill small holes through the mating surfaces. Use brass pins or dowels to hold the parts in place while the glue dries.
- Place your cuts along natural seam lines or panel boundaries. This hides the seams and makes your helmet look seamless.
- Add keys or tabs to help the pieces snap together.
Some helmets use adjustable liners and stability features. These help you get a custom fit and keep the helmet secure. You can also add rail mounts or shroud mounts if you want to attach accessories. If your helmet has a face shield or extra layers, make sure these features fit together during assembly.
Pro Tip: Take your time with alignment. Good alignment features make sanding and finishing much easier later.
Now you know how to print full size helmet parts, split large 3D models, and add alignment features for a seamless finish. This step by step guide gives you the tools to start your diy helmet project with confidence. You will get a helmet that fits well, looks great, and feels comfortable every time you wear it.
Materials, Tools, and Slicing Guide
Choose Filament and Adhesives
You want your helmet to last. You also want it to look good. Picking the right filament and adhesive is important. Some filaments are stronger than others. Nylon is strong and lasts a long time. Polycarbonate can take hits and heat. PETG bends well and sticks nicely. Look at this table to see which filament works for your project:
|
Filament Type |
Durability Features |
Best Use Cases |
|---|---|---|
|
Nylon |
Strong like glass fiber, durable like nylon |
Tough functional parts, wear parts, production-ready prints |
|
Polycarbonate |
Extremely tough, impact-resistant, temperature-resistant |
Applications requiring high durability, such as bullet-proof glass |
|
PETG |
Durable, flexible, impact and heat resistant |
Mechanical parts, snap fit enclosures, adheres well to blue painters tape |
You need strong adhesives to put 3D printed parts together. Epoxy and polyurethane stick well and fill gaps. Cyanoacrylate dries fast but does not like water or sunlight. Here’s a quick comparison:
|
Adhesive Type |
Bonding Strength |
Water Resistance |
UV Resistance |
Curing Time |
Gap-Filling Ability |
|---|---|---|---|---|---|
|
Epoxy |
High |
Excellent |
Good |
Moderate |
Moderate |
|
Polyurethane |
High |
Excellent |
Good |
Moderate |
High |
|
Cyanoacrylate |
Moderate |
Poor |
Poor |
Very Fast |
Low |
Essential Tools for Assembly
You need the right tools to build your helmet. These tools help you make it look smooth and seamless. Here’s a list of what you need:
- Soldering iron melts seams in PLA parts.
- Sandpaper (grits 120, 240, 400) smooths rough spots.
- Filler primer hides gaps and gets parts ready for paint.
- Strong glue, like 2-part epoxy, joins parts together.
- 3D printer with a big build space prints larger pieces.
- Heated bed helps the first layer stick better.
- Slicing software like Cura or PrusaSlicer prepares your model.
Note: Sanding and filler primer help hide seams after you join 3D printed parts.
Slicing Settings for Large Parts
Slicing settings are important when you print full size helmet parts. You want prints that are strong and smooth. You also want to stop warping. Try these settings for best results:
|
Configuration Setting |
Recommended Value/Range |
Notes/Benefits |
|---|---|---|
|
Extrusion Temperature |
230–250 °C |
Ensures flow above glass transition temperature for layer adhesion |
|
Bed Temperature |
95–110 °C |
Higher temps prevent warping on thicker walls |
|
Layer Height |
0.2 mm (0.1 mm for cosmetics) |
Lower layer = better surface finish |
|
Wall Thickness |
1.2 mm (3 perimeters) |
Improves part strength and security |
|
Infill Percentage |
25–40% |
Balances strength and cost |
|
Cooling Fan Speed |
0–10% |
Limited use avoids layer separation |
|
Adhesion Aid |
6–10 mm brim / raft optional |
Reduces warping, improves stability |
|
Enclosure Temperature |
45–60 °C |
Maintains heat resistance and finish |
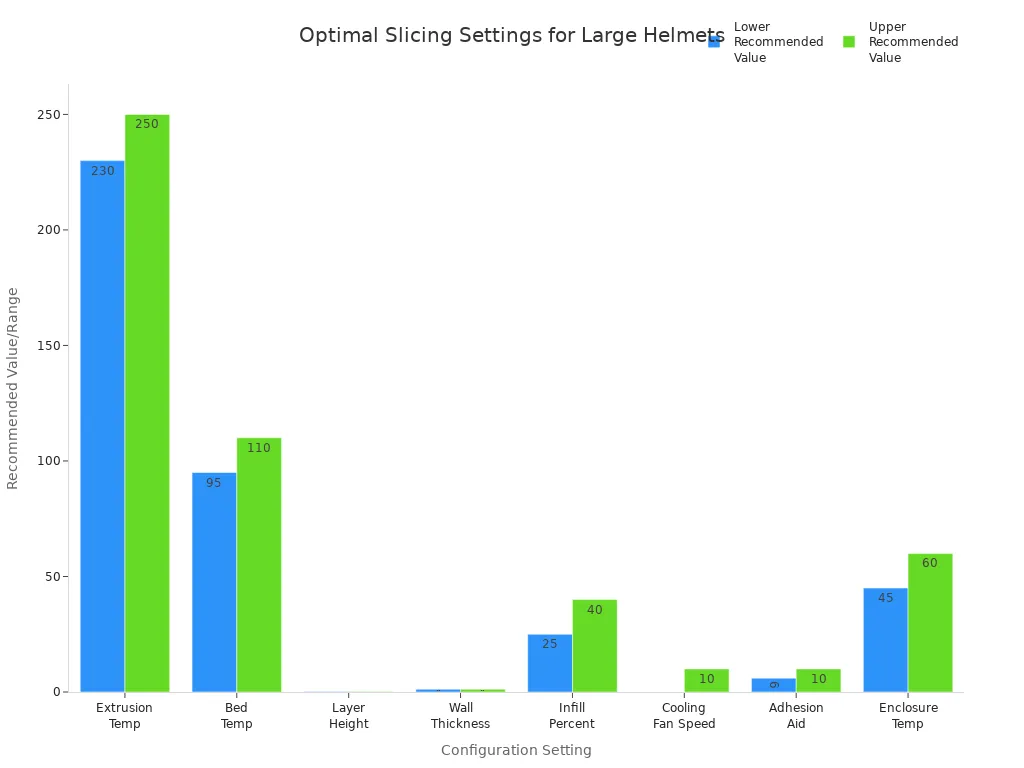
Now you know how to pick materials, tools, and slicing settings for your 3D print helmet guide. These steps help you split big 3D models and put 3D printed parts together with confidence.
Printing and Handling Parts
Organize and Track Printed Pieces
When you print a full size helmet in parts, keeping track of each piece makes assembly much easier. You can label every part with a marker or use sticky notes. Store the pieces in separate bags or boxes and write the part name on each container. Some people use a simple spreadsheet or checklist to mark which parts are done. If you want to get fancy, try taking photos of your layout before removing parts from the print bed. This helps you remember how everything fits together. Using these methods, you avoid losing small pieces and make sure you assemble 3D printed parts in the right order.
Tip: Stronger association between parts, like matching numbers or colors, helps you spot missing pieces quickly. This keeps your helmet project on track and reduces mistakes.
Remove Supports and Clean Up
After printing, you need to remove supports and clean up each part. Use pliers or flush cutters to snip away support material. Go slow and work carefully, especially around detailed areas. Sandpaper helps smooth rough spots left by supports. Start with a coarse grit, then move to finer grits for a smooth finish. If you see stringy bits or blobs, a hobby knife can trim them away. Cleaning up each piece now saves you time when you assemble your helmet later.
Fix Warping and Print Issues
Large helmet parts sometimes warp or lift from the print bed. You can fix these problems with a few simple tricks:
- Lower the first layer height and slow down the print speed.
- Preheat your printer’s chamber before starting.
- Keep part cooling fans below 30%.
- Use a brim with zero distance inside and outside the part.
- Adjust nozzle temperature within the recommended range.
- Print at a slower speed for better adhesion.
- Try adhesives like wood glue mixed with water on the bed.
- Make sure the heated bed stays at a steady temperature.
- Enclose your printer to block drafts.
- Change your model to reduce big flat walls that cause stress.
- After printing, reinforce seams with 2-part epoxy.
Many makers glue helmet pieces together and fill seams with extra glue or epoxy. This helps prevent splits and keeps your helmet strong, even if some warping happens.
By following these steps, you make sure your helmet parts stay organized, clean, and ready for seamless assembly. This 3D print helmet guide helps you handle every piece with confidence.
Seamless Assembly Techniques
Dry Fit and Align Parts
Before you start gluing, always dry fit your helmet pieces. This step helps you spot any issues early. Lay out all the parts and check that each one lines up with its neighbor. Make sure the mating surfaces are clean and level. If you see bumps or uneven edges, sand them down until they fit together smoothly. Remove any dust or residue so nothing gets in the way of a strong bond.
You can use simple tools to hold the parts in place. Try clothespins, rubber bands, or clamps. These tools keep everything steady while you check the fit. If you want a perfect joint, press the parts together and apply a little extra thin glue from the outside. The glue will flow into the seam and help with alignment.
Tip: Take your time with this step. Good alignment now means less work later during finishing.
Gluing and Welding Joints
When you feel happy with the fit, you can move on to gluing or welding the joints. Here’s a quick look at some popular methods:
|
Technique |
Description |
Advantages |
Limitations |
|---|---|---|---|
|
Plast-I-Weld |
Melts PLA parts together for a super strong bond. |
Joint will not fail. |
Costs more if you use it often. |
|
Dichloromethane |
Welds PLA and smooths surfaces. |
Good for welding and smoothing. |
Only works for some applications. |
You can also try friction welding. This method melts the edges a little and creates a strong bond, especially with tough PLA. Superglue works well for quick assembly and precise alignment. Just remember to hold the parts together until the glue sets.
Reinforce and Fill Seams
After you join the parts, you want to make the seams strong and smooth. For the inside, reinforce the seams with fiberglass resin. This adds a lot of strength and helps your helmet last longer. You can also use epoxy for extra support. Some makers use printed strips and heat-weld them along the seams for even more durability.
To fill gaps on the outside, pick the right filler. Here’s a quick guide:
|
Product Name |
Description |
Sandable |
Notes |
|---|---|---|---|
|
Green Stuff |
Good for sculpting, not for sanding. |
No |
Best for details, not for filling gaps. |
|
Liquid Green Stuff |
Water-based, flakes when sanded. |
No |
Okay for filling, not for smooth finishes. |
|
Sprue-Goo |
Liquid plastic, great for small gaps. |
Yes |
Needs several layers and drying time. |
|
Mr Hobby Dissolved Putty |
Goes on thick, sands to a hard smooth finish. |
Yes |
Needs more coats but gives a solid result. |
Sand the filled seams after they dry. This step helps you get a seamless look before painting. With these assembly techniques, you can build a helmet that looks and feels professional.
Finishing and Painting: Ultimate Guide
You’ve printed and assembled your helmet. Now comes the fun part—making it look like a pro built it! This ultimate guide walks you through every step of finishing, from sanding and smoothing to painting and sealing.
Sanding and Surface Prep
Start with sanding and smoothing. Grab 180-200 grit sandpaper and gently sand away the layer lines. Move your hand perpendicular to the lines for the best results. Work your way up through 200, 320, and 400 grit sandpapers. For a polished finish, use wet sanding with 600 grit, especially if you printed with PLA or ABS. Before you sand, spray on a filler primer. This fills in small gaps and gives you a nice surface to work with.
Tip: Focus on seams. Sand them flat, then use a little filler putty to hide any gaps. Let it dry, then sand again until everything feels smooth.
Priming and Painting Steps
Wash and dry your helmet to remove dust. Spray on 2-4 coats of sand-able primer. Hold the can 8-10 inches away for the first coat. Let each coat dry for 15-30 minutes. For the next coats, spray slowly to avoid drips. After 24 hours, check for any lines or dents. Dab on Bondo putty where needed. Sand the putty, starting at 120 grit and moving up to 600 grit. Wash off the dust. When the primer feels tacky, spray on your base color. Use 3-4 light coats for even coverage.
Try using painter’s tape to mask off areas for cool designs or details.
Sealing and Final Touches
Protect your paint job with a strong seal. Reinforce seams inside the helmet with fiberglass resin for extra strength. Run a thin line of epoxy along the seam lines to seal and harden them. For even more support, heat-weld printed strips over the seams. Finish with a clear coat spray to lock in your paint and add shine.
With these finishing steps, you’ll hide seams and get a helmet that looks smooth and ready for action.
Troubleshooting and Pro Tips
Fix Misalignments and Gaps
You might notice small gaps or misalignments when you assemble 3D printed parts for your helmet. These issues happen for many reasons, like printer warping or parts not lining up just right. If you spot a gap between parts, grab some filler putty or epoxy and press it into the joint. Sand it smooth after it dries. For weak joints, add extra adhesive or even a small bracket inside the helmet for extra strength. Always check your printer calibration before you start. This helps prevent warping and keeps your parts fitting together better.
Here’s a quick look at common helmet assembly problems and how you can fix them:
|
Problem |
Solution |
Prevention Tip |
|---|---|---|
|
Gaps Between Parts |
Fill with putty or epoxy, then sand smooth |
Calibrate printer and handle parts carefully |
|
Weak Joints |
Add more adhesive or use brackets |
Test adhesives before full assembly |
|
Bad Fit |
Adjust padding or straps for comfort |
Test-fit all parts before gluing |
Improve Seam Quality
You want your helmet to look seamless. Start by sanding each joint after gluing. Use a filler primer to hide small lines. For bigger gaps, apply a few layers of putty, letting each one dry before sanding. If you see any rough spots, go over them with fine sandpaper. Try using a soldering iron to gently melt PLA seams for a smoother finish. Remember, patience pays off—take your time and check your work as you go.
Common Mistakes to Avoid
Many beginners run into the same problems when they 3D print helmet parts. Here are some mistakes and how you can avoid them:
- Stringing or leakage: Adjust your printer’s retraction settings and use coasting to stop filament from oozing.
- Layer separation: Raise your nozzle temperature and check your cooling fan speed to help layers stick.
- Uneven extrusion: Clean your extruder and check for blockages.
- Bad fit: Measure your head and scale your model before printing.
- Filament seeping between layers: Lower the flow rate in your slicer for better print quality.
Pro Tip: Keep a checklist of each step in your 3D print helmet guide. This helps you catch mistakes early and keeps your project on track.
Small vs Large 3D Printers: Cosplay Helmet 3D Printing Guide
Pros and Cons of Splitting Models
If you use a small printer, you need to split large 3D models into parts. This method lets you print a full-size helmet even with a tiny build volume. You split the helmet into quadrants—front, back, left, and right. You add alignment pins along the seams. You print with oversized pin holes for easy adjustment. After printing, you bond the pieces, sand, and apply filler to hide the seams. This process works well for most beginners following a cosplay helmet 3d printing guide.
Here are some pros and cons:
Pros:
- You can print any helmet size, no matter your printer.
- You get flexibility with assembly and customization.
- You can fix mistakes by reprinting only one part.
Cons:
- You spend more time on post-processing.
- You need to assemble 3D printed parts carefully.
- You may see seams if you don’t finish them well.
Strength and Seam Comparison
Printing a helmet in one piece with a large printer gives you fewer seams and stronger structure. You avoid weak points where glue or filler might crack. If you split large 3D models, you must reinforce the seams. You can use epoxy or fiberglass resin for extra strength. When you follow a cosplay helmet 3d printing guide, you learn how to make seams nearly invisible. Still, a single-piece helmet usually feels sturdier.
|
Printer Model |
Build Volume (mm) |
|---|---|
|
Creality CR-10 Max |
450 x 450 x 470 |
|
Anycubic Chiron |
400 x 400 x 450 |
|
Prusa XL |
360 x 360 x 360 |
|
Raise3D Pro2 Plus |
305 x 305 x 605 |
Workflow and Efficiency Tips
Your workflow changes based on your printer size. With a large printer, you print the helmet in one go. You spend less time assembling and finishing. With a small printer, you follow a cosplay helmet 3d printing guide step by step. You organize parts, label them, and track progress. You spend more time sanding and filling seams. Both methods work, but you must choose what fits your setup and skills.
If you’re new, start with splitting models. You learn how to print full size helmet parts and assemble 3D printed parts. You build confidence and skills for future projects. If you upgrade to a bigger printer, you can print helmets faster and with fewer seams.
Remember: The best cosplay helmet 3d printing guide adapts to your printer and your needs.
Safety and Helmet Longevity Guide
The Five-Year Helmet Rule
You want your helmet to last, but even the best 3D printed helmets have a lifespan. Most experts recommend the five-year helmet rule. This means you should replace your helmet every five years, even if it still looks good. Over time, materials can weaken. Sunlight, sweat, and small impacts all add up. If you drop your helmet or see cracks, replace it sooner. A helmet that no longer fits well or feels loose will not protect you as it should.
Remember: A helmet’s job is to keep you safe. Don’t take chances with old or damaged gear.
Fit and Comfort Tips
Getting the right fit makes your helmet comfortable and safe. You want your helmet to feel snug but not tight. Your cheeks should feel a gentle squeeze, but you should not bite the inside of your cheeks. The helmet should move with your head. If it shifts or wobbles, the fit is too loose.
Here are some tips from experienced helmet makers:
- Avoid pressure points on your temple, forehead, or the top of your head. If you feel pain, try a different size or model.
- Make sure your cheeks are semi-squashed, but not uncomfortable.
- The helmet should fit snugly, applying slight pressure on your cheeks without causing pain.
- Do a shake test. Move your head side to side. The helmet should stay in place.
- Cheek pads should feel snug, but not overly tight. They may loosen over time.
- If you feel pressure points, try another brand or model.
- If the helmet shifts, it may be too large. Try sizing down or add padding.
- For tightness across the cheeks, look for helmets with interchangeable cheek pads.
A good fit means better protection and more comfort. Take your time to find the right fit for your head shape. You will enjoy wearing your helmet and feel safer every time you put it on.
You now know how to print full size helmet parts, split large 3D models, and assemble 3D printed parts for a seamless look. Careful prep and attention to detail make pro results possible. Always check your fit with the 2-2-2 rule and remember the five-year helmet rule for safety. Don’t be afraid to try new techniques or add cool features. This 3D print helmet guide is just the start—explore advanced painting or even electronics next!
FAQ
How do I know if my helmet will fit before printing the whole thing?
Print a small test ring or a section of the helmet. Try it on your head. This helps you check the fit before you print the full size helmet. Adjust the scale if it feels too tight or loose.
What’s the best way to split large 3D models for a small printer?
Use free tools like Meshmixer or Blender. Cut along natural seams or panel lines. Add alignment pins or tabs. This makes it easier to assemble 3D printed parts and get a seamless finish.
How can I hide seams when I assemble 3D printed parts?
Sand each joint after gluing. Use filler primer or putty to fill gaps. Sand again for a smooth look. You can also use a soldering iron to gently melt PLA seams. Take your time for the best results.
What filament should I use for a strong and safe helmet?
Check this quick table:
|
Filament |
Strength |
Best For |
|---|---|---|
|
Nylon |
High |
Tough helmets |
|
Polycarbonate |
Very High |
Impact resistance |
|
PETG |
Medium |
Easy printing |


