


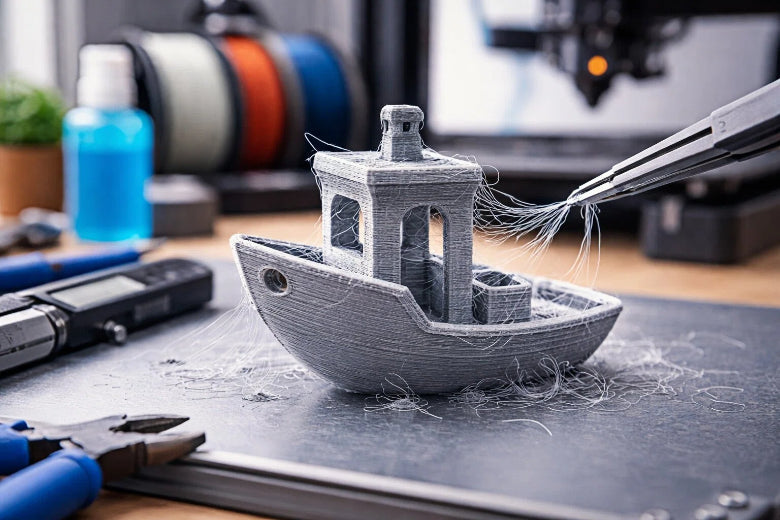
If you have ever taken a 3D print off the bed and seen it covered in thin, wispy strands, you know how annoying stringing can be. These spiderweb-like threads happen when melted filament leaks from the nozzle as your printer moves to different spots. You can fix this problem fast by changing your retraction settings. Check out the table below for the best values:
|
Setting Type |
Recommended Value |
Impact on Stringing |
|---|---|---|
|
3 mm to 5 mm |
Cuts down oozing by controlling filament flow |
|
|
Retraction Speed |
20 mm/s to 100 mm/s |
Balances speed to lower stringing without causing clogs |
With just a few small changes, you will see how to stop stringing in 3D printing and get cleaner prints—even on your next try.
Key Takeaways
- Change your retraction settings to help stop stringing. Begin with a retraction distance between 3 and 5 mm. Set the speed between 20 and 100 mm/s.
- Make sure your filament stays dry. Put it in airtight containers with desiccants. This stops it from soaking up water, which can cause stringing.
- Try making your travel speed faster, like 150 to 200 mm/s. Moving faster gives less time for filament to leak out when not printing.
- Turn on combing mode in your slicer. This keeps the nozzle above printed parts. It helps stop melted filament from being dragged over open spaces.
- Lower the nozzle temperature by 5 to 10°C if you see stringing. A cooler nozzle makes it easier to control filament flow and stops oozing.
How to Stop Stringing in 3D Printing
What Is Stringing?
Stringing happens when your 3D printer leaves behind thin, wispy threads of melted plastic between different parts of your print. You might see these strands stretching from one section to another, almost like spiderwebs. This issue pops up during non-printing moves, when the nozzle travels across open spaces. Even if the extruder is not pushing out filament, pressure inside the nozzle can force melted plastic to leak out. In FDM printing, stringing shows up as very fine strings or hair-like filaments. These unwanted threads can make your print look messy and less professional.
Tip: If you notice shiny spots or tiny blobs on your print, that’s another sign of stringing. These imperfections can distort details and leave gaps in your design.
Stringing does more than just ruin the look of your model. It can weaken the structure, especially if you need strong, clean parts. You might find that small features lose their shape, or that the surface feels rough instead of smooth.
- Stringing creates a messy appearance and lowers print quality.
- It can cause weak spots that might break during use.
- You’ll see fine filaments connecting different areas.
- Glossy surfaces or blobs may appear where filament oozed out.
- Details can get distorted, making intricate designs unclear.
Main Causes of Stringing
You might wonder why stringing happens in the first place. Several factors can lead to this problem, but some are more common than others. Here’s what you should watch out for:
- Incorrect retraction settings: If your printer doesn’t pull back the filament enough during travel moves, melted plastic can ooze out.
- High nozzle temperature: When the nozzle gets too hot, the filament becomes runny and leaks more easily.
- Moisture in filament: Filament absorbs water from the air. When heated, this moisture turns to steam, causing bubbling and extra oozing.
- Low print speed: Moving the nozzle slowly gives the filament more time to drip out.
- Dirty or damaged nozzle: Contamination or defects can make it harder to control filament flow.
- Large nozzle diameter or melt zone: Bigger openings let more filament escape during travel moves.
Some filaments, like PETG, Nylon, and TPU, absorb moisture quickly. Even PLA can pick up water if left out. Wet filament leads to fine stringing, even if the rest of your print looks good.
- Filament absorbs moisture from the air.
- Steam from wet filament causes bubbling and oozing.
- Bubbling during travel moves results in stringing.
If you use a higher nozzle temperature, you’ll see more stringing. Lowering the temperature can help, but you still need to tune your retraction settings for the best results.
- Higher nozzle temperatures increase stringing.
- Lower temperatures make filament firmer and reduce ooze.
- Retraction settings help, but temperature matters too.
Why Retraction Is Key
When you want to know how to stop stringing in 3D printing, you should start with retraction settings. Retraction is the process where your printer pulls back the filament before moving the nozzle across open spaces. This action lowers the pressure inside the nozzle and keeps melted plastic from leaking out.
If you turn off retraction, your printer can’t control filament flow during travel moves. You’ll almost always see stringing. That’s why retraction settings are the most effective way to fix this issue. When you adjust these settings, you give your printer the power to stop oozing and keep your prints clean.
Retraction settings let the extruder pull back the filament during non-printing moves. This reduces pressure and prevents unwanted strings. If you don’t activate retraction, the filament keeps flowing, and you get messy prints.
You can test different retraction distances and speeds to find what works best for your printer and filament. Longer retraction distances and faster speeds can help, but you need to avoid clogs. Running a retraction test print is a smart way to dial in your settings.
If you want to know how to stop stringing in 3d printing, focus on retraction settings first. You’ll see big improvements with just a few tweaks. Try small changes and watch how your prints get cleaner and stronger.
- Adjust retraction distance and speed for your printer and filament.
- Run a retraction test print to find the best settings.
- Start with retraction settings when troubleshooting stringing.
Learning how to stop stringing in 3d printing is all about understanding what causes it and knowing which settings to change. Retraction settings are your best tool for cleaner, more professional prints.
Retraction Tweaks to Eliminate Stringing
Retraction Distance and Speed
You can eliminate stringing by dialing in your retraction settings. Start by making sure you enable and optimize retraction in your slicer. Retraction distance tells your printer how far to pull the filament back before a travel move. Retraction speed controls how quickly the extruder pulls the filament. Both settings depend on your printer’s extruder type.
|
Extruder Type |
Retraction Distance |
Retraction Speed |
|---|---|---|
|
Bowden |
30 to 45 mm/s |
|
|
Direct Drive |
1 to 2 mm |
35 to 60 mm/s |
If you use PLA or PETG, try increasing retraction speed in small steps, like 5 mm/s at a time. This helps the nozzle pull filament back fast enough to stop leaks. Too much speed can cause jams, so make changes slowly and test with a simple print.
Tip: Always enable retraction in your slicer before making adjustments.
Travel Speed Adjustments
Travel speed is how fast the print head moves when not printing. If you want to eliminate stringing, set your travel speed between 150 and 200 mm/s. Fast travel means the nozzle spends less time over open spaces, so melted filament has less chance to ooze out. If you notice more strings, try bumping up the speed a little at a time.
- Increase travel speed in your slicer settings.
- Faster travel reduces stringing.
- Slower travel gives filament more time to leak.
Combing and Avoid Crossing Perimeters
Combing mode changes the path your print head takes during non-print moves. When you turn on combing, the nozzle follows the outline of your print instead of moving straight across gaps. This trick keeps the nozzle over printed areas, so it doesn’t drag melted filament through empty space. You’ll see fewer strings and cleaner prints.
- Enable combing in your slicer.
- The nozzle avoids open spaces and follows the print’s shape.
- Less oozing means less stringing.
Try these tweaks one at a time. Print a small test model after each change. You’ll find the right settings to eliminate stringing and get smooth, sharp results.
Reduce Stringing with Filament and Temperature Fixes
Drying Filament Properly
Filament can soak up water from the air. This can cause stringing and other problems. If you hear popping or see steam, your filament is wet. You should keep filament in sealed boxes with desiccant. Vacuum bags are good for storing filament for a long time. Before printing, dry your filament in a dryer or oven at about 45°C. Here’s a table to help you remember what to do:
|
Best Practice |
Description |
|---|---|
|
Ensure filament is dry |
Store filament in sealed boxes and dry it if you hear popping or see steam. |
|
Store filament properly |
Use airtight boxes with desiccant or dry boxes for storage. |
|
Use vacuum bags |
Great for long-term filament storage. |
|
Dry before printing |
Use a filament dryer or oven at 45°C. |
Wet filament can make popping sounds and bubbles. You might see rough spots or weak layers on your print. These are signs that you need to dry your filament to stop stringing.
Lowering Nozzle Temperature
If the nozzle is too hot, the filament gets runny. This makes stringing worse. Lower the print temperature by 5–10°C if you see strings. For PETG, try printing between 220°C and 250°C. For PLA, start at 200°C and lower it if you see strings. Lower temperatures help control the flow and keep prints clean.
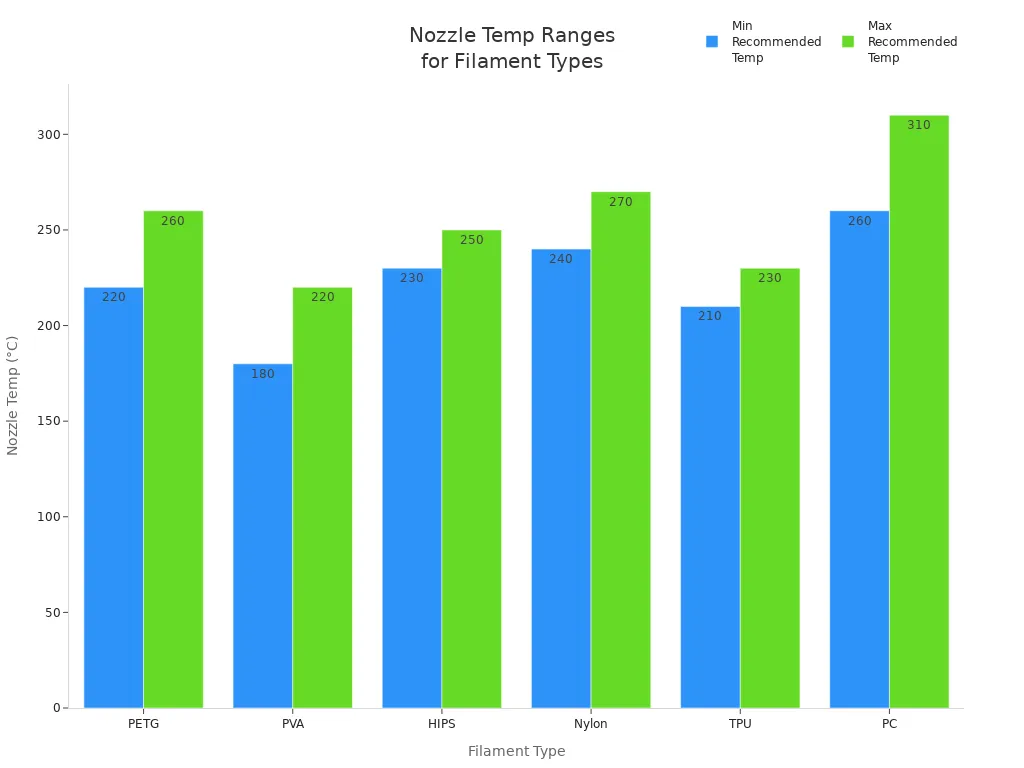
Here’s a table with good nozzle temperatures for different filaments:
|
Filament Type |
|
|---|---|
|
PLA |
Low stringing brands recommended |
|
ABS |
Higher temperatures lead to stringing |
|
PETG |
220°C to 260°C |
|
PVA |
180°C to 220°C |
|
HIPS |
230°C to 250°C |
|
Nylon |
240°C to 270°C |
|
TPU |
210°C to 230°C |
|
PC |
260°C to 310°C |
Tip: If you see stringing, lower the print temperature a little. Check your next print for better results.
Filament Types Prone to Stringing
Different filaments act in different ways. PLA is easy to use and does not string much. PETG strings more and needs careful settings. ABS and TPU can string if you do not use the right settings.
- PLA: Does not warp or string much. Good for new users.
- PETG: Strings and oozes more. Needs careful tuning.
- ABS and TPU: Not much info, but watch for stringing.
If you want less stringing, use PLA for simple prints. For PETG, spend more time adjusting your settings. Always check your filament and temperature for the best prints.
Fix Stringing with Advanced Troubleshooting
Check for Nozzle Damage or Clogs
You might not realize how much a clogged or damaged nozzle can mess up your prints. If you see stringing that won’t go away, check your nozzle first. Keeping the nozzle clear helps your printer push out filament smoothly. When the nozzle gets blocked, you might hear clicking sounds or notice missing layers. These problems mean the filament isn’t flowing right, and that can cause stringing during travel moves.
Here’s what you should do:
- Check the nozzle temperature. Make sure it matches your filament’s needs.
- Clean the nozzle to remove old filament or debris.
- Inspect the hotend assembly. Make sure all parts fit and work well.
Regular maintenance stops clogs before they start. You’ll get better prints and fewer headaches.
Fine-Tune Slicer Settings
Once your hardware looks good, dive into your slicer settings. Advanced tweaks can help you fix stringing for good. Try adjusting these options:
|
Setting |
Description |
|---|---|
|
Retraction Distance |
Pulls filament back to stop oozing. |
|
Retraction Speed |
Faster speeds can help, but don’t go too fast. |
|
Minimum Travel Distance |
Lower values can reduce stringing, but watch for grinding. |
|
Combing Mode |
Keeps the nozzle over printed areas, avoiding open spaces. |
|
Nozzle Switch Retraction Distance |
Higher values during standby can help. |
|
Travel Speed |
Fast moves mean less time for filament to ooze. |
Try changing one setting at a time. Print a small test model to see what works best.
Quick Settings Checklist for Beginners
Ready for a quick fix? Use this checklist to tackle stringing fast:
- Lower the nozzle temperature by 5°C if you see strings.
- Dry your filament before printing. Store it in airtight boxes with silica gel.
- Set travel speed to 150–200 mm/s.
- Enable combing mode and avoid crossing perimeters.
- Use retraction: 6 mm distance, 40 mm/s speed.
- Turn on coasting (0.2 mm³/s) and Z-Hop (0.2 mm).
- Set outer wall speed to 30 mm/s for PLA.
- Clean your nozzle every day for best results.
Tip: Always slice your model and export the G-code before printing. Follow your printer’s prompts for filament changes.
If you follow these steps, you’ll see cleaner prints and less stringing. Keep testing and tweaking. You’ll learn what works for your printer and filament.
You can fix stringing quickly by changing retraction and slicer settings. Look at this table to see which changes help the most:
|
Adjustment Type |
Specific Adjustment |
Effect on Stringing |
|---|---|---|
|
Retraction Length |
Increased |
Less stringing |
|
Retraction Speed |
Increased |
Less stringing |
|
Flow Rate |
Slightly above 100% |
Helps with under-extrusion |
|
Print Speed |
Reduced to 75% |
Filament sticks better |
Make small changes and print a test model each time. Troubleshooting is normal when you do 3D printing. If you want more help, join Facebook groups, watch '3D Printing Nerd' on YouTube, or read blogs for more tips.
FAQ
Why does my printer still string after changing retraction settings?
You might need to dry your filament or lower the nozzle temperature. Sometimes, old filament absorbs moisture and causes stringing. Try cleaning your nozzle and running a test print with new settings.
How do I know if my filament is too wet?
You hear popping sounds or see steam during printing. Wet filament can also leave bubbles or rough spots on your print. Store filament in airtight boxes with silica gel to keep it dry.
What is the best retraction distance for my printer?
Direct drive printers work well with 1–2 mm. Bowden setups need 4–6 mm. Always start with these values and adjust in small steps. Run a test print to check for improvement.
Can travel speed help reduce stringing?
Yes! Faster travel speed means the nozzle moves quickly over gaps. This gives melted filament less time to ooze out. Set travel speed between 150 and 200 mm/s for best results.
Should I use combing mode for every print?
You should enable combing mode for most prints. It keeps the nozzle over printed areas and avoids dragging filament across open spaces. This helps you get cleaner results with less stringing.


