


If you’ve ever done multi-color (or multi-material) prints on a single-nozzle machine, you know the pattern:
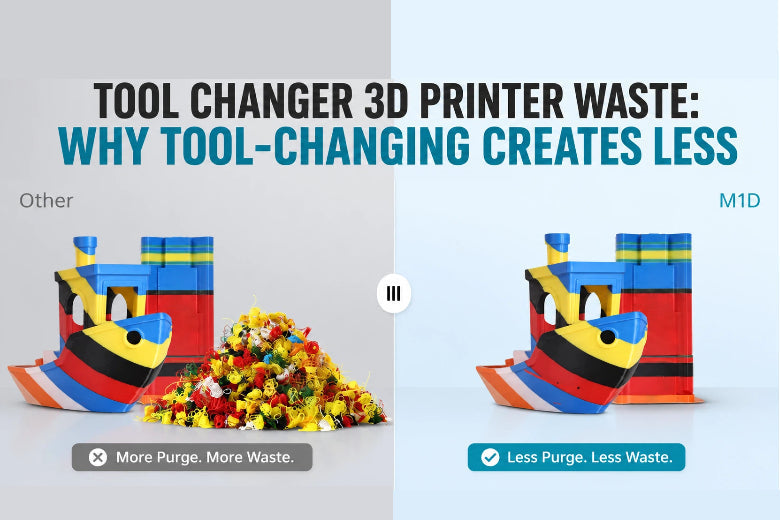
- Every swap creates a pile of “poop” somewhere.
- The print time jumps.
- And the purge tower sometimes feels bigger than the part you actually wanted.
Tool-changing systems are popular for one simple reason: they move a lot of that waste from “mandatory flushing” to “optional cleanup.” In other words, they change the rules of the problem.
That’s the lived experience behind purge waste multi color printing—and why people start looking at other architectures.
If you’re comparing toolchanger vs AMS waste, this is the architectural reason the numbers can look so different.
Key Takeaway: Single-nozzle multi-color systems waste material because they have to flush a shared melt zone. Tool-changing reduces waste because each filament gets its own nozzle/hotend—so most swaps don’t require flushing at all.
The core problem: one nozzle means one shared melt zone
In a single-nozzle setup (including AMS/MMU-style filament switching), all colors and materials take turns using the same hotend.
That hotend isn’t empty when the swap happens.
It contains a small “reservoir” of melted plastic inside the nozzle and melt zone. When you load the next filament, what comes out is a blend of old + new until you push enough fresh material through.
That blended section is exactly what you don’t want on your model—especially on a visible surface.
This is why slicers enforce a flush step after a filament change. Bambu Lab’s documentation on Reduce Waste during Filament Change explains this directly: a small amount of old filament remains in the nozzle path, so the printer must flush until the output is “pure” enough for the next color.
Why dark-to-light swaps create the worst purge waste
If you’ve ever switched from black to white, you’ve seen how unforgiving it is.
Even a tiny amount of dark pigment residue can tint the next filament. That’s why many slicers use higher flushing volumes for dark → light transitions and lower volumes for light → dark.
(You can also reduce waste by reducing the number of color changes—but that’s a design/slicing topic. We’ll cover the practical levers later.)
Tool changer 3D printer waste: what changes with tool-changing

A toolchanger swaps the entire tool (or at least the hotend/nozzle assembly) instead of pulling filament through one shared hotend.
So instead of doing this:
- retract filament A
- feed filament B into the same hotend
- flush until the melt zone is clean
a toolchanger does this:
- park tool A
- pick up tool B
Each tool has its own melt zone, so you don’t pay the “flush the old color out of the melt reservoir” tax every time.
That’s the main reason tool-changing creates less waste.
A clear high-level comparison is in Filament2Print’s Multimaterial vs Toolchanger overview: filament-switching systems must purge to avoid contamination, while toolchangers reduce that problem by isolating materials per tool.
Purge tower vs prime tower: same object, different job
People often use “purge tower,” “prime tower,” and “wipe tower” interchangeably—but it helps to separate the jobs:
- Purge/flush: getting old material out of the melt zone so you don’t get contamination.
- Prime: restoring consistent pressure/flow so the next line isn’t under-extruded.
- Wipe: cleaning strings/blobs off the nozzle before it returns to the model.
On a single-nozzle multi-color system, the tower is often doing all three.
On a toolchanger, the “purge” part shrinks dramatically (because you’re not flushing a shared melt zone). But a small prime/wipe structure can still be useful depending on the printer, slicer, and material.
Prusa’s documentation on the Wipe tower is a good reference for what these towers are really doing and why they scale with the number of changes.
Toolchangers aren’t magic: where waste can still come from
Tool-changing reduces flush waste. It doesn’t automatically eliminate all waste.
Here’s what can still generate blobs, strings, or scrap plastic:
1) Priming and wiping (small but real)
Even if a tool has the “right” filament already in it, you might still need a small prime/wipe move so:
- the nozzle starts flowing consistently again
- you don’t drag a cooled blob onto the part
This is usually far smaller than single-nozzle flushing, but it’s not always zero.
2) Oozing from idle tools
A parked nozzle sitting at printing temperature can drool—especially with runny filaments or higher temps.
That waste might show up as:
- strings when the tool is picked back up
- blobs that get wiped off before printing resumes
Many toolchanger workflows mitigate this with idle temperatures, extra retraction at toolchange, and “ooze prevention” logic.
For example, the StealthChanger slicer guidance notes the role of idle temperature and recommends extra retraction during tool changes to reduce oozing while docked (see their Slicers guide).
3) Failed tool changes (rare, but expensive)
Any mechanical swap can fail. When it does, you can lose time, plastic, and sometimes the whole print.
This is less about “purge waste” and more about the reliability tradeoff: toolchangers can be mechanically more complex than a single-nozzle system.
When tool-changing reduces waste the most

Tool-changing’s advantage grows as the number of transitions grows.
If you only change color once (like a two-color logo at a specific height), single-nozzle workflows can be perfectly reasonable.
But tool-changing starts to shine when:
- you have lots of swaps per print
- you’re doing high-contrast swaps (black ↔ white)
- you’re mixing materials that don’t play nicely when contaminated
Single nozzle vs tool changer multi material: a decision table
Use this to choose the architecture that matches your actual prints.
|
Your typical print looks like… |
Single-nozzle filament switching (AMS/MMU-style) |
Tool-changing / multi-tool |
|---|---|---|
|
1–5 color changes total |
Often fine |
Often overkill |
|
Lots of swaps per layer (logos, text, pixel art) |
Waste grows fast |
Much better fit |
|
Dark → light transitions on visible surfaces |
Needs conservative flushing |
Usually easier to keep clean |
|
Multi-material where contamination matters (supports, TPU+PLA, etc.) |
Possible but finicky |
Better isolation |
|
You want simplest hardware and workflow |
Strong advantage |
More setup/calibration |
How to reduce purge waste if you’re staying single-nozzle
If you’re committed to a single-nozzle multi-color system, focus on two levers:
- Reduce the number of changes (design/slicing choices)
- Make purge material do useful work (when your model can hide it)
We’ve covered practical, non-hype steps in SOVOL’s guide on reducing filament waste in multi-color prints, including when it makes sense to flush into infill/support and when it doesn’t.
And if you want the deeper “why this happens” breakdown first, see Multi-Color 3D Printing Waste: Why It Happens (and When It's Worth It).
FAQ
Does a toolchanger mean “zero waste” multi-color printing?
Not automatically. Tool-changing usually eliminates the big waste driver (flushing a shared melt zone), but you can still get small prime/wipe blobs and some waste from managing ooze.
Why can’t slicers just “flush less” on a single nozzle?
They can—but it’s a tradeoff. Too little flushing means contamination (tinted layers, weak interfaces, messy surfaces). Many slicers calculate flush volumes based on color/material pairs, because a little residue is much more visible in some transitions than others.
Is a purge tower the same as a prime tower?
People use the terms interchangeably, but the functions differ. The tower might be used to purge/flush, prime, and/or wipe. Toolchangers reduce the need for purging, but priming and wiping may still be useful.
Next steps
If you’re trying to decide whether multi-color printing is “worth it” for your kinds of projects, start here:
- Understand the waste math: SOVOL’s Multi-Color 3D Printing Waste — why it happens (and when it’s worth it)
- Reduce waste on today’s setups: SOVOL’s Reduce filament waste in multi-color 3D printing — 9 practical moves


