


When small 3D printed parts fail, it can be frustrating, especially when they break or detach from the build plate. Understanding why small parts fail in 3D printing is crucial. Issues like poor adhesion, rough surfaces, and machine errors frequently lead to unsuccessful prints. Occasionally, you might observe bumpy textures or sticky areas that detract from the print's appearance. Small parts are particularly prone to breaking or disintegrating before the print is complete. You seek straightforward solutions that enhance print quality without complicated procedures. By implementing simple adjustments, both novice and experienced makers can effectively address these challenges.
Key Takeaways
- Small 3D printed parts can fail for a few reasons. These include poor bed adhesion, warping, and cooling problems. Knowing about these problems helps you get better prints.
- To make bed adhesion better, clean the print bed well. Level the bed the right way. Use the correct temperature settings. You can also use glue sticks to help parts stick.
- To stop warping, control the temperature and airflow. Use an enclosure to keep heat in. Set the bed to the right temperature. Add brims or rafts to help small parts stay in place.
- Change print settings to get better prints. Use lower layer heights for more detail. Slow down the first layer speed. Make sure the nozzle and bed are at the right temperatures.
- Pick high-quality filament that is the same thickness all over. Store filament the right way. Try different brands to see what works best. This can help stop print failures and make your prints look better.
Why Small Parts Fail in 3D Printing
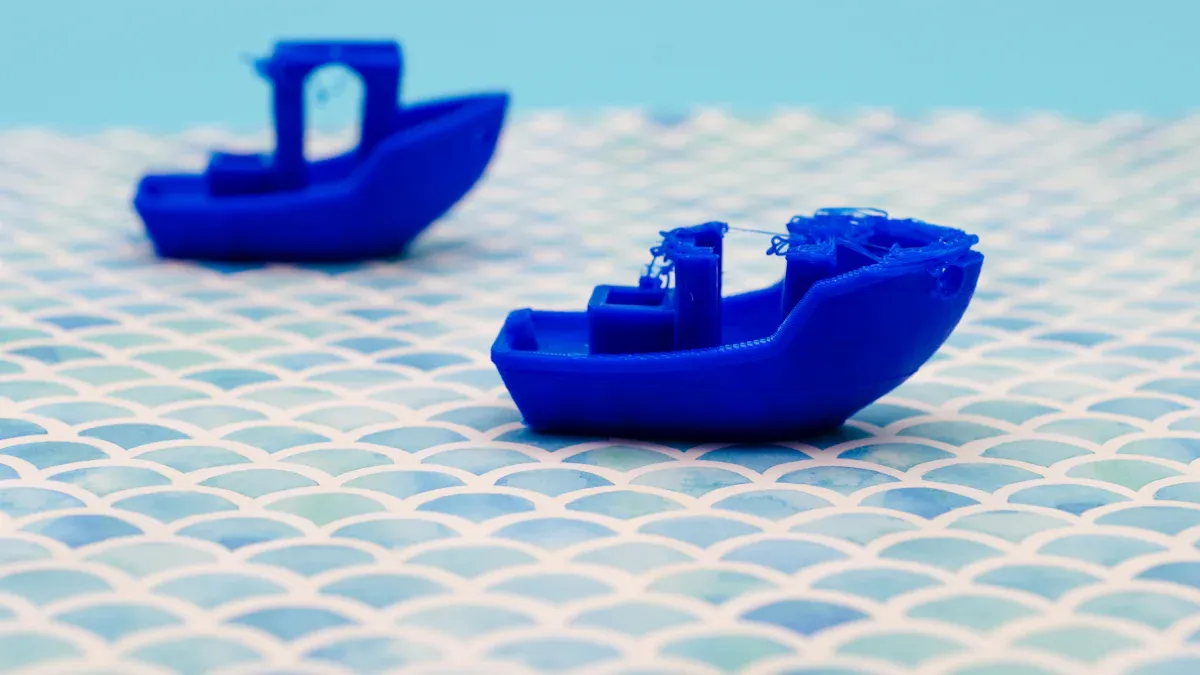
Printing small parts is harder than printing big ones. Small objects often have more gaps and rough corners. Sometimes, they curl or come off the print bed. These problems make you wonder why small parts fail so much. Let’s look at the main problems and what causes them.
Bed Adhesion Issues
Bed adhesion is a big reason small parts fail in 3d printing. If a part does not stick, it can move or peel up. Sometimes, it even sticks to the nozzle. This causes gaps and weak spots. Small parts touch less of the bed, so they move or fall off more easily.
Not enough bed adhesion can cause:
- The print to move and fail.
- The print to stick to the nozzle.
- The print to peel or curl, ruining the part.
If there is too little adhesion, the print can move and fail. Too much adhesion can hurt the part or the bed when you take it off. You might see gaps in thin walls or between infill and outline if the first layer does not stick well.
Warping and Shrinkage
Warping is another reason small parts fail in 3d printing. You might see corners lift or curl. Sometimes, layers split apart. Warping happens when plastic cools too fast or unevenly. This makes the part change shape.
Common causes of warping and shrinkage:
- Fast or uneven cooling makes the part shrink wrong.
- Bad layer adhesion causes layers to split.
- Weak base adhesion lifts the part.
- Cooling makes the material shrink.
- The part’s shape and size affect warping.
- Heat changes around edges cause curling.
- The way filament heats and cools matters.
- The type of filament affects warping.
Big parts warp more, but small parts can warp too if cooling is not right. You might see gaps in top layers or layers splitting. Small features may not print at all.
Cooling and Overheating
Cooling and overheating are big reasons small parts fail in 3d printing. If a part gets too hot, details get soft and lose shape. If cooling is not enough, hot plastic can sag before it hardens. This causes stringing, poor bridges, and gaps.
- Overheating makes the outside lose detail.
- Not enough cooling lets hot plastic change shape.
- More fan speed or extra cooling helps keep the part’s shape.
- Lower print temperatures make plastic harden faster.
- For small parts, slower print speed gives layers time to cool.
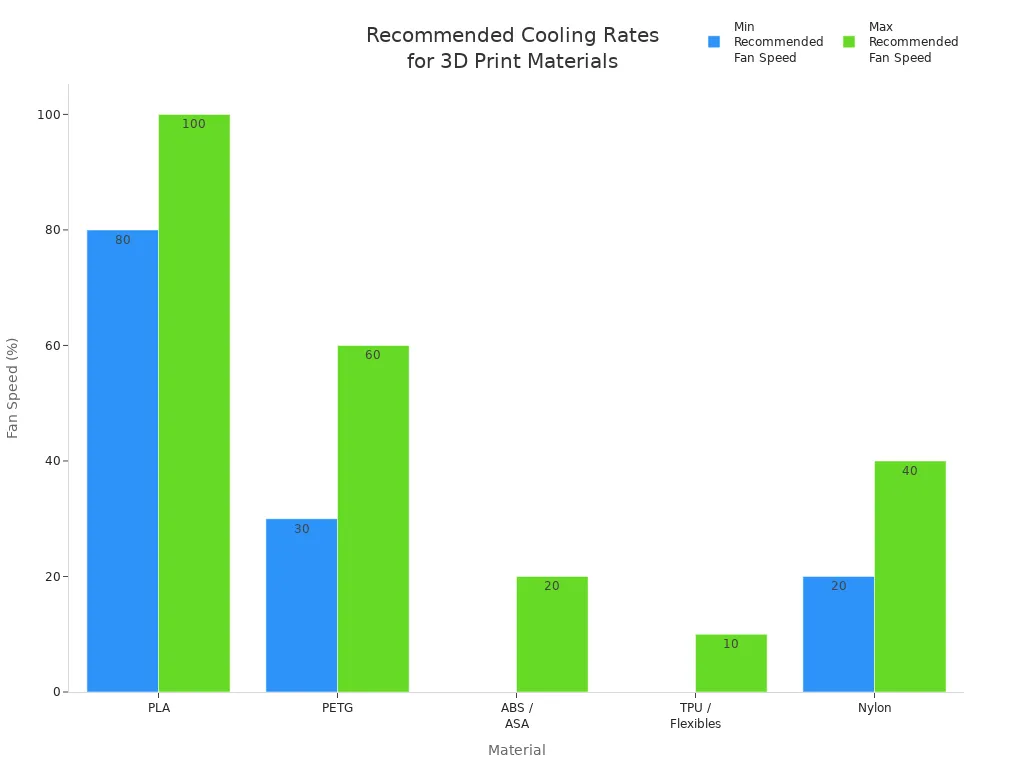
Here is a table with fan speeds for different materials to help stop these problems:
|
Material |
Recommended Fan Speed (%) |
Why This Cooling Level Works |
Risks of Too Much Cooling |
Risks of Too Little Cooling |
|---|---|---|---|---|
|
PLA |
80–100% |
Fast cooling stops drooping and keeps details sharp |
Brittle prints, weak layers |
Stringing, sagging, blobs |
|
PETG |
30–60% |
Gentle air stops stringing and keeps layers together |
Layers split, weak bonds |
Too much stringing, blobs from heat |
|
ABS / ASA |
0–20% |
Little fan stops warping and cracking |
Cracked layers, curled edges |
Overheated, sagging, lost fine details |
|
TPU / Flexibles |
0–10% |
Low air keeps extrusion smooth |
Brittle, uneven layers |
Deformed prints, sticky, stringing |
|
Nylon |
20–40% |
Balanced cooling stops warping and keeps layers strong |
Weaker prints |
Warping, bent shapes |
Print Settings Problems
Print settings matter a lot for small parts in 3d printing. Wrong settings can cause gaps or missing features. Bad bed leveling can cause warping and blobs.
|
Print Setting |
Associated Issue |
Recommendations |
|---|---|---|
|
Bed Adhesion |
Layers coming off, failed prints |
Use the right bed surface and temperature |
|
Over-Extrusion |
Too much plastic, jams, bad prints |
Keep layer height less than nozzle size, use more fan |
|
Under-Extrusion |
Weak prints, bad layer bonding |
Check for clogs, raise hot end temperature |
|
Incorrect Bed Leveling |
Warping, blobs, poor adhesion |
Make sure the plate is level |
Layer height and print speed also matter. Thin layers give better detail but take longer. Thick layers print faster but can cause gaps and rough surfaces.
- Thin layers make prints look smoother.
- More detail means longer print times.
- Thick layers can make prints look rough.
You might see gaps in thin walls or weak infill if settings are wrong.
Material and Nozzle Challenges
Material and nozzle problems also make small parts fail in 3d printing. Some printers cannot make tiny, detailed parts well. The material may not be strong or detailed enough. Prints can take longer, and some jobs need special materials.
Filament thickness matters. If the filament is not even, you get rough surfaces and weak spots. This causes under extrusion, over extrusion, and stringing. Even filament helps layers stick and makes parts stronger.
- Uneven filament makes weak prints.
- Under- or over-extrusion happens if the printer cannot push out the right amount.
- Even thickness helps layers stick and makes prints strong.
- Uneven filament makes weak spots that break easily.
Nozzle size matters too. Small nozzles give more detail but clog easily. Big nozzles print faster but miss small details.
Tip: Always check your filament for even thickness and keep your nozzle clean. This helps stop gaps, stringing, and bad bridges.
By knowing these problems, you can see why small parts fail in 3d printing. Watch for gaps, curling, and other signs to make your prints better.
How to Fix Failed 3D Prints

When you face failed 3d prints, you want clear steps on how to fix each problem. This section gives you practical solutions for common issues with small 3d printed parts. You will learn how to improve bed adhesion, prevent warping, enhance cooling, adjust print settings, and choose quality filament. Each tip helps you avoid gaps, over extrusion, under extrusion, and other print quality problems.
Improve Bed Adhesion
Bed adhesion is the foundation of every successful print. If your part does not stick well, you will see gaps, curling, or even the part moving during printing. You can boost bed adhesion by following these steps:
- Clean the Print Bed: Remove dust, oil, or leftover glue. Use isopropyl alcohol and a lint-free cloth.
- Level the Bed: Make sure the nozzle is the right distance from the bed. Use a piece of paper to check the gap. The nozzle should just touch the paper.
- Set the Right Bed Temperature: Use the correct temperature for your material. The table below shows the best settings:
|
Material |
Nozzle Temp (°C) |
Bed Temp (°C) |
Adhesion Characteristics |
Warping Tendency |
Recommendations |
|---|---|---|---|---|---|
|
PLA |
190–220 |
50–60 |
Good adhesion on glass, painter's tape, or glue stick; PEI bed works best |
Low |
Use a thicker first layer; apply glue stick or blue tape for extra grip |
|
PETG |
220–240 |
70–80 |
Naturally sticky; adheres well to PEI or glass (with glue) |
Medium |
Use glue stick on glass; control cooling fan; avoid over-extrusion |
|
ABS |
220–250 |
85–110 |
Poor adhesion; needs high bed temp, Kapton tape, or ABS glue |
High |
Use ABS/acetone slurry or glue stick on Kapton/glass; print in enclosed area with fan off |
|
TPU |
200–230 |
30–60 |
Very strong adhesion, especially on PEI; harder to remove when cooled |
Low |
Use PEI bed or glue on glass; print slowly; ensure firm first-layer contact |
- Use Adhesives: Apply glue stick, painter’s tape, or special sheets for extra grip.
- Increase Surface Area: Add a brim or raft in your slicer. This gives your part more contact with the bed and helps prevent gaps in the first layers.
- Slow Down the First Layer: Set the first layer speed to 30-50% of your normal speed. This gives the filament more time to stick and fill any gaps.
Tip: A smooth and even first layer with no gaps is a sign of good bed adhesion.
Prevent Warping
Warping can ruin small parts by lifting corners or splitting layers. You can stop warping by controlling temperature and airflow. Here are proven ways to prevent warping:
- Set the Correct Bed Temperature: For PLA, use 50°C–60°C. For ABS, use 85°C–110°C. This keeps the part warm and reduces thermal stress.
- Use an Enclosure: Keep the printer in a warm, draft-free space. An enclosure helps maintain a steady temperature and stops cool air from causing warping.
- Control Cooling: Turn off or lower the fan for materials like ABS. For PLA, use the fan after the first layer.
- Add Brims or Rafts: In your slicer, add a brim or raft to increase the base area. This helps hold down corners and prevents gaps from forming.
- Clean and Prepare the Bed: Always start with a clean bed and use adhesives if needed.
- Choose the Right Filament: Some filaments have additives to reduce warping. Look for these if you have trouble with gaps or curling.
Note: Printing ABS parts on a thin layer of PLA can also help reduce warping and improve bed adhesion.
Enhance Cooling
Proper cooling keeps your prints sharp and strong. Too much or too little cooling can cause gaps, over extrusion, or under extrusion. Here is how to fix cooling problems:
- Install a Part Cooling Fan: This cools the filament right after it leaves the nozzle. For PLA, set the fan to 100% after the first layer. For PETG, use 30–60%. For ABS, keep the fan off or very low.
- Balance Cooling for Each Material:
|
Filament Type |
|
|---|---|
|
PLA |
100% after the first layer |
|
PETG |
30% to 60% |
|
ABS |
Off or very low |
|
TPU |
0% (off) or 20-40% |
|
Nylon |
0% to 50% (often off) |
- Use an Enclosure for Sensitive Materials: This keeps the temperature steady and prevents warping.
- Add Extra Fans for Complex Prints: Dual-fan setups or enclosure cooling systems can help with larger or detailed parts.
- Watch for Signs of Overcooling: Too much cooling can cause gaps between layers or weak bonds. Too little cooling can cause over extrusion, blobs, or rough surfaces.
Tip: Good cooling leads to sharper edges, smoother surfaces, and fewer gaps in your prints.
Adjust Print Settings
Your slicer settings have a big impact on print quality. Small changes can fix gaps, over extrusion, under extrusion, and other issues. Here is how to fix your settings:
- Layer Height: Use a lower layer height for small parts. This gives better detail and fewer gaps.
- Infill Density and Pattern: Set infill to about 20% for a balance of strength and speed. Try grid or triangle patterns for strong support. Make sure infill lines connect well to the outer walls to avoid gaps.
- Print Speed: Slow down the first layer and outer walls. This helps the filament bond and fill gaps.
- Nozzle and Bed Temperature: Adjust temperatures to match your filament. Too hot can cause over extrusion and blobs. Too cold can cause under extrusion and gaps.
- Wall/Shell Thickness: Use thicker walls for more strength and fewer gaps.
- Retraction Settings: Fine-tune retraction to prevent stringing and over extrusion.
- Top/Bottom Thickness: Increase these settings to cover infill and avoid gaps on the surface.
Tip: Always test your settings with a small print before starting a big job. Look for gaps, rough spots, or signs of over extrusion or under extrusion.
Choose Quality Filament
The filament you use affects every part of your print. Low-quality filament can cause gaps, under extrusion, over extrusion, and weak spots. Here is how to pick the best filament:
- Check Filament Diameter: Use filament with even thickness. Uneven filament causes under extrusion, over extrusion, and gaps.
- Pick the Right Material: Some filaments are made for strength or low warping. Choose one that fits your needs.
- Test Different Brands: Some brands have higher strength and fewer gaps. Try a few to see which gives the best print quality.
- Mix Materials for Special Prints: Hybrid prints can spread stress and reduce gaps or weak spots.
- Store Filament Properly: Keep it dry and clean to avoid moisture, which can cause gaps and poor print quality.
Note: High-quality filament and good storage habits lead to fewer failed 3d prints and better print quality.
By following these steps, you will know how to fix common problems with small 3d printed parts. You will see fewer gaps, less warping, and better print quality in every project.
Boost Print Quality for Small Parts
Design for Printability
You can get better prints by changing your design a little. Making the part’s base bigger helps it stick to the bed. This lowers the chance of the part failing. Your prints will turn out better and more often. Try these ideas:
- Make the bottom of your part wider so it touches more of the bed.
- Add brims or small edges to help keep the part steady.
- Use rounded corners instead of sharp ones to stop cracks.
- Change infill patterns to help thin parts stay strong.
These changes help your part stay in place while printing. You won’t need as many extra supports. Good sticking means fewer failed prints and better results.
Test and Iterate
Testing helps you find the best way to print. Try different ways to place your part and use different supports. Change how you fill the inside of your part. Do things step by step:
- Look at the material and the shape of your part.
- Test your part to see where it is weak.
- Change printer settings and check if the bed is flat.
- Make sure your part is the right size and fix how much plastic comes out.
Each test tells you what works and what does not. Use what you learn to make small changes. Over time, your prints will get better.
Tip: Print a small test piece before a big project. This saves time and stops you from wasting plastic.
Regular Maintenance
Taking care of your printer helps you get good prints. Clean and check your printer often. The table below shows how often to do basic jobs:
|
Usage Intensity |
Maintenance Frequency |
Tasks Involved |
|---|---|---|
|
Extensive |
Weekly or every two weeks |
Look for loose nuts, clean off dust, check belts and motors |
|
Moderate |
Monthly |
Clean and oil moving parts |
|
Low |
Every three months |
Check everything, update software, clean deeply |
- Check and clean the nozzle so it does not get blocked.
- Make sure the print bed is always flat.
- Clean the path where the filament goes and the gear that moves it.
- Oil moving parts so they do not rub too much.
- Reset the extruder steps if needed.
Doing these things stops problems before they start. Your prints will look better and fail less. Taking care of your printer means your small parts will turn out great.
You can stop most problems with 3d printed parts by doing a few important things. Make sure your design has thick walls and the right size gaps. Test your prints and change settings to make them better. Pick the best material for your project and turn your part the right way for more strength. Try these smart steps:
- Make your design easy to build and put together.
- Print test pieces and change settings to get better results.
- Make thin parts stronger and do not use weak connections.
- Turn your part and add supports so it prints stronger.
Use these ideas to make your prints look and work better. If you have questions or tips, write them in the comments!
FAQ
Why do small 3D prints often fail?
Small prints fail because they have less contact with the bed. They cool quickly and can warp or detach. You need to check your settings and make sure the first layer sticks well.
How can I improve the strength of tiny printed parts?
You can increase wall thickness and use a higher infill percentage. Try to avoid sharp corners. Rounded edges help spread stress and make your part stronger.
What is the best way to remove a small part from the print bed?
Let the bed cool before removing the part. Use a thin spatula or scraper. Work slowly to avoid breaking the part. If it sticks too much, try a gentle twist.
How do I know if my filament is causing print failures?
Look for uneven lines, blobs, or gaps in your print. If you see these, your filament may have moisture or diameter problems. Store filament in a dry box and check for even thickness.
When should I start troubleshooting a failed print?
Start troubleshooting as soon as you see warping, gaps, or poor adhesion. Early action helps you fix problems before the print fails completely.


