


Improving filament cooling strategies can significantly enhance the appearance of your 3D prints. By controlling how each layer hardens, you can achieve better results. For PLA, effective cooling strategies help prevent stringing and ensure that layers adhere properly.
- Enhanced cooling speeds maintain the accuracy of shapes and prevent warping.
- However, cooling too quickly can weaken prints, so finding the right balance is essential.
- Slower cooling can strengthen prints, allowing more time for layers to bond effectively.
|
Practice |
Result |
|---|---|
|
Utilize your part cooling fan to rapidly harden filament |
Reduced stringing and improved details |
|
Decrease fan speed to maintain warmth in layers |
Better adhesion between layers |
Experimenting with different filament cooling strategies is crucial. Choose the approach that best suits your material and project needs.
Key Takeaways
Change the cooling fan speed to fit the filament type. This helps make your prints look better. Use the fan at 100% speed for PLA after the first layer. This stops the print from drooping. Use medium cooling for PETG. This helps stop stringing and makes layers stick together better. Do not use high fan speeds for ABS. This can cause warping and cracks. Try different cooling methods to see what works best for your projects.
How Filament Cooling Works
Cooling and Layer Solidification
When you use a 3D printer, cooling helps each layer get hard fast. This shapes your print and changes how strong it is. You can change how fast the filament cools by using the printer’s fans and settings. Here are some things to remember about layer cooling:
- If cooling is not even, layers may not stick well.
- Moving air from a fan makes the filament harden faster.
- Different airflow can change the shape and strength of your print.
- Cooling layers too fast can cause stress and make shapes less accurate.
- Controlling the fan can help layers stick better and stop print problems.
You can make prints better by changing cooling for each project. Thin parts might need slow cooling to stop cracks. Small details may need fast cooling to keep their shape.
Airflow and Heat Dissipation
Airflow is important for taking heat away from the filament. When you set up your fans, you control how fast heat leaves each layer. The table below shows how airflow types and speeds change how heat goes away:
|
Structure Type |
Fluid Velocity (m/s) |
Heat Dissipation Performance |
|---|---|---|
|
Gyroid |
Undisturbed |
Best performance observed |
|
Diamond |
4 |
Surpassed Gyroid performance |
|
Primitive |
N/A |
Lower performance observed |
You can use this table to help set your fan speed. More airflow with the right structure can cool layers faster. Good airflow stops warping and bad surface finish. By knowing how cooling and airflow work, you can make better 3D prints.
Cooling and Print Quality
Layer Adhesion and Warping
You can change how well layers stick by changing cooling. If layers cool too fast, they might not stick together. This can make your print weak or cause cracks. If layers cool too slow, the print might bend or lift up. Warping happens when parts cool at different speeds. This is common with ABS and Nylon.
- Cooling at different speeds can cause stress. This stress can make the print bend or lift off the plate.
- ABS and Nylon shrink a lot, so they can warp if cooling is not right.
- Keeping the bed warm or using an enclosure helps stop warping.
Tip: For big prints or hard materials, use a heated bed and keep your printer warm to help stop warping.
Overhangs and Fine Details
Cooling is important for sharp overhangs and small details. When you print overhangs, the filament must get hard fast so it does not droop. You can use the fan to control this. Too much cooling can make the print break easily. Too little cooling can cause stringing or sagging.
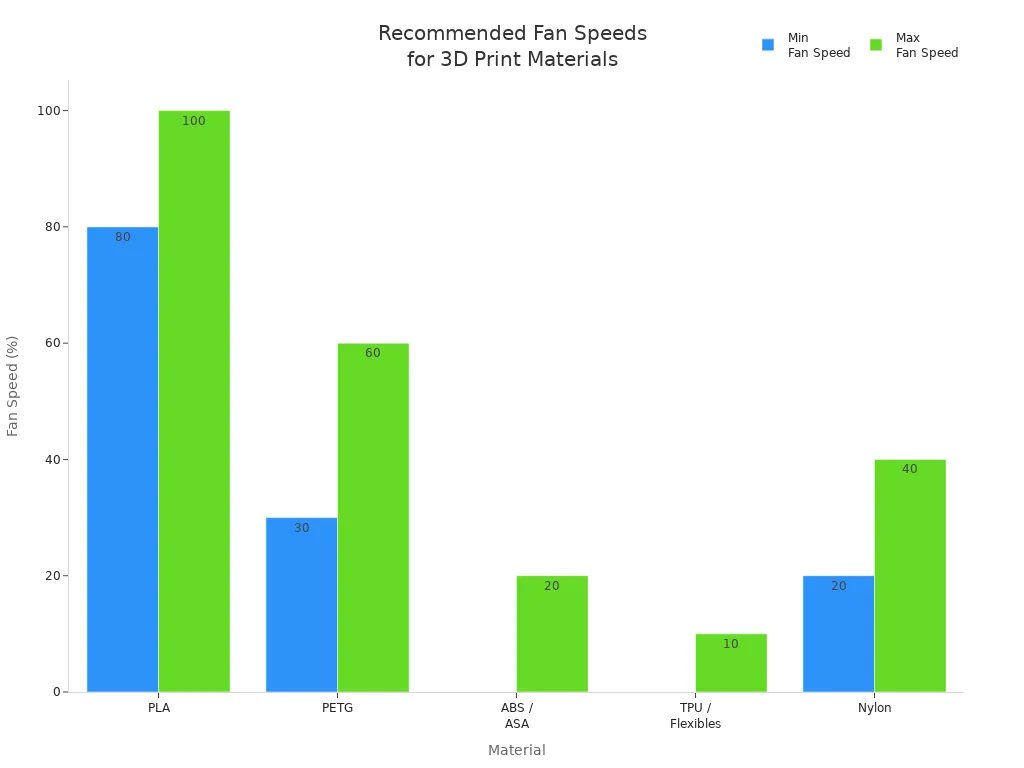
Here is a table that shows how different materials react to fan settings:
|
Material |
Recommended Fan Speed (%) |
Why This Cooling Level Works |
Risks of Too Much Cooling |
Risks of Too Little Cooling |
|---|---|---|---|---|
|
PLA |
80–100 |
Fast cooling stops drooping and keeps details sharp. |
Prints can break, layers may not stick |
Stringing, sagging, blobs on the surface |
|
PETG |
30–60 |
Soft airflow stops stringing and keeps layers strong |
Layers can split, weak bonds |
More stringing, too hot, blobs on the surface |
|
ABS / ASA |
0–20 |
Little fan use stops stress and warping |
Layers can crack or curl |
Too hot, sagging, lose small details |
|
TPU / Flexibles |
0–10 |
Low airflow keeps the print smooth |
Parts can break, layers not even |
Bent prints, sticky filament, stringing |
|
Nylon |
20–40 |
Balanced cooling stops warping and keeps layers strong |
Not as strong |
More warping, shapes can get messed up |
- Good cooling makes prints look better, especially for small parts and overhangs.
- Fast hardening stops the print from bending while printing.
- Changing fan speed for each material and print helps you get good results.
The right cooling settings help you make strong and detailed prints. Try different fan speeds and see how your printer changes your project.
Common Cooling Problems
When you use a 3D printer, you may see problems if your filament cooling is not set up well. Cooling fan settings can change how your print looks and how strong it is. Here are some common issues you might face:
Under-Cooling Symptoms
If your 3D printer cooling is too low, you may notice:
- Stringing: Thin threads of plastic stretch between parts of your print. This happens when the filament does not cool fast enough.
- Sagging Overhangs: Parts that stick out may droop or look messy. The filament stays soft and cannot hold its shape.
- Blurry Details: Small features may look melted or unclear.
- Warping: The bottom of your print may lift off the bed. Uneven cooling causes stress in the layers.
Tip: If you see drooping layers or curling at the edges, try increasing your cooling fan speed.
Over-Cooling Issues
Too much cooling can also hurt your print quality. You may see:
- Delamination: Layers split apart because they cool too quickly. This weakens your print.
- Porosity: Gaps or holes form between layers. The filament does not bond well when it cools too fast.
- Cracks: You may see cracks, especially in tall prints or with materials like ABS.
- Brittle Prints: Your print may break easily if the layers do not stick together.
Common signs of over-cooling:
- Layers look rough or have small gaps.
- The print feels weak or snaps when you bend it.
Diagnosing Cooling Failures
You can spot cooling problems by looking at your print and checking your settings:
- Examine steep curves and small arches for drooping or messy layers.
- Look for curling at the bottom edges of overhangs.
- Check for poor layer bonding on steep angles. This can mean you need more cooling or a lower print temperature.
- Watch for under-extrusion or inconsistent layer height. These can signal cooling or temperature issues.
Quick diagnostic checklist:
|
Problem Area |
What to Look For |
Possible Cause |
|---|---|---|
|
Overhangs |
Drooping or curling |
Not enough cooling |
|
Layer bonding |
Cracks or splits |
Too much cooling |
|
Small details |
Blurry or melted features |
Low cooling or high temp |
|
Surface finish |
Rough or uneven layers |
Cooling or extrusion issues |
You can improve print quality by adjusting your cooling fan settings and watching how your filament cools. Try different speeds for each material and print type to find what works best.
Filament Cooling Strategies
Choosing the right filament cooling strategies can make a big difference in your 3D prints. You can control how your print cools by picking the right fans, setting up airflow, and adjusting slicer settings. Each step helps you get better results and avoid common problems.
Fan Types and Placement
You have several options when it comes to fans on your 3D printer. Each type of fan and its placement can change how well your print cools.
- Install a part cooling fan to cool the filament right after it leaves the nozzle. This helps with overhangs and bridges.
- Use enclosure cooling systems if you have an enclosed printer. These systems help keep the inside temperature steady.
- Add heat sink fans to keep stepper motors and hotend parts from getting too hot.
- Try dual-fan setups for large or complex prints. Two fans can cover more area and give even cooling.
- Make sure you place fans to avoid dead zones or areas with little airflow.
Tests show that a 50 mm blower fan cools better than a 40 mm case fan. The blower fan reduces warping and improves overhang quality. Using a fan shroud that spreads air over a wide area also helps reduce warping. The shape of the shroud does not change overhang quality much, but it does help with even cooling.
Tip: For high-speed or large prints, you can use a small household fan to boost airflow around your printer. This helps cool big parts evenly and prevents heat from building up.
Airflow Direction and Ducts
The way air moves around your print matters a lot. Good airflow direction and duct design help you get the most out of your cooling fan.
|
Aspect |
Impact on Cooling Performance |
|---|---|
|
Airflow Direction |
Good direction helps heat leave the print and stops heat from getting trapped. |
|
Duct Design |
Well-designed ducts guide air to the right spots, reducing hot spots. |
|
Airflow Speed |
Faster air removes more heat and cools the print better. |
|
Airflow Patterns |
Uneven or blocked air can cause hot spots and lower print quality. |
You should aim the airflow right at the spot where the filament comes out. Use ducts or shrouds to guide the air. This helps cool each layer quickly and evenly. If you see some parts of your print looking rough or warped, check your ducts and airflow direction.
Note: If you print with high-temperature filaments, make sure your ducts do not block airflow or create hot spots. This keeps your print strong and smooth.
Slicer Fan Speed Settings
You can control your cooling fan with slicer software. Adjusting fan speed in your slicer is one of the most important filament cooling strategies. Different filaments need different fan speeds for the best results.
|
Filament Type |
|
|---|---|
|
Nylon |
0% to 50% (often off) |
|
TPU |
0% (off) or 20-40% |
For PLA, set your fan to 100% after the first layer. For PETG, use a lower speed, usually between 30% and 60%. For ABS, keep the fan off or very low to prevent warping.
You can also use advanced filament cooling strategies like feature-specific local cooling. This means you set different fan speeds for the outer perimeter, inner perimeter, and infill. The table below shows two common strategies:
|
Outer Perimeter (%) |
Inner Perimeter (%) |
Infill (%) |
|
|---|---|---|---|
|
CLoC |
100 |
100 |
100 |
|
FLoC |
100 |
60 |
10 |
A study found that using feature-specific local cooling (FLoC) improved the strength of prints without losing accuracy. You can try these settings in your slicer to see if your prints get stronger and look better.
Actionable Tip: In your slicer, set the fan to turn off for the first layer. Then, increase the speed for the next layers based on your filament type. Adjust the fan speed for perimeters and infill to match your print needs.
When you use the right filament cooling strategies, you get better layer adhesion, sharper details, and fewer print problems. Try different fan types, adjust your airflow, and fine-tune your slicer settings to find what works best for your projects. These steps are part of the best practices for 3d printing and help you get high-quality results every time.
3D Printing with PLA Filament
PLA Cooling Best Practices
When you start 3d printing with pla filament, you need to focus on cooling. For the best results, turn off the cooling fan for the first layer. This step helps the print stick to the bed. After the first layer, set your fan to 100%. This setting cools each new layer quickly and keeps details sharp. If you print small parts, try printing two at once. This gives each part more time to cool and improves print quality.
- Always use 100% fan speed after the first layer.
- If you see stringing or poor layer bonding, check your cooling fan settings.
- Printing in pairs can help with cooling on small prints.
Tip: Too little cooling can cause stringing and weak details. Too much cooling can make layers brittle.
Temperature and Bed Settings
Getting the first layer right is important for 3d printing with pla filament. You need to set the correct temperature required for both the nozzle and the bed. The right settings help the filament stick and prevent warping.
|
Bed Temperature (°C) |
|
|---|---|
|
200 - 215 |
50 - 60 |
- Use a nozzle temperature required between 200°C and 215°C.
- Set your bed requirements to 50°C–60°C for best adhesion.
- Make sure your bed is clean and level before starting.
Reducing Stringing and Improving Adhesion
You can reduce stringing and improve adhesion by adjusting your cooling and temperature settings. Set your fan to 100% after the first two layers. This helps the filament solidify fast and keeps prints clean. If you see stringing, check your retraction settings and make sure your cooling fan works well.
- Proper cooling improves layer adhesion and makes prints stronger.
- If you notice poor overhangs, increase your fan speed.
- For better bed requirements, use a glue stick or painter’s tape if needed.
3d printing with pla filament becomes easier when you follow these steps. You will see better print quality and fewer problems with stringing or weak layers.
Cooling for Other Filaments
PETG Cooling Tips
PETG filament needs a different approach than PLA. You should use moderate cooling to get strong prints and smooth surfaces. Set your cooling fan speed between 30% and 50% after the first layer. For the first few layers, keep the fan off or very low. This helps the print stick to the bed and prevents warping.
- Use 20–50% fan speed after the first layer. You can go up to 60% for tricky overhangs.
- Moderate cooling reduces stringing and oozing, especially on detailed prints.
- If you see weak layer bonding or brittle parts, lower the fan speed.
- For strong, durable parts, keep the fan speed low or off.
Tip: PETG benefits from limited airflow. If you notice poor bonding, adjust your cooling fan settings right away.
TPU Cooling Adjustments
TPU is a flexible filament that needs careful cooling. You should avoid high fan speeds because they can make layers weak and cause print defects. For most prints, set your cooling fan between 40% and 50%. If you want a smoother finish or need to print bridges and overhangs, increase the fan speed to 50–70%.
- Avoid 100% fan speed. High cooling makes layers brittle.
- Use 40–50% for strong prints.
- Increase to 70% for smoother surfaces or detailed parts.
- Always check your filament path. TPU prints best with controlled cooling.
|
Filament |
|
|---|---|
|
TPU |
Not required, needs controlled filament path |
Note: If your TPU print feels sticky or bends too much, lower the fan speed to improve strength.
ABS Cooling Considerations
ABS filament can be tricky because it shrinks and warps if cooled too quickly. You should keep the part-cooling fan off or set it very low, no more than 10%. Too much cooling causes splits and weakens the print. Use a warm enclosure to keep the air around your print steady.
- Turn off the cooling fan or set it below 10%.
- Avoid rapid cooling to prevent warping and cracks.
- Use an enclosure to keep the temperature stable and improve print quality.
|
Filament |
Cooling Requirement |
|---|---|
|
ABS |
Strongly recommended, avoid using cooling fan too much |
Alert: Excessive cooling with ABS leads to warping and poor layer adhesion. Keep your 3D printer warm for best results.
You can improve print quality by adjusting filament cooling for each material. PETG, TPU, and ABS all need special cooling fan settings. Try these tips to get strong, smooth, and reliable 3D prints.
Advanced Cooling Tips
High-Speed and Large Prints
When you print at high speeds or work with large models, you need to manage heat quickly. Proper filament cooling keeps your prints strong and prevents warping. You can use advanced techniques to boost your 3D printer cooling and maintain print quality.
|
Technique |
Description |
|---|---|
|
Complex shapes in 3D prints can improve airflow, helping heat escape faster than with metal. |
|
|
TCPoly Materials |
Special materials like TCPoly help create lightweight parts that move heat away from your print. |
- Adjust your cooling fan settings to match your print speed. Faster prints need more airflow.
- Effective cooling can let you increase print speeds by up to 30% while keeping quality high.
- Too much or too little cooling can cause weak spots or warping.
Tip: Place a small household fan near your printer for large prints. This helps cool every part evenly.
Upgrading Fans and Airflow
Upgrading your fans or changing airflow paths can make a big difference. Stronger fans and better ducts help you control temperature and improve print quality.
|
Material |
Impact on Print Quality |
|
|---|---|---|
|
PLA |
100% fan speed |
Sharp fine details |
|
ABS/ASA |
0–20% or no cooling |
Prevents warping |
|
PETG |
Moderate cooling |
Maintains layer bonding |
- Use dual fans or larger fans for even airflow.
- Install custom ducts to direct air right where you need it.
- Clean your fans and ducts often to keep airflow strong.
Note: Upgraded cooling systems help you print complex shapes and fine details with fewer problems.
Avoiding Common Mistakes
You can avoid many print problems by watching your cooling habits. Here are some common mistakes and how to fix them:
- Setting the fan too high for ABS or ASA causes cracks and warping.
- Using low fan speeds for PLA leads to stringing and soft details.
- Ignoring airflow direction creates hot spots and uneven cooling.
Quick Fixes:
- Always match your cooling fan settings to your filament type.
- Check airflow paths before each print.
- Watch your first few layers and adjust settings if you see problems.
Remember: Good filament cooling keeps your prints strong, smooth, and accurate. Small changes in your 3D printer cooling setup can make a big difference in print quality.
You can make your prints look better by using good filament cooling strategies. Blowing air on your print helps shapes stay the right size, but you need to balance the airflow so your print stays strong. Change the cooling fan settings for each filament type and every print job. Turn on cooling features in your printer, use tools to check your settings, and upgrade your hardware if you want better results. Printing more than one part at a time lets layers cool longer. Try different slicer settings and hardware changes to see what works best for your 3D printer cooling.
FAQ
What does a cooling fan do in 3D printing?
A cooling fan blows air onto the hot filament as it leaves the nozzle. This helps the filament cool quickly. You get sharper details and better print quality when you use the right cooling fan settings.
How do I know if my print needs more cooling?
You might see stringing, sagging, or blurry details if your print needs more cooling. Try increasing your 3D printer cooling fan speed. Watch for improvements in overhangs and small features.
Can too much cooling hurt my 3D print?
Yes, too much cooling can make layers weak or cause cracks. Your print may break easily. Always match your cooling fan settings to the filament type for the best results.
What are the bed requirements to 3d print with good cooling?
You need a clean, level bed and the right temperature. Good bed requirements to 3d print help the first layer stick well. This supports strong layer adhesion and improves print quality when you use proper filament cooling.
Should I change cooling settings for different filaments?
Yes, you should adjust cooling fan settings for each filament. PLA needs high cooling, PETG uses moderate cooling, and ABS works best with little or no cooling. This helps you get the best print quality for every material.


