


Elephant foot is a common problem in 3D printing, specifically referred to as the "3D Print Elephant Foot." It occurs at the bottom of a 3D print, where the bottom layer can appear wider or bulged out. This distortion makes it different from the rest of your object. The extra material can lead to parts not fitting together properly, which is a significant issue if you require precise fits. The 3D Print Elephant Foot can cause your prints to function incorrectly, making them less accurate and less reliable. Understanding this problem is essential for achieving better prints and avoiding frustration.
If you want your prints to look good and work well, you need to learn about the 3D Print Elephant Foot.
Key Takeaways
- Elephant foot is a usual 3D printing problem. The bottom of a print sticks out and looks wider than the rest.
- This problem can make parts not fit or work right. It can be annoying and may mean you need to sand or print again.
- To stop elephant foot, change your printer settings. Try lowering the bed temperature and set the nozzle height right.
- Always check your prints after you take them off the build plate. This helps you find elephant foot early and fix it fast.
- Try using different materials and settings for your projects. This helps you see what works best and lowers the chance of elephant foot.
Elephant Foot in 3D Printing
What Is Elephant Foot?
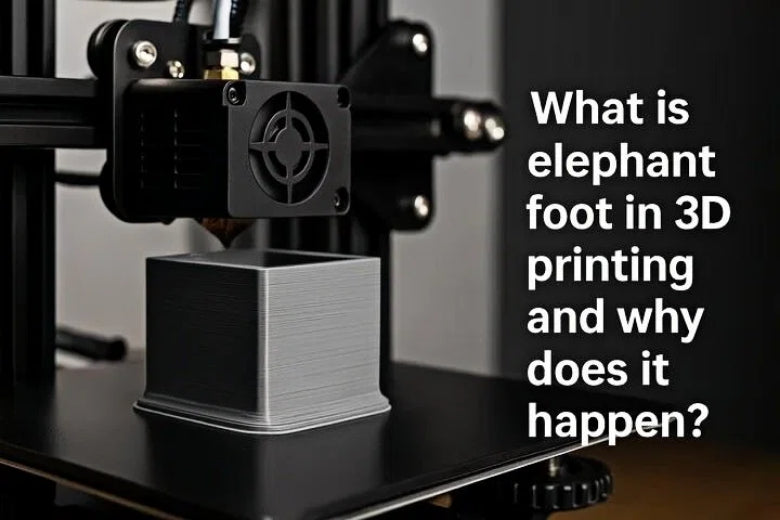
You may notice a bulge at the base of your 3D print. This bulge is called elephant foot. The 3d print elephant foot appears when the first few layers of your print spread outward more than intended. The bottom of your object looks wider than the rest, almost like the foot of an elephant. This 3d printing defect happens because the first layers stay warm and soft longer than the layers above. The weight of the upper layers pushes down, causing the base to flatten and expand.
The elephant foot phenomenon is easy to spot if you look closely at your finished print. The technical definition describes it as a distortion where the initial layers become wider due to the excessive weight of the following layers. The first layer does not cool quickly enough, so it remains fluid and spreads out. The result is a base that looks swollen compared to the rest of the part. You see this effect most often in prints with large flat surfaces or heavy objects.
You might wonder why this matters. The 3d print elephant foot can cause problems with fit and function. If you print parts that need to snap together or slide into place, the bulged base can prevent them from fitting. You may also see issues with moving parts or assemblies. The elephant foot 3d print can ruin the look of your model, making it appear sloppy or unfinished. You want your prints to look clean and professional, so understanding the elephant foot phenomenon helps you avoid these problems.
Imagine printing a box with a lid. If the base of the box has elephant foot, the lid may not fit. You might need to sand or trim the base, which takes extra time. In some cases, you may need to reprint the part. The 3d print elephant foot affects both beginners and experienced users. You can learn to spot and fix this issue with practice.
Common Signs
You can recognize the 3d print elephant foot by looking for certain signs. The most obvious sign is a visible bulge at the bottom of your print. The base looks wider than the rest of the object. The edges may appear rounded or flattened. You may notice that the first layer sticks out past the sides of the print.
Here are some common signs to watch for:
- The bottom layer is noticeably wider than the layers above.
- The corners of the base look rounded or squished.
- The print does not sit flat on the build plate.
- The part does not fit with other pieces as expected.
- The surface of the base feels rough or uneven.
You can use a ruler or caliper to measure the base. If the bottom is wider than the design, you have found the 3d print elephant foot. You may also see that the print wobbles or rocks when placed on a flat surface. This happens because the bulged base prevents the part from sitting evenly.
Tip: Always inspect your prints right after removing them from the build plate. You can catch the elephant foot 3d print early and decide if you need to fix it.
You may see the 3d printing elephant foot more often with certain materials. PLA and ABS are common choices for beginners. PLA cools quickly, so you may see less elephant foot. ABS stays warm longer, which can increase the risk. You can adjust your printer settings to reduce the chance of seeing this 3d printing defect.
Typical Examples
You can find the 3d print elephant foot in many real-world scenarios. Here are some examples to help you understand how it affects different projects:
1. Mechanical Parts:
You print gears or brackets for a robot. The base of each part shows a bulge. The gears do not mesh smoothly, and the brackets do not fit into their slots. You need precise dimensions for mechanical parts, so the elephant foot phenomenon causes problems.
2. Decorative Models:
You create a figurine or statue. The bottom looks wider than the rest of the model. The figure does not stand upright, and the base appears uneven. You want your model to look neat, but the 3d elephant foot ruins the appearance.
3. Boxes and Containers:
You design a box with a lid. The base of the box is larger than planned. The lid does not fit, and you cannot close the box. You may try to sand the base, but this takes extra effort. The elephant foot 3d print makes your project less useful.
4. Puzzle Pieces:
You print interlocking puzzle pieces. The base of each piece is too wide. The pieces do not fit together, and the puzzle does not work. You need accurate shapes for puzzles, so the 3d print elephant foot creates frustration.
5. Phone Stands or Holders:
You make a stand for your phone. The base bulges out, and the stand wobbles. Your phone does not sit securely. The 3d printing elephant foot affects the stability of your stand.
|
Example Project |
Impact of Elephant Foot |
Actionable Tip |
|---|---|---|
|
Mechanical Gear |
Gears do not mesh |
Check first layer settings |
|
Decorative Figurine |
Model does not stand upright |
Lower bed temperature |
|
Box with Lid |
Lid does not fit |
Add a chamfer to the base |
|
Puzzle Piece |
Pieces do not interlock |
Use a raft or brim |
|
Phone Stand |
Stand wobbles |
Level the bed and calibrate nozzle |
You can see that the 3d print elephant foot affects many types of projects. You want your prints to work as intended. You can avoid the elephant foot phenomenon by learning to spot the signs and making simple adjustments.
Note: If you see the 3d elephant foot in your prints, do not worry. You can fix most problems with small changes to your printer settings or design.
You can prevent the 3d print elephant foot by adjusting the bed temperature, calibrating the nozzle height, and changing the first layer settings. You can also use design tricks like adding a chamfer or using a raft. You will learn more about these solutions in the next sections.
You may feel frustrated when you see the elephant foot 3d print in your work. You are not alone. Many users experience this 3d printing defect, especially when starting out. You can improve your results by understanding the causes and taking action. You will gain confidence as you learn to recognize and fix the elephant foot phenomenon.
You can experiment with different materials and settings. You may find that some filaments show less 3d print elephant foot than others. You can keep notes on what works best for your projects. You will see better results as you gain experience.
You want your prints to look clean and fit together perfectly. You can achieve this by learning about the 3d print elephant foot and using the tips in this guide. You will save time and avoid frustration. You will enjoy your 3D printing journey even more.
3D Print Elephant Foot Causes
When you see the 3d printing elephant foot on your finished part, you might wonder what went wrong. Several causes can lead to this problem. You can fix most of them with simple adjustments. Let’s look at the main reasons why elephant foot happens and how you can prevent it.
Bed Temperature Issues
One of the most common causes of elephant foot is elevated print bed temperatures. If your print bed is too hot, the first layer of filament stays soft for too long. The weight of the layers above pushes down, causing the base to bulge outward. You see this effect most often when printing large, flat objects.
High bed temperatures prevent the filament from solidifying quickly. The soft base cannot support the weight of the print, so it spreads out. You might notice the bottom layer looks melted or squished. This is a clear sign of elephant foot.
You can avoid this issue by lowering the bed temperature. If you see the first layers are wider than necessary, reduce the bed temperature by 5–10°C. Make sure the temperature is consistent across the print surface. Uneven heating can cause layer separation or warping.
Tip: Start with the recommended bed temperature for your filament. If you notice elephant foot, lower the temperature in small steps. For PLA, try 55–60°C. For ABS, use 90–100°C. Always check your printer’s manual for safe temperature ranges.
Example Scenario:
You print a box with a lid using ABS. The base of the box bulges out, and the lid does not fit. You check your bed temperature and see it is set to 110°C. You lower it to 100°C, and the next print comes out with a clean, flat base.
Common Misconception:
Some users think a hotter bed always improves adhesion. In reality, too much heat can cause elephant foot. You want enough heat for good adhesion, but not so much that the filament stays soft.
Table: Main Causes of Elephant Foot
|
Cause of Elephant Foot |
Description |
|---|---|
|
Excess Filament at the First Layer |
Too much material is extruded, causing the first layer to bulge and create the elephant foot effect. |
|
Excess Compression from Top Layers |
Additional layers compress the base layer, leading to deformation if the base layer is weak. |
|
Excess Compression from Nozzle |
Improper Z-offset or a poorly leveled bed can cause the nozzle to press down too hard on the base. |
|
Insufficient Cooling |
Overheating of the base layer can prevent it from gaining strength, leading to deformation. |
Nozzle Height and First Layer Squish
Nozzle height plays a big role in the formation of elephant foot. If the nozzle is too close to the bed, it squishes the first layer too much. This extra compression pushes the filament outward, making the base wider than intended. You might see the edges of your print sticking out past the design.
Incorrect Z-offset can also cause problems. If the Z-offset is set too low, the nozzle presses down hard on the filament. The first layer gets flattened and spreads out. Over-extrusion during the first layer adds more material, which increases the bulge.
You can fix this by calibrating your nozzle height. Use a piece of paper to check the gap between the nozzle and the bed. The paper should slide under the nozzle with slight resistance. Adjust the Z-offset until you get a smooth first layer without excess squish.
Tip: Print a single-layer test square. If the edges look wider than the rest, raise the nozzle slightly and try again. Small changes can make a big difference.
Example Scenario:
You print a phone stand. The base wobbles and looks uneven. You check your nozzle height and see it is too low. You adjust the Z-offset up by 0.05 mm. The next print has a flat, stable base.
Common Misconception:
Some users believe a lower nozzle always improves adhesion. Too much squish can cause elephant foot. You want a balanced gap for good adhesion and clean layers.
Cooling and Adhesion
Cooling and bed adhesion also affect the development of elephant foot. If the first layer does not cool quickly enough, it stays soft and can deform under pressure. Inadequate cooling is a major cause of this problem. Your printer’s fan settings help control how fast the filament solidifies.
If you use too little cooling, the base remains weak. The weight of the print pushes down, causing the base to bulge. If you use too much cooling, the filament may not stick to the bed, leading to warping or poor adhesion.
Bed adhesion methods, such as glue sticks, hairspray, or special build surfaces, help keep the first layer in place. If the adhesion is too strong, it can pull the filament outward as the print cools. If the adhesion is too weak, the print may lift or warp.
Tip: Set your fan to run at 50–70% for the first few layers. Increase the speed after the base has solidified. Use a build surface that matches your filament type.
Example Scenario:
You print a puzzle piece with PETG. The base bulges out, and the piece does not fit. You check your fan settings and see the cooling is set to 20%. You increase it to 60%, and the next print has a clean edge.
Common Misconception:
Some users think maximum cooling is always best. Too much cooling can cause poor adhesion. You need a balance for strong, clean prints.
Material Differences
Different 3D printing materials react differently to heat and cooling. PLA, ABS, PETG, and Nylon have unique requirements for bed temperature and cooling. These differences affect the likelihood and severity of elephant foot.
PLA prints at lower temperatures and cools quickly. You see less elephant foot with PLA. ABS and Nylon need higher bed temperatures to prevent warping. These materials stay soft longer, increasing the risk of elephant foot. PETG falls in between, with moderate temperature needs.
You can adjust your printer settings based on the material you use. Always check the recommended bed temperature and cooling settings for your filament. If you switch materials, run a test print to check for elephant foot.
Tip: Keep a notebook of your best settings for each material. Write down the bed temperature, fan speed, and nozzle height. Use these notes to avoid problems in future prints.
Example Scenario:
You print a mechanical gear with Nylon. The base bulges out, and the gear does not mesh. You lower the bed temperature and increase cooling. The next gear fits perfectly.
Common Misconception:
Some users think all filaments behave the same. Each material has its own needs. Adjust your settings for the best results.
Quick Checklist for Preventing Elephant Foot:
- Lower bed temperature if you see bulging at the base.
- Calibrate nozzle height and Z-offset for a balanced first layer.
- Adjust fan speed for proper cooling.
- Use the right build surface for your filament.
- Test new materials with small prints before starting big projects.
Note: You can prevent most 3d printing elephant foot problems by making small changes to your printer settings. Always check your first layer and adjust as needed.
You now understand the main causes of elephant foot. You can use these tips to improve your prints and avoid frustration. With practice, you will get clean, professional results every time.
Detecting Elephant Foot
Visual Inspection
You can spot elephant foot by looking closely at the base of your print. The bottom layer often appears wider or bulged compared to the rest of the object. You may see rounded corners or a squished edge. If you notice that your print does not sit flat or wobbles on the table, this is a clear sign. For example, when you print a phone stand, check if the base looks swollen or uneven. If it does, you likely have elephant foot. Always inspect your print right after removing it from the build plate. This helps you catch problems early and decide if you need to fix them.
Tip: Hold your print at eye level and look for any bulging at the bottom. Compare the base to the design in your slicer software.
Measuring Dimensions
You can measure the base of your print to confirm elephant foot. Use a ruler or caliper to check the width and length of the bottom layer. Compare these measurements to your original design. If the base is larger than planned, you have found the issue. Some users sketch the footprint of their print on paper and measure the diameter and edge length. You can also estimate the area by seeing how many coins fit inside the base outline. For more accuracy, calibrate your measuring tools before use. This ensures you get reliable results.
- Use a ruler or caliper for direct measurement.
- Sketch the base and measure the outline.
- Estimate area with coins for a quick check.
|
Tool |
What It Measures |
When to Use |
|---|---|---|
|
Ruler |
Width, length |
Quick checks |
|
Caliper |
Precise dimensions |
Detailed analysis |
|
Sketch/Coin |
Area estimation |
Fast estimation |
Early Print Warnings
You can detect elephant foot early by watching your print during the first few layers. If you see the filament spreading out more than expected, pause and check your settings. Some printers show warnings if the nozzle is too close or the bed is too hot. For example, if the first layer looks extra shiny or thick, you may need to adjust the bed temperature or nozzle height. Catching these signs early saves you time and filament.
Tip: Watch the first layer as it prints. If you see bulging or excess material, stop the print and recalibrate before continuing.
Preventing 3D Printing Elephant Foot
Bed Leveling and Nozzle Calibration
You can stop the 3d print elephant foot by starting with proper bed leveling and nozzle calibration. Begin by making sure your print bed is flat and level. Use manual bed tramming to keep the distance equal from the hotend to all corners. Before using software adjustments, check the bed with a mechanical device. For nozzle calibration, use a calibration card. Slide it under the nozzle and feel slight resistance. Set the nozzle height to 0.2mm. If you see elephant foot, raise the nozzle by 0.05mm. These calibration techniques help you avoid over-extrusion on the first layer and keep your prints accurate.
Adjusting Bed Temperature
Bed temperature plays a big role in preventing elephant foot. If the bed is too hot, the first layer stays soft and spreads out. Lower the temperature by 5–10°C if you notice a first layer problem. For PLA, start at 55–60°C. For ABS, use 90–100°C. Keep the bed slightly hotter for the first layer to help with adhesion, but avoid overheating. This simple adjustment gives you better results and reduces over-extrusion on the first layer.
First Layer Settings
First layer settings matter when you want clean prints. Set your first layer height to 0.2mm. Many users find this helps avoid elephant foot. Clean your print surface before each job. Use Live-Z calibration for consistent adhesion. These steps help you solve the first layer problem and improve your print quality.
Using Rafts and Chamfers
You can use design solutions like rafts and chamfers. Add a small chamfer to the base of your model to reduce the bulge. Printing with a raft lifts your part off the bed and prevents the base from spreading. These solutions work well for boxes, gears, and puzzle pieces.
Material and Cooling Adjustments
Adjust your cooling and material settings for each filament type. Keep the build plate slightly hotter for the first layer. If you use too much heat, you may see sagging and elephant foot. If you cool too fast, warping can happen. Find a balance for each material. PLA needs less heat and more cooling. ABS and Nylon need more heat and slower cooling. Test small prints to find the best settings.
Tip: Write down your favorite settings for each filament. This helps you get consistent results and avoid elephant foot.
Fixing Elephant Foot
Post-Processing Methods
You can fix minor elephant foot problems with simple post-processing methods. If you see a small bulge at the base, you do not need to throw away your print. You can use tools and software to clean up the edges and make your part fit better.
Many users choose to sand the bottom layer. You can use sandpaper or a file to smooth out the bulge. Start with coarse sandpaper and finish with a finer grit for a smooth edge. This works well for boxes, gears, and puzzle pieces.
You can also use software like UVTools to adjust your print file before you try again. Here is a step-by-step example:
- Open UVTools on your computer.
- Load your 3D print file.
- Check the loaded file for any signs of elephant foot.
- Go to the suggestions tab.
- Open the suggestion settings.
- Adjust the values to match your printer.
- Set any extra values you need.
- If you want, enable waiting after curing.
- Apply all the suggestions.
- Confirm your changes.
- Save your file.
This process helps you fix the base before you print again. You can avoid sanding and get a better result on your next try.
Tip: Always wear a mask when sanding plastic. Small particles can be harmful if you breathe them in.
When to Reprint
Sometimes, the elephant foot is too large to fix with sanding or trimming. If your part does not fit or looks uneven, you may need to reprint. You should reprint if:
- The bulge is more than 1 mm wide.
- The part does not fit with other pieces.
- The base is rough or cracked.
Before you start a new print, check your bed temperature and nozzle height. Make small changes and print a test piece. This saves time and filament. You can get a perfect base and avoid elephant foot in future prints.
If you keep seeing the same problem, try a different material or adjust your cooling settings. Small changes can make a big difference.
You can stop elephant foot by changing the bed temperature. You should also check the nozzle height and use the right cooling. These steps help you get a smooth first layer. They also lower the chance of mistakes in your print. Try these tips and do not worry if you see problems. You can use programs like PrusaSlicer or Cura to fix issues. You can also clean up your print after it is done.
|
Method/Tool |
Description |
|---|---|
|
Calibration Test |
Checks nozzle height and printer setup |
|
Rafting |
Adds extra layers to stop elephant foot |
|
PrusaSlicer |
Changes how wide the first layer is |
|
Cura |
Fixes a squished first layer |
|
Post-processing |
Cuts away extra material |
- Good calibration and settings are needed for great prints.
- Keep learning and trying new things to get better.
- Anyone can make better prints with practice.
Keep trying new ways to print. Your 3D prints will get better each time. 😊
FAQ
What causes elephant foot in 3D printing?
You often see elephant foot when the bed temperature is too high or the nozzle sits too close to the bed. These settings keep the first layer soft and let it spread out. Lower the bed temperature and check nozzle height for better results.
How do you fix elephant foot after printing?
You can sand the base with fine sandpaper or use a file to remove the bulge. If the problem is severe, reprint the part with adjusted settings. Always wear a mask when sanding plastic to protect your lungs.
Which materials show elephant foot most often?
ABS and Nylon tend to show elephant foot more than PLA. These materials need higher bed temperatures and cool slowly. Try lowering the bed temperature or increasing cooling for these filaments to reduce the effect.
Can slicer software help prevent elephant foot?
Yes, slicer software like Cura or PrusaSlicer lets you adjust first layer height and width. You can add a chamfer or use a raft in your design. These changes help you avoid bulging at the base.
Why does my print wobble or not sit flat?
A bulged base from elephant foot makes your print unstable. Measure the bottom with a ruler or caliper. If you see extra width, adjust your printer’s bed leveling and nozzle height before your next print.


