


You want to fix bad 3d printing bridging, but those pesky issues like sagging, stringing, and gaps keep showing up. Bridging happens when your printer tries to lay down filament across open air. Sometimes, things go wrong and you spot 3D printing bridging problems that ruin your print’s look and strength. Don’t worry! You will find easy, step-by-step fixes here that you can try right away, even if you’re new to 3D printing.
Key Takeaways
- Bridging in 3D printing happens when filament goes over gaps. Good settings stop sagging and gaps.
- Turn up the cooling fan speed. This helps the filament harden fast. It stops drooping and makes bridges better.
- Lower the print temperature a little at a time. This helps the filament get solid faster. It keeps bridges strong and stops sagging.
- Make the extrusion rate lower. This stops too much filament from coming out. It keeps blobs away and makes bridges even.
- Pick high-quality filament for better prints. Filament that is always the same size makes bridges stronger and cleaner.
What Is 3D Printing Bridging?
Bridging Definition
When you hear about 3d printing bridging, think of it like building a tiny bridge out of melted plastic. Your printer tries to stretch filament across open gaps, almost like stringing a rope from one side of a canyon to the other. If everything goes right, the filament forms a neat, flat bridge between two points. This technique lets you print overhangs and gaps without extra support material. You might picture it as laying down a tight clothesline—if the line sags, your bridge does too.
Bridging comes in handy for printing things like vents, holes, or any design where you need to cross empty space. Good bridging means the filament stays straight and strong, creating a clean, solid surface.
Signs of Bridging Problems
You can spot bridging problems pretty easily once you know what to look for. Imagine a bridge made of thread that droops in the middle or has holes where the thread didn’t reach. That’s what happens when 3d printing bridging goes wrong. Here are some common signs:
Tip: Watch your print closely when it starts bridging. Early signs of trouble can help you fix bridging before it ruins your whole print.
|
Symptoms of Poor Bridging |
|---|
|
Filament droops between gaps. |
|
Sagging or stringy bridges. |
|
Holes in bridged sections. |
You might notice:
- Sagging or drooping bridges, where the filament hangs down instead of staying flat. This often happens if the printer runs too hot or the cooling fan doesn’t work well.
- Stringy or messy bridges, which look like spider webs stretched across the gap.
- Gaps or holes in the bridge, making the surface weak or see-through.
If you see these issues, your bridging settings might need a tweak. Don’t worry—most bridging problems have simple fixes, and you’ll get better results with just a few adjustments.
Causes of Poor Bridging in 3D Printing
When you run into poor 3d printing bridging, it usually comes down to a few main issues. Let’s break down the most common causes of poor bridging so you can spot and fix them fast.
Cooling and Temperature Issues
Cooling and temperature play a huge role in how well your printer handles bridging. If the filament stays too hot, it acts like syrup and sags before it can harden. Not enough cooling means the plastic won’t set quickly, so it droops between the gaps. On the other hand, if you set the temperature too low, the filament might not flow smoothly, causing clogs or weak bridges.
Tip: For PLA, try a bed temperature between 50°C and 70°C, with 60°C as a good starting point. This helps the filament stick but also cools fast enough for strong bridges.
Here’s a quick look at how temperature settings affect bridging:
|
Parameter |
Temperature Range |
|---|---|
|
Nozzle Temperature |
220–250°C |
|
Bed Temperature |
50–70°C |
If you notice sagging, try increasing cooling by turning up your part cooling fan. This helps the filament solidify faster and hold its shape.
Print Speed and Extrusion
Print speed can make or break your bridges. If you print too fast, the filament stretches across the gap before it has time to cool, which leads to drooping or uneven lines. Slowing down the print speed gives the filament a chance to set, making your bridges stronger and cleaner.
Extrusion also matters. Too much filament can cause blobs and sagging, while too little leaves gaps. Think of it like squeezing toothpaste—too much or too little makes a mess.
Filament Quality
Filament quality affects bridging more than you might think. If your filament has an uneven diameter, your printer can’t push out a steady flow. This leads to weak or broken bridges. Always check that your filament is smooth and consistent.
Some technical studies show that longer fibers or higher volume fractions in the filament can slow down the flow and cause clogging, which makes bridging harder. If you keep running into trouble, try a different brand or batch of filament.
Remember: Good filament and the right settings make bridging much easier!
How to Fix Bad 3D Printing Bridging
If you want to fix bad 3d printer bridging, you need to know what steps to take and why they work. Think of bridging like trying to stretch a piece of tape across a gap. If the tape is too hot or sticky, it sags. If you blow on it, it cools and stiffens. The same ideas apply to 3D printing bridging problems. Let’s walk through the best solutions for making stronger bridges and stopping bridge edges from curling.
Adjust Cooling and Fan Speed
Increasing cooling is one of the fastest ways to improve bridging quality. When you boost the fan speed, you help the filament harden quickly as it stretches across the gap. This is like blowing on hot glue to make it set faster. If the filament cools too slowly, it droops and forms gaps and inconsistencies.
- For PLA, set your fan speed to 100%. This gives you the best results for most bridging problems.
- For ABS, use a fan speed between 50% and 70%. This helps avoid warping while still improving bridge strength.
Tip: Direct the fan airflow right at the bridge area. This helps the material set evenly and prevents sagging.
You can usually adjust fan speed in your slicer’s print settings. Look for a section called “Cooling” or “Fan Speed.” Try a test print with higher fan settings and see if your bridges look flatter and cleaner.
Lower Print Temperature
Lowering print temperature is another simple solution for bridging problems. When you print at a lower temperature, the filament solidifies faster. This means it holds its shape better as it crosses the gap, just like letting chocolate cool before it melts everywhere.
- Start by reducing your nozzle temperature in small steps, about 5°C at a time. This helps you find the sweet spot where the filament flows well but doesn’t sag.
- If you print too hot, the filament stays soft and droops. If you print too cold, you might get clogs or weak layers.
Note: Always check your filament’s recommended temperature range before making changes.
Lowering print temperature works best when combined with increasing cooling. Together, these adjustments can solve most bridging problems and help you avoid gaps and inconsistencies.
Reduce Extrusion Rate
Sometimes, too much filament causes blobs and drooping lines on your bridges. Reducing the extrusion rate helps prevent this. Imagine squeezing less toothpaste onto a toothbrush so it doesn’t spill over the sides.
- In your slicer, look for a setting called “Flow Rate” or “Extrusion Multiplier.” For bridges, try lowering this to 90–95%.
- This small change can stop excess filament from weighing down the bridge and causing uneven bridge thickness.
Tip: Combine a lower extrusion rate with reducing print speed for the best results.
Reducing extrusion rate is a great way to fix bridging problems like sagging and blobs. It also helps when you see gaps or holes in your bridges.
Optimize Slicer Bridge Settings
Optimizing slicer settings is like tuning your car for a smoother ride. Most slicers have special options for bridging. These let you fine-tune how your printer handles bridges, making stronger bridges and solving uneven bridge thickness.
- Adjust the bridge speed. Slower speeds give the filament more time to cool and set, which improves bridging quality.
- Set the bridge flow rate a bit lower than normal. This helps avoid blobs and drooping.
- Align bridges along the shortest span. This reduces sagging, just like using a shorter plank to cross a stream.
- Run a bridging test print. Try different settings to see what works best for your printer and filament.
Tip: Printing with high-quality filament makes a big difference. Cheap or inconsistent filament can cause problems no matter how good your settings are.
If you keep having trouble, consider redesigning for better bridges. Change your model so bridges are shorter or add support where needed. This can be the best solution for tricky prints.
Quick Troubleshooting Checklist for Bridging Problems:
|
Step |
What to Do |
Why It Works |
|---|---|---|
|
Adjust Cooling |
Increase fan speed |
Hardens filament quickly, prevents sagging |
|
Lower Print Temperature |
Drop temp by 5°C steps |
Solidifies filament faster |
|
Reduce Extrusion Rate |
Set flow to 90–95% |
Prevents blobs and drooping |
|
Optimize Slicer Settings |
Tweak bridge speed/flow/orientation |
Improves bridging quality and consistency |
|
Use High-Quality Filament |
Choose reliable brands |
Reduces gaps and inconsistencies |
|
Add Support for Long Bridges |
Enable supports in slicer |
Prevents printing in the air |
By following these steps, you can fix most 3d printing bridging problems. Remember, small changes in print settings can make a big difference. If you still see issues, try solving uneven bridge thickness by tweaking one setting at a time. With patience and practice, you’ll master bridging and get cleaner, stronger prints every time.
Using Supports for Large Bridges
When you face large gaps in your 3D prints, sometimes you need a little extra help. That’s where supports come in. Think of supports like scaffolding under a bridge—they hold things up until the main structure can stand on its own. Using supports can help you avoid common bridging problems, like sagging or big gaps and inconsistencies.
When to Add Supports
You don’t always need supports for every bridge. For short spans, your printer can often handle the job with the right settings. But when you see a bridge that stretches a long way, or if you’ve tried to fix bridging and still see problems, it’s time to consider supports.
Here’s when you should add supports:
- The bridge is longer than your printer can handle without sagging.
- You notice repeated bridging problems, even after adjusting cooling and extrusion.
- The model has complex shapes or lots of suspended parts.
Tip: If you want to avoid extra cleanup, try to design your model with fewer suspended sections. Compact designs often need fewer supports.
Support Placement Tips
Placing supports in the right spots makes your life much easier when it’s time to remove them. You want to keep post-processing simple and avoid damaging your print.
Here are some practical tips:
- Align the bridge along the shortest span. This reduces sagging and makes the bridge stronger.
- Rotate your model. Sometimes, changing the printing angle can shrink the size of the bridge or reduce the number of supports needed.
- Adjust layer height and infill. Lower layer heights and higher infill rates can make bridges more stable, so you might need fewer supports.
- Use customizable support settings. Most slicers let you choose where to place supports. Only add them where you really need them.
Note: High-performance 3D printers, like the Sovol Zero or SV08, handle tough bridges better, but good support placement still matters.
If you follow these tips, you’ll fix bridging problems faster and spend less time cleaning up after your print. Try out different support strategies and see what works best for your projects.
Best Settings for 3D Printing Bridging
Getting the right print settings can make a huge difference when you want to fix bridging problems. You can think of bridging like building a tightrope—if the rope is too loose or too soft, it sags. The right settings help your printer lay down filament across gaps and inconsistencies without drooping or breaking.
Cooling and Fan Recommendations
Cooling is one of the most important factors for strong bridges. If you use too much cooling, your print might get brittle. Too little, and you get sagging or blobs. The best fan speed depends on the material you use. Here’s a handy table to guide you:
|
Material |
Recommended Fan Speed (%) |
Why This Cooling Level Works |
Risks of Too Much Cooling |
Risks of Too Little Cooling |
|---|---|---|---|---|
|
PLA |
80–100 |
Rapid solidification prevents drooping and ensures crisp details. |
Brittle prints, poor layer adhesion |
Sagging bridges, stringing, surface blobs |
|
PETG |
30–60 |
Gentle airflow prevents stringing, keeps layers strong |
Layer splitting, weak bonds |
Stringing, overheating, blobs |
|
ABS / ASA |
0–20 |
Minimal fan avoids warping and thermal stress |
Cracking, curling |
Sagging, loss of fine features |
|
TPU / Flexibles |
0–10 |
Low airflow keeps extrusion smooth |
Brittle, uneven layers |
Deformed prints, sticky extrusion |
|
Nylon |
20–40 |
Balanced cooling reduces warp, keeps strong bonding |
Lower strength |
Warping, distorted shapes |
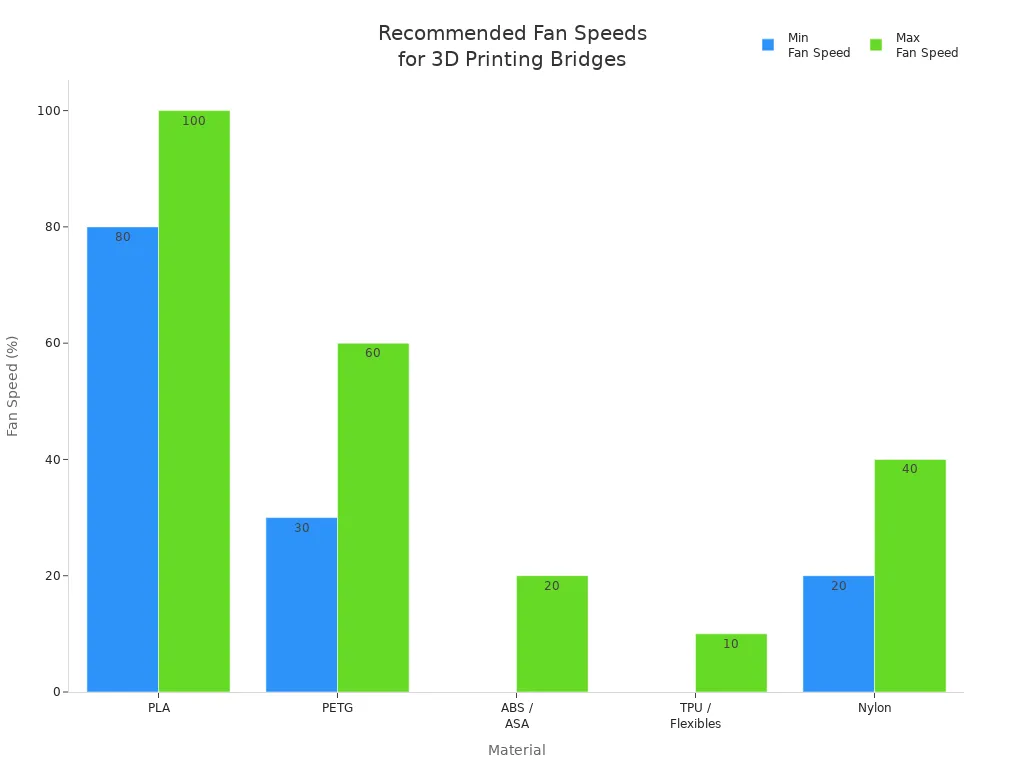
Tip: For most bridging, start with a high fan speed for PLA and lower speeds for PETG or ABS. Adjust if you see problems.
Print Speed for Bridges
Slower print speed helps the filament stretch neatly across the gap. Fast speeds can cause the filament to droop or snap, just like running too quickly across a wobbly bridge. Try lowering your bridge print speed to 20–40 mm/s. This gives the filament time to cool and stay straight. If you notice sagging, slow it down even more.
Slicer Settings for Bridging
Your slicer has special settings just for bridging. These settings tell your printer how to handle tricky spots. Here are the most important ones:
|
Slicer Setting |
Typical Value |
Description |
|---|---|---|
|
Bridge Flow Ratio |
0.95 |
Use a little less filament for bridges. |
|
Bridging Angle |
N/A |
Adjust in advanced settings. |
Set your bridge flow ratio to 0.95. This means your printer uses slightly less filament, which helps prevent blobs and sagging. You can also adjust the bridging angle in advanced slicer settings to line up bridges with the shortest gap.
If you follow these tips, you can solve most 3d printing bridging problems. The right cooling, speed, and slicer settings help you avoid gaps and inconsistencies. High-performance printers like the Sovol Zero or SV08 handle tough bridges well, but good settings matter most. Try these changes and watch your bridging improve!
Advanced Tips for 3D Printing Bridging Problems
Model Design Adjustments
You can often fix 3d printing bridging problems before you even start your print. Smart model design makes a huge difference. Try these tricks:
- Adjust print orientation. Turn your model so the bridge crosses the shortest gap. This helps the filament stay tight, like stretching a rope between two close trees.
- Keep overhang angles at or below 45°. Steeper angles need more support, but gentle slopes let you print without extra help.
- Change the part orientation. Sometimes, flipping or rotating your model removes the need for supports altogether.
Tip: The strategic use of supports can save you time and material. Place supports only where you really need them.
When you plan your model with these ideas, you reduce sagging and get cleaner bridges. You also spend less time removing supports after printing.
Filament Selection
Not all filaments handle bridging the same way. Some types work better for long gaps or tricky shapes. PLA usually gives you the best results for bridging because it cools fast and holds its shape. PETG and ABS can work, but they may need more cooling or support.
Check your filament for smoothness and even thickness. Cheap or old filament can cause problems, like blobs or gaps. If you keep seeing issues, try a new spool or a different brand.
Note: Good filament makes your bridging stronger and reduces the need for using supports for large bridges.
Persistent Problem Solutions
Sometimes, you try every basic fix and still see problems. Don’t give up! Here are steps you can take when bridging just won’t cooperate:
- Increase the cooling fan speed during bridging.
- Lower the print temperature a little.
- Reduce the extrusion rate slightly.
- Slow down the print speed for bridges.
- Use your slicer’s bridge settings to fine-tune flow and speed.
If you follow these steps, you can fix bridging even on tough prints. High-performance printers, like the Sovol Zero or SV08, handle challenging bridges well, but your settings and support choices matter most.
Remember: Every print is a chance to learn. Try these advanced tips and see how much your bridging improves!
You can fix 3D printing bridging problems by using a few simple steps. First, check how long your bridge can be. Make sure your printer can handle it. Next, add support structures if you need them. Good cooling helps your bridges stay strong. Use the right bridge settings in your slicer. Slow down extrusion to make bridges look better. Turn on the bridging option in your slicer for best results.
Changing small settings, like lowering print speed or making the fan stronger, can help a lot. Even powerful printers, like the Sovol Zero or SV08, work better with these changes.
Keep a troubleshooting checklist close by:
|
Key Item |
Description |
|---|---|
|
Temperature and Cooling |
Use the right temperature and enough cooling. |
|
Supports |
Add supports for long or hard bridges. |
|
Model Orientation |
Turn your model to make bridges shorter. |
|
Material Choice |
Use strong and reliable filament or resin. |
Try these tips and you will get stronger and cleaner bridges in your prints!
FAQ
What causes 3D printing bridging problems?
You usually see bridging problems when the filament stays too hot, the fan speed is too low, or the print speed is too fast. Poor filament quality or wrong bridging settings can also make bridges sag or break.
How do I fix bridging issues on my 3D printer?
Start by increasing the cooling fan speed and lowering the print temperature. Slow down the print speed for bridges. Adjust your slicer’s bridging settings. Use high-quality filament for better results.
What are the best bridging settings in my slicer?
Set a high fan speed for PLA, lower the bridge flow rate to about 95%, and reduce bridge print speed to 20–40 mm/s. Try a bridging test print to see what works best for your setup.
Why does my filament droop during bridging?
Filament droops when it stays soft for too long. This happens if the cooling is weak or the nozzle temperature is too high. Strong cooling and lower temperatures help the filament harden quickly and stay flat.
Do I always need supports for bridges?
No, you don’t always need supports. Short bridges often print fine with good bridging settings. For long or tricky gaps, supports help prevent sagging and gaps. Try to design your model with shorter bridges when possible.


