


If you notice that your 3D prints appear crooked or misaligned, you can address layer shifting 3D printing issues with a few simple steps. Most solutions only take a few minutes and do not require special skills. It's important to regularly check your printer and perform basic maintenance to prevent problems. Here, you will find helpful tips that will assist you in getting your printer back to optimal working condition.
Key Takeaways
- Check and tighten belts often to stop layer shifting. Loose belts can make prints not line up right.
- Keep your printer clean and put oil on moving parts. Dust and dirt can block parts and cause layer shifting.
- Change print speed for better results. Printing slower helps layers stick and stops shifting.
- Calibrate your printer a lot. Good calibration makes layers stick and stay in place.
- Look at motors and wires often. Hot motors or loose wires can make motors skip and shift layers.
What Is Layer Shifting?
Layer Shifting Definition
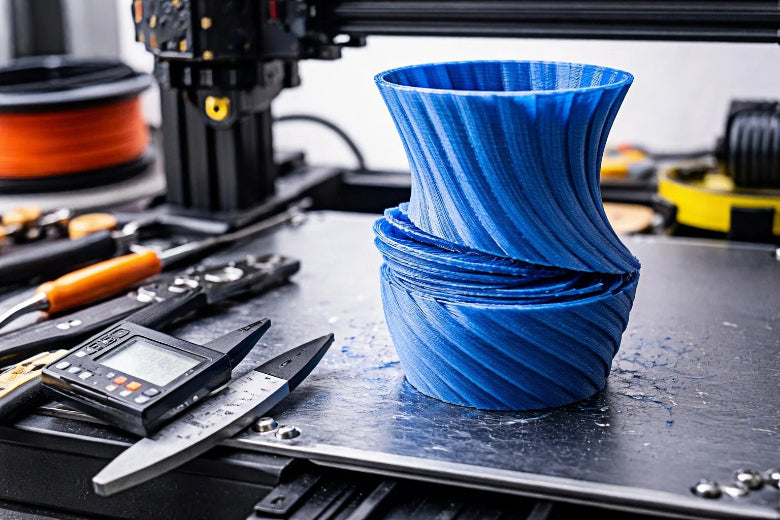
Layer shifting happens when layers do not line up right. Your 3D printer may make objects that look crooked. Sometimes, parts of the print are not in the right place. Industry standards say layer shifting is when layers move sideways or up and down. This can make your print less accurate and lower its quality. Mechanical problems, software mistakes, or outside bumps can cause this issue. If you see layer shifting, your printer needs fixing to work well again.
Tip: If you notice layer shifting early, stop the print. You can fix the problem and save filament.
Visual Signs of Layer Shifting
You can spot layer shifting by looking for certain clues. These clues help you find the problem fast and fix it. Here are the most common signs:
- Layers coming apart or peeling away
- Cracks or splits in the top layers
- Bumpy or rough spots on the surface
If you see these signs, your print may have layer shifting. Check your printer for loose belts, things in the way, or calibration problems. When you notice these clues, you can fix the issue before it ruins more prints.
Layer Shifting 3D Printing Causes
Mechanical Issues
You may find that most problems with misaligned layers start with mechanical parts. Loose belts or pulleys can cause the print head to slip. If the belts are too tight, they can wear out the motor or create extra friction. Worn or dirty rods and wheels can also block smooth movement. When you see misaligned layers, check for loose screws, uneven rails, or bent rods. Each part must move freely and stay in place during printing. Regular checks help you spot these issues early.
Tip: Move the print head by hand when the printer is off. It should glide smoothly without bumps or resistance.
Electrical Problems
Electrical issues can also lead to layer shifting. Problems with stepper drivers, overheating, or unstable power can cause the motors to skip steps. This makes the layers move out of place. The table below shows how electrical factors affect your prints:
|
Evidence |
Explanation |
|---|---|
|
Variations in electrical impedance |
These can cause poor bonding between layers, which affects the accuracy of your 3D prints. |
|
Print parameters affecting electrical properties |
Settings like extrusion temperature and print speed change how well layers line up. |
|
Anisotropic properties of printed parts |
The way layers build up can make them shift if you do not manage the print settings carefully. |
Check all wires and connections. Make sure the motors do not get too hot. Stable power keeps your printer running smoothly.
Speed and Vibration
Print speed plays a big role in keeping layers lined up. If you print too fast, the motors may miss steps and cause misaligned layers. High speeds can also create strong vibrations, which shake the printer and shift the layers. Lower speeds give you better control and stronger layer bonding. For example, ABS works best at 40-60 mm/s, PETG up to 60 mm/s, and TPU at 15-30 mm/s. Reducing speed and acceleration by 20-50% can help prevent shifting.
- Printing too fast can overload the motors.
- Lower speeds improve layer bonding and reduce shifting.
- Adjust speed settings for each material.
Physical Blockages
Physical blockages can stop the print head from moving as it should. Dust, bits of filament, or tangled wires can block the path. Even a small object on the rails can cause misaligned layers. Always keep the print area clean. Check for anything that might get in the way before you start a print.
Note: A clean printer is less likely to have layer shifting problems.
How to Fix Layer Shifting
If you want to fix layer shifting 3d printing problems, you need to follow a clear process. Each step below will help you solve the most common causes of misaligned layers. Use these instructions to get your printer working smoothly again.
Check and Tighten Belts
Loose or worn belts are a leading cause of layer shifting 3d printing issues. You can fix layer shifting by following these steps:
- Turn off your printer and move the print head by hand to feel for any bumps or resistance.
- Look at the belts on both the X and Y axes. They should feel firm, like a guitar string.
- If you find a loose belt, use the tensioner to tighten it. Do not make it too tight, or you may damage the motor.
- Check the pulleys for any movement. Tighten the grub screws to stop slipping.
- If you see any fraying or damage, replace the belt right away.
- Make belt checks a regular part of your maintenance routine.
Tip: Balanced tension on both axes keeps your prints accurate and prevents sudden shifts.
Over time, belts can stretch and lose tension. If the belt is too loose, it may slip on the pulley. If it is too tight, it can cause extra friction and slow down the motor. Regular checks help you fix layer shifting before it ruins your print.
Calibrate Printer
You can fix layer shifting 3d printing problems by making sure your printer is calibrated. Here are the best steps to calibrate your printer:
- Level the build plate often to keep layers even and help them stick.
- Calibrate the stepper motors (E-steps) for accurate movement.
- Tighten all motor fasteners and set-screws to keep pulleys secure.
- Place your printer on a stable surface to reduce shaking.
- Check and adjust the timing belts to stop slipping.
- Update your firmware and slicing software for better motion paths.
- Lower print speed for more precise movements.
- Use adhesives or a heated bed to help the first layer stick.
If you calibrate your printer often, you will fix layer shifting and get better results.
Clean and Lubricate Parts
Dust and dirt can block smooth movement and cause layer shifting 3d printing problems. You can fix layer shifting by cleaning and lubricating your printer:
- Lubricate moving parts like rods and lead screws to reduce friction and noise.
- Clean and lubricate every 30 minutes to 1 hour during long prints.
- Wipe away dust and debris from rails, wheels, and bearings.
- Use a light machine oil or grease for lubrication.
Note: Clean and lubricate your printer often to prevent jams and keep everything moving smoothly.
Adjust Print Speed
High print speeds can cause ringing, poor layer adhesion, and under-extrusion. These problems increase the risk of layer shifting 3d printing. You can fix layer shifting by adjusting your print speed:
- Lower the print speed if you see misaligned layers or hear vibrations.
- Reduce speed to avoid ringing, which is caused by too much vibration.
- Slow down for better layer bonding and fewer gaps.
- Match the speed to your material. For example, print TPU at 15-30 mm/s.
Tip: Slower speeds give you more control and help fix layer shifting.
Inspect Motors and Wiring
Motors and wiring problems can lead to layer shifting 3d printing. You can fix layer shifting by checking these parts:
- Open the electronics cover and check all wires for tight connections.
- Look for any frayed or broken wires.
- Check stepper drivers for overheating. Make sure they have heatsinks and good airflow.
- Use a multimeter to check the power supply voltage.
- Adjust motor current settings if needed.
- Replace any damaged wires or power supplies.
Note: Overheating or loose connections can cause motors to skip steps and shift layers.
Remove Obstructions
Physical blockages can stop the print head from moving. You can fix layer shifting by removing anything in the way. Here is a table of common obstructions and how to solve them:
|
Type of Obstruction |
Description and Solution |
|---|---|
|
Mechanical Issues |
Loose belts, worn pulleys, or unstable build plates. Check and tighten belts and pulleys. |
|
Electrical Problems |
Stepper motors skipping steps or overheating. Ensure proper motor settings and cooling. |
|
Environmental Factors |
Small bumps or vibrations. Place the printer on a stable surface. |
|
Cleaning and Lubrication |
Dust and debris causing resistance. Clean and lubricate rods and bearings. |
|
Printer Stability |
Wobbly printer. Secure the print bed and frame, and use a solid surface. |
Always check for and remove any obstructions before you start a print.
Adjust Extrusion Rate
If your extrusion rate is too high or too low, you may see gaps or extra material that causes the print head to catch. You can fix layer shifting by adjusting the extrusion rate in your slicer settings. Make small changes and test with a simple print. Watch for smooth, even layers.
Secure Eccentric Nuts and Wheels
Loose wheels or eccentric nuts can cause wobble and misalignment. You can fix layer shifting by tightening these parts:
- Check the wheels on the X and Y axes. They should roll smoothly without wobbling.
- Use a wrench to adjust the eccentric nuts until the wheels are snug but not too tight.
- Test the movement by sliding the print head. It should move easily without bumps.
Tip: Secure wheels and nuts to keep your printer steady and your layers aligned.
By following these steps, you can fix layer shifting 3d printing problems quickly and easily. Regular maintenance and careful checks will help you avoid future issues and keep your prints looking great.
Preventing Layer Shifting
Regular Maintenance
You can keep your 3D printer running smoothly by following a regular maintenance routine. Here are the most effective tasks:
- Recalibrate and level the build plate before every print. This helps layers stick well and stay even.
- Remove dust and debris from the build plate and nozzle. Clean surfaces improve bed adhesion.
- Tighten all screws and bolts. Loose parts can cause the printer to shake or shift.
- Lubricate moving parts, such as rods and lead screws. This reduces friction and noise.
- Check and adjust belt tension. Proper tension keeps layers aligned.
For printers used often, check these items every week or two. If you print less, monthly checks are enough. Every few months, do a deeper cleaning and update your software.
Best Practices
You can prevent layer shifting by following expert tips:
- Calibrate stepper motors for accurate movement.
- Inspect and tighten motor fasteners.
- Clean and lubricate the printer during long prints.
- Keep firmware and slicing software updated.
- Perform deep cleaning and inspections regularly.
Tip: Always place your printer on a stable surface to reduce vibrations.
Filament Care
Good filament care helps you avoid many printing problems. Store filament in a dry place to keep it from absorbing moisture. Dry filament sticks better and feeds smoothly. This reduces under extrusion and over extrusion, which can cause layers to shift. Check your filament for tangles or breaks before each print.
Testing After Fixes
After you repair your printer, test it to make sure the problem is gone:
- Inspect hardware like belts, motors, and moving parts.
- Adjust print speed and flow settings in your slicer.
- Clean the nozzle and check the filament for smooth feeding.
- Print a small test object and watch for any shifting.
If you follow these steps, you will prevent layer shifting and keep your prints looking great.
You can stop layer shifting if you do these things: 1. Check the belts and make them tight. 2. Clean the nozzle and all moving parts. 3. Add oil to the axes so they move easily. 4. Slow down the print speed and keep your printer steady. 5. Change motor current and slicer settings if needed.
If you check and adjust your printer often, it will work better. Clean parts and good pieces help your prints turn out well. Take care of your printer so you get strong and neat prints every time.
FAQ
What causes layer shifting in 3d printing?
You may see layer shifting in 3d printing when belts are loose, motors skip steps, or something blocks the print head. Sometimes, high speed or electrical issues also cause this problem. Always check your printer before starting a new 3d printing project.
How do I know if my 3d printing belts are too loose?
If you hear strange noises or see crooked layers during 3d printing, your belts may be loose. Gently press the belt. It should feel tight, like a guitar string. Loose belts often lead to layer shifting in 3d printing.
Can print speed affect layer shifting in 3d printing?
Yes, print speed can cause layer shifting in 3d printing. Printing too fast makes motors miss steps. Lowering the speed helps your 3d printing stay accurate. Try reducing speed by 20% if you notice shifting.
How often should I maintain my 3d printing machine?
You should check your 3d printing machine every week if you print often. Clean and lubricate moving parts. Tighten screws and belts. Regular care keeps your 3d printing smooth and prevents layer shifting.
What should I do if layer shifting happens during 3d printing?
Stop your 3d printing right away. Check for loose belts, blocked paths, or motor issues. Clean the printer and restart the print. Fixing problems early saves time and filament in your 3d printing projects.


