


You may think that the line your 3D printer lays down should always match the size of the nozzle. In reality, line width and nozzle size do not always equal each other. This difference affects how strong, smooth, and reliable your prints turn out. When you look at line width vs nozzle size, you will see that printers work best when you set these values with care. Challenge the idea that these numbers must match every time.
Key Takeaways
- Line width and nozzle size do not have to match. Adjusting line width can improve print strength and quality.
- Set line width between 0.75 and 1.5 times the nozzle size for best results. A common recommendation is 110% of the nozzle size.
- Consider die swell when printing. The melted plastic expands after leaving the nozzle, affecting the final line width.
- Use slicer software to calculate line width based on nozzle size and other settings. Custom adjustments can enhance strength and detail.
- Test different line widths to find the best fit for your project. This helps achieve better adhesion, stronger parts, and improved surface finish.
Line Width vs Nozzle Size
What Is Nozzle Size?
You can think of the nozzle size as the diameter of the small hole at the tip of your 3D printer’s hot end. This hole controls how much melted filament comes out at once. Most consumer FDM 3D printers use nozzle sizes like 0.2 mm, 0.4 mm, 0.6 mm, and 0.8 mm. Each size works best for different types of prints. For example, a 0.2 mm nozzle helps you print fine details, while a 0.8 mm nozzle lets you print large, strong parts faster.
Tip: The nozzle diameter sets the minimum possible line width, but you can adjust the actual line width in your slicer settings.
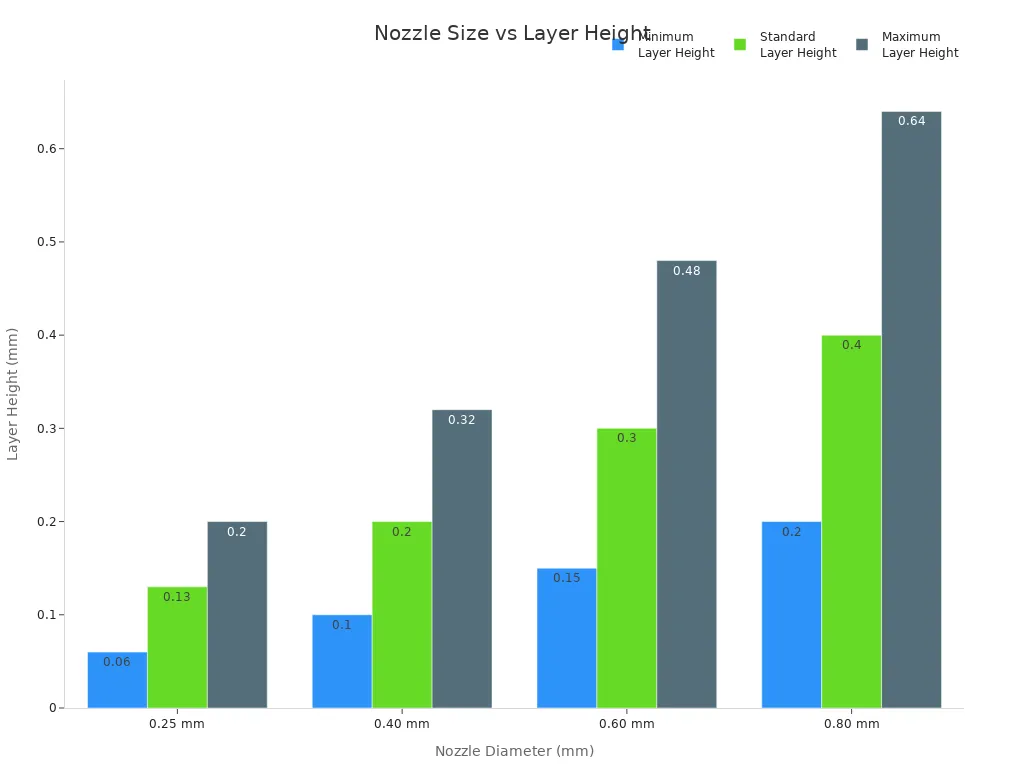
Here is a table showing common nozzle diameters and the layer heights you can use with them:
|
Nozzle Diameter |
Minimum Layer Height |
Standard Layer Height |
Maximum Layer Height |
|---|---|---|---|
|
0.25 mm |
0.06 mm |
0.13 mm |
0.20 mm |
|
0.40 mm |
0.10 mm |
0.20 mm |
0.32 mm |
|
0.60 mm |
0.15 mm |
0.30 mm |
0.48 mm |
|
0.80 mm |
0.20 mm |
0.40 mm |
0.64 mm |
What Is Line Width?
Line width is the width of the plastic line your printer lays down on each pass. You set this value in your slicer software. The slicer uses this number to plan how many lines to print and how much filament to push through the nozzle. Most of the time, the line width is close to the nozzle size, but it does not have to be exactly the same.
You measure line width in millimeters, just like nozzle size. If you want a line width that is different from your nozzle diameter, you need to change the extrusion flow. Most experts suggest keeping the line width between 0.75 and 1.5 times the nozzle size for best results.
- The line width controls how much plastic covers each layer.
- The slicer uses the line width to calculate how many lines fit in each part of your print.
- You can adjust the line width to make your prints stronger or to improve surface finish.
Why They Differ in Practice
Many people believe that line width and nozzle size must always match. This is a common misconception. In reality, the relationship between line width vs nozzle size is more flexible. You can set the line width to be a bit larger or smaller than the nozzle diameter, depending on what you want to achieve.
Several technical reasons explain why line width vs nozzle size do not always match:
- The way melted plastic flows through the nozzle changes the final width of the line.
- The thickness of each layer affects how much material gets pushed out, which changes the line width.
- The pressure inside the extruder can make the filament spread out more or less as it leaves the nozzle.
When you adjust the line width vs nozzle size, you control the strength, look, and accuracy of your prints. If you set the line width too small for your nozzle, you might get gaps or weak spots. If you set it too large, the lines may squish together and ruin the details.
Note: For most prints, you get the best results when you set the line width to about 110% of your nozzle size. This helps the lines bond well and gives your print more strength.
You can see that line width vs nozzle size is not a simple one-to-one match. You have the power to adjust these settings to fit your project. Understanding the difference helps you make better choices and avoid common printing problems.
Physical Extrusion Effects
Die Swell and Extrusion Shape
When you push melted plastic through a nozzle, the material does not always keep the same shape as the nozzle opening. This happens because of a process called die swell. The plastic, which acts like a stretchy solid and a liquid at the same time, wants to expand after it leaves the nozzle. The molecules inside the filament stretch and build up stress during extrusion. When the material exits, it relaxes and swells outward. This causes the final line width to become wider than the nozzle diameter.
If you do not account for die swell, your printed lines may look too thick or uneven. This can lead to geometric distortions in your print. You may notice that the quality of your printed objects drops if you ignore this effect.
|
Aspect |
Description |
|---|---|
|
Die Swell |
The extrudate diameter differs from the nozzle diameter due to viscoelastic properties of polymers. |
|
Impact on Line Width |
Geometric distortions in printed structures occur if die swell is not accounted for in deposition. |
|
Quality of Printed Objects |
Neglecting die swell leads to poor quality in 3D printed objects. |
Pressure, Flow, and Material Behavior
You control extrusion by changing the pressure and speed at which the filament moves through the nozzle. When you want a wider line, you need to increase the extrusion pressure. This extra force helps the material spread out more as it leaves the nozzle. Higher pressure can also help the layers stick together better, which improves print quality.
- If you use too much pressure, thin areas may deform or sag.
- Extra material from high pressure can drag along the print, causing defects.
- The speed of extrusion flow matters. If you move the nozzle faster, the line becomes narrower. If you slow down, the line gets wider.
You must balance pressure and extrusion flow to get the best results. Each material behaves differently, so you may need to adjust your settings for different filaments.
Limits of Line Width Adjustment
You cannot set any line width you want for a given nozzle. If you try to make the line much wider than the nozzle, you may see poor print quality, especially on the outer surfaces. Wider extrusions can reduce the number of perimeter walls, which may weaken the bond between layers.
- Too wide: The print may look rough and lose detail.
- Too narrow: Gaps or weak spots may appear between lines.
Stay within the recommended range for line width. Most slicers suggest a width between 0.75 and 1.5 times the nozzle size. This keeps your extrusion stable and your prints strong.
Tip: Always check your print after changing extrusion flow or line width. Small changes can make a big difference in quality.
Slicer Settings and Line Width
How Slicers Calculate Line Width
When you use slicer software like Cura or PrusaSlicer, the program calculates line width based on your nozzle size and other print settings. The slicer looks at factors such as temperature, flow rate, and speed to decide how much plastic to push out for each line. Most slicers set a default line width that matches or slightly exceeds the nozzle diameter. For example, if you use a 0.4 mm nozzle, the slicer may suggest a line width of 0.4 mm or 0.42 mm. This helps improve overlap between lines and gives better print quality, especially for overhangs.
- Slicers use complex math to plan how lines overlap and fill gaps.
- A line width above the nozzle size can make parts stronger and help with faster printing.
Developers often keep the calculation method simple for users, but you can still adjust the line width if you want to fine-tune your prints.
Default vs Custom Widths
You can choose to use the default line width or set your own custom value. The default works well for most prints, but custom settings let you control strength, detail, and surface finish.
- A wider line width increases strength and bonding between layers, but it may show more ridges and lose fine details.
- A narrower line width gives a smoother surface and better detail, but it can cause under-extrusion and weak spots if set too low.
If you change the line width, always check your print for issues like gaps or poor adhesion.
Recommended Ranges (e.g., 110% of Nozzle)
Experts recommend setting line width between 100% and 120% of your nozzle size. Many users find that 110% works well for most prints. For example, with a 0.4 mm nozzle, a line width of 0.44 mm helps improve bonding and surface quality.
- Outer walls: 105-120% of nozzle size for best appearance.
- Infill: 105-115% for strong bonding.
- Top layers: 100-105% for a smooth finish.
- Support: 100% for easy removal.
Choosing the right line width helps you get strong, reliable, and high-quality prints.
Print Quality and Strength
Adhesion and Layer Bonding
You want your 3D prints to stay together and last a long time. The way each line of plastic sticks to the next is called adhesion. Good adhesion means the layers bond well and your print does not break easily. When you set the line width, you control how much each line overlaps with the one next to it. If you choose a line width that is too narrow, the lines may not touch enough. This can cause weak spots or gaps. If you pick a line width that is too wide, the lines can squish together and lose detail. You should aim for a balance so that each line bonds tightly with its neighbors. This helps you get strong prints with good quality.
Impact on Strength and Reliability
Line width affects the strength and reliability of your prints. When you change the line width, you change how much plastic fills each layer. A study shows that mechanical strength depends on production settings like line width. Researchers tested different line widths from 0.25 mm to 0.40 mm and found that these changes impact the mechanical properties of printed parts. If you use a wider line, you can make your print stronger because the lines have more area to stick together. If you use a very narrow line, the print may break more easily. You should test different settings to find what works best for your project. This will help you improve the quality of your prints.
Surface Finish and Accuracy
The line width you choose also changes how your print looks and how accurate it is. If you want a smooth surface, you can use a smaller line width. This lets your printer make fine details and sharp corners. If you use a wide line, the surface may look rough or lose small features. You may also see rounded edges in places that should be sharp.
A carefully chosen line width can greatly improve the surface finish of your prints. Finer lines can print in tighter concaved areas. However, if the lines are too thick, you may notice some concave features become rounded to fit the wider lines.
You should think about the shape and size of your model when you set the line width. This helps you get the best print quality and the right level of detail.
You now know that line width and nozzle size do not always match in 3D printing. The nozzle controls the minimum line width, but you can set the line width above the nozzle size to improve print strength and first layer adhesion. Research shows that changing the line width from 1.2 mm to 1 mm increases shear strength from 12.5 MPa to 15.1 MPa. This means you can make your prints stronger by adjusting the nozzle and line width settings. The table below shows how different line widths affect strength and adhesion:
|
Line Width (%) |
Effect on Strength and Adhesion |
|---|---|
|
110% - 120% |
Promotes better fusion between adjacent lines and layers, increasing part strength. |
|
120% - 150% |
Generally improves layer adhesion and overall part strength due to more forceful squishing of extruded lines. |
|
150% - 200% |
Can produce parts nearly as strong or stronger than using more perimeters with standard line width, often in less print time. |
You should avoid setting the line width below the nozzle size, as this can cause gaps and weak spots. Setting the line width above 150% of the nozzle can lead to over-extrusion and defects. Different slicers may calculate extrusion width in unique ways, so always test your settings. For fine details, use 80%–90% of the nozzle size. For functional parts, use 110%–120%. For standard prints, use 100%. Adjusting the nozzle and line width helps you control material flow and print quality. Try different settings to find what works best for your printer and material. You will see better adhesion, stronger parts, and improved surface finish.
FAQ
What happens if you set the line width smaller than the nozzle size?
You may see gaps or weak spots in your print. The filament cannot fill the space well. This can cause poor layer bonding and weak parts. Always keep the line width close to or above the nozzle size.
Can you use a line width much larger than the nozzle size?
You can set a wider line width, but do not go too far. If you set it too wide, the lines may squish together and lose detail. Prints may look rough. Stay within 1.5 times the nozzle size for best results.
Does changing line width affect print speed?
Yes, a wider line width can help you finish prints faster. The printer covers more area with each pass. Narrow lines take longer because the printer needs more passes to fill the same space.
How do you choose the best line width for your project?
Think about what you want. For strong parts, use a line width about 110% of the nozzle size. For fine details, use a smaller width. Test different settings to see what works best for your printer and material.
Will changing line width affect the first layer adhesion?
Yes, line width changes can help the first layer stick better. A slightly wider line gives more surface area. This helps the print stick to the bed and reduces the chance of warping or lifting.


