


When you print something, bulging or rounded corners can be easy to see. These corners look puffed up or a little curved, not sharp and neat. You may notice extra material at the edges. This makes the print lose its clean shape. Some common reasons for this issue in corner quality 3D printing are die swell, over-extrusion at corners, and cooling shrinkage. The table below shows how these factors change the size and look of your prints.
|
Factor |
Explanation |
|---|---|
|
Die Swell |
The melted filament gets bigger as it leaves the nozzle. This can change the size, especially at corners. |
|
Over-extrusion at corners |
Too much material builds up at the corners. This can make bulges and change the shape and look of parts. |
|
Cooling Shrinkage |
Different materials shrink in different ways when cooling. This can change the final size and look of printed parts. |
You see these problems because the printer has trouble controlling material flow and cooling at corners. Understanding these issues helps you make better choices to improve corner quality in 3D printing.
Key Takeaways
- Bulging corners in 3D prints can happen for a few reasons. Die swell, over-extrusion, and uneven cooling are common causes. Knowing these reasons helps you make better prints.
- You can stop bulging by changing extrusion and flow settings. Adjust the extrusion multiplier to get smooth surfaces. This stops extra material from coming out.
- Cooling and layer timing are very important. Make sure cooling is even. Set the fan speed right to keep corners sharp.
- Bed leveling is needed for good corners. A level bed stops warping. It also helps the first layers stick well.
- Setting pressure advance the right way controls filament flow. This helps when print speed changes. It makes corners sharper and reduces bulging.
Corner Quality in 3D Printing
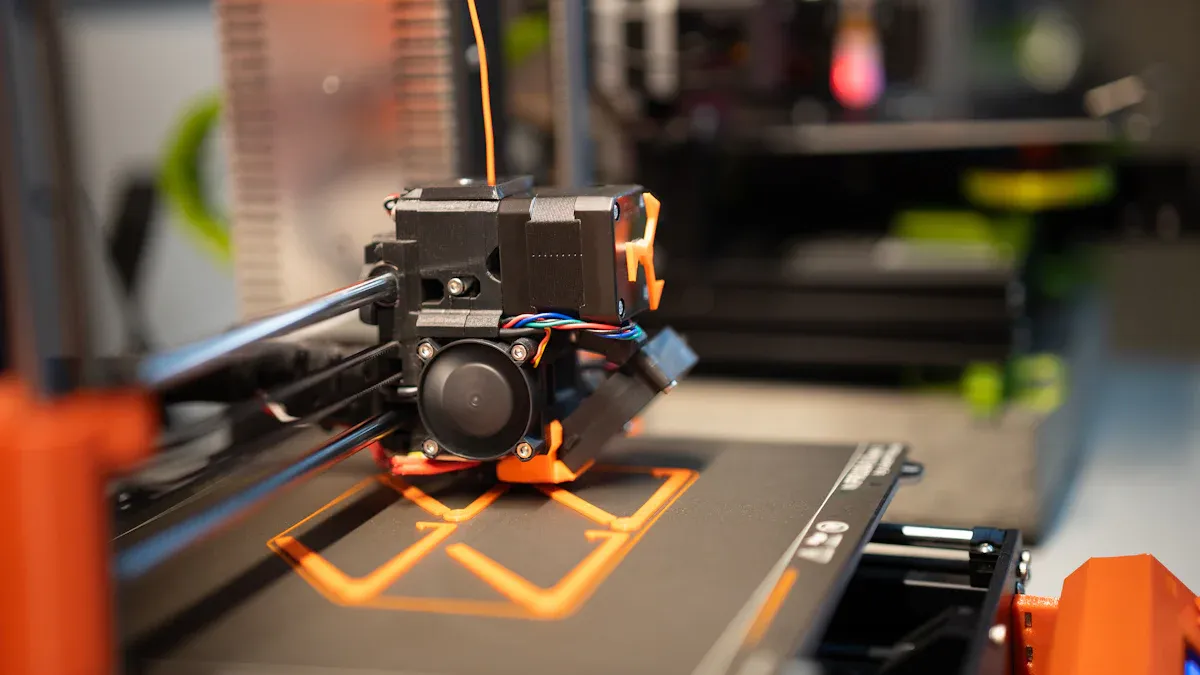
Identifying Bulging Corners
You can find bulging corners by looking for puffed or rounded edges. These spots often show up where two sides meet or at the ends of walls. Sometimes, the first layers stick out and make an "elephant's foot" shape. This happens because the nozzle is round and cannot make perfect square corners. If you see extra material at the corners or your print does not match your design, you probably have poor corner quality 3d printing.
Tip: Look at your print as soon as it finishes. Check the corners and compare them to your digital model. This helps you spot bulging early and change your settings for better corner quality 3d printing.
Material properties matter too. Cooling time, fan speed, and print speed can change how much corners bulge. If cooling is uneven, corners can look bigger than they should. Mechanical problems like loose belts or slicer settings can also change corner quality 3d printing.
Why Sharp Corners Are Hard to Print
Sharp corners are tough for 3D printers because of physics and machine design. When the printer slows down at a corner, melted filament can pile up. This makes extra material collect and causes bulging. The shape of your model matters too. Sharp corners put stress in one spot, which can cause warping or peeling when the print cools. Rounded corners spread out the stress, so they do not bulge or crack as easily.
Cooling makes things harder. As the print cools, it shrinks. Sharp corners shrink unevenly, which can cause warping and poor corner quality 3d printing. Print speed and acceleration also change how well the printer handles corners. Fast moves can make the extruder go too far, while slow speeds let too much material build up.
Knowing these causes helps you make better choices for corner quality 3d printing. When you know what makes corners bulge, you can adjust your printer and model for sharper, more accurate prints.
3D Print Bulging Corners: Causes
If you see 3d print bulging corners, you might wonder why. Many things can make corners bulge. Knowing about each one helps you fix your prints. Let’s talk about the main reasons for bulging corners and how they change your 3d print.
Extruder Slowdown and Pressure Buildup
The printer moves slower at corners. When it slows down, pressure inside the nozzle stays high. This pushes out extra filament and makes corners bulge. Here’s what happens:
- When the printer goes fast, pressure builds up in the nozzle.
- When it slows or stops at corners, the pressure comes out.
- This can cause too much filament and bulging at corners.
You might see more bulging when the printer changes direction fast. Printing at high speeds can make this worse. Some people find that printing at 60mm/s or more helps corners look better if you set pressure advance right. Printing slow, like 20mm/s, does not always fix bulging. This means speed and pressure both matter for bulging.
Over-Extrusion and Material Flow
Overextrusion is when the printer uses too much filament. Extra material gathers at corners and makes them bulge. Blobs show up at corners because the print head slows down but pressure stays high. This makes melted filament ooze out and form bulges.
- Blobs form at corners when the print head slows down and pressure stays high, so extra melted filament oozes out.
- Over-extrusion means too much filament comes out, which makes the print look messy and leaves extra material at the corners.
To stop overextrusion, check your flow rate. For PLA, keep the flow rate under 9 mm³/s with a 0.4 mm nozzle. This helps stop both under-extrusion and bulging. If you see bulging corners, try changing your extrusion multiplier or flow rate.
Uneven Cooling and Layer Timing
Uneven cooling is another reason for bulging corners. If the fan does not cool the print evenly, some parts shrink more. This can make corners bulge or curl. Layer timing matters too. If a layer prints too slow or too fast, the material may not set before the next layer starts.
- Change cooling settings by making layers print faster, maybe from 20 seconds to 1 second.
- Slow down the outside perimeter to 20 mm/s to help stop bulging.
- Use three or four perimeters. Some people get good results at 15 mm/s.
- Check and change print speeds in the slicer so all perimeters print at the same speed.
If you see bulging at corners, try changing cooling or layer timing. This helps the material set right and can stop bulging.
Bed Leveling Issues
A flat print bed is important for good corners. If the bed is not level, the first layers may not stick. This can make the edges lift or warp, causing bulging at corners.
Warping or curling corners happen when the print lifts from the bed because it is not level.
To stop this, clean and level your bed before printing. Calibrate your printer often to keep small parts sharp and make support removal easier. Change your print settings so infill does not show on the outside. These steps help stop bulging and make your prints better.
Pressure Advance Settings
Pressure advance helps control how the printer handles speed and direction changes. If you set it wrong, you can get too little or too much filament at corners. This can make gaps, holes, or bulging corners.
- Wrong pressure advance can cause underextrusion at corners because the extruder pulls back more than it pushes out when changing direction fast.
- High pressure advance can make this worse, causing gaps and holes.
- Lower jerk settings might help but may not stop over-extrusion at corners.
Most printers use a default pressure advance for common materials and a 0.4 mm nozzle. For bigger nozzles, use a lower value or turn it off. Bowden extruders may need a higher value because the filament travels farther. A good starting value for many plastics is about 0.035.
|
Nozzle Size |
|
|---|---|
|
0.4 mm |
0.050 - 1.000 |
|
0.6 mm |
Start around 0.01 or turn off |
|
0.8 mm and up |
Turn off (set to 0.0) |
If you see bulging corners, check your pressure advance settings. Changing them can help you get sharper corners and better prints.
When you know what causes bulging corners, you can make better choices for your printer. Each thing—motion, pressure, material flow, cooling, bed leveling, and pressure advance—matters for bulging. By learning how these work together, you can adjust your printer for sharper, cleaner corners and better 3d prints.
Fix 3D Print Bulging Corners
Bulging corners can ruin the look and accuracy of your 3D prints. You can fix 3d print bulging corners by following practical solutions for each cause. Let’s break down the steps you need to take.
Adjust Extrusion and Flow Settings
You control how much filament your printer uses by adjusting extrusion and flow settings. If you use too much, you get bulging at corners. If you use too little, you see gaps and weak spots.
Step-by-step solutions:
- Enable the flow setting for each test cube in your slicer.
- Adjust the extrusion multiplier (EM) for each cube.
- Save your project for future reference.
- Print the cubes and inspect them for smoothness and gaps.
- Fine-tune the EM in small intervals, such as 0.5%, until you see smooth surfaces without overflow.
Tip: Look for smoothness on the top of your printed cube. If you see valleys or gaps, your EM is too low. If you see overflow or bulging, your EM is too high.
Start with a 100% flow rate. Adjust by 5% up or down if you see over-extrusion or under-extrusion. If the extrusion ratio is too small, layers may not stick, causing cracks. If it is too large, you get bulging and loss of detail. The Extrusion Multiplier fine-tunes the flow rate and helps you fix 3d print bulging corners.
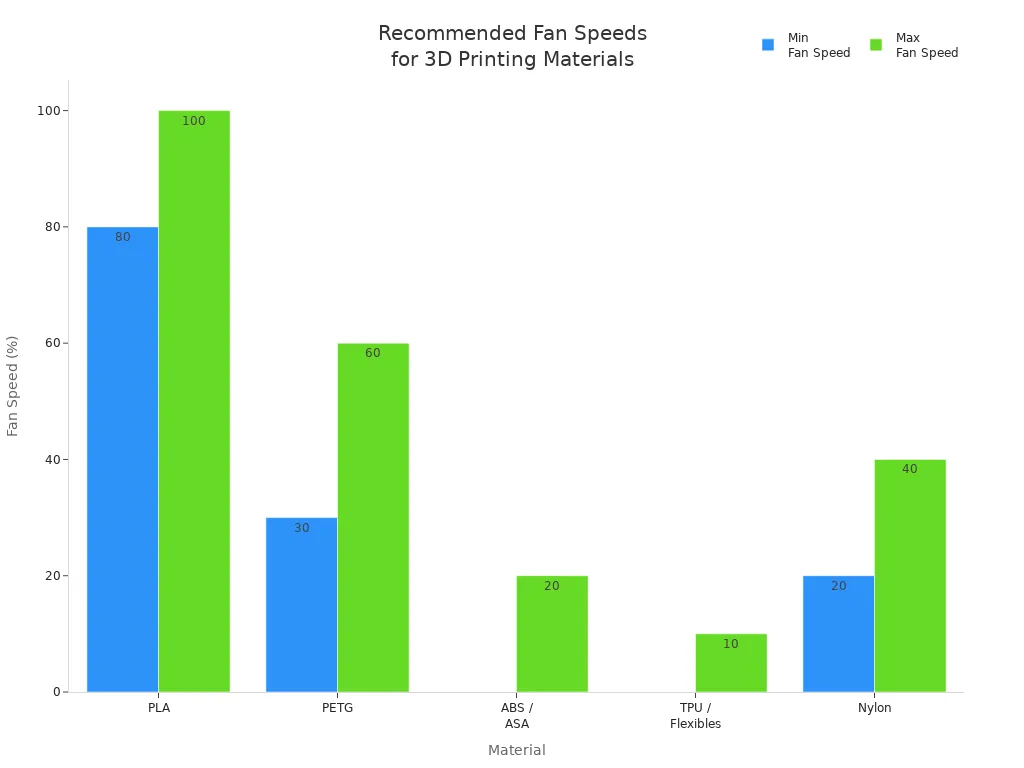
Optimize Cooling and Layer Timing
You need to use cooling system properly to prevent bulging. Cooling fan speed and layer timing affect how quickly the filament sets and how sharp your corners look.
|
Material |
Why This Cooling Level Works |
Risks of Too Much Cooling |
Risks of Too Little Cooling |
|
|---|---|---|---|---|
|
PLA |
80–100% |
Rapid solidification prevents drooping and ensures crisp details. |
Brittle prints, poor layer adhesion |
Stringing, sagging, blobs |
|
PETG |
30–60% |
Gentle airflow prevents stringing and keeps layers strong. |
Layer splitting, weak bonds |
Stringing, overheating, blobs |
|
ABS / ASA |
0–20% |
Minimal fan use avoids warping and thermal stress. |
Cracking, curling |
Overheating, loss of features |
|
TPU / Flexibles |
0–10% |
Low airflow keeps extrusion smooth. |
Brittle, uneven layers |
Deformed prints, sticky extrusion |
|
Nylon |
20–40% |
Balanced cooling reduces warp and keeps bonding strong. |
Reduced strength |
Warping, distorted shapes |
Adjust the minimum layer time so each layer cools before the next one starts. This prevents warping and sagging. If cooling time is too short, corners curl or bulge. Proper cooling ensures strong layer adhesion and better print quality.
- Set the minimum layer time in your slicer.
- Slow down the print speed for outer perimeters.
- Use three or four perimeters for better corner strength.
Tune Speed, Acceleration, and Jerk
Speed, acceleration, and jerk settings control how your printer moves. If these are too high, you get bulging at corners. If they are too low, prints take longer and may lose detail.
- Lower jerk to 8–10 mm/s.
- Set acceleration to 1500 mm/s².
- Adjust jerk to balance sharp corners and reduced ringing.
Changes in print speed can cause thermal expansion and contraction, especially on solid layers. Bulging can happen on both the skirt and main object. You can manually edit G-code to keep a consistent feedrate, which helps control bulging.
Note: Consistent speed helps the extruder maintain even pressure, reducing bulging at corners.
Level the Bed and Improve First Layer
Leveling is key for sharp corners. Improper print bed leveling leads to bulging and poor adhesion. You need to calibrate the print bed before every print.
Best practices for leveling:
- Use the Four Corner Paper Method to level the bed and set the Z offset.
- Slide a piece of paper under the nozzle at each corner. Adjust screws until you feel slight resistance.
- Use mesh bed leveling to fix any bumps or dips in the bed surface.
Adjust the first layer height. If it is too low, the layer gets squished and causes a bulge at the bottom, known as elephant’s foot. Increase the first layer height, but make sure the layer sticks well.
Tip: Always check the first layer after starting a print. A good first layer prevents bulging and makes support removal easier.
Set Pressure Advance Correctly
Pressure advance helps control filament flow when the printer changes speed or direction. If you set it wrong, you get bulging, gaps, or holes at corners.
Step-by-step solutions:
- Fine-tune your first layer for best print quality.
- Test at higher speeds to see how pressure advance affects bulging.
- Run calibration tests for each filament type.
- Use the latest slicer software for better calibration tools.
- Check your printer for hardware issues before calibration.
- Repeat tests if you do not get good results.
- Write down your settings and results for future use.
Firmware updates improve control over nozzle pressure. Calibration routines help set the K-Factor, which affects pressure advance. Pressure advance compensates for pressure changes during speed changes, keeping flow uniform and preventing bulging.
Tip: Print a calibration pattern and inspect the corners. Adjust the K value until you see the cleanest, sharpest corners.
You can fix 3d print bulging corners by following these solutions. Adjust extrusion and flow, optimize cooling and layer timing, tune speed and movement, level the bed, and set pressure advance correctly. Each step helps you control bulging and improve corner quality. When you understand the causes, you make better decisions and get sharper, more accurate prints.
You can make corners look better if you know why bulging happens. Pay attention to how your printer works, how much filament comes out, and how it cools. Try these ideas:
- Make sure all bearings move easily and bolts are tight.
- Keep the room at the same temperature so prints do not warp.
- Change flow and extrusion temperature to help layers stick.
Most people get better prints after trying a few times. Every change helps you get sharper and more exact corners. Be patient and keep testing. Learning more helps you get better prints each time.
FAQ
Why do corners bulge more on the first layer?
You see more bulging on the first layer because the nozzle presses filament down. The bed may not be level. Heat causes the filament to spread out. This makes corners look wider and less sharp.
How can you tell if over-extrusion causes bulging?
Check for thick lines and blobs at corners. If you see extra material or rough edges, you likely have over-extrusion. Adjust the flow rate or extrusion multiplier to fix this issue.
Does print speed affect corner sharpness?
Yes. High print speed can cause the extruder to overshoot corners. Slow speed lets more filament build up. You need to find a balance for your printer and material.
What is pressure advance, and why does it matter?
Pressure advance helps control filament flow during direction changes. You set it in your firmware or slicer. Correct settings reduce bulging and improve corner quality.
Can cooling settings change how corners look?
Cooling settings affect how fast filament hardens. Strong cooling keeps corners sharp. Weak cooling lets filament sag or bulge. Adjust fan speed for your material.
Tip: Test different cooling levels on small prints to see what works best for your setup.
|
Problem |
Quick Fix |
|---|---|
|
Lower flow rate |
|
|
Rough edges |
Adjust cooling |
|
Gaps at corners |
Tune pressure advance |
You improve print quality when you understand these causes. Careful tuning helps you get sharper corners and better results.


