


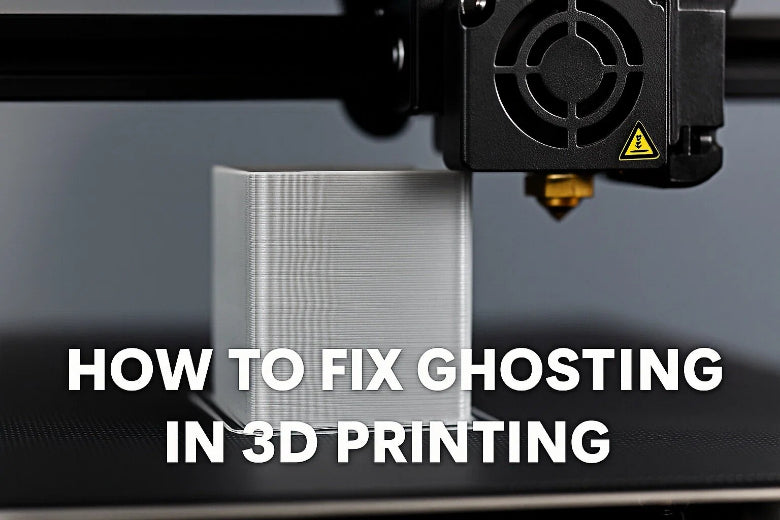
You can fix ghosting on your 3D printer by tightening loose parts, slowing down print speed, and stabilizing the machine. 3d printer ghosting, also called ringing, happens when you see faint lines or shadows near sharp corners or details on your print. Loose belts, high speeds, or vibrations often cause ghosting. Reducing ghosting will help you get cleaner and more accurate 3D prints.
Key Takeaways
- Make sure belts are tight and the frame is secure. This helps stop vibrations and ghosting in your prints.
- Slow down print speed and lower acceleration settings. This helps reduce shaking and makes prints look better.
- Put damping pads or mats under your printer. These help soak up vibrations and keep your printer steady.
- Check and take care of your printer often. This helps stop ghosting and keeps your printer working well.
- Print test models after you make changes. This helps you see improvements and adjust your settings.
What Is 3D Printer Ghosting
Ghosting Meaning
You may notice that sometimes your 3D prints show faint lines or ripples, especially near sharp corners or detailed features. This problem is called 3d printer ghosting. People also call it ringing or echoing. Ghosting happens when your printer’s moving parts shake or vibrate as they change direction. These small movements create repeated patterns or shadows on the surface of your print.
- Ghosting looks like faint, wavy lines or ripples that follow the shape of your model.
- You often see these lines near corners or where the printer has to stop and start quickly.
- The patterns repeat, almost like an echo of the original shape.
You can think of ghosting as a kind of “echo” left behind after your printer moves too fast or parts are not tight enough. If you run your finger over the print, you might feel these tiny waves.
Ghosting Print Effects
Ghosting in 3D printing can make your finished parts look less sharp and less professional. The most visible signs include:
- Faint wavy lines that appear on flat surfaces
- Repeating patterns that show up near corners or detailed edges
- Shadows or blurred outlines that make text or logos hard to read
For example, if you print a cube, you might see extra lines running parallel to each edge. If you print a part with letters, the letters may look fuzzy instead of crisp. Ghosting does not usually make your print fall apart, but it does lower the quality and can hide fine details.
Tip: If you see these patterns only on one side of your print, check the movement of that axis. Sometimes, ghosting shows up more on the X or Y axis, depending on which part of the printer is loose or vibrating.
When you fix ghosting, your prints will have smoother surfaces and sharper details. This makes your models look better and work better for their intended use.
Common Causes of 3D Printing Ghosting
Knowing what causes ghosting helps you make better prints. Ghosting usually happens because of problems with parts or settings. Here are some main reasons you might see ghosting.
Loose Belts or Frame
If belts are loose, parts can shake. When this happens, the print head might not stop in the right spot. This makes light lines or waves on your print. If the frame is not steady, it can move during fast printing. This causes uneven layers and ghosting marks.
- Loose belts make parts shake and cause ghosting.
- A shaky frame makes the printer vibrate and leaves ripples.
Tip: If ghosting is only on one side, check that belt and frame first.
High Speed and Acceleration
Printing too fast or using high acceleration can make the printer shake. If you set the speed high, motors work harder and can miss corners. This makes ringing or ghosting. The table below shows how speed and acceleration change ghosting:
|
Acceleration/Jerk Setting |
Print Speed |
Surface Defects |
Maintenance Needs |
|---|---|---|---|
|
Higher |
Faster |
More ringing/ghosting |
Increased |
|
Lower |
Slower |
Reduced ringing/ghosting |
Decreased |
If you see more ghosting after going faster, try slowing down the speed and acceleration.
Unstable Bed or Base
If the base is wobbly or not flat, the printer can shake. These shakes move up to the print head and make ripples or ghosting.
- A wobbly base can move during printing and make ripples.
- An unstable table can shift layers and make ghosting worse.
Always put your printer on a flat, strong table to help stop these problems.
Worn Parts and Vibrations
Parts like belts and rollers can wear out over time. Old parts do not move smoothly and can shake more, causing ghosting. Cleaning and checking your printer often helps stop these problems.
- Clean and check your printer every day and week.
- Oil moving parts and look at belts for damage.
Note: Taking care of your printer stops ghosting and helps it last longer.
You can find ghosting by looking for repeating lines near corners or details. When you know what causes ghosting, you can fix your prints and have less ghosting.
Fix Ghosting: Step-by-Step Guide
If you want to fix ghosting on your 3D printer, follow these steps. Each one helps you check the mechanics and improve print quality. You will learn how to check the belts, secure the frame, adjust the speed, and more. These best practices to prevent ghosting will help you get smoother prints.
Inspect and Tighten Belts
Loose or worn belts often cause ghosting lines on your prints. You should check the belts on both the X and Y axes.
- Look at the belts for any slack or signs of wear.
- If you find the belts loose, tighten them gently. Do not overtighten, as this can damage the printer.
- For the X-axis, aim for a tension value around 250. For the Y-axis, aim for about 275. A tolerance of plus or minus 15 is okay.
- If the tension drops below 240, loosen the belt. If it goes above 290, tighten it.
- Hold the X-axis motor shaft with pliers and try to move the extruder by hand. The belt should not have any slack.
Tip: Improper belt tension can lead to ghosting. Always check the belts during regular calibration of printer settings.
Secure Frame and Bed
A strong and stable position for your printer helps minimize ghosting. You should check the mechanics of the frame and bed.
- Tighten all screws and bolts on the frame.
- Make sure the printer sits on a flat, sturdy table.
- Check that the bed does not wobble or shift during printing.
- Squaring the frame makes movement more accurate and reduces ghosting in 3D printing.
A stable position keeps the printer steady and allows for smoother movement. This step helps you fix ghosting and get better results.
Lower Print Speed and Acceleration
High speed and acceleration can make the printer shake, causing 3d printer ghosting. You can adjust the speed and acceleration to reduce these effects.
- Start with a lower acceleration value, such as 500 mm/s².
- Gradually increase the value if you want faster prints, but always check for ghosting.
- Halve the Max X & Y acceleration as a quick test to see if ghosting improves.
- Adjust the speed to a slower setting if you see ghosting lines.
Example: If your normal print speed is 60 mm/s, try lowering it to 40 mm/s. Watch for changes in ghosting.
Lowering these values helps the printer move smoothly and reduces vibrations.
Adjust Jerk Settings
Jerk settings control how quickly your printer changes direction. High jerk values can cause sudden movements and ghosting.
- Set jerk values between 5 mm/s and 10 mm/s for both X and Y axes.
- Lower jerk settings if you see ghosting marks after sharp corners.
- Adjust the speed and jerk together for the best results.
Jerk settings impact ghosting by making movements smoother. Lower values help minimize ghosting and improve print quality.
Add Damping Pads or Mats
Vibrations from the printer can travel through the table and cause ghosting in 3d printing. You can use damping pads or mats to absorb these vibrations.
- Place a thin rubber mat under your printer to keep it steady.
- Try anti-vibration feet, but know they may not work for every setup.
- For extra stability, put your printer on a concrete paver.
A solid base and stable position help reduce ghosting and make your prints look better.
Print and Check Test Model
After you make changes, print a test model to see if you fixed the ghosting problem.
- Choose a model with sharp corners and flat surfaces, like a calibration cube.
- Compare the print before and after your adjustments.
- Look for ghosting lines near corners or details.
Note: If you still see ghosting, repeat the steps above and check the mechanics again.
Printing test models helps you track your progress and find what works best for your printer.
By following these steps, you can fix ghosting and improve your 3D prints. Always check the belts, secure the frame, adjust the speed, and use a stable position. Regular calibration of printer settings and careful observation will help you minimize ghosting and get the best results.
Advanced Ways to Minimize Ghosting
Upgrade Belts and Frame
You can make your printer work better by changing some parts. Try these ideas:
- Put in stronger belts so they do not get loose. This helps the printer move just right.
- Use smooth bearings to make the printer move quietly and easily.
- Get good motors to stop shaking and make prints look nicer.
- Pick a better hotend to keep the filament coming out smoothly.
These changes help your printer shake less. You will see sharper corners and smoother sides on your prints.
Use Input Shaping or Firmware
Input shaping in firmware helps control shaking that causes ghosting. When the printer turns fast, shaking can happen. Input shaping changes how the printer speeds up and slows down. It breaks movement into steps to fight shaking. You can change M593 values to adjust how the printer moves. This helps stop ringing and makes prints cleaner, even when printing fast. You will see fewer wavy lines and better details.
Apply Mesh Modifiers
Mesh modifiers let you change print settings for certain spots. You can:
- Make infill thicker or walls stronger for better support.
- Make corners or thin parts stronger so they do not move.
- Change settings for tricky shapes to stop ghosting.
Mesh modifiers help you fix problem areas and make prints look better. Your prints will look more professional and have fewer mistakes.
Reduce Fan and Motor Vibrations
Fans and motors can shake and mess up your prints. You can lower these shakes by:
- Using coatings that soak up shakes and make things quieter.
- Putting special covers on motors to cut down noise.
- Adding rubber or silicone pads between motors and mounts.
- Using mounts that block shakes and keep things steady.
- Checking and fixing loose parts and changing old ones often.
These steps help your printer stay quiet and steady. You will see less ghosting and get smoother prints.
Tip: Print a test cube before and after making changes. Look at the surfaces to see if ghosting got better.
To fix ghosting, you need to do a few things. Tighten the belts so they are not loose. Make sure the frame is strong and does not move. Lower the speed if your printer shakes. Change the jerk settings to help the printer move smoother. Try one step at a time and print a test model after each change. Small changes can help a lot. Write down what you do so you remember what works. Check your printer often and change old parts when needed. This keeps your printer working well. If you see ghosting on one side, look at prints before and after you make changes. This helps you see if things got better. Take your time and check everything. This will help you get sharp and clean prints with less ghosting.
|
Impact on Performance |
|
|---|---|
|
Routine inspections |
Stops problems from getting worse |
|
Replacing worn parts |
Keeps the printer working well |
|
Upgrading components |
Makes the printer last longer and work better |
FAQ
What is the fastest way to spot ghosting on a 3D print?
You can spot ghosting by looking for faint, wavy lines near sharp corners or detailed features. These lines often repeat and look like echoes of the original shape. Use a calibration cube to check for these patterns.
Can changing filament type help reduce ghosting?
Changing filament type does not usually fix ghosting. Most ghosting comes from mechanical issues or printer settings. Focus on tightening belts, securing the frame, and adjusting speed for better results.
How often should you check your printer for ghosting issues?
Check your printer for ghosting every few weeks or after moving it. Regular checks help you catch problems early. Print a test model if you notice changes in print quality.
Does print orientation affect ghosting?
Yes, print orientation can affect ghosting. You may see more lines on one axis if that side has loose parts or more vibration. Try rotating your model and compare the results to find the best orientation.
Will upgrading my printer always remove ghosting?
Upgrading parts can help, but you still need to set up your printer correctly. Even with new belts or frames, loose screws or high speeds can cause ghosting. Always check your setup after upgrades.


