


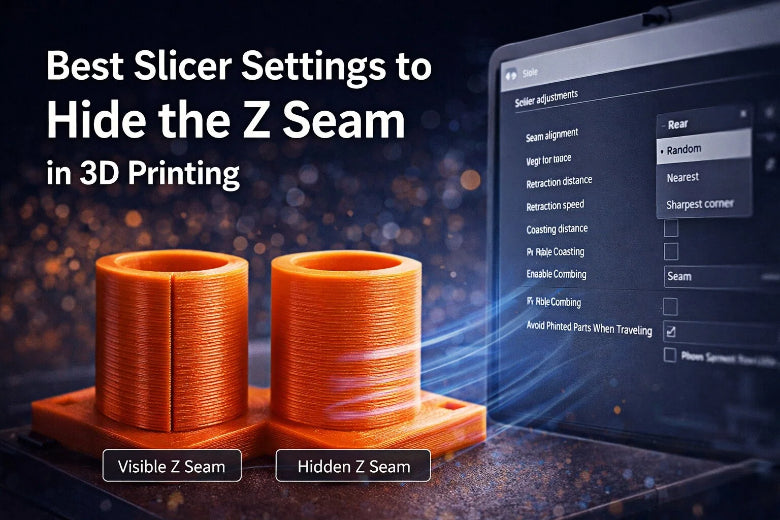
If you want to hide the seam on your 3d print z seam, you need to adjust slicer settings that control where each new layer starts. The Z seam is a thin line that forms when your printer moves up to the next layer. It can show up as a visible streak or even small blobs if the settings are off. You can use different z seam placement options to make the seam less noticeable. Some slicers let you pick where the seam goes, like on the nearest edge, aligned for a smooth look, random spots, or hidden at the rear. Changing these settings helps you get cleaner prints with fewer seam lines and zits.
Key Takeaways
- Change z seam placement to hide seams well. Put the seam in the back for models you want to show. Use random placement for round shapes.
- Fix retraction settings to stop blobs at the z seam. Make the retraction distance longer. Turn on coasting and wipe features.
- Try different slicer settings like seam alignment modes. Pick 'nearest' or 'sharpest corner' to blend seams better.
- Think about using advanced methods like ironing and chemical smoothing. These ways can make your prints look much better.
- Always test with small prints after you change settings. This helps you find the best settings for your model and filament.
Z Seam Placement Strategies
When you start 3D printing, you notice the z seam right away. This line shows where each layer begins and ends. Z seam placement matters because it can change how your print looks and feels. If you want a smooth finish, you need to think about where the seam goes. The model’s shape and print orientation also play a big role. The nozzle pauses at the end of each layer, and this pause can leave a blob. By adjusting z seam placement, you can move these blobs to less visible spots.
Rear vs. Random Placement
Let’s look at two popular z seam placement options. You can choose rear z seam or random z seam. Rear z seam puts the line at the back of your model. This works well for display pieces because you hide the seam from the front view. Random z seam spreads the seam around the model. This makes the seam less obvious, but you might see small bumps or zits on the surface.
|
Seam Placement Type |
Description |
|---|---|
|
Rear Z Seam |
Positioned close to the back of the print, helping to hide it from view, especially for display models. |
|
Random Placement |
Spreads the seam across different points on each layer, making it less noticeable but may cause small bumps or zits on the surface. |
You should pick rear z seam for models with a clear front and back. Random z seam works better for round shapes without sharp edges.
Sharpest Corner and Nearest Options
Some slicers let you use seam corner preference. You can set the z seam to start at the sharpest corner or the nearest edge. The sharpest corner option hides the seam in a spot where it blends in with the model’s lines. Nearest edge makes the seam follow the shortest path, which can help with mechanical strength. Studies show that overlapping seams at corners improves polymer diffusion and makes your print stronger.
Impact on Surface Finish
Z seam placement affects how smooth your print looks. If you put the seam on a flat surface, you see blobs and lines. Moving the seam to a corner or the rear hides these marks. Good retraction settings also help. When you combine smart z seam placement with the right slicer settings, you get a cleaner, more professional finish.
Tip: Try different z seam placement strategies on test prints. You’ll see which one works best for your model’s shape and purpose.
Slicer Settings for Z Seam
Getting the z seam to disappear takes more than just picking a spot on your model. You need to tweak a few slicer settings to get the best results. Let’s break down the most important options and how you can use them to hide the seam and get a smooth finish.
Seam Alignment Modes
You can control where the z seam appears by choosing different seam alignment modes in your slicer. Each mode changes how the seam looks on your print. Here’s a quick look at the most common options:
|
Description |
Influence on Z Seam Visibility |
|
|---|---|---|
|
Nearest |
Picks the closest edge or corner for the seam. |
Hides the seam in sharp corners or angles. |
|
Aligned |
Lines up the seam from bottom to top. |
Makes a straight vertical seam, easy to spot. |
|
Back |
Puts the seam at the back of your model. |
Hides the seam from the front view. |
|
Random |
Moves the seam to different spots on each layer. |
Breaks up the seam but can cause bumps or zits. |
|
Scarf seam |
Overlaps the seam for a smoother look. |
Reduces seam visibility, but may slow down prints. |
|
Sharpest corner |
Places the seam in the sharpest corner. |
Makes the seam blend into the model’s lines. |
You’ll find these options in most slicers, including Cura settings. If you want to hide the z seam, try the “nearest” or “sharpest corner” mode for models with lots of edges. For display pieces, “back” works well. If you print round objects, “random” can help, but watch out for small bumps.
Tip: For high-detail prints, use “scarf seam” or “aligned” if you want a uniform vertical seam. For models with lots of corners, “nearest” or “sharpest corner” will hide the seam better.
Retraction and Wipe/Coast
The z seam can look messy if your printer leaves blobs or strings at the layer start. You can fix this by adjusting retraction settings and using wipe or coast features.
- Retraction pulls the filament back before the nozzle moves. This stops oozing and stringing, which makes the z seam cleaner.
- Wipe moves the nozzle along the last bit of the path while retracting existence. This helps clean the nozzle tip and reduces blobs at the seam.
- Coasting stops the extruder just before the end of a layer. The leftover pressure in the nozzle finishes the line, which prevents extra material from building up at the z seam.
Here’s how you can tune these settings:
- Start by adjusting retraction settings. Increase the retraction distance if you see blobs, but don’t go too high or you’ll get gaps.
- Enable coasting if your slicer supports it. Set a small coasting distance (like 0.2–0.5 mm) to start.
- Turn on wipe if you see small zits or rough spots at the seam. Try a wipe distance of 5–10 mm.
- Test your print. If you still see issues, tweak the settings a little at a time.
- Wiping during retraction helps clean the nozzle, which minimizes imperfections at the z seam.
- The length of fast retraction before a wipe can affect the z seam appearance. Start with the default value and adjust if needed.
- Wiping while retracting moves the nozzle along the last extrusion path, which helps to minimize blobs and improve the z seam.
Note: If you use both wipe and coasting, make small changes and test often. Too much can cause under-extrusion.
Wall Order and Layer Start
The order in which your printer lays down the walls and where each layer starts can change how the z seam looks. You can use these settings to hide the seam or make it less obvious.
- Outer wall first: Printing the outer wall first can make the z seam sharper but more visible. Printing the inner wall first can help blend the seam into the model.
- Layer start position: Some slicers let you pick where each layer starts. You can set this to the back, a corner, or a custom spot. This gives you control over where the vertical seam appears.
- Travel path optimization: Shorter travel paths can reduce stringing and blobs, which helps hide the z seam.
Here’s a step-by-step guide:
- In your slicer, look for the wall order setting. Try “inner wall first” if you want to hide the seam.
- Set the layer start position to the back or a sharp corner for best results.
- Use travel path optimization to keep the nozzle moving smoothly and avoid extra blobs.
Some new slicer features, like “Z Seam On Vertex” and “Seam Overhang Angle” in Cura settings, give you even more control. You can place the seam on a specific vertex or avoid putting it on overhangs. This helps you get a cleaner finish, especially on tricky models.
Tip: For the best results, combine smart seam alignment, good retraction and wipe/coast settings, and careful wall order. Test small prints to see what works best for your printer and filament.
You can use these slicer settings to control the z seam and get a professional look on your 3D prints. With a little practice, you’ll know exactly how to hide the seam, whether you want a perfect display model or a strong mechanical part. Don’t forget to experiment and take notes on what works best for your setup. The right settings can make your vertical seam almost invisible.
Advanced Techniques to Minimize Z Seam
You can make your 3D prints look even better by using special tricks to hide the z seam. These tricks help when regular slicer settings do not work well enough. Here are three ways to get a smoother finish.
Ironing for Seam Reduction
Ironing is a neat tool in many slicers. It helps smooth the top layer of your print. The nozzle moves over the finished surface and puts out a tiny bit of filament. This fills small gaps and softens lines, so the z seam is harder to see.
- Ironing makes the top of your model smoother.
- The nozzle stays at the same height after the top layer and adds more material to fill spaces.
- This step blends the top lines together and makes them look smoother.
If you want smooth spiral shapes, try ironing with spiralize outer contour or vase mode. You will notice a big change in how flat tops look.
Tip: Ironing works best on models with big flat areas. Test it on a small print before using it on something large.
Lowering Temperature and Speed
You can also hide the z seam by printing at a lower temperature and slower speed. Printing slowly gives the filament more time to cool and settle. This stops blobs and zits from forming along the z seam.
- Lowering print temperature and speed helps stop blobs and zits, which often show up at the z seam.
- Slower speed gives more time for the filament to cool and stick, making the z seam look better.
- Reducing print speed by 5 to 10 mm/s can help stop blobs from showing.
If you use vase mode or spiralize outer contour, printing slower makes the z seam even harder to see. You get cleaner lines and a nicer finish.
Note: Always check your filament’s temperature range before changing settings.
Chemical Smoothing Methods
Sometimes you want a perfect finish. Chemical smoothing can help hide the z seam, especially with some materials.
- ABS can be smoothed with acetone vapor, which melts the surface a little and blends lines for a shiny look.
- PETG can be smoothed with solvents like dichloromethane, but you need good airflow and safety gear because it is toxic.
Pick the right method for your filament. Here is a quick guide:
|
Filament Color |
Seam Visibility |
|---|---|
|
Light |
High |
|
Dark |
Low |
|
Matte |
Lower |
|
Shiny |
Higher |
If you want the z seam to show less, use matte or dark filaments. Chemical smoothing works best on ABS and PETG. Always follow safety rules when using chemicals.
Tip: Chemical smoothing is not for every print. Use it for display pieces or when you want a perfect look.
You can use these advanced tricks with smart slicer settings for the best results. Try them and see how much your prints improve.
Troubleshooting Z Seam Issues
Fixing Blobs and Zits
You might notice blobs or zits popping up along the z seam. These little bumps can ruin the look of your print. They usually show up when the printer pauses at the end of a layer or when the plastic flow isn’t controlled well. You can fix z seam problems by tweaking a few settings. Here’s a quick table to help you troubleshoot:
|
Step |
Description |
|---|---|
|
Print at low temperatures |
Lowering the temperature helps stop filament oozing and reduces blobs. |
|
Adjust retraction to prevent stringing and oozing, which cause blobs. |
|
|
Z-Seam settings |
Change start and end points to eliminate z seam blobs. |
|
Use Wipe Nozzle and Coasting |
These features control nozzle pressure and prevent blobs. |
|
Change Seam Position |
Move the seam to a less visible spot to hide blobs. |
If you see thin lines or defects on the surface, try lowering your print speed and temperature. Adjusting retraction and enabling wipe or coasting in your slicer can also help. You can move the seam to a sharp corner or the back of your model to make it less noticeable.
Using Linear Advance
Linear advance is a smart feature that helps control how your printer pushes out filament. It can make the z seam look smoother by balancing the pressure inside the nozzle. When you tweak linear advance, you reduce uneven spots and get a cleaner finish.
Tweaking Linear Advance can help reduce the uneven appearance slightly. But the seam always has to go somewhere with the current capabilities of consumer-grade FFF printing.
You won’t make the z seam disappear completely, but you can make it less obvious. Try small changes and print a test piece to see the results.
Practical Adjustment Checklist
Ready to tackle z seam issues? Here’s a checklist to guide you:
- Lower print temperature and speed.
- Calibrate retraction settings.
- Enable wipe nozzle and coasting.
- Adjust z seam position in your slicer.
- Test linear advance settings.
- Print a small test model after each change.
If you follow these steps, you’ll see fewer blobs and a smoother surface. Keep notes on what works best for your printer and filament. With practice, you’ll know how to fix z seam problems and get professional-looking prints every time.
You can make your prints look great by changing z seam settings. Follow these steps to hide seam lines and get a smoother finish:
- Change retraction settings to stop blobs
- Turn on coasting and wiping for cleaner seams
- Adjust E-steps for better filament flow
- Sand your print after to smooth rough spots
- Try ironing and vase mode for a nicer surface
Testing different slicer choices helps your prints get stronger and more even. Each model needs its own settings, so keep trying until the z seam is hard to see.
FAQ
Where do I find Z seam settings in my slicer?
You can find Z seam settings in the “Shell” or “Walls” section of most slicers like Cura or PrusaSlicer. Look for options called “Z Seam Alignment” or “Seam Position.”
What’s the best Z seam placement for round objects?
Random placement works best for round shapes. It spreads the seam around the model, so you don’t see a straight line. You might notice tiny bumps, but they’re less obvious.
How do I fix blobs at the Z seam?
Try lowering your print temperature and speed. Calibrate your retraction settings. Turn on coasting and wipe features in your slicer. These steps help stop blobs from forming at the seam.
Does filament color affect Z seam visibility?
Yes! Dark and matte filaments hide the seam better. Light or shiny colors make the seam stand out more. If you want a smoother look, pick darker or matte filament.
Can I completely remove the Z seam?
You can’t make the Z seam disappear entirely. You can hide it by using smart slicer settings, careful placement, and advanced techniques like ironing or chemical smoothing. Test different options to see what works best for your model.


