


If you want great 3D prints, you must pay attention to your 3D print cooling strategy. Cooling determines how each layer hardens, which affects the smoothness of the print. It also influences how well the layers adhere to one another and can even impact the strength of your print. When you implement an effective 3D print cooling strategy, you achieve smoother prints and stronger parts. To improve your 3D prints, experiment with different fan speeds and test various cooling times. This approach will help you discover what works best for your specific material and model.
Key Takeaways
- Adjust fan speed based on filament type to enhance print quality. For PLA, use 100% after the first layer; for PETG, set it between 30-50%; and for ABS, keep it low or off.
- Use a part cooling fan to target the filament right after it leaves the nozzle. This improves results for overhangs and bridges.
- Experiment with cooling strategies to find the right balance. Too much cooling can weaken layers, while too little can lead to messy prints.
- Set a minimum layer time in your slicer to allow each layer to cool properly. This helps prevent defects like warping and sagging.
- Regularly maintain your cooling system. Clean fans and check for airflow blockages to ensure consistent print quality.
Why Cooling Is Key for High-Quality 3D Prints
Cooling and Layer Adhesion
You might think that more cooling always means better print quality, but that's not always true. Cooling plays a huge role in how well each layer sticks to the next. If you cool your print too quickly, the layers do not have enough time to bond. This weakens your print and can cause problems like delamination or cracks. Studies show that rapid cooling during printing leads to poor diffusion between filament layers. When this happens, you get larger pores in the shell and weaker parts. The temperature of your print environment matters a lot. If the material cools too fast, the molecular chains in each layer do not have time to connect. This means your print loses strength and durability. On the other hand, if you use the right filament cooling strategies, you give each layer enough time to fuse. This boosts layer adhesion and improves print quality.
You want to find a balance. Too little cooling can make your print look messy, but too much can make it fragile. Try different cooling strategies and see how they affect your results. Good filament cooling strategies help you get strong, smooth prints every time.
Surface Finish and Bridging
Cooling does more than just help with layer adhesion. It also shapes the surface quality and helps with tricky parts like overhangs and bridges. When you use the right cooling strategies, you get smoother textures and sharper details. Cooling controls how fast each layer sets, which affects how well the layers line up. This makes a big difference in the final look of your print.
Here’s a quick look at how cooling affects surface quality:
|
Benefit |
Explanation |
|---|---|
|
Elimination of Warping |
Even cooling reduces the risk of warping, keeping your print in shape. |
|
Smoother Textures |
Good cooling strategies give you finer details and better surface quality. |
|
Better Layer Alignment |
Cooling decides how quickly layers set, which impacts the final look. |
Bridging is another area where cooling strategies matter. When you print a bridge, rapid cooling helps reduce sagging. However, if you cool too fast, you might weaken the bond between layers. Some technical reports point out that high cooling rates, especially when the print does not touch the build plate enough, can hurt layer adhesion. You need to adjust your filament cooling strategies for each print. This helps you get the best print quality, whether you want strong bridges or a smooth finish.
3D Print Cooling Strategy: Hardware and Slicer Settings
When you want to get the best print quality, you need a solid 3d print cooling strategy. Both your hardware and slicer settings play a big role in how your prints turn out. Let’s break down what you need to know to fine-tune your setup for top-notch results.
Fan Types and Placement
The type of fan and where you place it can make or break your print quality. You might not realize it, but airflow direction and coverage matter a lot. Here’s why:
- Proper fan placement helps you avoid warping and sagging, especially with temperature-sensitive materials like PLA.
- Good airflow can boost your print quality by reducing surface roughness by up to 37%.
- If you don’t cool your print evenly, you might see deformations or gaps in your finished part.
- With the right 3d print cooling strategy, you can print faster without losing quality or stability between layers.
You can upgrade your hardware to improve part cooling. Try adding a part cooling fan that targets the filament right after it leaves the nozzle. If you use an enclosure, consider an enclosure cooling system. For bigger or more complex prints, a dual-fan setup can help. Make sure you place your fans to avoid dead zones—spots where air doesn’t reach. Some users find that a 50 mm blower fan cools better than a 40 mm case fan. Adding a fan shroud that spreads air over a wider area can also help you get more even cooling.
Tip: Custom duct designs can improve cooling performance. If your printer only blows air from one side, you might get uneven cooling and rough surfaces. A two-sided airflow setup can give you smoother, more consistent results.
Slicer Settings for Best Print Quality
Your slicer software gives you lots of control over your 3d print cooling strategy. The right settings can make a huge difference in quality. Here’s what you should look at:
- Turn off the cooling fan for the first layer. This helps your print stick to the bed.
- After the first layer, set your cooling fan speed to 100% for PLA. This helps the filament solidify quickly and reduces stringing.
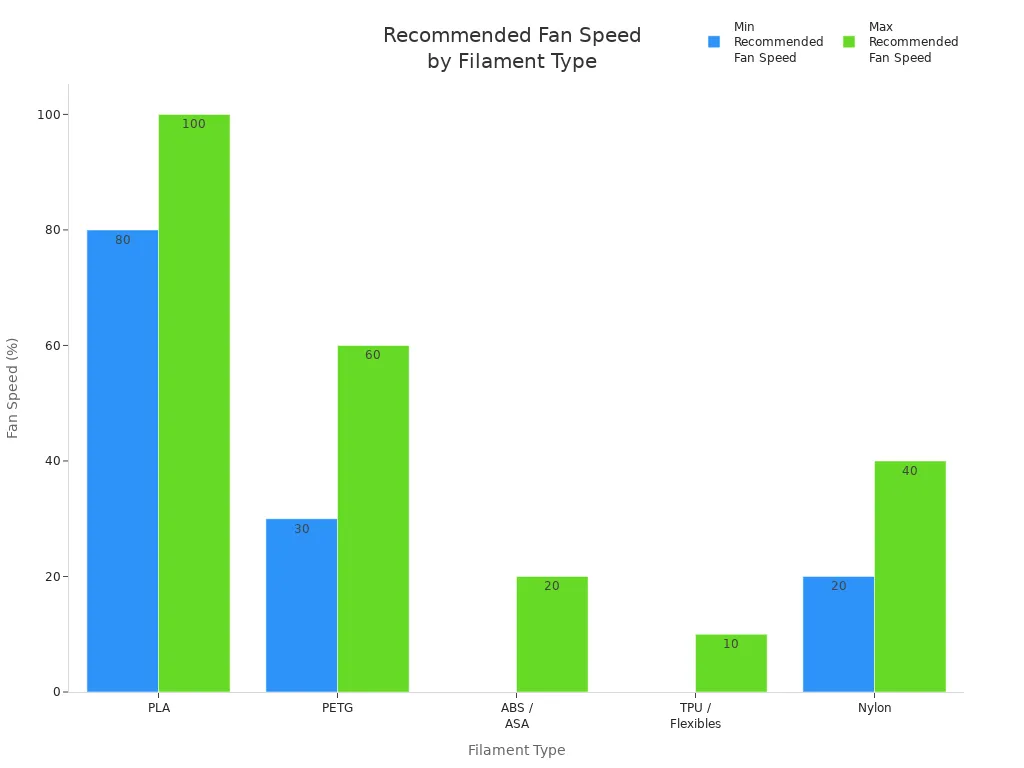
- For PETG, use a cooling fan speed between 30% and 50% after the first layer. This keeps the print strong and prevents warping.
- ABS and similar materials need very little cooling. Set your fan speed to 0–20% to avoid cracks and warping.
- TPU and other flexible filaments work best with a cooling fan speed of 0–10%. Too much cooling can make these prints brittle.
- Nylon likes a balanced approach. Try a fan speed between 20% and 40%.
You can also use advanced slicer settings to fine-tune your 3d print cooling strategy. Some slicers let you set different fan speeds for bridges, overhangs, or small features. This feature-specific cooling can help you get the best print quality without sacrificing strength.
Here’s a quick table to help you pick the right cooling fan speed for your material:
|
Material |
Recommended Fan Speed (%) |
Why This Cooling Level Works |
Risks of Too Much Cooling |
Risks of Too Little Cooling |
|---|---|---|---|---|
|
PLA |
80–100 |
Rapid solidification, crisp details |
Brittle prints, poor layer adhesion |
Stringing, sagging bridges, surface blobs |
|
PETG |
30–60 |
Gentle airflow, prevents stringing, keeps layers strong |
Layer splitting, weak bonds |
Stringing, overheating, surface blobs |
|
ABS / ASA |
0–20 |
Minimal fan, avoids thermal stress and warping |
Cracking, curling |
Overheating, sagging, loss of fine features |
|
TPU / Flexibles |
0–10 |
Low airflow, smooth extrusion |
Brittle parts, uneven layers |
Deformation, sticky extrusion, stringing |
|
Nylon |
20–40 |
Balanced cooling, reduces warp, keeps strong bonding |
Reduced tensile strength |
Warping, distorted geometries |
Fan Speed and Minimum Layer Time
Getting your cooling fan speed right is only half the battle. You also need to set the minimum layer time in your slicer. This setting tells your printer to slow down or pause between layers, giving each one enough time to cool before the next goes on top.
- Minimum layer time helps prevent defects like warping, curling, and poor layer adhesion.
- If your layers don’t cool enough, you might see sagging or blobs on your print.
- Adjusting this setting can improve both the look and strength of your prints.
For most prints, a minimum layer time of 5–10 seconds works well. If you print tiny parts or sharp points, you might need to increase this time. This gives each layer a chance to set and keeps your details crisp.
Pro Tip: If you see issues like drooping or melted corners, try increasing your minimum layer time or lowering your print speed. This simple change can boost your print quality fast.
Bringing It All Together
A great 3d print cooling strategy combines the right hardware, smart slicer settings, and careful fine-tuning. Use the recommended cooling fan speed for your material, place your fans for even airflow, and set your minimum layer time to match your print. Don’t be afraid to experiment and adjust your settings. Every printer and filament is a little different, so a bit of fine-tuning can help you reach the best print quality possible.
Optimize Filament Cooling for Different Materials
PLA Cooling Strategies
When you print with PLA, you want to get the cooling just right. Start by turning off the fan for the first layer. This helps the filament stick to the bed and gives you a strong foundation. After that, set your fan to 100%. This rapid cooling locks in details and prevents stringing. If you print several small parts at once, you can improve cooling efficiency and get even better results. Keep an eye on your nozzle temperature. When the fan kicks in after the first layer, the nozzle temperature can drop quickly. This sudden change might weaken the bond between layers. If you notice lifting, try using a brim in your slicer. For the best results, use the recommended pla filament temperature and make sure your ideal bed temperature matches your filament’s needs.
- Turn off the fan for the first layer.
- Use 100% fan speed after the first layer.
- Print multiple small parts for better cooling.
- Watch for sudden drops in nozzle temperature.
PETG Cooling Tips
PETG needs a different approach. Too much cooling can cause weak layers, but too little can lead to stringing. For the first few layers, keep the fan off. This helps with bed adhesion. Once you get past those layers, set your fan between 30% and 50%. For tiny details, you can bump it up to 70–100%. Always check your nozzle temperature and pla filament temperature to avoid sudden changes. If you use too much cooling, PETG can delaminate or lose strength. Try to optimize filament cooling by balancing airflow and temperature.
|
Printing Stage |
Fan Speed (%) |
|---|---|
|
First Few Layers |
0 |
|
General Printing |
30–50 |
|
Detailed Features |
70–100 |
ABS Cooling Adjustments
ABS is sensitive to cooling. You want to keep the fan off or set it very low, no more than 10%. Too much cooling can cause warping or cracks. Use a warm enclosure to keep the temperature steady. This helps prevent layer separation and keeps your print strong. If you see splits or weak spots, lower the fan speed and check your nozzle temperature. For ABS, the right pla filament temperature and ideal bed temperature make a big difference. Avoid high fan speeds and keep your print environment stable for the best results.
Tip: For ABS, less cooling means stronger prints. Keep your fan off and use an enclosure if possible.
Troubleshooting for Best Print Quality
Warping and Layer Issues
Warping can ruin a print fast. You might see corners lifting or layers separating. This usually happens when cooling is too strong or uneven. To fight warping, keep your fan speed low for materials that need it. Use a heated bed and make sure your bed adhesion is solid. Try slowing down your print speed. Slower speeds help layers bond better and reduce warping. If you notice melted points, lower your temperature and check that your fan points at the print. Increase the minimum time per layer to let each layer cool before the next one starts.
|
Problem |
Solution |
|---|---|
|
Warping |
Lower fan speed, use heated bed, improve bed adhesion, slow print speed |
|
Melted points |
Lower temperature, check fan, increase minimum layer time |
Stringing and Oozing
Stringing can make your print look messy. You see thin threads between parts of your print. To prevent stringing, adjust your retraction settings and lower your print temperature. Make sure your cooling fan works well. Heat creep can also cause stringing and jams. Keep your hot end clean and boost cooling if you spot these problems. Lowering the temperature helps prevent stringing and keeps your print neat.
Overhangs and Bridging Problems
Overhangs and bridges need special care. If you see sagging, increase your fan speed for those layers. Cooling helps the filament solidify fast and supports the next layer. Lower your print temperature for these tricky spots. Slower print speeds also help overhangs keep their shape. For better bed adhesion, use supports or adjust your slicer settings.
Tip: For bridges, set your fan to 70% or higher and slow down the print speed. This helps the filament stay in place and prevents drooping.
Brittle or Weak Layers
If your print feels brittle or breaks easily, you might have too much cooling. High fan speeds can make layers weak. Try lowering the fan speed and slowing down your print. Good bed adhesion also helps keep layers strong. If you print too fast, layers may not bond well, leading to weak spots.
|
Problem |
Solution |
|---|---|
|
Brittle layers |
Lower fan speed, slow print, improve bed adhesion |
By tweaking your cooling and print speed, you can fix most common issues like warping, stringing, and weak layers. Keep testing until you find what works best for your setup.
Advanced Filament Cooling Strategies
Aftermarket Cooling Upgrades
If you want to push your print quality even further, you can try some aftermarket cooling upgrades. These upgrades help you control airflow and temperature more precisely. Here are some options you might consider:
- Install a part cooling fan. This fan cools the filament right after it leaves the nozzle. You get better results on overhangs and bridges.
- Use an enclosure cooling system. This keeps the temperature steady inside your printer, which helps with tricky materials.
- Add heat sink fans. These fans stop your stepper motors and hotend parts from overheating.
- Try a dual-fan setup. Two fans can cool large or complex prints more evenly.
- Check your fan placement. Make sure you do not have dead zones where air cannot reach.
You can also look at the recommended fan speeds for different filaments. This table gives you a quick guide:
|
Filament Type |
Recommended Fan Speed |
|---|---|
|
Nylon |
0% to 50% (often off) |
|
TPU |
0% (off) or 20-40% |
|
PLA |
100% after the first layer |
|
PETG |
30% to 60% |
|
ABS |
Off or very low |
Monitoring and Maintenance
You should not forget about regular monitoring and maintenance. Cooling systems work on many parts of your printer. They protect the control board, hot end, printed parts, power supply, and motors from overheating. If you skip maintenance, you might see print quality drop or even damage your equipment.
Check your fans often. Clean out dust and make sure nothing blocks the airflow. Listen for strange noises that could mean a fan is failing. If you notice your printer getting hotter than usual, stop and inspect the cooling system. Keeping your cooling setup in good shape means you get consistent results, even on complex prints that need precise temperature control.
You can get high-quality 3D prints by following a few simple steps.
- Adjust your fan speed for each filament type to boost print quality.
- Use a part cooling fan to cool the filament right after it leaves the nozzle. This helps with overhangs and bridges.
- Try different cooling methods for materials like PLA, PETG, and ABS.
Keep testing and tweaking your setup. You will see better results with every print!
FAQ
What happens if you use too much cooling on your 3D print?
Too much cooling can make your print brittle. Layers may not stick well. You might see cracks or weak spots. Try lowering your fan speed if your print breaks easily.
How do you know if your fan speed is set correctly?
Check your print for signs like smooth surfaces and strong layers. If you see stringing, warping, or weak spots, adjust your fan speed. Small test prints help you find the best setting.
Should you always use the cooling fan for every filament?
No, you should not. PLA needs lots of cooling, but ABS and some flexibles need little or none. Always check the recommended settings for your filament type.
Can better cooling fix stringing and blobs?
Yes, better cooling can help. If you see stringing or blobs, increase your fan speed and lower your print temperature. Good airflow helps the filament set quickly and keeps your print neat.


