


You can fix 3D print blobs and zits by making a few simple changes to your printer setup. Start by checking your retraction settings, lowering the nozzle temperature, and drying your filament. Adjust the flow rate and tune slicer settings to prevent excess material. Make sure you clean the nozzle and increase the cooling fan speed. Try moving the Z-Seam to a less visible spot for a smoother finish. Test each change with a small object and share your results with the 3d printing community.
Key Takeaways
Look at your retraction settings and change them if needed. This helps you control how the filament moves. It can stop blobs and zits from showing up on your prints. - Lower the nozzle temperature and slow down the print speed. This makes the surface smoother. If the temperature is too high, the filament can ooze too much. - Always dry your filament before you start printing. Wet filament can make bubbles and mess up the surface. - Clean your nozzle often to keep the extrusion even. If the nozzle is dirty, it can make blobs and hurt print quality. - Use slicer features like coasting and wipe to fix surface problems. These settings help you control the filament flow better.
What Are 3D Printing Blobs and Zits?
Definition and Signs
You may notice small bumps or dots on the surface of your 3D prints. These are called blobs and zits. They stand out from other surface imperfections because they look like raised spots or tiny lumps. You often see them as irregular bumps, ridges, or small accumulations on the outer walls of your printed object. These marks lower the print quality and make the surface feel rough. They can also affect how your part fits or moves if you need precise dimensions.
Here are some common signs of 3d printing blobs and zits:
- Small bumps or dots that appear on flat or curved surfaces
- Rough patches that make the print look less smooth
- Raised spots that you can feel when you run your finger over the print
- Areas where the surface looks uneven or has extra plastic
You can spot these issues early by checking your prints as soon as they finish. If you see these signs, you know you have a problem with blobs or zits.
Why Blobs and Zits Happen
You may wonder why 3d print blobs and zits show up on your models. Several mechanical and material factors cause these surface flaws. The Z seam forms when your printer moves from one layer to the next. If the print head pauses or moves too slowly, it can leave behind extra plastic. This creates blobs or gaps, depending on how much material comes out.
Improper retraction settings also play a big role. If your printer pulls back too little or too much filament during moves, you get more blobs or even under-extrusion. Over-extrusion, high temperatures, and incorrect slicer settings can make the problem worse. You need to check these settings to reduce the chance of blobs and zits in your 3d printing projects.
Causes of 3D Print Blobs
Retraction Problems
You may see blobs and zits if your printer does not pull back the right amount of filament during moves. This process is called retraction. If the retraction settings are too low, extra plastic leaks out and forms blobs. If the settings are too high, you might see gaps or under-extrusion. You need to check your retraction settings in your slicer. Make small changes and test your results. This step helps you control oozing and keeps your prints clean.
High Temperature and Speed
High temperatures and fast speeds can make 3d print blobs worse. When you set the temperature too high, the filament becomes runny. This makes it easy for blobs and zits to form on your print. The filament may ooze out of the nozzle even when it should not. If you print at high speed, you often need a higher temperature to keep the filament flowing. Lower speeds let you use a lower temperature, which helps prevent blobs.
- High temperatures make the filament runnier, increasing the risk of blobs and zits.
- If the temperature is too high, the filament may ooze uncontrollably, leading to 3d print blobs.
- When printing at higher speeds, a higher temperature is required to keep the material in a molten state.
- Lower speeds allow for a reduction in temperature without compromising the print.
Try lowering your print temperature and slowing down your speed. This change can help you avoid blobs and get smoother surfaces.
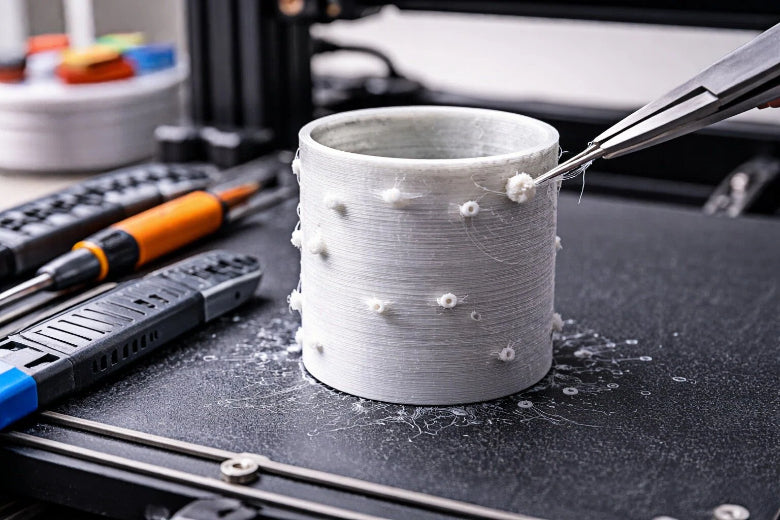
Wet Filament Issues
Moisture in your 3d printer filament can cause many problems. Wet filament pops and sizzles as it melts. This action creates bubbles and weak spots in your print. You may see holes, blobs, or even zits on the surface. Sometimes, wet filament causes stringing even if your retraction is set up well. If you use filament that has been left out in the open, it may have absorbed water from the air. Always store your filament in a dry box or sealed bag.
- Wet or bad filament can make weak prints and holes.
- Wet filament can cause stringing even if your retraction settings are good.
- Moisture in filament can lead to hollow or bubbly spots inside your print.
Check your filament if you see sudden blobs or zits. Drying your filament before printing can solve many surface issues.
Nozzle Maintenance
A dirty or worn nozzle can lead to 3d print blobs. Bits of old filament or dust can block the nozzle. This blockage causes uneven flow and blobs on your print. You should clean your nozzle often. Use a small wire or a cold pull method to remove debris. If cleaning does not help, you may need to replace the nozzle. A clean nozzle gives you smooth and even extrusion.
Slicer Settings and Layer Height
Your slicer controls how your printer moves and lays down plastic. Some slicer settings can cause blobs and zits if not set right. Retraction speed and distance, coasting, wiping, and extra restart distance all affect the flow of filament. If these settings are off, you may see blobs on your print. Slower print speeds give you better control and help prevent over-extrusion. Layer height also matters. A layer height about 20% smaller than your nozzle diameter often gives the best results.
Common slicer settings linked to blobs and zits include:
- Retraction speed and distance
- Coasting and wiping options
- Extra restart distance
Adjusting print speed and layer height can reduce blobs and zits:
- Slower speeds provide better control, preventing over-extrusion.
- A layer height about 20% smaller than the nozzle diameter often yields better results.
Check your slicer settings if you notice blobs or zits. Small changes can make a big difference in your print quality.
Fixes for 3D Printing Blobs
Adjust Retraction Settings
You can fix blobs and zits by changing retraction settings. Retraction controls how much filament is pulled back when the printer moves. If retraction speed is too low, extra filament leaks out and makes blobs. If retraction distance is too high, you might see gaps or missing plastic.
- Change retraction speed and distance a little at a time.
- Make retraction speed faster to stop oozing.
- Lower retraction distance so you do not pull back too much filament.
Bowden extruders need higher retraction numbers than direct drive ones. Retraction settings help stop extra filament at the start of new lines. This often causes blobs and zits. You can find these settings in your slicer program. Try small prints to test changes and see if things get better.
Lower Temperature and Speed
High temperatures make filament very runny. This makes blobs and zits more likely. Lowering the print temperature helps control how much filament comes out. Print slower so the filament cools and settles better.
- Set the nozzle temperature just above the lowest number for your filament.
- Print slower for better control and smoother prints.
Start by lowering the temperature by 5°C each time. Watch your prints for changes. If you see fewer blobs, you found a better setting.
Dry Filament Properly
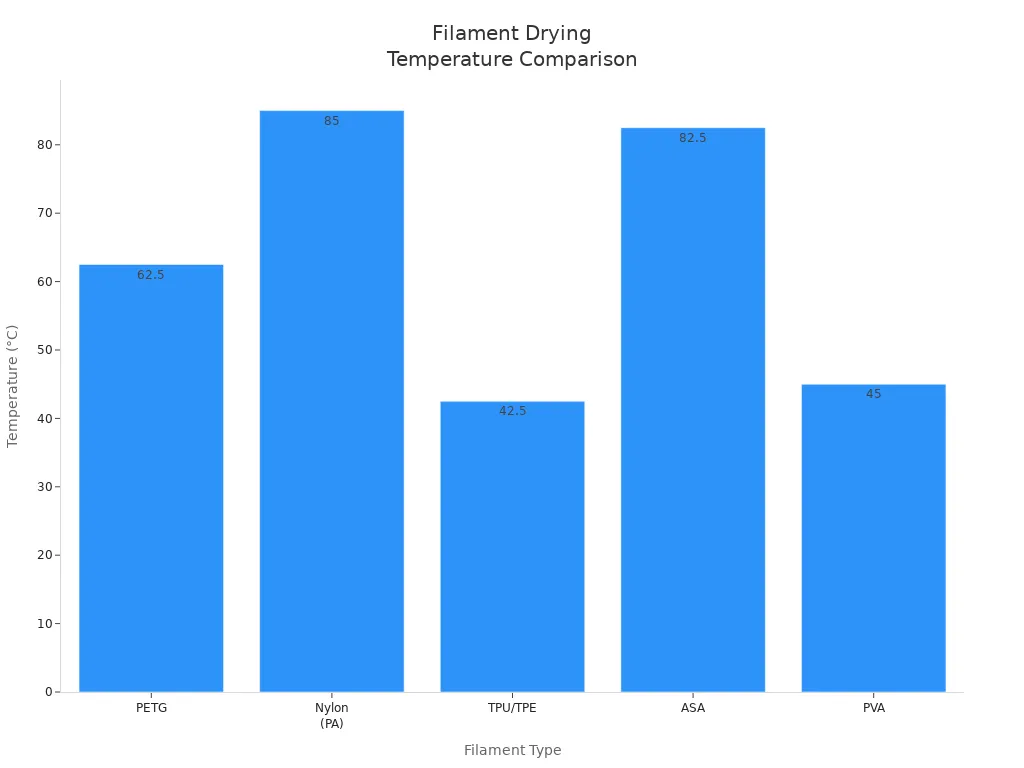
Wet filament can make bubbles, blobs, and zits. Drying filament before printing makes the surface look better. Use a filament dryer or a regular oven at the right heat. Do not use too much heat or you could ruin the filament.
|
Filament Type |
Temperature (°C) |
Drying Time |
Notes |
|---|---|---|---|
|
PETG |
60-65 |
4–6 hours |
Use medium heat to stop stringing; do not go over 70°C. |
|
Nylon (PA) |
80-90 |
6–12+ hours |
Nylon soaks up water fast; dry longer if needed. |
|
TPU/TPE |
40-45 |
4–6 hours |
Use low heat so it does not get too soft. |
|
ASA |
80-85 |
4–6 hours |
Like ABS; drying at about 75°C works well. |
|
PVA |
45 |
3–4 hours |
Use low heat so it does not melt; check the label. |
Drying filament is important for fixing bubbles and making prints look better. You can use a filament dryer or an oven. Always check the right temperature for your filament.
Clean and Replace Nozzle
A dirty or old nozzle can mess up filament flow. This causes blobs, zits, and rough spots. Clean your nozzle often with a small wire or by using the cold pull method.
- Scratches and old filament can make prints look dull.
- A clean nozzle helps filament come out smooth and stick well.
- A worn nozzle can clog, make stringy prints, and cause uneven layers.
If cleaning does not work, put in a new nozzle. Your prints will look smoother and have fewer blobs.
Use Wipe Nozzle and Coasting
Slicer programs have wipe and coasting features to help stop blobs and zits.
- The wipe feature moves the nozzle after each layer to hide marks from the Z seam.
- Coasting stops filament flow a little early to stop too much filament from coming out.
- Both features help control pressure in the nozzle.
Turn on wipe and coasting in your slicer. Try different numbers to see what works best for your printer and filament.
Change Seam Position
You can pick where blobs and zits show up by changing the seam spot in your slicer.
- Changing the seam spot changes where the Z-seam shows on your print.
- Lining up the seam hides blobs in places you do not see.
- Random seams spread blobs and zits all over the print.
Pick a seam spot that hides blobs on the back or bottom of your model. This makes them harder to see.
Reduce Layer Height
Making the layer height smaller helps fix blobs and zits. Changing travel moves and layer height can lower the chance of surface problems.
- Small changes in travel speed and layer height help a lot.
- Lower layer height makes prints look better and have fewer blobs.
Set your layer height about 20% less than your nozzle size. This gives you smoother prints and fewer mistakes.
Tip: Only change one thing at a time. Print a small object to see how each change affects blobs and zits. Write down what works best for your printer.
Quick Checklist for 3D Printing Blobs
A quick checklist helps you spot and fix blobs and zits before they ruin your print. You can use this guide before every job to save time and get better results.
Retraction and Temperature
- Check your retraction settings in the slicer. Make sure the speed and distance match your printer type.
- Set the nozzle temperature just above the minimum for your 3d printer filament. High temperatures cause oozing and blobs.
- Verify nozzle temperature before each print. Small changes can stop zits from forming.
- Test with slower print speeds if you see blobs or zits. Lower speeds help the filament settle and cool.
Tip: If you use a Bowden setup, increase retraction distance. Direct drive printers need less retraction.
Filament and Nozzle Care
- Store 3d printer filament in a dry box or sealed bag. Moisture leads to zits and blobs.
- Dry filament before printing, especially if it feels sticky or has been exposed to air.
- Clean the nozzle with a wire or cold pull method. A clean nozzle prevents blobs and keeps extrusion smooth.
- Replace the nozzle if cleaning does not help. Worn nozzles cause zits and uneven layers.
|
Task |
How Often |
Why It Matters |
|---|---|---|
|
Dry filament |
Before print |
Stops zits and bubbles |
|
Clean nozzle |
Weekly |
Prevents blobs |
|
Replace nozzle |
As needed |
Fixes extrusion issues |
Slicer Settings
- Calibrate the extrusion multiplier to control filament output. Too much extrusion causes blobs and zits.
- Perform e-step calibration if your printer is not a Prusa. This step helps you avoid over-extrusion.
- Adjust fill density from 50% to 15%. Lower density reduces blobs and zits.
- Test with two perimeters to see if print quality improves.
- Make sure the printer preset matches your actual model in the slicer.
- Toggle the ooze prevention setting to check its effect on blobs and zits.
- Review slicer settings before every print. Small tweaks can prevent surface flaws.
By following this checklist, you solve most 3d printing problems with blobs and zits. You spend less time fixing mistakes and get smoother prints.
Prevention Tips for 3D Printing
Regular Calibration
You should check your printer often to keep prints smooth. This helps stop blobs from showing up. Calibration makes sure your printer uses the right amount of plastic. When you change retraction and flow rate, you lower the chance of oozing and rough spots.
- Check your extruder and flow rate before each project.
- Change retraction settings to fit your printer and filament.
- Calibrating often makes your prints look better and stronger.
Tip: If you calibrate well, you fix fewer blobs and print more cool models.
Filament Storage
Storing filament the right way keeps blobs and zits away. You can use vacuum bags with drying packs or bins with silica gel. These ways keep your filament dry and ready to use.
- Put filament in airtight boxes with silica gel.
- Use vacuum bags if you want to store filament for a long time.
- Keep filament in a cool, dark spot so it does not get ruined.
- Use a hygrometer to check humidity and keep it under 20%.
If you use petg filament, make sure it stays dry. Wet filament can make bubbles and weak spots.
Slicer Updates
You should update your slicer software when you can. New updates give you more control over how much plastic comes out. These updates let you change things like coasting, wipe, and restart distance. Better slicer tools help you stop blobs and zits.
- Turn on coasting to stop plastic before a line ends.
- Use the wipe feature to clean the nozzle before it moves.
- Change flow rate to fix too much or too little plastic.
Slicer updates help you get better prints from your 3d printer.
Monitor Print Progress
Watching your print while it works helps you find blobs and zits early. Some printers have smart tools that spot problems and tell you how to fix them. You can use this table to see how watching your print helps:
|
Feature |
Description |
|---|---|
|
Automated Detection |
Finds print mistakes fast, like blobs and zits. |
|
Correction Wizard |
Gives you tips to fix problems right away. |
|
Self-Correction |
Lets the printer change settings to make prints better. |
|
Failure Recognition |
Spots many print problems, not just blobs and zits. |
|
Fast Response |
Finds problems in seconds so you can fix them quickly. |
Note: Finding problems early saves time and filament. You can stop a bad print before you waste material.
If you follow these tips, you will have fewer surface problems and get better prints every time.
You can get rid of blobs and zits in 3d printing by doing a few simple things:
- Change retraction settings so extra filament does not leak out.
- Calibrate your printer to stop too much filament from coming out.
- Pick the right nozzle temperature for your filament type.
- Keep filament in sealed containers so it stays dry.
- Clean the nozzle and check your printer often.
Doing regular checks and trying new settings helps you print better. These habits give you some big long-term benefits:
|
Benefit |
Description |
|---|---|
|
Consistent Print Quality |
Taking care of your printer keeps prints smooth and steady. |
|
Reduced Downtime |
Fewer problems mean more prints work out well. |
|
Extended Operational Life |
Good care makes your printer last longer. |
Keep testing and show others what you learn. Your prints will look smoother, and you will have more fun with 3d printing.
FAQ
Why do blobs appear only on one side of my print?
You may see blobs on one side because the seam position is set to "aligned" in your slicer. Change the seam to "random" or "hide seam" to spread or move blobs to less visible areas.
Can I fix blobs without changing hardware?
Yes, you can adjust slicer settings like retraction, coasting, and temperature. Clean your nozzle and dry your filament. These steps often solve blobs without buying new parts.
What filament type is most likely to cause zits?
Nylon and PETG absorb moisture quickly. Wet filament creates bubbles and zits. Store these filaments in airtight containers with silica gel to prevent problems.
How often should I clean my nozzle?
You should clean your nozzle every week or after every five prints. Use a cold pull or a small wire to remove debris. Regular cleaning keeps extrusion smooth.
Does print speed affect blobs and zits?
Yes, high print speed can cause blobs and zits. Slow down your print speed to give the filament time to settle. Lower speeds help you get smoother surfaces.


