


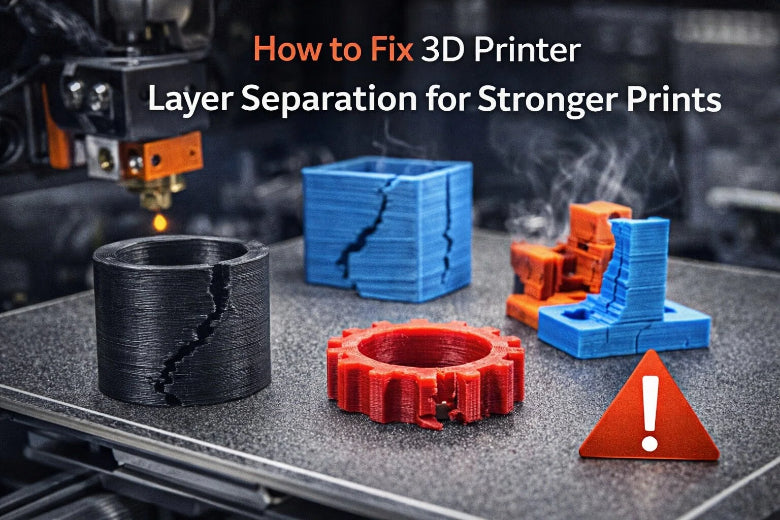
To fix 3D printer layer separation quickly, adjust the print temperature. Slow down the print speed and reduce cooling. Additionally, check your material settings. You can identify 3D printer layer separation by looking for gaps or cracks between layers. If you do not address this issue, your prints may break easily and become unusable.
|
Evidence Description |
Impact on 3D Prints |
|---|---|
|
Layer separation causes weak layer fusion. |
Prints lose strength and are not reliable. |
|
Poor adhesion leads to gaps or cracks. |
Parts cannot be used for important jobs. |
|
Good adhesion ensures parts act as one solid piece. |
Strong prints can withstand force and last longer. |
Key Takeaways
- Change the print temperature to help layers stick and stop cracks.
- Make the printer go slower so layers can join better and prints get stronger.
- Lower the cooling for materials like ABS and PETG to keep layers from splitting.
- Use good, dry filament to make prints strong and stop weak layers.
- Look at your printer settings and workspace often to find problems early and make prints better.
Fix 3D Printing Layer Separation: Quick Steps
When you see cracks or gaps between layers, you need to act fast. You can fix layer separation in 3d printing by making a few key changes to your printer settings and environment. Here is a quick summary table of the most common causes and solutions:
|
Cause |
Suggested Solution |
|---|---|
|
Print temperature is set too low |
Adjust print temperature higher |
|
Too much layer cooling during and after print |
Disable or reduce layer cooling |
|
Ambient air temperature is too cold or uneven |
Use an enclosure to control the environment |
|
Printer is printing too fast |
Decrease print speed |
Adjust Print Temperature and Layer Height
You need to set the right print temperature for your filament. If the temperature is too low, layers will not stick together. This can cause cracks and weak spots. For most materials, a higher temperature helps layers fuse better. Polycarbonate and ABS need especially high temperatures. PLA and PETG also benefit from proper heat.
- Use these tips for better results:
- Set the first layer height between 100% and 150% of your nozzle diameter.
- Make the first layer width 120% to 150% for strong bed adhesion.
- Slow down the first layer speed to 15%–30% of your normal speed.
- Increase the first layer temperature by about 30°C above the rest of the print.
- For ABS, use a layer height of 0.2–0.3 mm. Thicker layers can help prevent warping.
- For PETG, try a layer height of 0.2 mm for balance, or 0.15 mm for stronger adhesion.
Note: If you see poor adhesion or warping, check your first layer settings. A good first layer is the foundation for a strong print.
Optimize Print Speed and Cooling
Print speed affects how well each layer bonds. If you print too fast, the layers do not have enough time to stick together. This can lead to weak prints that break easily. For high-quality prints, use slower speeds between 30–60 mm/s. If you want to print faster, you can try 60–100 mm/s, but you may lose some strength. Only use speeds above 100 mm/s if you do not need perfect quality.
Cooling also plays a big role. Too much cooling can cause layers to shrink and separate. You should:
- Keep the cooling fan at a constant speed to avoid uneven layers.
- Set a minimum layer time so each layer cools before the next one starts.
- For PLA, use more cooling. For ABS, PETG, and ASA, reduce or turn off the fan, especially for the first few layers.
- Enable auto cooling in your slicer. This lets the printer adjust fan speed based on how long each layer takes.
- Turn off the fan for the first few layers to help the print stick to the bed.
Tip: If you print in a cold room, use an enclosure like a cardboard box or shower curtain. This keeps the air warm and helps prevent cracks.
Improve Flow Rate and Filament Quality
The flow rate controls how much plastic your printer pushes out. If the flow rate is too low, you will see gaps or thin layers. If it is too high, you may get blobs or thick walls. You can test and adjust the flow rate with these steps:
- Print a small test cube.
- If you see gaps, increase the flow rate by 5%.
- If you see blobs, decrease the flow rate by 5%.
- Print again and check the results.
- For a more accurate test, print a single-wall cube and measure the wall thickness with calipers. Adjust the flow rate in your slicer until the wall matches your nozzle size.
Filament quality matters, too. Poor quality filament can cause weak layers and cracks. Moisture in the filament can also lead to bad prints. Store your filament in a dry place and use fresh spools for important projects.
Signs of bad filament:
- Cracks between layers
- Parts that snap easily
- Layers that peel apart when you bend the print
Note: Always check your filament before starting a big print. Dry, high-quality filament gives you the best results.
Quick Recap:
- Raise the print temperature if you see cracks.
- Lower the print speed for better layer bonding.
- Reduce cooling, especially for ABS and PETG.
- Adjust the flow rate if you see gaps or blobs.
- Use dry, good-quality filament.
- Control the room temperature with an enclosure.
By following these steps, you can fix layer separation and make your 3d printing projects stronger and more reliable.
3D Printer Layer Separation: Causes and Symptoms
Common Signs of Layer Separation
You can find 3d printer layer separation by looking for changes in your print. This problem happens when the layers do not stick together well. You might see:
- Cracks or gaps between layers, mostly on the sides
- Warping or curling at corners or edges of the part
- Layers that split or peel off when you press gently
- De-lamination, where big parts of the print come apart, sometimes from hardware or file problems
Layer separation is not the same as stringing or blobs. If you see layers coming apart while printing, you have 3d printer layer separation. This usually happens if the print cools too fast or warping pulls layers apart. If you do not fix these signs, your print can break or lose its shape.
Tip: Check your print for cracks or splits before you take it off the bed. Finding problems early helps you fix them before they get worse.
Main Causes: Temperature, Speed, Cooling, Filament, Environment
There are a few main reasons for 3d printer layer separation. Knowing these can help you stop weak prints and save material. The most common causes are:
- Printing at the wrong temperature. If the temperature is not right, the filament will not melt enough to stick layers together.
- Printing too fast. High speed can stop layers from joining, which makes cracks or gaps.
- Too much cooling. A strong fan or cold air can make layers shrink and pull apart.
- Bad filament quality. Wet or cheap filament can make bubbles or weak spots.
- Mechanical problems. Uneven extrusion or a clogged nozzle can make layers messy.
- Environmental factors. High humidity can make layers weak, and low humidity can make prints break easily. Room temperature changes can also hurt adhesion.
|
Material |
Effect of Humidity and Temperature |
Result |
|---|---|---|
|
PLA |
More delamination of filament layers |
Big changes in structure |
|
HIPS |
Fewer pores and melting of filament fibers |
Structure gets weaker |
Always check your printer settings and room if you see 3d printing layer separation. Fixing these problems early gives you stronger and better prints.
Troubleshooting 3D Printing Layer Separation
Step-by-Step Checklist for Stronger Prints
You can solve most 3D print delamination problems by following a clear checklist. Use these steps to fix layer separation and get stronger prints:
- Check your print settings. Make sure your file is complete and the parameters match your filament.
- Look at your printing environment. Cold air or high humidity can cause poor layer bonding.
- Clean your printer’s material tank. Remove any leftover filament or resin debris.
- Level the print bed. A flat and secure bed helps layers stick together.
- Inspect your model design. Repair any broken STL files and add supports if needed.
- Test the printer’s light source or extruder. Make sure it works well and does not skip parts.
- Examine belts and pulleys. Tighten them to prevent shifting layers.
- Lubricate moving parts. Clean and oil rails and rods for smooth movement.
- Calibrate stepper motors. Set the right voltage and check for overheating.
- Secure the printer frame and bed. Tighten all screws to reduce vibrations.
Enclosure and Ambient Temperature Tips
A stable environment helps prevent layer separation in 3D printing. You can use these tips for better results:
- Place your printer in an enclosure to trap heat and block drafts.
- Keep the temperature around your print steady. This helps layers bond and reduces warping.
- Use a heated enclosure for ABS or ASA. Warm air makes tall and large prints stronger.
- Add brims or use glue sticks for better first-layer adhesion, especially with tricky shapes.
Edge Rounding and Slicer Settings
You can improve interlayer adhesion by adjusting slicer settings. Try these recommendations:
|
Adjustment Type |
Recommendation |
|---|---|
|
Heated Bed |
Use a heated bed for best results. |
|
Bed Temperature |
Adjust bed temperature in your slicer settings. |
|
First Layer Settings |
Use a thicker first layer (0.20 mm) and print slowly (20–30 mm/s) for better adhesion. |
|
Print Speed |
Start at 40–60 mm/s; slower speeds improve layer bonding and surface quality. |
Round sharp corners in your model to reduce stress points. This helps prevent cracks at the edges. You can find this option in most slicer software.
Small changes in slicer settings can make a big difference in print strength.
Material Fixes for Layer Separation
PLA: Temperature and Cooling
You can prevent layer separation in PLA by setting the right temperature and cooling. PLA works best when you use a nozzle temperature between 190°C and 220°C. Lower temperatures, like 190°C to 200°C, give you smooth surfaces and fine details. Higher temperatures, such as 210°C to 220°C, help layers stick together and make your prints stronger, especially for bigger models. Set your heated bed to 50°C to 65°C. This helps the first layer stick and reduces warping. After the first two layers, turn your cooling fan to 100%. This cools the filament quickly and stops sagging. If you use Sovol filament, make sure it is dry before printing. Dry filament gives you better results and fewer cracks.
- Nozzle temperature: 190–220°C
- Bed temperature: 50–65°C
- Cooling fan: 100% after layer two
Tip: Always check your filament for moisture. Store it in a dry box to keep your prints strong.
PETG: Speed and Moisture
PETG can separate if you print too fast or use wet filament. Slow down your print speed, especially for the outer walls. Set the outer wall speed to about 60 mm/s. Lower your overall print speed by 20% if you see cracks or rough surfaces. Moisture in PETG causes bubbles, stringing, and weak layers. Dry your PETG filament before printing. You can use a filament dryer, a food dehydrator, or an oven at 65°C (149°F) for 4 to 6 hours. Sovol filament, when kept dry, helps you avoid these problems.
- Print speed: 60 mm/s for outer walls
- Lower speed by 20% for better results
- Dry filament before use
Note: Dry PETG prints stronger and looks smoother.
ABS/ASA: Enclosure and Adhesion
ABS and ASA need special care to stop layer separation. Use an enclosure to keep the air warm and block drafts. This helps layers bond and stops warping. You also need to focus on bed adhesion and temperature. The table below shows the best techniques:
|
Technique |
Explanation |
|---|---|
|
Optimize Bed Temperature |
Set the bed to 90–110°C for ABS. Warm layers cool slowly and bond better. |
|
Use Appropriate Bed Adhesion |
Clean the bed often. Use glue stick, tape, or a textured sheet for a strong first layer. |
|
Manage Print Temperatures |
Use the right print temperature to keep layers sticking and prevent warping. |
|
Control Cooling Fan Settings |
Adjust the fan to manage cooling rates. This is important for good layer bonding. |
Quick Recap:
Set the right temperature and cooling for PLA. Slow down and dry PETG before printing. Use an enclosure and focus on bed adhesion for ABS and ASA. Dry filament, like Sovol, helps you fix layer separation and get stronger prints.
Prevent Layer Separation in Tall and Large Prints
Layer Height and Flow Rate Adjustments
Tall and big 3D prints can have special problems. You might see more cracks or weak spots as the print gets taller. The layers are farther apart, and the top cools down faster. This makes it harder for layers to stick together.
Tall and large 3D prints have their own challenges. Cooling, sticking, and support are big issues. Layers may not stick well because they are far apart. Fast cooling can make the layers bond poorly. The print’s weight and size can make these problems worse. You need to change print speed, temperature, and add supports. These steps help your print finish strong.
You can fix these problems by changing layer height and flow rate. Set your layer height to about 80% of your nozzle size. This helps each layer stick better. If you use a 0.4 mm nozzle, try a 0.32 mm layer height. If you see gaps, raise the flow rate. More flow puts extra plastic between layers and makes prints stronger. Always check your slicer before starting a big print.
- Use a slower print speed for tall prints.
- Raise the print temperature a little to help layers stick.
- Add more supports for big models so they do not sag.
Printable Checklist for Prevention
Use this checklist to stop layer separation in tall and big prints. Print it out and keep it close to your printer for easy use.
|
Factor |
Description |
|---|---|
|
Print Temperature |
Change it if you see too little or too much plastic. This helps layers stick together. |
|
Extrusion Multiplier |
Raise it if you see not enough plastic coming out. This gives better flow while printing. |
|
Layer Height |
Make it 80% of your nozzle size. This helps layers stick well. |
|
Bed Temperature |
Set it by what your filament needs. This keeps the first layer stuck during the whole print. |
If you follow these steps and check your settings, you can stop layer separation. Your prints will be strong and work well, even for big projects.
You can stop 3D printer layer separation by doing a few things. Try changing your print temperature, speed, and cooling for each material. Use the checklist and special fixes for each material to get good results. Take care of your printer often so it works well. Keep your filament in dry, clean boxes so it does not get wet. Pick the best filament for your project. Doing these things helps you make strong prints that you can trust every time.
FAQ
What causes 3D print delamination or layer separation?
You often see 3D print delamination when the nozzle temperature is too low, the print speed is too high, or the cooling fan runs too strong. Moist filament and cold air also cause layers to separate. Always check these settings before you start printing.
How do you fix layer separation in PLA prints?
Raise the nozzle temperature to 210–220°C. Set the cooling fan to 100% after the first two layers. Use dry filament for best results. If you still see cracks, slow down the print speed and check your flow rate.
Why does ABS need an enclosure to prevent layer separation?
ABS shrinks quickly when exposed to cold air. An enclosure keeps the temperature steady and blocks drafts. This helps layers bond and stops warping. You get stronger, more reliable prints with an enclosure.
Can moisture in filament cause weak layer bonding?
Yes, moisture in filament leads to bubbles and poor adhesion. Always store filament in a dry box or sealed bag. Dry your filament before printing if you notice popping sounds or rough surfaces.
What slicer settings help prevent layer separation in tall prints?
- Lower the print speed for tall prints.
- Increase the print temperature slightly.
- Set layer height to about 80% of your nozzle size.
- Raise the flow rate if you see gaps.


