


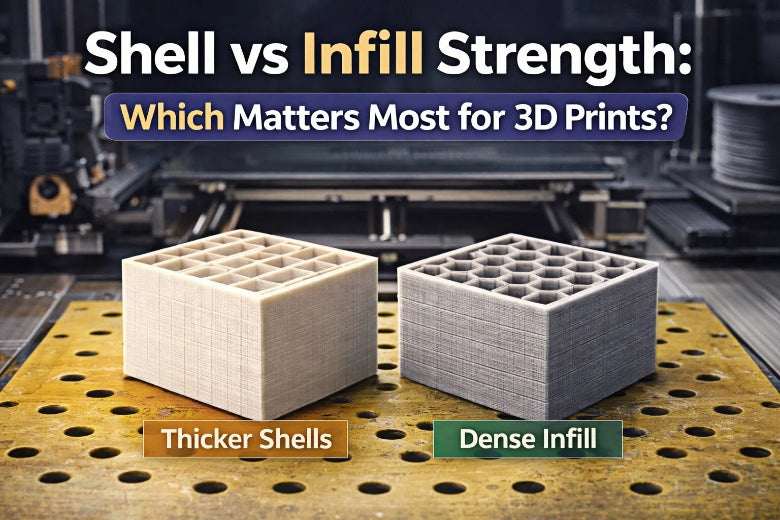
You want your 3D prints to be strong. This is important for tools, prototypes, or medical devices. Shell vs infill strength is important when you need tough and reliable prints. Shell thickness usually makes prints stronger than infill density does. Many mechanical jobs need prints that can handle stress. These include jigs, fixtures, and engineering parts. Here is how strength matters in different uses:
|
Application Type |
Description |
|---|---|
|
Prototyping |
Snap-fits, hinges, and engineering models |
|
End-use parts |
Jigs, housings, and fixtures |
|
Dental/medical |
Splints, surgical guides, wearables |
|
Engineering components |
Stiffness and flexural resistance |
|
Jewelry |
Precise burnouts for casting |
|
Miniatures |
High-detail models |
|
Creative/art |
Design pieces and visual objects |
|
Functional tools |
Accuracy and durability for workshop use |
You can make your prints stronger by changing some settings.
Key Takeaways
- Shell thickness is very important for 3D print strength. Use at least three shells for strong parts. This helps your prints last longer.
- Infill density changes how much support is inside your print. A density between 40% and 60% works well. It gives good strength and does not waste material.
- Pick your infill pattern carefully. Honeycomb and cubic patterns are very strong. They spread out the force inside your print. These patterns are good for parts that hold weight.
- Try different shell and infill settings to see what works best. Changing these can make your prints stronger and use less material.
- Thicker shells can use less material and still be strong. Try different settings to make your prints better for what you need.
Shell Strength in 3D Printing
What Is Shell Thickness?
You may hear the term shell thickness when you start 3D printing. In FDM 3D printing, shell thickness means the width of the outer walls or shells of your printed object. Shell thickness plays a big role in how strong and smooth your print will be. If you set a thicker shell, your part will have more material on the outside, which helps protect the inside and gives your print a better finish.
How Shell Affects Part Strength
Shells do more than just make your print look good. They give your part the strength it needs to handle stress and bending. When you increase shell thickness, you boost the mechanical properties of your print. Here is what happens when you use thicker shells:
- Increasing shell thickness from 0.4 mm to 1.2 mm raises the tensile strength of your part.
- Thicker shells help your print resist breaking or cracking.
- Shell thickness has a big impact on how much force your print can handle before it snaps.
You can see how shell thickness changes strength in the table below:
|
Shell Thickness (relative to nozzle diameter) |
Effect on Strength |
|---|---|
|
3 to 4 times |
|
|
Standard minimum (about 1mm) |
Basic strength level |
|
Increased thickness |
Improves tensile and impact strength |
Another test compared prints with different numbers of shells and found that more shells led to higher tensile strength, even when the infill stayed the same.
Shell Settings for Stronger Prints
You can adjust shell settings in your slicer to make your prints tougher. Here are some tips:
- Use at least 3 shells for parts that need to be strong.
- For parts that will face bending or impact, try 4 shells or more.
- Remember, thicker shells use more material and take longer to print. Thinner shells print faster but may not be as strong.
Tip: If you print a tool handle or a bracket, increase the shell thickness to make sure it does not break under pressure.
Shells matter most when you want your print to last and handle real-world use. You can always test different shell settings to find what works best for your project.
Infill 3D Printing and Strength
What Is Infill?
Infill 3d printing builds a support inside your part. The infill structure fills space between the outer shells. It acts like a hidden skeleton for your print. This helps your print keep its shape and strength. Infill 3d printing uses different infill structures. These help balance weight, strength, and how much material you use. You measure infill as a percentage. This shows how much of the inside is filled. Most slicers let you pick infill density from 0% to 100%. If you choose 0%, your part is hollow. If you choose 100%, your part is solid. Most projects use between 20% and 50% infill density. This range saves material but keeps your print strong. Infill 3d printing lets you pick the best infill structure for your needs.
- Infill in 3d printing means the inside structure that helps with weight, strength, and saving material.
- You measure infill density as a percentage, usually from 20% to 50%.
Infill Density and Patterns
Infill density affects how strong your print is. If you increase infill density, you add more material inside. This makes the infill structure stronger. Your print can handle more force. If you use low infill density, your part is lighter. But it may break more easily. High infill density makes your part solid. It uses more filament and takes longer to print. Infill 3d printing gives you many infill patterns. Some are honeycomb, gyroid, and cubic. Each infill structure has its own good points. Honeycomb infill structure saves material and gives good strength. Gyroid infill structure gives strength in all directions. It works well for flexible parts. Cubic infill structure spreads stress evenly. It is good for strong, load-bearing prints.
|
Infill Pattern |
Infill Density |
Mechanical Property |
Result |
|---|---|---|---|
|
Triangular |
N/A |
Ultimate Tensile Strength (UTS) |
Highest |
|
Wiggle |
N/A |
Ductility, Elongation, Toughness |
Greatest |
|
Concentric |
75-85% |
Impact Strength |
168% higher than line pattern |
|
Line |
75-85% |
Impact Strength |
Lower than concentric |
|
Triangle |
75-85% |
Impact Strength |
Lower than concentric |
|
N/A |
100% |
Flexural Strength |
Improved |
|
N/A |
0.5 mm |
Tensile Strength |
Increased with smaller layer thickness |
Tip: If you want a strong tool or bracket, use cubic or honeycomb infill structure at 40% infill density.
Infill’s Role in Print Strength
Infill 3d printing gives your part support inside. The infill structure helps the outer shell stay strong. It stops warping or bending. If you use the right infill density, your print gets stronger. Infill structure spreads forces inside the part. This lowers the chance of breaking. If your part faces stress again and again, strong infill structure helps it last longer. For example, honeycomb and grid infill structures can make elastic modulus and yield strength up to 25% higher. Infill density also changes compressive strength. Low infill density makes weaker parts. High infill density makes them much stronger. Infill 3d printing lets you change infill density and infill structure for your needs. If you want a light model, use low infill density and a simple infill structure. For a part that holds weight, use high infill density and a strong infill structure like gyroid or cubic.
|
Infill Density |
Compressive Strength |
Observations |
|---|---|---|
|
Low |
Lower |
Initial tests show weaker strength |
|
Medium |
Moderate |
Strength improves with density |
|
High |
Higher |
Significant strength enhancement observed |
You can see that infill 3d printing lets you control strength, weight, and material use. Try different infill density and infill structure settings in your slicer. This helps you find the best mix for your project.
Shell vs Infill Strength Comparison
Flexural vs Crushing Strength
You need to know how shell vs infill strength affects your print’s ability to handle bending and crushing forces. Flexural strength means how well your part resists bending. Crushing strength means how much force your part can take before it gets squashed.
Sandwich panel theory helps explain why shell thickness often matters more for flexural strength. The outer shells act like the strong skin of a sandwich panel, carrying most of the load when your part bends. Recent studies show that thick shells give you better bending resistance than high infill density. You get more strength to weight ratio with thicker shells because you use less material for the same part strength.
Here is a table that compares thick shells and high infill density for flexural strength:
|
Feature |
Thick Shells |
High Infill Density |
|---|---|---|
|
Strength Contribution |
More effective for bending strength |
Diminishing returns on strength |
|
Material Efficiency |
More material-efficient |
Less efficient, more material used |
|
Print Time & Cost |
Faster and cheaper |
Increases print time and cost |
|
Risk of Warping |
Lower risk |
Higher risk, especially with certain materials |
You see that increasing shell thickness gives you better flexural strength and saves material. If you want a strong tool handle or a bracket that must not bend, focus on shell thickness.
Crushing strength depends more on infill. Compression tests show that infill pattern and layer number change how much force your part can take before it crushes. Two-layer prints have higher compressive strength than single-layer prints, even at the same infill density. Honeycomb infill gives the best crushing strength at 20% density. Grid infill works best at 50% density with four layers. You can boost crushing strength by picking the right infill pattern and using more layers.
When to Prioritize Shell or Infill
You need to decide when to focus on shell thickness or infill density for the best shell vs infill strength. Here are some tips to help you choose:
- If your part faces bending, snapping, or flexing, increase shell thickness. You get higher part strength and better strength to weight ratio.
- If your part faces compression or crushing, use a strong infill pattern and higher infill density. You improve part strength for loads that push down or squeeze.
- For most mechanical parts, a balance works best. Use at least three shells and 40-60% infill density with a strong pattern like honeycomb or grid.
Recent studies show that shell thickness boosts tensile strength by improving layer bonding. Infill density matters most when you combine it with a solid wall structure. One study found that 60% infill with thick shells gives maximum mechanical strength. Another study highlights how infill geometry changes the strength to weight ratio and helps meet testing standards.
Here are some practical examples:
|
Parameter |
Mean Stress at Failure (MPa) |
Difference (MPa) |
|---|---|---|
|
100% Infill |
46.18 |
|
|
50% Infill |
29.62 |
16.56 |
|
0.8 mm Shell |
35.93 |
|
|
1.2 mm Shell |
39.86 |
3.93 |
You see that increasing infill density from 50% to 100% raises strength by 16.56 MPa. Increasing shell thickness from 0.8 mm to 1.2 mm raises strength by 3.93 MPa. Both settings matter for part strength, but infill density gives a bigger jump in this test.
Tip: If you print a part that needs to be light but strong, use thicker shells and a medium infill density. You get a better strength to weight ratio and save material.
You can solve most strength problems by testing different shell and infill settings. For example, if your print breaks when you bend it, add more shells. If it crushes under weight, use a stronger infill pattern and more layers. Shell vs infill strength depends on your part’s job. Try different settings and see what works best for your project.
Optimizing Print Settings for Part Strength
Best Shell Settings
You can make your part stronger by picking the right shell settings. Shell thickness is how much material covers your part. If you print something just to look nice, use 2 or 3 shells. This makes the outside smooth and prints faster. For parts that need to work hard, use 4 to 6 shells. This helps your part last longer and not bend or break. The table shows how many shells to use for each print type:
|
Print Type |
Shells |
Purpose |
|---|---|---|
|
Decorative Prints |
2-3 |
Appearance and speed |
|
Functional Prints |
4-6 |
Strength and durability |
Change shell settings in your slicer before printing. If your part needs to be tough, pick thick shells. Thin shells are fine for models that do not need to be strong.
Best Infill Settings
You can change infill density to control how strong your part is. For parts that get a lot of stress, use 50% to 70% infill. For medium stress, use 25% to 40%. For low stress, use 10% to 20%. Parts that do not need to be strong can use 5% to 15%. If your part holds weight, set infill between 40% and 60%. This keeps your part strong and saves material. If your part will be used a lot, use 80% or more infill. For medium stress, 30% to 40% infill works well. You can also pick different infill patterns. Triangular patterns are good for strong parts. Rectangular patterns are good for test parts. Hexagonal patterns are good for light but tough parts.
Tip: Use different infill density for each part of your print. This saves filament and keeps strength where you need it.
More infill makes your part stronger, but uses more material and takes longer. Less infill saves time and filament, but your part may not be as strong.
Other Factors Affecting Strength
You can make your part stronger by changing more than just shell and infill. Print orientation is important. Line up layers with the way your part will be pulled or pushed. This helps your part not break. Spread out material so your part does not shrink. The kind of plastic you use changes how strong your part is. Some plastics are tougher than others. How well layers stick together matters too. The bond between layers is often the weakest spot. Use a rectangle shape for printed lines. Keep nozzle offset small to stop holes from forming. Print layers close together in time to keep out water and help layers stick. Change layer thickness to help layers bond and make your part stronger.
Note: You can get stronger parts by changing shell, infill, orientation, material, and layer bonding. Try different settings to find what works best for your project.
You should focus on shell thickness when you want strong 3D prints. Infill density also helps, but balancing both gives you the best results. Try these strategies:
- Pick infill patterns that match your part’s needs.
- Increase wall thickness and use lower infill density for strong shells.
Experiment with different settings. You will learn what works best for your projects. Keep testing and enjoy building stronger prints! 🚀
FAQ
How many shells should you use for strong 3D prints?
You should use at least three shells for most functional parts. If you want extra strength, increase to four or more. Thicker shells help your print resist bending and breaking.
What infill pattern gives the best strength?
Honeycomb and cubic patterns give you strong support inside your print. These patterns spread force evenly. You can use them for parts that need to hold weight or resist crushing.
Does higher infill always mean stronger prints?
Higher infill density makes your print stronger, but it also uses more material and takes longer to print. You should balance infill density with shell thickness for the best results.
Can you save material and still get strong prints?
Yes! You can use thicker shells with medium infill density. This combination gives you good strength and saves filament. Try different settings to find what works best for your project.


