


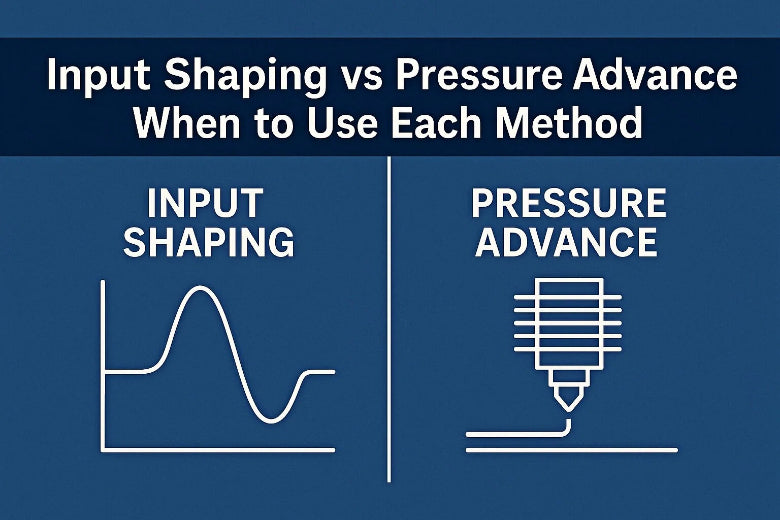
You want your prints to look better and finish faster. If you see ringing or ghosting, input shaping vs pressure advance can help you decide the best approach. Input shaping helps the most with reducing those artifacts, while pressure advance gives you better control over oozing or messy corners. You can use both features at the same time, but you need to tune them with care. Most people care about these things:
- Print speed makes your projects finish faster.
- Surface quality changes how smooth your parts are.
- Setup complexity affects how easy it is to begin.
- Compatibility lets you use more materials.
Choosing between input shaping vs pressure advance depends on your printer and what you want.
Key Takeaways
- Input shaping helps stop ringing and ghosting. It makes prints look smoother and nicer.
- Pressure advance controls how the filament moves. It stops oozing and keeps corners sharp in your prints.
- Use input shaping for fast printers like CoreXY. Use pressure advance for Bowden setups to get better prints.
- Adjusting both methods together can make prints faster and better. Make changes slowly so you do not cause new problems.
- Always test your printer after you change settings. This helps you get the best results for every print.
Input Shaping vs Pressure Advance: Key Differences
What Each Method Does
You might wonder how input shaping vs pressure advance helps your 3D printer. Both methods make your prints look better, but they fix different things.
- Input Shaping changes the way your printer moves. It stops vibrations that make ringing or ghosting. Your prints look smoother and have fewer wavy lines.
- Pressure Advance controls how quickly filament leaves the nozzle. It solves problems like oozing at corners and uneven lines. Your prints have sharper corners and cleaner details.
Input shaping vs pressure advance gives you two ways to make prints better. Input shaping works on movement and vibration. Pressure advance works on how the filament flows.
Pros and Cons
You should think about the good and bad sides of input shaping vs pressure advance before picking one. Here is a simple table to help you compare:
|
Feature |
Input Shaping |
Pressure Advance |
|---|---|---|
|
Main Benefit |
Reduces ringing and ghosting |
Controls oozing and sharp corners |
|
Print Speed |
Allows higher speeds with less ringing |
Improves quality at any speed |
|
Surface Quality |
Smoother surfaces, fewer artifacts |
Cleaner corners, less stringing |
|
Setup Complexity |
Needs firmware support and tuning |
Needs careful calibration |
|
Compatibility |
Works best on fast, rigid printers |
Works on Bowden and direct drive |
|
Limitations |
May not fix extrusion issues |
May not fix vibration problems |
Tip: Input shaping vs pressure advance can be used together. You need to tune both to get the best prints.
Smooth Pressure Advance helps stop oozing when printing. Input Shaping helps stop vibrations. Both features help your prints look neat and professional.
Best Use Cases
You may want to know when to use input shaping vs pressure advance. Each method is good for different printing needs.
- Input Shaping is best if you print fast or use a CoreXY printer. You see the most help if you have ringing or ghosting. Klipper tuning makes input shaping easier to use.
- Pressure Advance helps if you see blobs at corners or stringing between parts. You need it most with Bowden tubes or flexible filaments. It also helps with fast printing when extrusion changes quickly.
You should pick input shaping vs pressure advance based on your printer and the problems you see. If you want to print fast and stop ringing, input shaping is best. If you want sharp corners and less oozing, pressure advance is better.
You can use both methods together for the best prints. You need to tune each one carefully. This gives you fast, clean, and high-quality prints.
What Is Input Shaping?
How It Reduces Vibrations
You want your 3D printer to move without shaking. Input shaping helps by changing how the motors move. It does not just send one command. It adds a special pattern to each move. This pattern helps stop vibrations that cause ringing or ghosting. When you use input shaping, your printer learns how it shakes. It then sends signals that match this shaking. This makes the printer move more smoothly.
Researchers tried input shaping on a soft robot. They found it lowered vibrations by using sensor data. Another test used Klipper firmware and an accelerometer. The printer shook less after input shaping. The graphs showed the shaking dropped a lot.
Impact on Print Quality
Input shaping helps your prints look better. When the printer shakes less, surfaces look smoother. Details are sharper. You also see fewer wavy lines and less ghosting. Scientists checked how settings change print quality. They found layer height, extrusion temperature, and speed matter. If you use a 0.1 mm layer height and 70 mm/s speed, you get a better finish and more accurate shapes.
Here is a table that shows how these settings affect your prints:
|
Parameter |
Effect on Surface Finish |
Effect on Dimensional Accuracy |
|---|---|---|
|
Layer Height |
Big impact on roughness |
Changes angle and height accuracy |
|
Extrusion Temperature |
Changes surface smoothness |
Important for size accuracy |
|
Printing Speed |
Changes surface quality |
Changes length and width accuracy |
You can get better prints by tuning these settings and using input shaping.
Limitations and Requirements
You need the right hardware and firmware for input shaping. Most printers need the newest Klipper firmware. You might need a sensor, like an accelerometer, to check vibrations. Make sure your printer’s board works with your computer or Raspberry Pi. Tighten all screws and belts to keep your printer steady.
This simple shaper adds a signal to the stepper motors. It sends two sets of steps. The second set is delayed to match the ringing time. This helps stop vibrations before they hurt your prints.
To set up input shaping, follow these steps:
- Install the newest Klipper firmware.
- Check your board works with your computer or Raspberry Pi.
- Use a sensor to check vibrations if you can.
- Tighten all parts to keep your printer steady.
Input shaping works best when your printer is stable and tuned. You get smoother and better prints when you follow these steps.
What Is Pressure Advance?
How It Controls Extrusion
Pressure advance helps control how much filament comes out. When your printer speeds up or slows down, the plastic flow can lag. This lag can make blobs or gaps in your print. Pressure advance fixes this by changing pressure as you print. It pushes more filament before fast moves. It pulls back at the end of a move. This keeps the flow steady and smooth.
Pressure advance acts like a helper for your printer. It learns how your printer works and uses feedback. This makes sure the right amount of filament comes out each time. Studies show feedback helps make lines more even and faster. Here is a table that shows how different ways affect print quality:
|
Methodology |
Results |
|---|---|
|
Continuous dispensing |
PID-based pressure control gave a steady flow rate and better prints. |
|
Adapting to ink inhomogeneities |
Real-time pressure changes improved print quality with tricky materials. |
|
Using different nozzle types |
Pressure advance made it easier to switch between nozzle types. |
Benefits for Corners and Oozing
Problems often happen at corners or when the nozzle stops. Pressure advance helps you get sharper corners and less oozing. When printing fast, the filament needs to compress before it flows. Without pressure advance, you might see underextrusion at the start. You might also see blobs at the end.
|
Aspect |
Explanation |
|---|---|
|
Filament Compression |
Fast printing needs more compression before extrusion starts. |
|
Not enough pressure at the start causes underextrusion. |
|
|
Over-extrusion at End |
Extra pressure at the end causes oozing and blobs. |
|
Bleeding Edges at Corners |
Corners can look messy without proper pressure control. |
|
Elimination of Issues |
Good linear advance tuning removes rough edges and improves print quality. |
Setup and Tuning Challenges
Calibrating pressure advance takes time and patience. You need to match settings to your printer’s hardware and software. The process means printing test files and checking results. Many people find tuning hard because changes are small. You also need to balance settings for different speeds and materials. Melt volume limits can change how much you can push the system. If you set pressure advance too high, you might get gaps. If you set it too low, you get oozing and rough corners.
Tip: Take your time when calibrating pressure advance. Print test patterns and adjust slowly. This helps you get the best print quality and avoid new problems.
- Each printer needs careful calibration.
- Tuning can be tricky and needs test prints.
- Checking the results takes practice.
You can get great results with linear advance and pressure advance if you tune them well. This gives you clean corners, less oozing, and better prints at any speed.
When to Use Input Shaping
High-Speed and CoreXY Printers
Input shaping helps most with fast 3D printers. These printers use special systems to move quickly. CoreXY printers use belts and motors to move fast. Delta printers use arms and joints for smooth moves. Input shaping changes motor signals to stop shaking. This makes surfaces smoother and lines less wavy. If you want better prints at high speeds, input shaping is a good idea.
- CoreXY printers move fast and stay accurate with belts and motors.
- Delta printers use arms and joints for quick moves.
- Input shaping helps stop vibrations before they mess up prints.
You get faster prints and better quality when you use input shaping on these printers.
Firmware Compatibility
Check your firmware before using input shaping. Not every platform supports it. Klipper works well with input shaping. You need an ADXL345 accelerometer for best results. Some Prusa printers have crash detection that does not work with input shaping. This is because of high accelerations.
|
Firmware Platform |
Compatibility Limitations |
|---|---|
|
Klipper |
Needs ADXL345 accelerometer for best results. |
|
Prusa MK4 |
Crash detection does not work with input shaping. |
|
Prusa MINI/+ |
Crash detection does not work with input shaping. |
|
Prusa XL |
Crash detection does not work with input shaping. |
Read your printer’s manual before you start. This helps you avoid problems and makes setup easier.
Common Limitations
You might have problems when using input shaping. Sometimes, results do not match the rules. You may still see shaking or vibrations after setup. You need to follow special steps to get the best results.
|
Limitation Description |
Source |
|---|---|
|
Results not always good even with rules |
MarlinFirmware/Marlin GitHub |
|
Prusa3D Forum |
|
|
Need for special calibration steps |
Prusa3D Forum |
Tip: Always check your printer before you start. Tighten belts and check the frame. This helps you get better prints and fewer problems.
Input shaping works best on fast, strong printers with the right firmware. You need to tune it well to see real changes in print quality.
When to Use Pressure Advance
Bowden vs Direct Drive
You should know how your extruder type changes pressure advance. Bowden and direct drive systems are not the same. Bowden extruders have a long tube between the motor and hotend. This makes the print head lighter, so it can move faster. Direct drive extruders put the motor right on the print head. This gives you more control over how the filament moves.
Here is a quick comparison:
|
Feature |
Bowden Extruder |
Direct Drive Extruder |
|---|---|---|
|
Printing Speed |
Higher due to less moving mass |
Generally lower due to added weight on the print head |
|
Print Quality |
Enhanced, especially with flexible filaments |
More precise control over extrusion, leading to better detail |
|
Compatibility |
More compatible with flexible filaments |
Better for rigid filaments due to direct control |
- Bowden extruders let you print faster and work well with flexible filaments.
- Direct drive systems give you better control, so prints look nicer and have more detail.
Filament Types and Print Speed
Pressure advance works with many filament types. It helps most when you use flexible or soft filaments. Bowden setups need more pressure advance because the filament can stretch in the tube. Direct drive systems need less change, but you still get sharper corners and cleaner lines. If you print fast, pressure advance keeps the flow steady and stops blobs or gaps.
Tip: Try pressure advance if you see stringing, oozing, or rough corners. It helps when you switch filament types or print faster.
Tuning for Best Results
You can tune pressure advance by doing a few easy steps:
- Set your slicer’s layer height to 75% of your nozzle size.
- Use 0% infill for your test print.
- Set all speed settings to 100 mm/s.
- Turn off acceleration and auto-cooling.
- Turn off machine limits and auto-speed.
After you print, check the corners on your test piece. Find the layer with the sharpest corners. Measure from the bottom to that layer. Use this formula: pressure_advance = [start] + [measured_height] * [factor]. Most values are between 0.050 and 1.000.
Note: Careful tuning of pressure advance gives you sharper corners and smoother surfaces. Take your time and try different settings to see what works best for your printer.
Input Shaping vs Pressure Advance: Real-World Scenarios
High-Speed Printing
You want to print fast and still get good quality. Many people with CoreXY printers use both input shaping and pressure advance. The K1 Max printer has a G-sensor that helps set up input shaping. This tool cancels out shaking so you can print faster. Pressure advance changes how the filament comes out, so you do not get blobs or gaps when printing quickly.
Here is a table that shows how these features help when printing fast:
|
Feature |
Description |
|---|---|
|
Input Shaping |
Stops shaking and lets you print faster with good results. |
|
Pressure Advance |
Keeps filament flow steady and stops blobs or gaps in prints. |
|
K1 Max Features |
Uses a G-sensor to check shaking and sets up input shaping for best results. |
Effects on Ringing and Corners
You might see ringing or ghosting if your printer moves fast. Input shaping helps by making the printer move more smoothly. Pressure advance helps you get sharp corners and nice details by controlling the filament at each turn.
- Input shaping helps stop ringing and ghosting.
- Pressure advance makes corners sharper and details better.
If you change your printer’s square_corner_velocity, you will see different results:
- Lowering square_corner_velocity makes corners more accurate, but pressure advance may not work as well, so corners can look rough.
- Raising square_corner_velocity helps pressure advance make sharper corners, but you might see more ringing if input shaping is not set right.
Tuning Both Methods Together
You can use input shaping and pressure advance at the same time, but you need to tune them slowly. Many people make mistakes by changing both settings too fast. If input shaping is too strong, you might lose details. If pressure advance is too high, you might get gaps or rough spots.
Try these tips for the best prints:
- Set input shaping first to stop shaking.
- Change pressure advance slowly to fix corners and flow.
- Print test shapes and look for ringing and corner problems.
- Use Klipper tools to help you find the best settings.
Note: Go slow and check each step. Small changes can really help your print quality.
Using Both Methods Together
Synergy and Benefits
You can use input shaping and pressure advance at once. When you use both, your printer works better. Input shaping helps stop shaking and ringing. Pressure advance helps control how the filament comes out. This gives you sharp corners and less mess. Both together help you print faster and get cleaner prints.
Many people print hard models, like a Benchy, much quicker by tuning both methods. Printers like the Mk4 and XL show you can print fast and still get great quality if you balance these settings. You will see smoother surfaces, sharper details, and fewer mistakes on your prints.
Benefits of using both methods:
- Print faster without losing quality
- Cut down on ringing, ghosting, and rough spots
- Get sharp corners and neat edges
- Works well with Bowden and direct drive printers
- Makes it easier to use soft and hard filaments
When you use input shaping vs pressure advance together, you get the most from your printer.
Potential Issues
Using both input shaping and pressure advance can be tricky. You need to tune each one carefully. If you set one too high or too low, new problems can show up.
Common issues include:
- Over-tuning: If input shaping is too strong, you might lose small details or see weird patterns on the surface.
- Under-tuning: If pressure advance is too low, you still get blobs and rough corners. If it is too high, you might see gaps or missing lines.
- Interaction effects: Changing one setting can change how the other works. For example, strong input shaping can affect pressure advance at corners.
- Firmware limits: Not all printers or firmware can use both features well. Some boards may have trouble with the extra work.
|
Issue |
What You Might See |
How to Spot It |
|---|---|---|
|
Over-tuned shaping |
Loss of detail, wavy surfaces |
Fine features look blurry |
|
Over-tuned advance |
Gaps, missing lines, rough edges |
Corners look chipped |
|
Firmware problems |
Crashes, skipped steps |
Printer stops or errors |
Tip: Make small changes and test after each one. Watch for new problems as you tune.
Decision Guide: Choosing the Right Method
You want to choose between input shaping vs pressure advance for your 3D printer. You also want to know how to tune each method for stable printing. This guide helps you make the right choice and gives you practical steps for setup.
Step-by-Step Checklist
Follow these steps to decide which method fits your needs. You can use this checklist before you start tuning your printer.
- Identify Your Print Problems
- Look for ringing, ghosting, or wavy lines on your prints.
- Check for blobs, oozing, or rough corners.
- Check Your Printer Type
- Use input shaping if you have a CoreXY, Delta, or high-speed printer.
- Use pressure advance if you have a Bowden tube or see extrusion issues.
- Review Firmware Compatibility
- Make sure your printer supports input shaping (Klipper, some Prusa models).
- Confirm pressure advance is available in your firmware.
- Prepare for Tuning
- Tighten belts and frame parts.
- Install sensors if needed (like an accelerometer for input shaping).
- Gather test files such as calibration cubes and corner tests.
- Tune Input Shaping
- Start with default settings in your firmware.
- Use a sensor to measure vibrations if possible.
- Adjust shaping parameters and print a test cube.
- Look for smoother surfaces and less ringing.
- Tune Pressure Advance
- Print a test pattern with sharp corners.
- Adjust pressure advance values in small steps.
- Watch for cleaner corners and less oozing.
- Test Both Methods Together
- If you use both, tune input shaping first.
- Adjust pressure advance slowly after input shaping.
- Print several test objects and check for new issues.
- Final Quality Check
- Print a calibration cube.
- Inspect for ringing, blobs, and sharp corners.
- Make small changes if needed.
Tip: Always print a test object after each change. This helps you spot problems early and keeps your prints looking great.
Quick Selection Table
Use this table to quickly decide which method to use for your printing scenario. You can see which problems each method solves and which printer types work best.
|
Scenario / Problem |
Input Shaping |
Pressure Advance |
Both Together |
|---|---|---|---|
|
Ringing / Ghosting |
✅ Best choice |
❌ Not effective |
✅ Use both for speed |
|
Oozing / Blobs |
❌ Not effective |
✅ Best choice |
✅ Use both for quality |
|
Sharp Corners |
❌ Not effective |
✅ Best choice |
✅ Use both for detail |
|
High-Speed Printing |
✅ Needed |
✅ Helpful |
✅ Best results |
|
Bowden Extruder |
❌ Not needed |
✅ Needed |
✅ Use both if possible |
|
CoreXY / Delta Printer |
✅ Needed |
✅ Helpful |
✅ Best results |
|
Flexible Filament |
❌ Not needed |
✅ Needed |
✅ Use both if possible |
|
Klipper Tuning Available |
✅ Easy setup |
✅ Easy setup |
✅ Best results |
Note: If you want the best print quality and speed, use both input shaping vs pressure advance. Tune each method slowly and test often.
Tips for Stable Printing
You want your prints to stay stable and look clean. Use these tips to keep your printer running smoothly when using input shaping vs pressure advance.
- Adjust acceleration to around 3000 mm/s² for X and Y axes. This helps prevent shaking and ringing.
- Set jerk values near 10 mm/s. This gives you smoother transitions between moves.
- If you see wavy lines or ghosting, lower acceleration or jerk settings.
- Always print a calibration cube before starting a big project. This helps you check for quality and spot problems early.
🛠️ Pro Tip: Small changes in acceleration and jerk can make a big difference. Test with a simple cube and look for smooth surfaces and sharp corners.
You can get stable, high-quality prints by following these tips and tuning input shaping vs pressure advance carefully. Take your time, test often, and enjoy better results from your 3D printer.
You can stop ringing and ghosting by using input shaping. Pressure advance helps you fix oozing and makes corners sharp. If you use both, tune each one for the best prints. You need to calibrate often to get high-quality results:
|
Benefit |
|
|---|---|
|
Retraction Tuning |
Cuts down on stringing between printed parts |
|
Input Shaping (Klipper) |
Stops ringing when printing fast |
|
Pressure Advance |
Makes corners sharper and controls flow |
|
Speed & Acceleration Settings |
Helps balance print quality and speed |
Try these tips to get fast and clean prints:
- Use special firmware like Klipper
- Change slicer speed and acceleration settings
- Use both input shaping and pressure advance for smooth, detailed prints
Test your printer often and read your firmware guide. Small changes can help you print faster and make your prints look better.
FAQ
What problems does input shaping vs pressure advance solve?
- Input shaping helps stop ringing and ghosting.
- Pressure advance keeps corners sharp and stops oozing.
- You can use both for faster printing and smoother surfaces.
Can you use input shaping and pressure advance together?
Yes, you can use both at the same time. You must tune each one slowly. Start with input shaping first. Then change pressure advance for the best results.
Do you need special hardware for input shaping vs pressure advance?
|
Feature |
Hardware Needed |
|---|---|
|
Input Shaping |
Accelerometer (optional) |
|
Pressure Advance |
No extra hardware |
You need Klipper tuning to use input shaping. Pressure advance works on most printers.
How do you know which method to tune first?
You should tune input shaping before pressure advance. This helps stop shaking. After that, tune pressure advance to fix flow and corners. Print a test cube after every change.


