


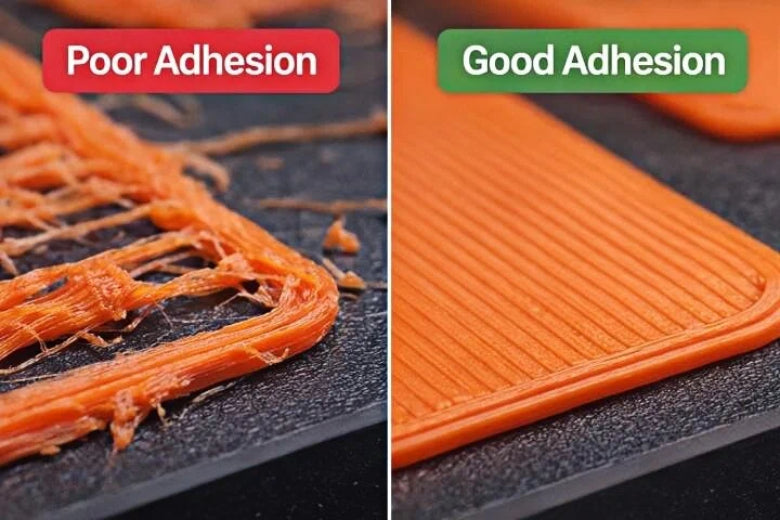
If you want to fix first layer adhesion issues in 3D printing, you need to focus on the basics. A strong first layer keeps your print stable and prevents problems that can ruin your project. When the first layer does not stick well, you might see warping, peeling, or gaps. You may notice rough spots, bulging edges, or even wavy lines across the surface. These issues show why 3D Prints Fail on the First Layer and why proper bed preparation and leveling matter.
- Print does not stick to the bed
- Edges bulge out or warp
- Gaps, rough spots, or uneven thickness
- Bumpy or rippled texture
Don’t worry—most first layer problems have simple fixes. You can get reliable results with a few easy changes.
Key Takeaways
- Make sure the nozzle is at the right height for good adhesion. Change the Z-offset so the filament touches the bed softly.
- Keep the print bed clean and do not let dust or oils stay. Clean the surface with isopropyl alcohol before you print.
- Level the print bed often. A level bed keeps the nozzle at the same distance everywhere. This helps the first layer stick better.
- Look at slicer settings for the first layer. Use a thicker layer, slow down the speed, and set the right temperature for strong bonding.
- Keep the printing area steady. Control the room’s temperature and humidity to stop warping and sticking problems.
Why 3D Prints Fail on the First Layer
What Is First Layer Adhesion
You might wonder why 3D prints fail on the first layer so often. The answer starts with first layer adhesion. This term means how well your first layer sticks to the print bed. The first layer acts as the base for every other layer. If it does not grip the bed, your print can shift, curl, or even detach before finishing. You need strong adhesion to keep your project stable from start to finish.
Here’s what makes first layer adhesion so important:
- The first layer serves as the foundation for all other layers in 3D printing.
- Proper adhesion of the first layer is critical for the success of the entire print process.
If you skip this step or rush through it, you risk wasting time and filament. You want to get it right every time.
Impact on Print Quality
When you see problems with the first layer, you often notice bigger issues later. Poor adhesion leads to prints that warp, peel, or have rough edges. Sometimes, the print lifts off the bed and ruins the whole job. You may see gaps, uneven lines, or a bumpy surface. These flaws make your print look messy and weak.
Why 3D prints fail on the first layer often comes down to a few main reasons:
- Dust, oil, or glue left on the bed can block the filament from sticking.
- Wrong nozzle height adjustment causes the filament to sit too high or too low.
- Uneven build plate makes some areas stick while others lift.
- Wrong bed or nozzle temperature prevents the filament from bonding.
If you fix these issues, you boost your print quality and save yourself a lot of frustration.
Tip: Always check your bed and nozzle settings before starting a new print. Small changes can make a big difference.
Signs of First Layer Problems
You can spot first layer issues early if you know what to look for. Watch your printer as it lays down the first lines. If you see gaps, squished lines, or uneven widths, you have an adhesion problem. These signs help you figure out why 3D prints fail on the first layer and what you need to adjust.
Here’s a quick table to help you identify common first layer problems:
|
Sign of Adhesion Problem |
Description |
|---|---|
|
Too High |
Gaps between lines in the end square indicate the nozzle is too high, leading to poor adhesion. |
|
Too Low |
A squished line with ridges indicates the nozzle is too low, causing excessive pressure and potential curling. |
|
Variable Line Width |
Inconsistent line width may suggest bed leveling issues, affecting adhesion. |
If you notice any of these signs, stop the print and check your setup. You can fix most problems by cleaning the bed, adjusting the nozzle height, or leveling the plate. When you pay attention to these details, you learn why 3D prints fail on the first layer and how to prevent it next time.
Common Causes of First Layer Adhesion Issues
Incorrect Nozzle Height
Nozzle height is one of the biggest reasons your first layer fails. If the nozzle sits too high, the filament barely touches the bed and won’t stick. If it’s too low, the filament gets squished, causing ridges or even clogs. Here’s a quick guide:
|
Nozzle Position |
Effect on Filament Adhesion |
Suggested Action |
|---|---|---|
|
Too far from bed |
Filament doesn't stick; thin lines or no adhesion |
Lower the nozzle height (adjust Z-offset) |
|
Too close to bed |
Filament is squished; flattened lines and clogs |
Raise the nozzle slightly (adjust Z-offset) |
You can fix this by running a Z-offset calibration. Use a piece of paper to check the gap. Adjust until you feel slight resistance when moving the paper.
Bed Leveling Errors
A level bed is key for a good first layer. If your bed tilts or dips, some areas will stick while others lift. You might see uneven lines or gaps. Most printers use a 3-point leveling system. Try these steps:
- Use a piece of paper to check the gap at each corner.
- Adjust the screws until the nozzle touches the paper with light friction.
- Re-level after every few prints or if you move your printer.
Tip: Always clean your nozzle before leveling for best results.
Dirty or Contaminated Bed Surface
A dirty bed can ruin your print before it even starts. Dust, grease, or leftover filament block the filament from sticking. Common culprits include fingerprints and debris from old prints. Clean your bed with isopropyl alcohol and a lint-free cloth before every print. Avoid touching the bed with your fingers.
Wrong Bed Temperature
Bed temperature matters a lot. If it’s too low, the filament won’t bond. If it’s too high, you might get stringing or blobs. For PLA, set your bed between 50°C and 60°C. For TPU, try 40°C to 60°C. Always check your filament’s recommended range.
Filament Problems
Not all filaments are the same. Wet or low-quality filament can cause poor adhesion. Look for filaments with even thickness and no fillers. Store your spools in a dry box. Try different brands if you keep having trouble. Each type, like PLA or ABS, needs its own settings for best results.
Slicer Settings for First Layer
Your slicer controls how the first layer prints. Some key settings include:
|
Slicer Setting |
Description |
|---|---|
|
Bed Leveling |
Aligns the bed and nozzle for even layers. |
|
Z-offset Calibration |
Sets the nozzle distance for proper squish. |
|
Temperature Management |
Matches bed temp to filament needs. |
|
Reduced First Layer Speed |
Slower speed helps the filament stick. |
|
Increased First Layer Height |
Thicker first layer covers small bed errors. |
|
Appropriate First Layer Width |
Wider lines give more grip. |
|
No Cooling |
Turning off the fan keeps the first layer warm and sticky. |
Check these settings before every print. Small tweaks can make a big difference.
Environmental Factors
Room temperature and humidity can affect your prints. Cold rooms make the bed cool too fast, causing warping. High humidity can make filament absorb water, leading to weak layers. Try to print in a stable, dry room. Store filament in airtight containers.
If you want to know Why 3D Prints Fail on the First Layer, start by checking these common causes. Fixing them will help you get smooth, strong prints every time.
Fixing First Layer Adhesion Problems
Adjust Nozzle Height and Z-Offset
Getting the nozzle height right is one of the most important steps for a strong first layer. If the nozzle sits too high, the filament will not stick. If it sits too low, the nozzle can scrape the bed and block the filament.
How to Adjust Nozzle Height and Z-Offset:
- Home your printer so the nozzle moves to the starting position.
- Place a piece of regular paper on the bed under the nozzle.
- Lower the nozzle until you feel slight resistance when sliding the paper.
- Use your printer’s “Live Adjust Z” or Z-offset setting to fine-tune the gap. Aim for a thin, even line of filament—about 0.2mm thick.
- Start a test print and watch the first layer. Adjust the Z-offset in small steps if needed.
Tip: The nozzle should be close to the bed but not touching it. You want the filament to press gently onto the surface for the best grip.
Level the Bed Properly
A level bed keeps the nozzle at the same distance from the bed across the whole print area. This helps every part of the first layer stick well.
Steps for Manual Bed Leveling:
- Open your printer’s control panel and find the bed leveling menu.
- Preheat the bed and nozzle to printing temperature.
- Move the nozzle to each corner of the bed.
- Slide a piece of paper under the nozzle. Adjust the leveling screw until you feel a slight drag.
- Repeat for all corners and the center. Go around at least twice for accuracy.
- If you see gaps or squished lines during printing, adjust the bed height again.
Note: Leveling the bed after moving your printer or changing the build plate helps prevent surprises.
Clean the Print Bed
A clean bed gives the filament a good surface to grip. Oils from your fingers, dust, and leftover glue can block adhesion.
Best Cleaning Methods:
|
Cleaning Agent |
Effectiveness Description |
|---|---|
|
IPA (90%) |
|
|
Warm Soapy Water + Soft Brush |
Removes dust and oils, enhances grip. |
|
Soapy Water + Sponge |
Great for deep cleaning with the bed removed. |
|
Microfiber Cloth |
Prevents scratches during cleaning. |
Cleaning Steps:
- Wipe the bed with isopropyl alcohol after every print.
- Wash PEI sheets with dish soap and rinse well every few prints.
- Use acetone for tough residue, but only on beds that allow it.
- Avoid touching the bed with your fingers after cleaning.
Tip: Clean the bed more often if you print daily. Consistent cleaning prevents random adhesion failures.
Optimize Slicer First Layer Settings
Your slicer controls how the printer lays down the first layer. Small changes here can make a big difference.
Key Slicer Settings to Check:
- First Layer Height: Set this thicker than other layers (e.g., 0.2–0.3mm) for better coverage.
- First Layer Width: Increase to 120–150% of the nozzle size for more grip.
- First Layer Speed: Slow down to half your normal print speed. This gives the filament time to stick.
- No Cooling Fan: Turn off the fan for the first layer to keep it warm and sticky.
- Bed and Nozzle Temperature: Use the recommended range for your filament.
Tip: Save your favorite first layer settings as a slicer profile. This makes it easy to repeat successful prints.
Set Correct Temperatures
Temperature affects how well the filament bonds to the bed. Too cold, and the filament will not stick. Too hot, and you may get blobs or stringing.
Temperature Guidelines:
- For PLA, set the first layer nozzle temperature to 210–215°C. Use a bed temperature of 60–65°C.
- For PETG, try a slightly lower first layer temperature to avoid sticking too much.
- Preheat the bed and nozzle before starting the print.
- If the first layer lifts, try raising the bed temperature by 5°C.
Note: Always check your filament’s recommended temperature range. Printing at the right temperature helps the filament melt and bond well.
Calibrate Flow Rate
The flow rate controls how much filament the printer pushes out. If it’s too high, you get blobs. If it’s too low, you see gaps.
How to Calibrate Flow Rate:
- Print a simple test square.
- Measure the width of the printed lines with calipers.
- Compare the measurement to your slicer’s expected value.
- Adjust the flow rate in your slicer until the lines match the expected width.
Tip: Proper flow rate calibration gives you a smooth, even first layer and helps avoid common print defects.
Control Printing Environment
Your print room can affect adhesion. Cold air, drafts, and humidity can cause problems.
How to Control the Environment:
- Store filament in dry containers to keep out moisture.
- Use an enclosure to keep the temperature steady, especially for ABS or nylon.
- Monitor room humidity and temperature. Try to print in a warm, dry space.
- For glass beds, a light spray of hairspray can help with adhesion and make removal easier after cooling.
Tip: Preheat the enclosure for a few minutes before printing. This helps the first layer stick and reduces warping.
By following these steps, you can fix most first layer adhesion problems and enjoy smoother, more reliable prints.
First Layer Tips for Different Filaments
PLA Adhesion Tips
PLA usually sticks well, but you might see curling or gaps if the bed is dirty or the nozzle sits too high. Prints can lift at the corners or show thin, uneven lines. These problems often come from oils, dust, or poor bed contact.
Here’s a quick table of practical tips for PLA:
|
Tip Description |
Why It Helps |
|---|---|
|
Clean the build plate with dish soap and warm water |
Removes oils and dust that block adhesion |
|
Use packing tape to pick up debris |
Ensures a spotless print area |
|
Adjust Z height closer to the bed |
Improves first layer contact |
|
Add a line or brim around the first layer |
Anchors the print and prevents lifting |
|
Try a smooth plate instead of a textured one |
Gives PLA more surface to grip |
|
Use an adhesion booster for small prints |
Helps with tricky shapes or small contact areas |
Tip: Always avoid touching the bed with your fingers after cleaning. Even a small fingerprint can cause a print to lift.
PETG Best Practices
PETG can stick too well or not enough. You might notice blobs, stringing, or the first layer tearing when you remove the print. These issues often happen if the nozzle is too close or the bed is too cool.
- Level the bed carefully and set the nozzle at the right height.
- Start with the cooling fan off or on low for the first layers.
- Print the first layer slowly—try 20–30 mm/s.
- Use a heated bed at 70–90°C.
- Apply a glue stick or hairspray to the bed to help with release and prevent damage.
|
Best Practice |
Description |
|---|---|
|
Bed Leveling |
Keeps first layer even and prevents missed spots |
|
Nozzle Distance |
Avoids over-squishing or poor contact |
|
Base Material |
Use PEI, glass, or glue stick for best results |
Note: PETG can bond permanently to some beds. A thin layer of glue can make removal much easier.
ABS and High-Temp Materials
ABS and similar filaments often warp or peel at the edges. You might see corners lifting or cracks in the first few layers. These problems happen because ABS shrinks as it cools, pulling away from the bed.
|
Tip |
Description |
|---|---|
|
Raise bed temperature |
|
|
Enclose build volume |
Prevents drafts and keeps heat inside |
|
Increase hot end temp |
Print at 250°C for strong layer bonding |
|
Decrease layer height |
Improves contact and reduces warping |
|
Reduce infill |
Lowers stress on the first layer |
- Use PEI sheets, ABS juice, or glue stick for extra grip.
- Keep the bed and enclosure warm to stop the print from cooling too fast.
Tip: An enclosure makes a big difference with ABS. It keeps the temperature steady and helps prevent warping.
Flexible Filament (TPU) Tips
TPU and other flexible filaments can be tricky. The first layer may not stick, or it might stretch and curl at the edges. These issues often come from the bed being too cool or the nozzle too far away.
- Use blue painter’s tape or a heated glass bed with a thin layer of PVA glue stick.
- Set the bed temperature between 55°C and 65°C when using blue tape.
- Adjust the nozzle height for a gentle squish—too much pressure can cause curling.
- If the first layer lifts, add a bit more glue stick.
Note: Flexible filaments need a clean, slightly tacky surface. Take your time with bed prep for the best results.
Preventing First Layer Issues
Pre-Print Checklist
You can avoid most first layer problems by following a simple checklist before every print. This habit saves time and helps you catch mistakes early.
- Check that the print bed is clean and free of dust or fingerprints.
- Make sure the nozzle is clear and not clogged.
- Confirm the bed is level and the Z-offset is set correctly.
- Double-check your slicer’s first layer settings, like speed and temperature.
- Store filament in a dry box to keep it from absorbing moisture.
- Preheat the bed and nozzle to the right temperatures for your filament.
Tip: Keep a printed checklist near your printer. It’s easy to forget a step when you’re excited to start a new project!
Maintenance Habits
Good maintenance keeps your printer running smoothly and helps every first layer stick. You don’t need fancy tools—just a few simple habits.
- Clean the PEI print surface with warm water and dish soap, like Dawn, to remove oils and dust.
- Use isopropyl alcohol (91% or higher) between prints, especially on textured PEI beds.
- Avoid touching the bed with your fingers after cleaning. Even a small fingerprint can cause problems.
- For stubborn residue, use 100% acetone, but only if your bed supports it.
- Never use sponges or cloths that have touched grease or oil.
Regular cleaning keeps the bed surface in top shape. You’ll notice fewer adhesion issues and more successful prints.
When to Recalibrate or Adjust Settings
Sometimes, you need to recalibrate or tweak your settings to keep prints sticking well. Watch for these signs:
- The first layer starts to show gaps, uneven lines, or poor adhesion.
- You switch to a new filament type or brand.
- You move your printer or change the build plate.
- Prints suddenly start to fail after working fine for a while.
When you see these issues, run a bed leveling routine and check your Z-offset. Adjust slicer settings if you change filament or notice temperature swings in your workspace. Staying alert to small changes helps you catch problems before they ruin a print.
Mistakes to Avoid on the First Layer
When you troubleshoot first layer adhesion, you might fix one problem but create another. Let’s look at the most common mistakes and how you can avoid them.
Over-Squishing
You might think pushing the nozzle closer to the bed will help the filament stick. If you go too far, you get over-squishing. The filament flattens out, creating ridges and rough edges. Sometimes, the nozzle scrapes the bed or blocks the flow. Over-squishing can cause curling, poor surface finish, and even damage to your print bed.
How to avoid it:
- Use the paper test for Z-offset. You should feel slight resistance, not a tight grip.
- Watch the first layer. Lines should look smooth, not pressed flat.
- Adjust the nozzle height in small steps.
If you see ridges or the filament looks smeared, raise the nozzle a tiny bit.
Excessive Adhesives
You might reach for glue sticks, hairspray, or tape when prints won’t stick. Too much adhesive can create bumps, uneven surfaces, or make removal difficult. Sometimes, adhesives leave residue that blocks future prints.
Practical tips:
- Clean the bed with isopropyl alcohol before each print.
- Use adhesives only when needed, like with ABS or PETG.
- Apply a thin, even layer. Avoid puddles or thick spots.
|
Mistake Type |
Recommendation |
Impact |
|---|---|---|
|
Use sparingly and evenly |
Prevents bumps and improves removal |
Ignoring Environment
Temperature and humidity in your workspace matter. If the room is cold or drafty, the bed cools too fast and prints warp. High humidity makes filament absorb water, causing weak layers and poor adhesion.
What you can do:
- Print in a warm, stable room.
- Store filament in airtight containers.
- Use an enclosure for materials like ABS.
A steady environment helps every layer stick and keeps your prints looking sharp.
Changing Too Many Settings at Once
You might want to fix everything at once, but changing too many slicer or printer settings can make troubleshooting harder. If you adjust speed, temperature, and nozzle height together, you won’t know which change helped or hurt.
Better approach:
- Change one setting at a time.
- Test with a small print after each adjustment.
- Keep notes on what works.
Common mistakes to watch for:
- Bed not level or nozzle too far from the bed.
- Bed or nozzle temperature too low.
- Print surface dirty or oily.
- First layer speed too high.
- Filament does not match the bed surface.
- Not enough contact area between print and bed.
Slow, steady changes help you find the real solution and build reliable habits.
You can solve first layer adhesion problems by doing a few things:
- Change the nozzle height and make sure the bed is flat.
- Clean the print bed before you start each print.
- Use the right temperature for your filament.
- Look at slicer settings and check the flow rate.
- Keep your printing room steady and dry.
Make small changes and test them one by one. If you keep good habits and learn as you go, your prints will get better every time.
FAQ
What should I do if my first layer looks stringy or messy?
You can slow down the first layer speed in your slicer. Lower the nozzle temperature by 5°C. Clean the nozzle tip before starting. Try printing a skirt or brim to help prime the nozzle and get a cleaner start.
Can I print without a heated bed?
Yes, you can print PLA on an unheated bed. Use blue painter’s tape or a glue stick for extra grip. Make sure the bed is clean and level. Heated beds help with other filaments like ABS or PETG.
How often should I level my print bed?
Level your bed every few prints or after moving your printer. If you see first layer issues, check the bed right away. Regular leveling keeps your prints consistent and helps avoid surprises.
Why does my print stick too well to the bed?
If removal is hard, let the bed cool completely. Use a flexible build plate if you have one. Try a thin layer of glue stick or switch to a different bed surface. Avoid over-squishing the first layer.

