


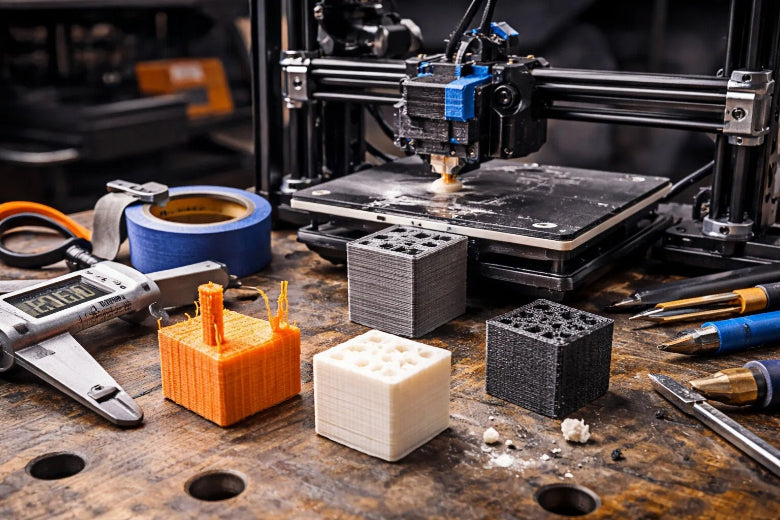
You can fix most 3D print problems by changing your printer’s settings. Adjust temperature, speed, layer height, and retraction. Many people have issues like stringing, warping, poor sticking, lines, and under-extrusion. The table below shows how often these problems happen:
|
Material |
|
|---|---|
|
PLA |
20 |
|
ABS |
34 |
|
Overall |
41.1 |
The most common problems are not extruding at the start, print not sticking to the bed, jammed nozzle, layer separation, stringing, under-extrusion, and blobs. Each layer in your print needs the right settings. Follow easy steps to change your settings and see fast improvements. You do not need special skills—just patience and small changes. Learning what affects 3D print quality most will help you get better results.
Key Takeaways
Change printer settings like temperature and speed to make prints better. Use the correct layer height for details. Lower heights make prints smoother. Check and set the flow rate to stop gaps and under-extrusion. Keep the bed at the right temperature for good sticking and to stop warping. Try different slicer settings to see what works best for each material.
What Affects 3D Print Quality Most
Knowing what affects 3d print quality most helps you get better prints. You can change many settings in your slicer to make prints look nicer. The main settings are layer height, print speed, extrusion width, resolution, infill, and wall thickness. Each one changes how your print looks and feels. You can use slicer settings for both home and factory 3D printing.
Tip: Start with the suggested settings for your material. Make small changes to see how each setting changes the print.
Layer Height and Print Speed
Layer height is very important for print quality. It controls how thick each layer is. Lower layer heights make the print smoother and show fewer lines. Higher layer heights print faster but can look rough. Print speed also changes how the print looks. Slower speeds let the plastic cool and stick better. This makes the print look nicer. Faster speeds save time but can make the print look rough or weak.
|
Parameter |
Effect on Surface Quality |
Effect on Print Time |
|
|---|---|---|---|
|
Layer Height |
Lower heights improve finish quality, reducing layer visibility |
Thinner layers increase print time significantly |
0.1 mm to 0.2 mm for standard applications, 0.05 mm for high detail |
|
Print Speed |
Higher speeds can reduce interlayer adhesion and increase roughness |
Higher speeds decrease print time |
20–170 mm/s for standard PLA prints |
You can see that what affects 3d print quality most is often the balance between speed and detail. Thinner layers give more detail and a smoother finish but take longer to print. For example, printing at 0.05 mm layer height can take four times longer than at 0.2 mm. Most slicers let you pick layer height and print speed before you start. For PLA, use 0.1–0.2 mm layer height and 40–60 mm/s speed. For PETG, try 0.1–0.2 mm layer height and 30–60 mm/s speed. For ABS, use 0.1–0.2 mm layer height and 40–60 mm/s speed.
- Studies show that layer height really changes how smooth the print is, with an importance score of 0.626.
- Changing layer height can make a big difference in how your print looks.
Extrusion Width and Resolution
Extrusion width is another important setting for what affects 3d print quality most. It controls how wide each line of plastic is. Wider extrusion widths make prints stronger and faster, but too wide can cause problems on the surface. Narrow widths give more detail but may make the print weaker.
|
Extrusion Width (%) |
Notes on Quality |
|
|---|---|---|
|
100 |
20 |
Failed first |
|
100 (4 perimeters) |
33 |
Some scatter |
|
133 |
37 |
Stronger than 100% |
|
200 |
39 |
Strongest, less time |
|
140 |
Similar quality |
No visible issues |
|
160+ |
Quality issues noted |
Artefacts visible |
|
250 |
Textured surface |
Thin walls issue |
Set extrusion width to match your nozzle size. Most slicers use 100% of the nozzle size by default. You can raise it to 120–140% for stronger prints. If you go above 160%, you might see surface problems or thin walls. Resolution matters too. Higher resolution means more detail but takes longer to print. Lower resolution prints faster but may show more lines.
Note: For most prints, set extrusion width to 0.4 mm if you use a 0.4 mm nozzle. Try 0.48–0.56 mm for stronger parts.
Infill and Wall Thickness
Infill is the pattern inside your print. It gives strength and saves material. Wall thickness is how thick the outside shell is. Both are important for what affects 3d print quality most. Infill density controls how solid your print feels. Higher infill density makes prints stronger but uses more filament and takes longer. Lower infill density saves time and material but can make prints weak.
|
Material |
Recommended Wall Thickness |
|---|---|
|
PLA |
|
|
PETG |
1.2–2.0 mm |
|
ABS |
1.2–2.5 mm |
- Infill patterns help your print handle stress.
- The amount of infill changes how strong the part is and how much material you use.
- Balancing material use and strength helps you print in a better way.
- Infill percentage changes how solid the inside is, which affects strength, material use, and print time.
- More infill makes prints stronger, but less infill saves time and material.
- Thicker walls can mean you do not need as much infill, so you save filament.
- Infill helps keep your print strong and stops it from breaking.
- Different infill patterns, like grid and honeycomb, spread out forces to keep the print stable.
- Using less infill can save filament and make printing faster.
- For most models, use wall thickness between 1 mm and 4 mm for a good mix of strength and flexibility.
- Use thinner walls (about 1 mm) for small or decorative prints.
- Use thicker walls (up to 4 mm) for big or working parts.
- Make sure wall thickness matches your printer’s nozzle size.
You can change infill and wall thickness in your slicer. For PLA, PETG, and ABS, start with 15–25% infill density for most prints. Use 1.2–2.0 mm wall thickness for PLA and PETG, and 1.2–2.5 mm for ABS. If you need more strength, use more infill or thicker walls. If you want to save material, use less infill or thinner walls.
Tip: Try different infill patterns in your slicer to see which one works best for your project.
By learning what affects 3d print quality most, you can use slicer settings to control layer height, print speed, extrusion width, infill, and wall thickness. These settings help you get the best prints, whether you use PLA, PETG, or ABS.
Stringing and Oozing
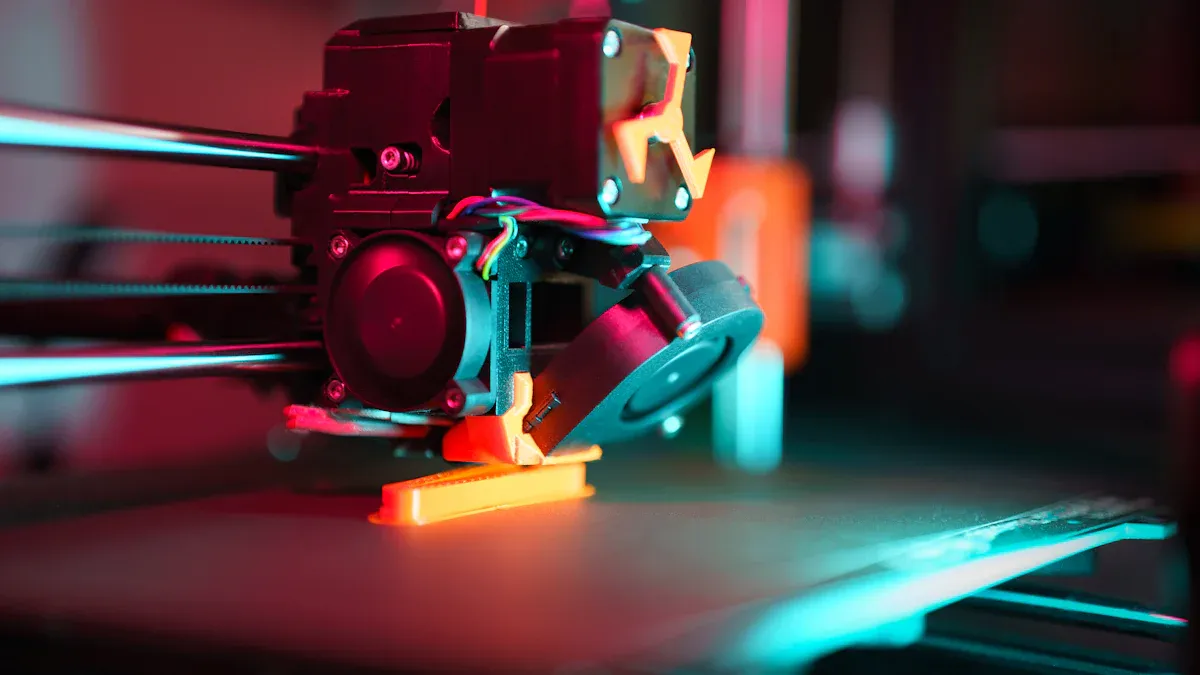
Stringing and oozing happen when melted filament makes thin strands or drips. You might notice small hairs or blobs on your print. These problems usually come from wrong printer settings. Retraction, temperature, cooling, and material choices matter a lot.
Retraction Settings
Retraction pulls filament back into the nozzle when the printer moves. If retraction distance or speed is too low, you get more stringing. If they are too high, the nozzle can clog. Use these safe ranges for PLA and PETG:
|
Parameter |
Recommended Range |
|---|---|
|
Retraction Distance |
0.5–2 mm (Direct Drive), 3–6 mm (Bowden) |
|
Retraction Speed |
20–45 mm/s |
|
Nozzle Temperature |
230–250 °C |
|
Travel Speed |
Above 150 mm/s |
Start with calibration prints like retraction towers. Change one setting at a time. Increase travel speed to help stop oozing. Try slicer features like coasting and wipe for better results.
Temperature Adjustments
High temperature makes filament flow too much. This causes stringing and oozing. Lowering the temperature helps control the flow. For PLA, use 190–220°C. For PETG, use 230–250°C. Print a temperature tower to find the best temperature for your material. Lower the temperature by 5–10°C if you see stringing. Cooler filament flows less, so prints look cleaner.
Tip: Always check your material’s recommended temperature range before you change settings.
Cooling and Fan Control
Cooling helps the filament harden fast and stops stringing. Fan speed depends on the material you use. Use this table for help:
|
Material |
Notes |
|
|---|---|---|
|
PLA |
100% after first two layers |
Helps solidify filament and reduce stringing |
|
PETG |
30% - 50% after first layer |
Moderate cooling to prevent warping |
|
TPU |
40% - 50% for strong prints, 50% - 70% for smoother finishes |
Avoid high speeds to prevent brittleness |
|
ABS |
Off or ≤ 10% |
Prevents warping and cracks |
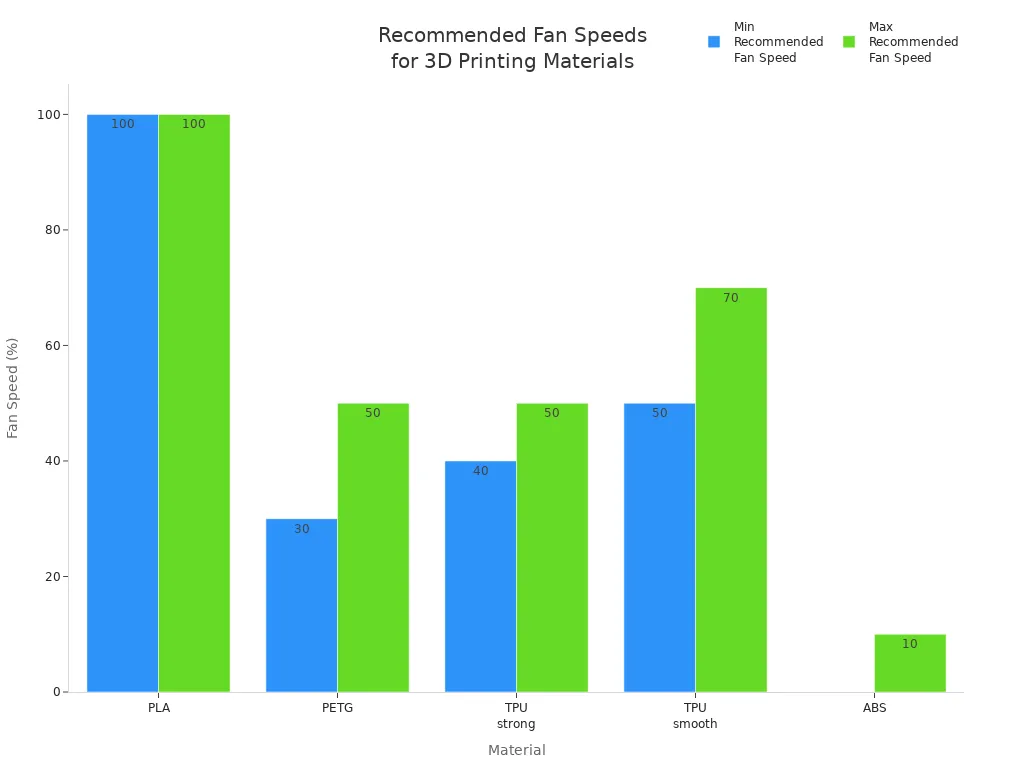
Set the cooling fan speed in your slicer. For PLA, use full fan speed. For PETG, use medium fan speed. For ABS, keep the fan low to stop warping.
Material Tips
Pick filament brands that do not string or ooze much. Siraya Tech Strong helps reduce stringing and oozing. This means you clean your prints less. OVERTURE PETG sticks well but may need retraction changes. Keep PETG dry in airtight containers. Do not use PLA settings for PETG. Each material needs different settings. Always check your material’s label for the best results.
Quick Fixes:
- Dry your filament before you print.
- Lower the temperature if you see stringing.
- Change retraction and cooling settings for each material.
By changing your printer settings for retraction, temperature, cooling, and material, you can fix stringing and oozing fast. Make small changes and test your prints for better results.
Warping and Adhesion Issues
Warping and adhesion problems can ruin your 3D prints. Warping makes the corners of your print lift off the bed. Poor adhesion means your print does not stick well and may move or fail. You can fix these issues by adjusting your printer settings.
Bed Temperature
Bed temperature is one of the most important settings for good adhesion. If the bed is too cool, prints can warp or come loose. If it is too hot, the print may become soft and hard to remove. For PETG, set the bed temperature between 60°C and 90°C. Start with 85–90°C for the first layer, then lower it to 75–80°C for the rest. For ABS, use a heated bed and keep the temperature stable. A heated bed helps support the print and keeps it flat.
|
Temperature Range |
Description |
|---|---|
|
60–90 °C |
Best bed temperature for PETG to improve adhesion and reduce warping |
|
Up to 90 °C |
Do not go higher to avoid PETG softening too much |
- Use a heated bed for best results.
- Adjust bed temperature in your slicer settings.
First Layer Settings
The first layer is key for bed adhesion. A thicker first layer helps the print stick better. Use a layer height of 0.20 mm for strong adhesion. Thinner layers, like 0.10 mm, can cause warping. Print the first layer slowly to give the filament time to bond with the bed. Set the first layer speed to 20–30 mm/s in your settings.
|
Layer Height (mm) |
Effect on Bed Adhesion |
Notes |
|---|---|---|
|
0.10 |
Reduced adhesion |
May cause warping |
|
0.20 |
Improved adhesion |
Best for stability |
|
0.32 |
Poor bonding |
Avoid for first layer |
Print Surface Prep
The print surface affects adhesion. Clean the bed before each print. Use isopropyl alcohol on glass or PEI beds. For PLA, blue painter’s tape, PEI, or glass works well. ABS sticks best to Kapton tape or a heated glass bed. PETG bonds strongly to PEI, but you may need a release agent to prevent sticking too much. BuildTak gives great adhesion for all materials, but you may need to adjust temperature settings.
|
Bed Type |
Characteristics |
Suitable Materials |
|---|---|---|
|
Glass |
Flat, smooth, heat-resistant |
PLA, ABS, PETG |
|
PEI Sheet |
Very strong adhesion, reusable |
PLA, PETG, ABS, TPU |
|
Magnetic Spring Steel Plate |
Flexible, easy removal |
All (depends on coating) |
Environmental Factors
The environment around your printer affects adhesion and warping. Keep the room temperature stable. Avoid drafts and sudden cooling, especially for ABS. Use an enclosure to support a steady temperature. Humidity can cause filament to absorb moisture, which hurts adhesion. Store filament in a cool, dry place. A stable print environment helps your settings work better and keeps prints flat.
- Keep the print area free from drafts.
- Use an enclosure for ABS to support stable temperature.
- Store filament in dry boxes to prevent moisture problems.
Tip: If you see warping or poor bed adhesion, check your bed temperature, first layer settings, and print surface. Adjust one setting at a time for best results.
Layer Lines and Surface Finish
Visible layer lines can make your 3D prints look rough or unfinished. You often see these lines when the layer height is too high or the print speed is not set correctly. Surface defects like blobs, uneven shells, or rough textures can also appear if you do not adjust your settings. You can fix these issues by changing a few key settings in your slicer.
Layer Height Settings
Layer height controls how thick each layer is. Lower layer height gives you a smoother finish and hides layer lines. Higher layer height prints faster but shows more lines. You should match the layer height to your nozzle size for best results. Use this table to pick the right layer height for your nozzle:
|
Nozzle diameter |
Recommended layer height range |
|---|---|
|
0.2mm |
0.05 - 0.15mm |
|
0.4mm |
0.1 - 0.3mm |
|
0.6mm |
0.15 - 0.45mm |
|
0.8mm |
0.2 - 0.6mm |
|
1.0mm |
0.25 - 0.75mm |
|
1.2mm |
0.3 - 0.9mm |
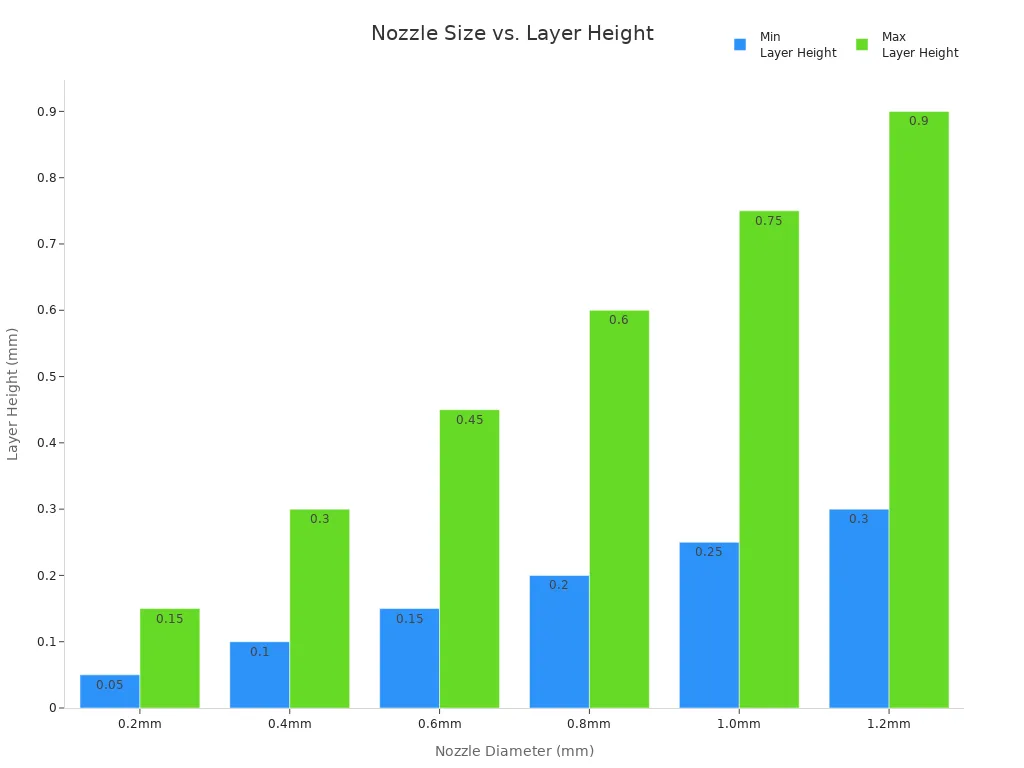
For high-detail prints, set the layer height between 0.05 mm and 0.15 mm. This works well for jewelry or display models. If you want faster prints, use a higher layer height, but expect more visible lines.
Print Speed Effects
Print speed changes how fast your printer moves. If you print too fast, you can get rough shells and weak part strength. Slower speeds help each layer stick better and improve surface quality. You can use high-speed PLA for prototypes, but it does not give the best strength for working parts. Try starting at 40–60 mm/s for most prints. Lower the speed if you see rough layers or poor shells.
- Increasing speed can reduce part strength.
- Slower speed improves surface finish and layer bonding.
Flow Rate and Temperature
Flow rate and nozzle temperature affect how much filament comes out and how well it melts. If the flow rate is too high, you get blobs and uneven layers. If it is too low, you see gaps and weak shells. Set the flow rate to 100% in your slicer for most prints. Adjust by 2–3% if you see problems. Keep nozzle temperature in the recommended range for your filament. For PLA, use 190–220°C. For PETG, use 230–250°C. Stable temperature helps each layer bond and reduces surface artifacts.
|
Parameter |
Description |
|---|---|
|
Flow Rate |
Controls how much material is extruded for each layer. |
|
Nozzle Temperature |
Affects how well the filament melts and flows. |
|
Surface Artifacts |
Appear if flow or temperature is not stable. |
Smoother Surfaces
You can improve surface finish with a few easy steps:
- Use lower layer height for smoother prints.
- Slow down print speed for better shells and part strength.
- Adjust flow rate and temperature if you see blobs or gaps.
- Try post-processing methods for a polished look.
|
Technique |
Description |
Effectiveness on PLA/ABS |
|---|---|---|
|
Sanding |
Smooths the surface with sandpaper. |
Works well for both PLA and ABS. |
|
Vapor smoothing |
Uses acetone vapor for ABS or ethyl acetate for PLA. |
Reduces layer lines and adds shine. |
|
Chemical smoothing |
Applies solvents to fill gaps and smooth texture. |
Improves surface but needs care. |
|
3D Gloop |
Softens the outer layer for a smoother finish. |
Good for minor imperfections. |
|
XTC-3D |
Fills in layer lines for a polished surface. |
Durable and smooth, but apply carefully. |
Tip: Always check your shell settings and print orientation. Printing with the right orientation and enough shells increases part strength and gives a better finish. Try changing print orientation to hide layer lines on less visible sides.
If you follow these steps and adjust your settings, you will see fewer layer lines and a smoother surface on every layer.
Under-Extrusion and Flow Problems
Under-extrusion happens when your printer does not push out enough filament. You might see thin layers, gaps, or missing lines in your print. Sometimes, the surface looks rough or weak. You can fix these problems by adjusting a few important settings.
Flow Rate Settings
Flow rate controls how much filament your printer pushes through the nozzle. If the flow rate is too low, you get under-extrusion. You should check that the filament diameter matches what you set in your slicer. Increase the flow rate a little at a time if you see gaps or thin layers. Start with 100% and raise it by 2–3% until the print looks solid. Make sure the filament feeds smoothly and does not tangle.
Tip: Always measure your filament with calipers and enter the correct size in your slicer.
Nozzle Temperature
Nozzle temperature affects how well the filament melts and flows. If the nozzle temperature is too low, the filament will not melt enough. This causes weak layers and poor bonding. Use the right range for your material:
|
Material |
|
|---|---|
|
PLA |
200 - 220 |
|
ABS |
210 - 250 |
|
PETG |
220 - 250 |
Raise the nozzle temperature by 5–10°C if you see under-extrusion. Watch for signs of overheating, like stringing or blobs.
Filament Quality
Good filament makes a big difference. If the filament has a steady diameter, you get smooth extrusion. If the filament is wet, tangled, or has bumps, you will see problems. Store filament in a dry box and check for knots or bends. Use high-quality filament for the best results.
- Consistent filament diameter gives you steady flow.
- Wet filament can bubble and jam the nozzle.
- Old or worn filament can break or slip.
Essential 3D Printing Settings
You can solve most under-extrusion issues by checking these 3d printing settings:
|
Parameter |
Impact |
|---|---|
|
Flow Rate |
Controls how much filament comes out. |
|
Layer Height |
Thicker layers need more flow. |
|
High speed can cause under-extrusion. |
|
|
Nozzle Temperature |
Low temperature can block filament flow. |
|
Shell Thickness |
Thicker shells need more filament. |
|
Retraction |
Too much retraction can cause gaps. |
|
Cooling |
Too much cooling can harden filament too soon. |
If you still see under-extrusion, check the nozzle for clogs, inspect the extruder gear, and make sure the filament path is clear. Adjust one setting at a time and test your print. You will quickly find the best 3d printer parameters for your setup.
You can fix most print defects by adjusting your printer settings. Try small changes and keep notes to track what works best.
- Fine-tune model orientation for better surface quality.
- Adjust layer height and nozzle size for detail and speed.
- Calibrate your printer often and check for obstructions.
Troubleshooting is normal in 3D printing. Each step helps you learn and improve. Start with recommended ranges, then fine-tune for each material. Stay curious and keep experimenting—your prints will get better every time!
FAQ
What should I do if my print keeps coming loose from the bed?
Clean the bed with isopropyl alcohol. Level the bed and set the right temperature. Use a brim or raft for extra grip. Try blue painter’s tape or a glue stick for better adhesion.
Why does my 3D print have gaps or missing lines?
Check the flow rate and filament diameter in your slicer. Raise the nozzle temperature by 5–10°C. Make sure the filament feeds smoothly. Use high-quality filament for best results.
How can I stop stringing between parts?
Lower the nozzle temperature by 5°C. Increase retraction distance and speed in your slicer. Dry your filament before printing. Use a higher travel speed to reduce oozing.
What is the best way to get a smooth surface on my print?
Use a lower layer height for smoother results. Slow down the print speed. Sand the print gently after it cools. Try chemical smoothing for ABS or PLA if you want a glossy finish.
Why does my printer make clicking noises during printing?
A clicking sound means the extruder struggles to push filament. Check for clogs in the nozzle. Raise the nozzle temperature slightly. Make sure the filament is not tangled or too tight.


